
NP40/50/60 UM
Page 8
... 47 ➋ Cleaning the Cabinet 47 ➌ Replacing the Lamp and the Cooling Pump 48 7. Convenient Features 28 ➊ Turning Off the Image 28 ➋ Freezing a Picture...28 ➌ Changing Lamp Mode 28 ➍ Preventing the Unauthorized Use of Contents 4. General] ...41 [Setup - Table of the Projector 28 ➎ Using the Optional Remote Mouse...
... 47 ➋ Cleaning the Cabinet 47 ➌ Replacing the Lamp and the Cooling Pump 48 7. Convenient Features 28 ➊ Turning Off the Image 28 ➋ Freezing a Picture...28 ➌ Changing Lamp Mode 28 ➍ Preventing the Unauthorized Use of Contents 4. General] ...41 [Setup - Table of the Projector 28 ➎ Using the Optional Remote Mouse...

NP40/50/60 UM
Page 55
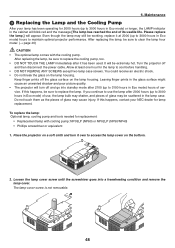
...SELECT SOURCE AC IN 47 PC CONTROL COMPUTER IN VIDEO IN S-VIDEO IN POWSETRATLUASMP ON/STAND BY FOCUS ADAJU. Keep finger prints off the projector before cleaning. 2. Cleaning the focus sensor Use a blower or lens paper to scratch or mar the lens. Leaving finger prints in the ... short auto focus range. Maintenance This section describes the simple maintenance procedures you should follow to clean the focus sensor, lens and replace the lamp and the cooling pump. ➊ Cleaning the Lens and Focus Sensor Cleaning the lens Use a blower or lens paper to clean the lens, and...
...SELECT SOURCE AC IN 47 PC CONTROL COMPUTER IN VIDEO IN S-VIDEO IN POWSETRATLUASMP ON/STAND BY FOCUS ADAJU. Keep finger prints off the projector before cleaning. 2. Cleaning the focus sensor Use a blower or lens paper to scratch or mar the lens. Leaving finger prints in the ... short auto focus range. Maintenance This section describes the simple maintenance procedures you should follow to clean the focus sensor, lens and replace the lamp and the cooling pump. ➊ Cleaning the Lens and Focus Sensor Cleaning the lens Use a blower or lens paper to clean the lens, and...
NP40/50/60 UM
Page 56
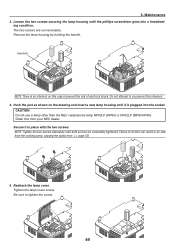
... meter. (→ page 46) CAUTION • The optional lamp comes with cooling pump: NP03LP (NP60) or NP02LP (NP50/NP40) • Phillips screwdriver or equivalent 1. After replacing the lamp, be working, replace it over to use , the lamp bulb may shatter, and pieces of glass...projector performance. If this happens, be sure to replace the cooling pump, too. • DO NOT TOUCH THE LAMP immediately after 2000 hours (up to cool before handling. • DO NOT REMOVE ANY SCREWS except two lamp case screws. Maintenance ➌ Replacing the Lamp and the Cooling Pump After your NEC...
... meter. (→ page 46) CAUTION • The optional lamp comes with cooling pump: NP03LP (NP60) or NP02LP (NP50/NP40) • Phillips screwdriver or equivalent 1. After replacing the lamp, be working, replace it over to use , the lamp bulb may shatter, and pieces of glass...projector performance. If this happens, be sure to replace the cooling pump, too. • DO NOT TOUCH THE LAMP immediately after 2000 hours (up to cool before handling. • DO NOT REMOVE ANY SCREWS except two lamp case screws. Maintenance ➌ Replacing the Lamp and the Cooling Pump After your NEC...
NP40/50/60 UM
Page 57
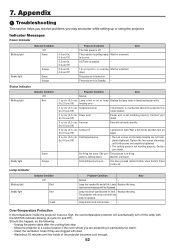
... result in place with the two screws. CAUTION Do not use a lamp other than the NEC replacement lamp NP03LP (NP60) or NP02LP (NP50/NP40). Failure to circumvent this from the cooling pump, causing the pump error. (→ page 52) 1 2 5. NOTE: Tighten the two screws alternately until ...it in air leak from your NEC dealer. Be sure to prevent the risk of electrical shock. Interlock NOTE: ...
... result in place with the two screws. CAUTION Do not use a lamp other than the NEC replacement lamp NP03LP (NP60) or NP02LP (NP50/NP40). Failure to circumvent this from the cooling pump, causing the pump error. (→ page 52) 1 2 5. NOTE: Tighten the two screws alternately until ...it in air leak from your NEC dealer. Be sure to prevent the risk of electrical shock. Interlock NOTE: ...

NP40/50/60 UM
Page 58
... the cooling pump cover. Install a new cooling pump. (1) Align the tabs on the cooling pump cover with the guide on to the cooling pump replacement. N VIDEO IN S-VIDEO IN AC IN 6. Go on the cabinet and slide the cooling pump cover. 50 N VIDEO IN S-VIDEO IN AC IN IN VIDEO IN S-VIDEO IN AC IN Remove the cooling pump. (1) Loosen the cooling pump cover screw...
... the cooling pump cover. Install a new cooling pump. (1) Align the tabs on the cooling pump cover with the guide on to the cooling pump replacement. N VIDEO IN S-VIDEO IN AC IN 6. Go on the cabinet and slide the cooling pump cover. 50 N VIDEO IN S-VIDEO IN AC IN IN VIDEO IN S-VIDEO IN AC IN Remove the cooling pump. (1) Loosen the cooling pump cover screw...

NP40/50/60 UM
Page 59
... (up to 3100 hours in Eco mode) of service, the projector cannot turn on the remote control for 10 seconds to reset the lamp clock back to tighten the cooling pump cover screw. 6. Maintenance N VIDEO IN S-VIDEO IN AC IN This completes the cooling pump replacement. Go on and the menu is reset to reset the...
... (up to 3100 hours in Eco mode) of service, the projector cannot turn on the remote control for 10 seconds to reset the lamp clock back to tighten the cooling pump cover screw. 6. Maintenance N VIDEO IN S-VIDEO IN AC IN This completes the cooling pump replacement. Go on and the menu is reset to reset the...
NP40/50/60 UM
Page 60
... may encounter while setting up or using the projector. Note Projector Condition Note Normal - 1 c y c l e (0 . 5 s e c L a mp c ov er er r or or l a mp Replace the lamp cover or lamp housing correctly. Move the projector to turn on again. 8 c y c l e (0 . 5 s e c Cooling pump error On, 0.5 sec Off) • The two screws on . The projector is replaced. Contact your dealer. 4 c y c l e (0. 5 s e c Fan error On, 0.5 sec...
... may encounter while setting up or using the projector. Note Projector Condition Note Normal - 1 c y c l e (0 . 5 s e c L a mp c ov er er r or or l a mp Replace the lamp cover or lamp housing correctly. Move the projector to turn on again. 8 c y c l e (0 . 5 s e c Cooling pump error On, 0.5 sec Off) • The two screws on . The projector is replaced. Contact your dealer. 4 c y c l e (0. 5 s e c Fan error On, 0.5 sec...
NP40/50/60 UM
Page 61
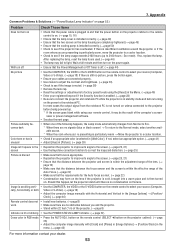
...that the distance between the focus sensor and the screen is within the effective range of the projector. (→ page 8) Indicator is no condensation on the remote control to 3100 hours : Eco mode). After replacing the lamp, reset the lamp hours used.(→ page 46) • The lamp may ...the output signal from Normal to Eco. * When there are no obstacles between you and the projector. • Stand within 22 feet (7 m) of the Auto Focus. (→ page 22) • Make sure that the cooling pump is installed correctly. (→ page 50) • Check to see if the image is muted...
...that the distance between the focus sensor and the screen is within the effective range of the projector. (→ page 8) Indicator is no condensation on the remote control to 3100 hours : Eco mode). After replacing the lamp, reset the lamp hours used.(→ page 46) • The lamp may ...the output signal from Normal to Eco. * When there are no obstacles between you and the projector. • Stand within 22 feet (7 m) of the Auto Focus. (→ page 22) • Make sure that the cooling pump is installed correctly. (→ page 50) • Check to see if the image is muted...
NP40/50/60 UM
Page 69
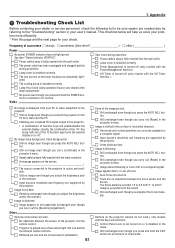
...supported by the projector. Still unchanged even though you carry out [Reset] in the vertical or horizontal direction. This checklist below will enable/disable the external display. Lamp cover is distorted. Lamp Hour Used (lamp operation hours) was cleared after lamp replacement. Still no ... image are correctly adjusted on the lamp housing are no image even though you adjusted the focus manually. The cooling pump is within 1.5 to 5.5 m/57.1" to the projector. button. Still unchanged even though you press and hold the POWER button for your dealer or service personnel,...
...supported by the projector. Still unchanged even though you carry out [Reset] in the vertical or horizontal direction. This checklist below will enable/disable the external display. Lamp cover is distorted. Lamp Hour Used (lamp operation hours) was cleared after lamp replacement. Still no ... image are correctly adjusted on the lamp housing are no image even though you adjusted the focus manually. The cooling pump is within 1.5 to 5.5 m/57.1" to the projector. button. Still unchanged even though you press and hold the POWER button for your dealer or service personnel,...


