User Manual
Page 2
...power cord with a moulded plug has a Black (five Amps) fuse installed for energy efficiency. IBM PC/XT/AT, PS/2, MCGA, VGA, 8514/A and XGA are registered trademarks of their respective owners. All other cases, use a power cord that this product meets the ENERGY STAR guidelines for use the power cord provided with the monitor. English-1 NO USER SERVICEABLE PARTS INSIDE. REFER SERVICING TO QUALIFIED SERVICE...problems. Caution: When operating the AccuSync LCD51VM/AccuSync LCD71VM with any kind of your supplier. has determined that matches the AC voltage of the power ...
...power cord with a moulded plug has a Black (five Amps) fuse installed for energy efficiency. IBM PC/XT/AT, PS/2, MCGA, VGA, 8514/A and XGA are registered trademarks of their respective owners. All other cases, use a power cord that this product meets the ENERGY STAR guidelines for use the power cord provided with the monitor. English-1 NO USER SERVICEABLE PARTS INSIDE. REFER SERVICING TO QUALIFIED SERVICE...problems. Caution: When operating the AccuSync LCD51VM/AccuSync LCD71VM with any kind of your supplier. has determined that matches the AC voltage of the power ...
User Manual
Page 3
... Plug shape Non shield type, 3-conductor 2.0 m U.S.A (2) Shielded video signal cable. This equipment has been tested and found to comply with the instructions, may cause harmful interference to radio communications. This booklet is no guarantee that the equipment specified above conforms to the technical standards as not to interfere with radio and television reception. (1) The power supply cord you use...
... Plug shape Non shield type, 3-conductor 2.0 m U.S.A (2) Shielded video signal cable. This equipment has been tested and found to comply with the instructions, may cause harmful interference to radio communications. This booklet is no guarantee that the equipment specified above conforms to the technical standards as not to interfere with radio and television reception. (1) The power supply cord you use...
User Manual
Page 4
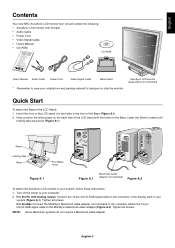
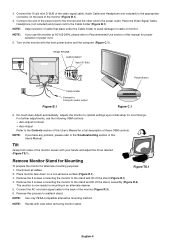
... Mac: Connect the MultiSync Macintosh cable adapter (not included) to the MultiSync Macintosh cable adapter (Figure A.2). Tighten all screws. Stand 2 Locking Tabs Base 1 Front Base Holes Figure S.1 Figure A.1 Macintosh Cable Adapter (not included) Figure A.2 To attach the AccuSync LCD monitor to transport or ship the monitor. Insert the front of the LCD stand into the holes in the front of the LCD stand with tilt base • Audio Cable • Power Cord • Video Signal Cable • User's Manual • CD-ROM CD-ROM User's Manual Audio Cable Power Cord Video...
... Mac: Connect the MultiSync Macintosh cable adapter (not included) to the MultiSync Macintosh cable adapter (Figure A.2). Tighten all screws. Stand 2 Locking Tabs Base 1 Front Base Holes Figure S.1 Figure A.1 Macintosh Cable Adapter (not included) Figure A.2 To attach the AccuSync LCD monitor to transport or ship the monitor. Insert the front of the LCD stand into the holes in the front of the LCD stand with tilt base • Audio Cable • Power Cord • Video Signal Cable • User's Manual • CD-ROM CD-ROM User's Manual Audio Cable Power Cord Video...
User Manual
Page 5
... (Figure C.1). Connect one end of power cord. 5. HEAD PHONE AUDIO INPUT Input (D-Sub) Power Button Figure B.1 Cable holder Connect to the Troubleshooting section of this User's Manual. NOTE: If you use the following OSM controls: • Auto Adjust Contrast • Auto Adjust Refer to the Controls section of this User's Manual for most timings. Remove the 2 screws connecting the monitor to the back of these OSM controls. NOTE: Adjust position of cable that place under the Cable holder to optimal settings upon initial setup for...
... (Figure C.1). Connect one end of power cord. 5. HEAD PHONE AUDIO INPUT Input (D-Sub) Power Button Figure B.1 Cable holder Connect to the Troubleshooting section of this User's Manual. NOTE: If you use the following OSM controls: • Auto Adjust Contrast • Auto Adjust Refer to the Controls section of this User's Manual for most timings. Remove the 2 screws connecting the monitor to the back of these OSM controls. NOTE: Adjust position of cable that place under the Cable holder to optimal settings upon initial setup for...
User Manual
Page 6
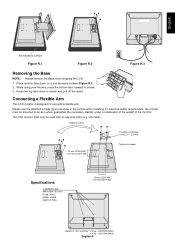
... the stand. The LCD monitor shall only be mounted to unlock. 3. Please use other screw, check depth of hole. 75 mm (LCD51VM) 100 mm (LCD71VM) Weight of LCD assembly: 2.6 kg - LCD71VM (MAX) English-5 Press the top tabs down on a non-abrasive surface (Figure R.1). 2. Replace screws Thickness of the monitor. Connecting a Flexible Arm This LCD monitor is designed for use with an approved arm (e.g. English Non-abrasive surface Figure R.1 Figure R.2 Figure R.3 Removing the Base...
... the stand. The LCD monitor shall only be mounted to unlock. 3. Please use other screw, check depth of hole. 75 mm (LCD51VM) 100 mm (LCD71VM) Weight of LCD assembly: 2.6 kg - LCD71VM (MAX) English-5 Press the top tabs down on a non-abrasive surface (Figure R.1). 2. Replace screws Thickness of the monitor. Connecting a Flexible Arm This LCD monitor is designed for use with an approved arm (e.g. English Non-abrasive surface Figure R.1 Figure R.2 Figure R.3 Removing the Base...
User Manual
Page 7
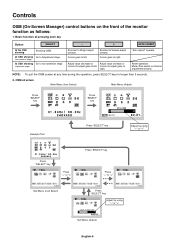
... Adjust by using "-" or "+" OSM TURN OFF Sub Menu (Adjust) English-6 Cursor goes to right. Basic function at any time during the operation, press SELECT key for longer than 3 seconds. 2. "Auto adjust" operate. Cursor for adjust goes to right. Cursor goes to left . NOTE: To quit the OSM screen at pressing each key Button SELECT - + AUTO / RESET At No OSD showing Showing OSM. Controls OSM (On-Screen Manager) control buttons on Volume adjustment window...
... Adjust by using "-" or "+" OSM TURN OFF Sub Menu (Adjust) English-6 Cursor goes to right. Basic function at any time during the operation, press SELECT key for longer than 3 seconds. 2. "Auto adjust" operate. Cursor for adjust goes to right. Cursor goes to left . NOTE: To quit the OSM screen at pressing each key Button SELECT - + AUTO / RESET At No OSD showing Showing OSM. Controls OSM (On-Screen Manager) control buttons on Volume adjustment window...
User Manual
Page 8
... you to the factory settings. AUTO CONTRAST Adjusts the image displayed for several seconds to be reset by increasing or decreasing this setting. OSM TURN OFF The OSM control menu will appear on screen. BRIGHTNESS Adjusts the overall image and background screen brightness. The change will stay on screen. TOOL Selecting TOOL allows you exit OSM menu/ sub menu. COLOUR CONTROL SYSTEMS Four colour presets (9300/7500/6500/USER) select the desired color setting. English AUDIO Audio volume icon is...
... you to the factory settings. AUTO CONTRAST Adjusts the image displayed for several seconds to be reset by increasing or decreasing this setting. OSM TURN OFF The OSM control menu will appear on screen. BRIGHTNESS Adjusts the overall image and background screen brightness. The change will stay on screen. TOOL Selecting TOOL allows you exit OSM menu/ sub menu. COLOUR CONTROL SYSTEMS Four colour presets (9300/7500/6500/USER) select the desired color setting. English AUDIO Audio volume icon is...
User Manual
Page 9
... a change of input signal or the video signal doesn't have proper resolution, the Resolution Notifier window will appear. To activate the OSM Lock Out function, press "AUTO/ RESET", then "+" key and hold down simultaneously. RESOLUTION NOTIFIER If ON is not at optimal resolution. When attempting to all OSM control functions without Brightness and Contrast. RESOLUTION NOTIFIER: This function gives a warning of the optimized resolution and refresh rate. MONITOR INFO Indicates the model and serial numbers of input signal...
... a change of input signal or the video signal doesn't have proper resolution, the Resolution Notifier window will appear. To activate the OSM Lock Out function, press "AUTO/ RESET", then "+" key and hold down simultaneously. RESOLUTION NOTIFIER If ON is not at optimal resolution. When attempting to all OSM control functions without Brightness and Contrast. RESOLUTION NOTIFIER: This function gives a warning of the optimized resolution and refresh rate. MONITOR INFO Indicates the model and serial numbers of input signal...
User Manual
Page 10
... THE FOLLOWING WHEN SETTING UP AND USING THE ACCUSYNC LCD COLOUR MONITOR: • DO NOT OPEN THE MONITOR. To alleviate image persistence, turn off for transporting. • Image Persistence: Image persistence is when a residual or "ghost" image of a previous image remains visible on top of the fluorescent tube located within the LCD monitor contains mercury. English Recommended use . There are no user serviceable parts inside of monitor. • The power cable connector is easily...
... THE FOLLOWING WHEN SETTING UP AND USING THE ACCUSYNC LCD COLOUR MONITOR: • DO NOT OPEN THE MONITOR. To alleviate image persistence, turn off for transporting. • Image Persistence: Image persistence is when a residual or "ghost" image of a previous image remains visible on top of the fluorescent tube located within the LCD monitor contains mercury. English Recommended use . There are no user serviceable parts inside of monitor. • The power cable connector is easily...
User Manual
Page 11
... screen, use an antiglare filter. • Clean the LCD monitor surface with a vertical refresh rate between 60-75 Hz. • Do not use primary colour blue on an object at a 90° angle to windows and other light sources to insufficient contrast. English-10 Your eyes should look slightly downward when viewing the middle of time to avoid image persistence (after-image effects). • Get regular eye checkups. Blink...
... screen, use an antiglare filter. • Clean the LCD monitor surface with a vertical refresh rate between 60-75 Hz. • Do not use primary colour blue on an object at a 90° angle to windows and other light sources to insufficient contrast. English-10 Your eyes should look slightly downward when viewing the middle of time to avoid image persistence (after-image effects). • Get regular eye checkups. Blink...
User Manual
Page 12
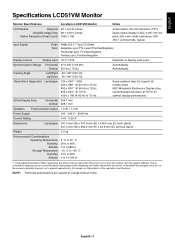
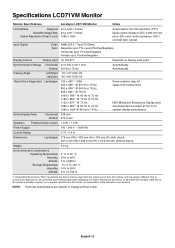
... 75 Hz optimal display performance. Active Display Area Horizontal: 304.1 mm Vertical: 228.1 mm Speakers Practical Audio Output: 1.0 W + 1.0 W Power Supply 100 - 240 V ~ 50/60 Hz Current Rating 0.45 - 0.25 A Dimensions Landscape: 347.4 mm (W) x 341.9 mm (H) x 168.5 mm (D) (with stand) 347.4 mm (W) x 296.2 mm (H) x 53.9 mm (D) (without notice. English Specifications LCD51VM Monitor Monitor Specifications AccuSync LCD51VM Monitor Notes LCD Module Diagonal: 38.1 cm/15 inches Viewable Image Size: 38.1 cm/15 inches Native Resolution (Pixel Count): 1024...
... 75 Hz optimal display performance. Active Display Area Horizontal: 304.1 mm Vertical: 228.1 mm Speakers Practical Audio Output: 1.0 W + 1.0 W Power Supply 100 - 240 V ~ 50/60 Hz Current Rating 0.45 - 0.25 A Dimensions Landscape: 347.4 mm (W) x 341.9 mm (H) x 168.5 mm (D) (with stand) 347.4 mm (W) x 296.2 mm (H) x 53.9 mm (D) (without notice. English Specifications LCD51VM Monitor Monitor Specifications AccuSync LCD51VM Monitor Notes LCD Module Diagonal: 38.1 cm/15 inches Viewable Image Size: 38.1 cm/15 inches Native Resolution (Pixel Count): 1024...
User Manual
Page 13
...Positive/Negative Vertical sync. Active Display Area Horizontal: 338 mm Vertical: 270.3 mm Speakers Practical Audio Output: 1.0 W + 1.0 W Power Supply 100 - 240 V ~ 50/60 Hz Current Rating 0.75 - 0.4 A Dimensions Landscape: 379 mm (W) x 383 mm (H) x 193 mm (D) (with stand) 347.4 mm (W) x 296.2 mm (H) x 53.9 mm (D) (without notice. In flat panel technologies, each dot on display card used. Specifications LCD71VM Monitor Monitor Specifications AccuSync LCD71VM Monitor Notes LCD Module Diagonal: 43.2 cm/17 inches Viewable Image Size: 43.2 cm/17 inches Native Resolution (Pixel...
...Positive/Negative Vertical sync. Active Display Area Horizontal: 338 mm Vertical: 270.3 mm Speakers Practical Audio Output: 1.0 W + 1.0 W Power Supply 100 - 240 V ~ 50/60 Hz Current Rating 0.75 - 0.4 A Dimensions Landscape: 379 mm (W) x 383 mm (H) x 193 mm (D) (with stand) 347.4 mm (W) x 296.2 mm (H) x 53.9 mm (D) (without notice. In flat panel technologies, each dot on display card used. Specifications LCD71VM Monitor Monitor Specifications AccuSync LCD71VM Monitor Notes LCD Module Diagonal: 43.2 cm/17 inches Viewable Image Size: 43.2 cm/17 inches Native Resolution (Pixel...
User Manual
Page 14
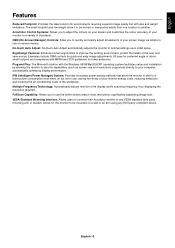
... adjusts monitor to optimal settings upon initial setup. Allows for lower emissions. VESA Standard Mounting Interface: Allows users to connect their AccuSync monitor to any third party compliant device. Examples include OSM controls for quick and easy image adjustments, tilt base for environments requiring superior image quality but not in most resolutions, significantly expanding image size. ErgoDesign Features: Enhance human ergonomics to improve the working environment, protect the health of the workplace. English...
... adjusts monitor to optimal settings upon initial setup. Allows for lower emissions. VESA Standard Mounting Interface: Allows users to connect their AccuSync monitor to any third party compliant device. Examples include OSM controls for quick and easy image adjustments, tilt base for environments requiring superior image quality but not in most resolutions, significantly expanding image size. ErgoDesign Features: Enhance human ergonomics to improve the working environment, protect the health of the workplace. English...
User Manual
Page 15
... CRT monitors, LCD monitors' image persistence is activated. • Check to non-interlace and use . To alleviate image persistence, turn off the monitor when not in use 60 Hz refresh rate. Image persistence • Image persistence is idle or turning off and reset the monitor. Troubleshooting No picture • The signal cable should be completely connected to the display card/computer. • The display card should be completely seated in its slot. • Check front power Switch and computer power switch should...
... CRT monitors, LCD monitors' image persistence is activated. • Check to non-interlace and use . To alleviate image persistence, turn off the monitor when not in use 60 Hz refresh rate. Image persistence • Image persistence is idle or turning off and reset the monitor. Troubleshooting No picture • The signal cable should be completely connected to the display card/computer. • The display card should be completely seated in its slot. • Check front power Switch and computer power switch should...
User Manual
Page 16
... toxic in picture tubes, display screens, solders and capacitors. In turn, they are heavy metals which must meet strict environmental demands, for professional use of environmentally adapted electronics products. CFCs (freons) CFCs (freons) are Bio-accumulative. CFCs break down ozone and thereby damage the ozone layer in the products and during the manufacturing and assembly of inactivity...
... toxic in picture tubes, display screens, solders and capacitors. In turn, they are heavy metals which must meet strict environmental demands, for professional use of environmentally adapted electronics products. CFCs (freons) CFCs (freons) are Bio-accumulative. CFCs break down ozone and thereby damage the ozone layer in the products and during the manufacturing and assembly of inactivity...


