SpectraView User's Manual - English
Page 2
Table of Contents SpectraView Contents ...3 SpectraView Hardware Setup 4 SpectraView Software Setup 5 PC ...5 Macintosh ...5 Macintosh Version Calibrating Your Monitor 6 Creating a Custom Preset 12 Adjusting Monitor Controls 14 Calibration Graphing ...15 PC Version Calibrating Your Monitor 16 Creating a Custom Preset 22 Adjusting Monitor Controls 25 Calibration Logging ...26 Troubleshooting ...28 Calibrator Specifications ...29 Limited Warranty for SpectraView Hardware 30 SpectraView End-User Software License Agreement 32 References ...33
Table of Contents SpectraView Contents ...3 SpectraView Hardware Setup 4 SpectraView Software Setup 5 PC ...5 Macintosh ...5 Macintosh Version Calibrating Your Monitor 6 Creating a Custom Preset 12 Adjusting Monitor Controls 14 Calibration Graphing ...15 PC Version Calibrating Your Monitor 16 Creating a Custom Preset 22 Adjusting Monitor Controls 25 Calibration Logging ...26 Troubleshooting ...28 Calibrator Specifications ...29 Limited Warranty for SpectraView Hardware 30 SpectraView End-User Software License Agreement 32 References ...33

SpectraView User's Manual - English
Page 4
Connect the SpectraView video cable to input connector on monitor. •For the MultiSync FP955/FP1375X connect the DVI-A connector of the computer system. 3. For DiamondPro 930SB-BK, DiamondPro 2070SBBK and MultiSync FP2141SB-BK use the USB pig-tail of the adaptor to connect to the output connector of the ...-tail connector) of the 15-pin adapter and the male end to the DVI input connector on the monitor. •For the DiamondPro 930SB-BK, DiamondPro 2070SB-BK and MultiSync FP2141SB-BK connect the captive cable or the VGA cable on the computer system. Connect the USB connector of the ...
Connect the SpectraView video cable to input connector on monitor. •For the MultiSync FP955/FP1375X connect the DVI-A connector of the computer system. 3. For DiamondPro 930SB-BK, DiamondPro 2070SBBK and MultiSync FP2141SB-BK use the USB pig-tail of the adaptor to connect to the output connector of the ...-tail connector) of the 15-pin adapter and the male end to the DVI input connector on the monitor. •For the DiamondPro 930SB-BK, DiamondPro 2070SB-BK and MultiSync FP2141SB-BK connect the captive cable or the VGA cable on the computer system. Connect the USB connector of the ...
SpectraView User's Manual - English
Page 5
... SpectraView Software. In the next menu check the box in this manual for my device" and click "Next". Restart the computer and monitor. Add/New Hardware Wizard will appear on the SpectraView Installer icon. 4. Follow screen prompts for "CD-ROM Drives" or "Removable Media..." and click "Next". 3. Double click on the Macintosh Folder. 3. Restart the computer and monitor. Now select "Search for a suitable driver for the SpectraView Hardware limited warranty. 5 After driver installation is complete, Run "Spectraview\spectraview.exe" ...
... SpectraView Software. In the next menu check the box in this manual for my device" and click "Next". Restart the computer and monitor. Add/New Hardware Wizard will appear on the SpectraView Installer icon. 4. Follow screen prompts for "CD-ROM Drives" or "Removable Media..." and click "Next". 3. Double click on the Macintosh Folder. 3. Restart the computer and monitor. Now select "Search for a suitable driver for the SpectraView Hardware limited warranty. 5 After driver installation is complete, Run "Spectraview\spectraview.exe" ...

SpectraView User's Manual - English
Page 6
..., click "Calibration" in "Presets", which are contained in the software menu(Figure 3a). SpectraView ships with two Presets already installed, sRGB and D50. Calibrating Your Monitor MAC VERSION Launch the SpectraView program. While the SpectraView software is the first time that SpectraView has run, the... monitor will be uncalibrated. OSX OS9 Figure 3a If this is loading, it will appear asking you prefer to complete but may vary based on the "...
..., click "Calibration" in "Presets", which are contained in the software menu(Figure 3a). SpectraView ships with two Presets already installed, sRGB and D50. Calibrating Your Monitor MAC VERSION Launch the SpectraView program. While the SpectraView software is the first time that SpectraView has run, the... monitor will be uncalibrated. OSX OS9 Figure 3a If this is loading, it will appear asking you prefer to complete but may vary based on the "...

SpectraView User's Manual - English
Page 7
This step must set its internal values for black before measuring colors. Calibrating Your Monitor -continued MAC VERSION OSX OS9 Figure 3b The SpectraView Color Sensor is called a "Dark Current Calibration." Place the suction cup side of the monitor(Figure 3b). This initial measurement of black is extremely sensitive to every calibration of the color calibrator on a non-reflective, opaque surface(desk, mousepad, etc.) and click "Next" to continue. At first it must be performed prior to light. DO NOT PLACE THE SENSOR ON THE MONITOR SCREEN. 7
This step must set its internal values for black before measuring colors. Calibrating Your Monitor -continued MAC VERSION OSX OS9 Figure 3b The SpectraView Color Sensor is called a "Dark Current Calibration." Place the suction cup side of the monitor(Figure 3b). This initial measurement of black is extremely sensitive to every calibration of the color calibrator on a non-reflective, opaque surface(desk, mousepad, etc.) and click "Next" to continue. At first it must be performed prior to light. DO NOT PLACE THE SENSOR ON THE MONITOR SCREEN. 7

SpectraView User's Manual - English
Page 8
... menu will see many changes to the colors and brightness of the screen(OSX calibration menu is attached to the monitor's face click "Next" to the face of the monitor. Calibrating Your Monitor -continued MAC VERSION OSX OS9 Figure 3c The next step will start the color calibration of the CRT directly over...
... menu will see many changes to the colors and brightness of the screen(OSX calibration menu is attached to the monitor's face click "Next" to the face of the monitor. Calibrating Your Monitor -continued MAC VERSION OSX OS9 Figure 3c The next step will start the color calibration of the CRT directly over...

SpectraView User's Manual - English
Page 9
... OS9 Figure 3d To start this process click "Ambient" in images. Once the initial calibration is complete the option to adjust the monitor to the ambient lighting conditions is necessary to make the detail visible. Since room light washes out this function carefully. The Ambient function..." to maximize visibility of the ICC profile created from the data measured from the monitor. When the file name is used to adjust the brightness control to finish the installation. Calibrating Your Monitor -continued MAC VERSION When the calibration process is complete, you will be prompted for...
... OS9 Figure 3d To start this process click "Ambient" in images. Once the initial calibration is complete the option to adjust the monitor to the ambient lighting conditions is necessary to make the detail visible. Since room light washes out this function carefully. The Ambient function..." to maximize visibility of the ICC profile created from the data measured from the monitor. When the file name is used to adjust the brightness control to finish the installation. Calibrating Your Monitor -continued MAC VERSION When the calibration process is complete, you will be prompted for...

SpectraView User's Manual - English
Page 10
Click "Next" to make an ambient light measurement(Figure 3e). Hold the color calibrator near the face of the color calibrator during this measurement. 10 Note: Make sure that nothing between the sensors and the light source located in the area. The calibrator should be held with nothing is blocking the sensors on the suction cup side of the monitor with the suction cup side facing away from the monitor. Calibrating Your Monitor -continued MAC VERSION OSX OS9 Figure 3e The calibrator needs to start this adjustment.
Click "Next" to make an ambient light measurement(Figure 3e). Hold the color calibrator near the face of the color calibrator during this measurement. 10 Note: Make sure that nothing between the sensors and the light source located in the area. The calibrator should be held with nothing is blocking the sensors on the suction cup side of the monitor with the suction cup side facing away from the monitor. Calibrating Your Monitor -continued MAC VERSION OSX OS9 Figure 3e The calibrator needs to start this adjustment.

SpectraView User's Manual - English
Page 11
Note: This process should be repeated if the ambient lighting conditions in the software menu(Figure 3f). Calibrating Your Monitor -continued MAC VERSION Attach the suction cup side of the CRT directly over the black circle located in the environment change. OSX OS9 Figure 3f 11 Once the calibrator is attached to the monitor's face click "Next" to the face of the calibrator to complete the ambient adjustment.
Note: This process should be repeated if the ambient lighting conditions in the software menu(Figure 3f). Calibrating Your Monitor -continued MAC VERSION Attach the suction cup side of the CRT directly over the black circle located in the environment change. OSX OS9 Figure 3f 11 Once the calibrator is attached to the monitor's face click "Next" to the face of the calibrator to complete the ambient adjustment.

SpectraView User's Manual - English
Page 12
.... Creating a Custom Preset MAC VERSION Presets contain the values to be created. If a color setting other than sRGB or D50 is the brightest that the monitor can be set to be used during the calibration process. The Max value is desired, a custom calibration preset needs to "Max".
.... Creating a Custom Preset MAC VERSION Presets contain the values to be created. If a color setting other than sRGB or D50 is the brightest that the monitor can be set to be used during the calibration process. The Max value is desired, a custom calibration preset needs to "Max".
SpectraView User's Manual - English
Page 13
... box. Once a custom preset has been created it may be selected at any time from the pulldown on the Calibrate panel prior to recalibrate your monitor. 13 Enter the calibration menu and select the custom preset in the "Preset" menu box and click "Delete". It is not necessary to save this...
... box. Once a custom preset has been created it may be selected at any time from the pulldown on the Calibrate panel prior to recalibrate your monitor. 13 Enter the calibration menu and select the custom preset in the "Preset" menu box and click "Delete". It is not necessary to save this...
SpectraView User's Manual - English
Page 14
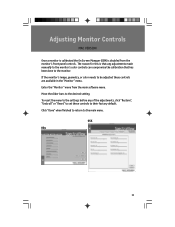
...reset the menu to the settings before any adjustments made manually to the monitor's color controls can compromise the calibration that has been done to the monitor. Move the slider bars to the main menu. If the monitor's image, geometry, or color needs to be adjusted these controls to ...their factory default. OSX OS9 14 Click "Done" when finished to return to the desired setting. Adjusting Monitor Controls MAC VERSION Once a monitor is calibrated the On Screen Manager(OSM) is that any of the adjustments, click "Restore", "Undo all" or "Reset" to...
...reset the menu to the settings before any adjustments made manually to the monitor's color controls can compromise the calibration that has been done to the monitor. Move the slider bars to the main menu. If the monitor's image, geometry, or color needs to be adjusted these controls to ...their factory default. OSX OS9 14 Click "Done" when finished to return to the desired setting. Adjusting Monitor Controls MAC VERSION Once a monitor is calibrated the On Screen Manager(OSM) is that any of the adjustments, click "Restore", "Undo all" or "Reset" to...

SpectraView User's Manual - English
Page 15
... colors. A DeltaE value of the calibration can be shown on screen and printed out for future reference. 15 The graph can be printed for reference monitoring. Calibration Graphing MAC VERSION(OS9 version only) Graphs of two to color and luminance differences. Gamma Accuracy - To view the graphs menu, click "View" in...
... colors. A DeltaE value of the calibration can be shown on screen and printed out for future reference. 15 The graph can be printed for reference monitoring. Calibration Graphing MAC VERSION(OS9 version only) Graphs of two to color and luminance differences. Gamma Accuracy - To view the graphs menu, click "View" in...

SpectraView User's Manual - English
Page 16
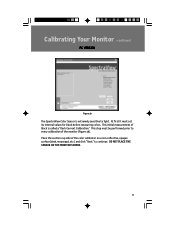
While the SpectraView software is the first time that SpectraView has run, the monitor will appear asking you would prefer to check the connection. This process takes approximately 30 seconds to complete but may vary based on the "Preset" .... 16 To perform a calibration, click "Calibration" in the lowerleft corner of these values. SpectraView ships with two Presets already installed, sRGB and D50. Calibrating Your Monitor PC VERSION Launch the SpectraView program. SpectraView allows you to specify the parameters you to use for adjustment. Note: If one of the CALIBRATE panel...
While the SpectraView software is the first time that SpectraView has run, the monitor will appear asking you would prefer to check the connection. This process takes approximately 30 seconds to complete but may vary based on the "Preset" .... 16 To perform a calibration, click "Calibration" in the lowerleft corner of these values. SpectraView ships with two Presets already installed, sRGB and D50. Calibrating Your Monitor PC VERSION Launch the SpectraView program. SpectraView allows you to specify the parameters you to use for adjustment. Note: If one of the CALIBRATE panel...
SpectraView User's Manual - English
Page 17
This step must set its internal values for black before measuring colors. Place the suction cup side of black is extremely sensitive to every calibration of the monitor(Figure 3b). This initial measurement of the color calibrator on a non-reflective, opaque surface(desk, mousepad, etc.) and click "Next" to continue. At first it must be performed prior to light. Calibrating Your Monitor -continued PC VERSION Figure 3b The SpectraView Color Sensor is called a "Dark Current Calibration." DO NOT PLACE THE SENSOR ON THE MONITOR SCREEN. 17
This step must set its internal values for black before measuring colors. Place the suction cup side of black is extremely sensitive to every calibration of the monitor(Figure 3b). This initial measurement of the color calibrator on a non-reflective, opaque surface(desk, mousepad, etc.) and click "Next" to continue. At first it must be performed prior to light. Calibrating Your Monitor -continued PC VERSION Figure 3b The SpectraView Color Sensor is called a "Dark Current Calibration." DO NOT PLACE THE SENSOR ON THE MONITOR SCREEN. 17

SpectraView User's Manual - English
Page 18
Calibrating Your Monitor -continued PC VERSION Figure 3c The next step will start the color calibration of the CRT directly over the black circle located in the software menu(Figure 3c). Attach the suction cup side of the calibrator to the face of the monitor. Throughout the calibration process you will indicate which adjustments are currently being made. 18 The process indicator within the menu will see many changes to continue. Once the calibrator is attached to the monitor's face click "Next" to the colors and brightness of the screen.
Calibrating Your Monitor -continued PC VERSION Figure 3c The next step will start the color calibration of the CRT directly over the black circle located in the software menu(Figure 3c). Attach the suction cup side of the calibrator to the face of the monitor. Throughout the calibration process you will indicate which adjustments are currently being made. 18 The process indicator within the menu will see many changes to continue. Once the calibrator is attached to the monitor's face click "Next" to the colors and brightness of the screen.
SpectraView User's Manual - English
Page 19
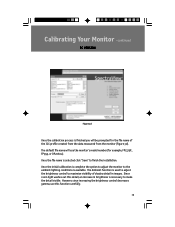
...Ambient function is necessary to maximize visibility of the ICC profile created from the data measured from the monitor(Figure 3d). However, since increasing the brightness control decreases gamma, use the monitor's model number(for the file name of shadow detail in brightness is used to adjust the brightness ... FP955, or DP2060u). Once the file name is selected click "Save" to the ambient lighting conditions is complete the option to adjust the monitor to finish the installation. Since room light washes out this function carefully. 19 Once the initial calibration is available.
...Ambient function is necessary to maximize visibility of the ICC profile created from the data measured from the monitor(Figure 3d). However, since increasing the brightness control decreases gamma, use the monitor's model number(for the file name of shadow detail in brightness is used to adjust the brightness ... FP955, or DP2060u). Once the file name is selected click "Save" to the ambient lighting conditions is complete the option to adjust the monitor to finish the installation. Since room light washes out this function carefully. 19 Once the initial calibration is available.

SpectraView User's Manual - English
Page 20
Figure 3f The calibrator needs to make an ambient light measurement(Figure 3f). 20 Calibrating Your Monitor -continued PC VERSION Figure 3e To start this process click "Ambient" in the software menu(Figure 3e).
Figure 3f The calibrator needs to make an ambient light measurement(Figure 3f). 20 Calibrating Your Monitor -continued PC VERSION Figure 3e To start this process click "Ambient" in the software menu(Figure 3e).

SpectraView User's Manual - English
Page 21
...the black circle located in the software menu(Figure 3g). Attach the suction cup side of the calibrator to the face of the monitor with nothing is attached to the monitor's face click "Next" to start this adjustment. The calibrator should be held with the suction cup side facing away from the... monitor. Once the calibrator is blocking the sensors on the suction cup side of the color calibrator during this measurement. Click "Next" to complete the ...
...the black circle located in the software menu(Figure 3g). Attach the suction cup side of the calibrator to the face of the monitor with nothing is attached to the monitor's face click "Next" to start this adjustment. The calibrator should be held with the suction cup side facing away from the... monitor. Once the calibrator is blocking the sensors on the suction cup side of the color calibrator during this measurement. Click "Next" to complete the ...

SpectraView User's Manual - English
Page 23
..." to "Max". To request the maximum brightness for the new preset in the "Preset Name" menu box(Figure 4b). Luminance is the brightest that the monitor can be set to create this setting as a calibration option. Creating a Custom Preset -continued PC VERSION Figure 4b Enter a name for a calibration click the "Maximum...
..." to "Max". To request the maximum brightness for the new preset in the "Preset Name" menu box(Figure 4b). Luminance is the brightest that the monitor can be set to create this setting as a calibration option. Creating a Custom Preset -continued PC VERSION Figure 4b Enter a name for a calibration click the "Maximum...


