SpectraView User's Manual - English
Page 2
Table of Contents SpectraView Contents ...3 SpectraView Hardware Setup 4 SpectraView Software Setup 5 PC ...5 Macintosh ...5 Macintosh Version Calibrating Your Monitor 6 Creating a Custom Preset 12 Adjusting Monitor Controls 14 Calibration Graphing ...15 PC Version Calibrating Your Monitor 16 Creating a Custom Preset 22 Adjusting Monitor Controls 25 Calibration Logging ...26 Troubleshooting ...28 Calibrator Specifications ...29 Limited Warranty for SpectraView Hardware 30 SpectraView End-User Software License Agreement 32 References ...33
Table of Contents SpectraView Contents ...3 SpectraView Hardware Setup 4 SpectraView Software Setup 5 PC ...5 Macintosh ...5 Macintosh Version Calibrating Your Monitor 6 Creating a Custom Preset 12 Adjusting Monitor Controls 14 Calibration Graphing ...15 PC Version Calibrating Your Monitor 16 Creating a Custom Preset 22 Adjusting Monitor Controls 25 Calibration Logging ...26 Troubleshooting ...28 Calibrator Specifications ...29 Limited Warranty for SpectraView Hardware 30 SpectraView End-User Software License Agreement 32 References ...33

SpectraView User's Manual - English
Page 4
... input connector on monitor. •For the MultiSync FP955/FP1375X connect the DVI-A connector of the SpectraView video cable to the DVI input connector on the monitor. •For the DiamondPro 930SB-BK, DiamondPro 2070SB-BK and MultiSync FP2141SB-BK connect the captive cable or the VGA cable on the monitor to the computer system. Remove adhesive covering on the monitor. 2. Connect the VGA connector(with the USB pig-tail connector) of the SpectraView video cable to the output connector of the SpectraView video cable to Signal...
... input connector on monitor. •For the MultiSync FP955/FP1375X connect the DVI-A connector of the SpectraView video cable to the DVI input connector on the monitor. •For the DiamondPro 930SB-BK, DiamondPro 2070SB-BK and MultiSync FP2141SB-BK connect the captive cable or the VGA cable on the monitor to the computer system. Remove adhesive covering on the monitor. 2. Connect the VGA connector(with the USB pig-tail connector) of the SpectraView video cable to the output connector of the SpectraView video cable to Signal...
SpectraView User's Manual - English
Page 5
...". In the next menu check the box in this manual for software installation. 5. Restart the computer and monitor. Now you are ready to launch the SpectraView Software. Macintosh (OS 9.x or higher) 1. Double click on the SpectraView Installer icon. 4. Double click on the Macintosh Folder. 3. Add/New Hardware Wizard will appear on the screen upon initial startup. SpectraView Software Setup Windows (98SE, Me...
...". In the next menu check the box in this manual for software installation. 5. Restart the computer and monitor. Now you are ready to launch the SpectraView Software. Macintosh (OS 9.x or higher) 1. Double click on the SpectraView Installer icon. 4. Double click on the Macintosh Folder. 3. Add/New Hardware Wizard will appear on the screen upon initial startup. SpectraView Software Setup Windows (98SE, Me...

SpectraView User's Manual - English
Page 6
... to check the connection. You may vary based on the "Preset" pulldown in "Presets", which are contained in the lower-left corner of these values. Note: If one of the CALIBRATE panel. These parameters(color temperature, gamma, and white luminance) are small files containing these two devices aren't detected an error screen will initialize the monitor and the color calibrator for calibration. SpectraView...
... to check the connection. You may vary based on the "Preset" pulldown in "Presets", which are contained in the lower-left corner of these values. Note: If one of the CALIBRATE panel. These parameters(color temperature, gamma, and white luminance) are small files containing these two devices aren't detected an error screen will initialize the monitor and the color calibrator for calibration. SpectraView...

SpectraView User's Manual - English
Page 8
Once the calibrator is attached to the monitor's face click "Next" to the colors and brightness of the screen(OSX calibration menu is full screen). The process indicator within the menu will see many changes to continue. Calibrating Your Monitor -continued MAC VERSION OSX OS9 Figure 3c The next step will start the color calibration of the CRT directly over the black circle located in the software menu(Figure 3c). Attach...
Once the calibrator is attached to the monitor's face click "Next" to the colors and brightness of the screen(OSX calibration menu is full screen). The process indicator within the menu will see many changes to continue. Calibrating Your Monitor -continued MAC VERSION OSX OS9 Figure 3c The next step will start the color calibration of the CRT directly over the black circle located in the software menu(Figure 3c). Attach...

SpectraView User's Manual - English
Page 9
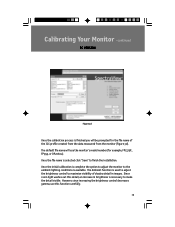
Once the initial calibration is complete the option to adjust the monitor to the ambient lighting conditions is selected, click "Save" to finish the installation. However, since increasing the brightness control decreases gamma, use this process click "Ambient" in the software menu(Figure 3d). 9 OSX OS9 Figure 3d To start this function carefully. Since room light washes out this detail, an increase in images. The...
Once the initial calibration is complete the option to adjust the monitor to the ambient lighting conditions is selected, click "Save" to finish the installation. However, since increasing the brightness control decreases gamma, use this process click "Ambient" in the software menu(Figure 3d). 9 OSX OS9 Figure 3d To start this function carefully. Since room light washes out this detail, an increase in images. The...

SpectraView User's Manual - English
Page 10
Note: Make sure that nothing between the sensors and the light source located in the area. The calibrator should be held with the suction cup side facing away from the monitor. Calibrating Your Monitor -continued MAC VERSION OSX OS9 Figure 3e The calibrator needs to start this adjustment. Hold the color calibrator near the face of the monitor with nothing is blocking the sensors on the suction cup side of the color calibrator during this measurement. 10 Click "Next" to make an ambient light measurement(Figure 3e).
Note: Make sure that nothing between the sensors and the light source located in the area. The calibrator should be held with the suction cup side facing away from the monitor. Calibrating Your Monitor -continued MAC VERSION OSX OS9 Figure 3e The calibrator needs to start this adjustment. Hold the color calibrator near the face of the monitor with nothing is blocking the sensors on the suction cup side of the color calibrator during this measurement. 10 Click "Next" to make an ambient light measurement(Figure 3e).

SpectraView User's Manual - English
Page 12
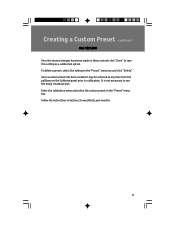
.../m2) or may have a value specified in the software menu and select "Presets". Adjust the "Color Temperature" control to the desired setting. The Max value is the brightest that the monitor can be adjusted using factory-specified limits for a calibration click the "Luminance Max" check box. 12 To request the maximum brightness for the red, green, and blue controls. OSX OS9 Figure 4 To create a new preset, click...
.../m2) or may have a value specified in the software menu and select "Presets". Adjust the "Color Temperature" control to the desired setting. The Max value is the brightest that the monitor can be adjusted using factory-specified limits for a calibration click the "Luminance Max" check box. 12 To request the maximum brightness for the red, green, and blue controls. OSX OS9 Figure 4 To create a new preset, click...
SpectraView User's Manual - English
Page 13
Creating a Custom Preset -continued MAC VERSION Once the desired changes have been made to these controls click "Done" to recalibrate your monitor. 13 Follow the instructions in Section 3 to save this setting as a calibration option. To delete a preset, select the setting in the "Preset" menu box. It is not necessary to calibration. Enter the calibration menu and select the custom preset in the "Preset...
Creating a Custom Preset -continued MAC VERSION Once the desired changes have been made to these controls click "Done" to recalibrate your monitor. 13 Follow the instructions in Section 3 to save this setting as a calibration option. To delete a preset, select the setting in the "Preset" menu box. It is not necessary to calibration. Enter the calibration menu and select the custom preset in the "Preset...
SpectraView User's Manual - English
Page 14
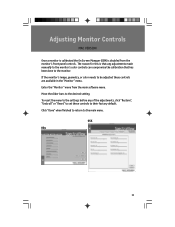
The reason for this is disabled from the main software menu. Enter the "Monitor" menu from the monitor's front panel controls. To reset the menu to the settings before any adjustments made manually to the monitor's color controls can compromise the calibration that has been done to their factory default. If the monitor's image, geometry, or color needs to be adjusted these controls to the monitor. OSX OS9 14 Adjusting Monitor Controls MAC VERSION Once a monitor is calibrated the On Screen Manager(OSM) is...
The reason for this is disabled from the main software menu. Enter the "Monitor" menu from the monitor's front panel controls. To reset the menu to the settings before any adjustments made manually to the monitor's color controls can compromise the calibration that has been done to their factory default. If the monitor's image, geometry, or color needs to be adjusted these controls to the monitor. OSX OS9 14 Adjusting Monitor Controls MAC VERSION Once a monitor is calibrated the On Screen Manager(OSM) is...

SpectraView User's Manual - English
Page 16
... If this is loading, it will initialize the monitor and the color calibrator for calibration. These parameters(color temperature, gamma, and white luminance) are small files containing these two devices aren't detected an error screen will be uncalibrated. SpectraView allows you to specify the parameters you to check the connection. You may vary based on the "Preset" pulldown in "Presets" which...
... If this is loading, it will initialize the monitor and the color calibrator for calibration. These parameters(color temperature, gamma, and white luminance) are small files containing these two devices aren't detected an error screen will be uncalibrated. SpectraView allows you to specify the parameters you to check the connection. You may vary based on the "Preset" pulldown in "Presets" which...

SpectraView User's Manual - English
Page 18
Throughout the calibration process you will see many changes to the colors and brightness of the CRT directly over the black circle located in the software menu(Figure 3c). Attach the suction cup side of the calibrator to continue. Calibrating Your Monitor -continued PC VERSION Figure 3c The next step will indicate which adjustments are currently being made. 18 The process indicator within the menu will start the color calibration of the monitor. Once the calibrator is attached to the monitor's face click "Next" to the face of the screen.
Throughout the calibration process you will see many changes to the colors and brightness of the CRT directly over the black circle located in the software menu(Figure 3c). Attach the suction cup side of the calibrator to continue. Calibrating Your Monitor -continued PC VERSION Figure 3c The next step will indicate which adjustments are currently being made. 18 The process indicator within the menu will start the color calibration of the monitor. Once the calibrator is attached to the monitor's face click "Next" to the face of the screen.
SpectraView User's Manual - English
Page 19
... is selected click "Save" to the ambient lighting conditions is available. The Ambient function is used to adjust the brightness control to make the detail visible. Calibrating Your Monitor -continued PC VERSION Figure 3d Once the calibration process is finished you will use this detail, an increase in images. Since room light washes out this function carefully. 19 The default file name will be...
... is selected click "Save" to the ambient lighting conditions is available. The Ambient function is used to adjust the brightness control to make the detail visible. Calibrating Your Monitor -continued PC VERSION Figure 3d Once the calibration process is finished you will use this detail, an increase in images. Since room light washes out this function carefully. 19 The default file name will be...

SpectraView User's Manual - English
Page 21
... "Next" to start this adjustment. Note: Make sure that nothing between the sensors and the light source located in the area. Note: This process should be repeated if the ambient lighting conditions in the environment change. Calibrating Your Monitor -continued PC VERSION Hold the color calibrator near the face of the CRT directly over the black circle located in the software menu(Figure 3g). Once...
... "Next" to start this adjustment. Note: Make sure that nothing between the sensors and the light source located in the area. Note: This process should be repeated if the ambient lighting conditions in the environment change. Calibrating Your Monitor -continued PC VERSION Hold the color calibrator near the face of the CRT directly over the black circle located in the software menu(Figure 3g). Once...

SpectraView User's Manual - English
Page 23
...(Figure 4b). Luminance is the brightest that the monitor can be set to the desired setting. To request the maximum brightness for a calibration click the "Maximum" check box. Once the desired changes have a value specified in candelas/meter-squared(cd/m2) or may be adjusted using factory-specified limits for the red, green, and blue controls. Creating a Custom Preset -continued PC VERSION Figure 4b...
...(Figure 4b). Luminance is the brightest that the monitor can be set to the desired setting. To request the maximum brightness for a calibration click the "Maximum" check box. Once the desired changes have a value specified in candelas/meter-squared(cd/m2) or may be adjusted using factory-specified limits for the red, green, and blue controls. Creating a Custom Preset -continued PC VERSION Figure 4b...
SpectraView User's Manual - English
Page 25
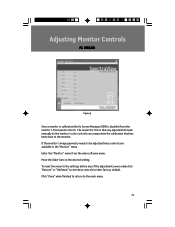
... Adjusting Monitor Controls PC VERSION Figure 5 Once a monitor is calibrated the On Screen Manager (OSM) is that any of the adjustments were made manually to the monitor's color controls can compromise the calibration that has been done to the monitor. If the monitor's image geometry needs to the desired setting. Enter the "Monitor" menu from the monitor's front panel controls. Click "Done" when finished to return to their factory default. To reset the menu to the settings...
... Adjusting Monitor Controls PC VERSION Figure 5 Once a monitor is calibrated the On Screen Manager (OSM) is that any of the adjustments were made manually to the monitor's color controls can compromise the calibration that has been done to the monitor. If the monitor's image geometry needs to the desired setting. Enter the "Monitor" menu from the monitor's front panel controls. Click "Done" when finished to return to their factory default. To reset the menu to the settings...
SpectraView User's Manual - English
Page 28
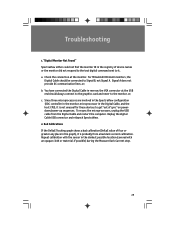
... of sync" on powerdown/power-up sequences. Signal A does not provide DC communication lines, or; b. c. Check the connection at the USB end should be connected to the monitor, or; a. Replug the digital Cable USB connector and relaunch SpectraView. 2. Repeat calibration with an opaque cloth or material, if possible) during the Measure Dark Current step. 28 Troubleshooting 1. For Mitsubishi DP2060U monitors, the Digital Cable should always connect to the graphics card...
... of sync" on powerdown/power-up sequences. Signal A does not provide DC communication lines, or; b. c. Check the connection at the USB end should be connected to the monitor, or; a. Replug the digital Cable USB connector and relaunch SpectraView. 2. Repeat calibration with an opaque cloth or material, if possible) during the Measure Dark Current step. 28 Troubleshooting 1. For Mitsubishi DP2060U monitors, the Digital Cable should always connect to the graphics card...
SpectraView User's Manual - English
Page 30
..., install and use or download the Software in part;(C)defeat, disable or circumvent any protection mechanism related to the Software;(D) sell, license, sublicense, lease, rent, distribute, disclose, permit access to, or transfer to any third party, whether for death or personal injury caused by destroying the Software and any review of or information about Software performance to use of the Software is...
..., install and use or download the Software in part;(C)defeat, disable or circumvent any protection mechanism related to the Software;(D) sell, license, sublicense, lease, rent, distribute, disclose, permit access to, or transfer to any third party, whether for death or personal injury caused by destroying the Software and any review of or information about Software performance to use of the Software is...
SpectraView User's Manual - English
Page 31
...make with the Software, whether or not such modifications are permitted. In particular, but without limitation, profiles in .ICM or .ICC format) created with the Software or any copyright, patent, trademark, trade secret or other applicable laws or (G) use the Software in connection with life support...Software are not located in, under control...using the SpectraView Software, you represent and warrant that you hereby assign to the United States Government, the Software is classified as "restricted computer software" as provided in clause 52.227-19 of the FAR. If the Software is supplied...
...make with the Software, whether or not such modifications are permitted. In particular, but without limitation, profiles in .ICM or .ICC format) created with the Software or any copyright, patent, trademark, trade secret or other applicable laws or (G) use the Software in connection with life support...Software are not located in, under control...using the SpectraView Software, you represent and warrant that you hereby assign to the United States Government, the Software is classified as "restricted computer software" as provided in clause 52.227-19 of the FAR. If the Software is supplied...
SpectraView User's Manual - English
Page 32
.... Service required as a result of the U.S.A. This warranty only covers Product distribution in material and workmanship and, subject to the conditions set forth below, agrees to the original purchaser of abuse or improper usage is limited to repair or replace (at NMD-A's sole option) any part of the enclosed unit which vary from state to be free...
.... Service required as a result of the U.S.A. This warranty only covers Product distribution in material and workmanship and, subject to the conditions set forth below, agrees to the original purchaser of abuse or improper usage is limited to repair or replace (at NMD-A's sole option) any part of the enclosed unit which vary from state to be free...


