
AccuSync 500, 700, 700M, 900 User's Manual
Page 3
... FROM OPENING THE CABINET AS THERE ARE HIGH VOLTAGE COMPONENTS INSIDE. NO USER SERVICEABLE PARTS INSIDE. Use the attached specified cables with the AccuSync color monitor so as not to interfere with Canadian Safety Regulations according to avoid any kind of the following booklet, prepared by the party responsible for a Class B digital device, pursuant to ensure FCC compliance. (2) Please use the supplied power cable...
... FROM OPENING THE CABINET AS THERE ARE HIGH VOLTAGE COMPONENTS INSIDE. NO USER SERVICEABLE PARTS INSIDE. Use the attached specified cables with the AccuSync color monitor so as not to interfere with Canadian Safety Regulations according to avoid any kind of the following booklet, prepared by the party responsible for a Class B digital device, pursuant to ensure FCC compliance. (2) Please use the supplied power cable...

AccuSync 500, 700, 700M, 900 User's Manual
Page 5
Quick Start Connecting the Tilt/Swivel stand 1. With the monitor unplugged from the front of the monitor until the latches click into the locked position. Slide the tilt/swivel stand toward the front of the monitor. 3. Push down on the tilt/swivel stand with care. Insert the hooks into place before turning the monitor upright. NOTE: To avoid self injury or damage to the monitor, attach and remove tilt/ swivel base with...
Quick Start Connecting the Tilt/Swivel stand 1. With the monitor unplugged from the front of the monitor until the latches click into the locked position. Slide the tilt/swivel stand toward the front of the monitor. 3. Push down on the tilt/swivel stand with care. Insert the hooks into place before turning the monitor upright. NOTE: To avoid self injury or damage to the monitor, attach and remove tilt/ swivel base with...
AccuSync 500, 700, 700M, 900 User's Manual
Page 6
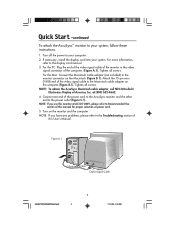
..., install the display card into your system, follow these instructions: 1. For the Mac: Connect the Macintosh cable adapter (not included) to the monitor connector on the computer (Figure B.1). Attach the 15-pin mini D-SUB end of power cord. 5. Tighten all screws. Quick Start -continued To attach the AccuSync™ monitor to your system. For the PC: Plug the end of the video signal cable of the monitor in the video signal connector of the power cord to the AccuSync monitor...
..., install the display card into your system, follow these instructions: 1. For the Mac: Connect the Macintosh cable adapter (not included) to the monitor connector on the computer (Figure B.1). Attach the 15-pin mini D-SUB end of power cord. 5. Tighten all screws. Quick Start -continued To attach the AccuSync™ monitor to your system. For the PC: Plug the end of the video signal cable of the monitor in the video signal connector of the power cord to the AccuSync monitor...

AccuSync 500, 700, 700M, 900 User's Manual
Page 8
... the on screen display. Use this indicator color changes to enter a selection in DPMS (Energy Saving) mode, this button to amber. Use these buttons to choose or adjust items in the On Screen Display (OSD) menu. 6 AS500700700M900FINAL2.p65 6 11/11/03, 1:45 PM Control Button Direct Access Function Bring up Contrast adjustment Button Bring up green when the monitor operates normally. Power (DPMS) Indicator MENU (or OSD) Button Buttons SELECT (or SET) Button This Indicator lights up Brightness adjustment The Contrast and Brightness functions...
... the on screen display. Use this indicator color changes to enter a selection in DPMS (Energy Saving) mode, this button to amber. Use these buttons to choose or adjust items in the On Screen Display (OSD) menu. 6 AS500700700M900FINAL2.p65 6 11/11/03, 1:45 PM Control Button Direct Access Function Bring up Contrast adjustment Button Bring up green when the monitor operates normally. Power (DPMS) Indicator MENU (or OSD) Button Buttons SELECT (or SET) Button This Indicator lights up Brightness adjustment The Contrast and Brightness functions...

AccuSync 500, 700, 700M, 900 User's Manual
Page 9
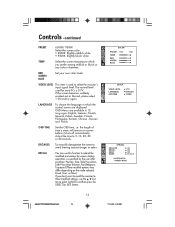
... Screen Display (OSD) menu. 7 AS500700700M900FINAL2.p65 7 11/11/03, 1:45 PM Use this button to enter or exit the on screen display. If the monitor is in the on or off. Buttons Use these buttons to choose or adjust items in DPMS (Energy Saving) mode, this indicator color changes to amber. Controls -continued (AccuSync 700/900) OSD (On Screen Display) control buttons on the front of the monitor function as follows: MENU SELECT Control Power Button Function Use this button to turn...
... Screen Display (OSD) menu. 7 AS500700700M900FINAL2.p65 7 11/11/03, 1:45 PM Use this button to enter or exit the on screen display. If the monitor is in the on or off. Buttons Use these buttons to choose or adjust items in DPMS (Energy Saving) mode, this indicator color changes to amber. Controls -continued (AccuSync 700/900) OSD (On Screen Display) control buttons on the front of the monitor function as follows: MENU SELECT Control Power Button Function Use this button to turn...

AccuSync 500, 700, 700M, 900 User's Manual
Page 10
... monitor is in DPMS (Energy Saving) mode, this button to enter or exit the on screen display. 4 Buttons Buttons Brings up to the audio menu. Use these buttons to choose or adjust items in the on screen display. 5 SELECT (or SET) Button Use this button to enter a selection in the On Screen Display (OSD) menu. 8 AS500700700M900FINAL2.p65 8 11/11/03, 1:45 PM Use this button to turn the monitor on screen display. 6 Power (DPMS) Indicator 7 Power Button This Indicator lights up Brightness adjustment The Contrast and Brightness...
... monitor is in DPMS (Energy Saving) mode, this button to enter or exit the on screen display. 4 Buttons Buttons Brings up to the audio menu. Use these buttons to choose or adjust items in the on screen display. 5 SELECT (or SET) Button Use this button to enter a selection in the On Screen Display (OSD) menu. 8 AS500700700M900FINAL2.p65 8 11/11/03, 1:45 PM Use this button to turn the monitor on screen display. 6 Power (DPMS) Indicator 7 Power Button This Indicator lights up Brightness adjustment The Contrast and Brightness...

AccuSync 500, 700, 700M, 900 User's Manual
Page 11
... cable needed to the microphone jack of the PC sound card. Pink Connects to the Sound Card Manual). 9 AS500700700M900FINAL2.p65 9 11/11/03, 1:45 PM Rear Panel Jacks Audio In -Sky Blue AUDIO IN MIC. If the Audio Out of the PC sound card is checked before connecting. Make sure that the connecting terminal of PC sound card has only Speaker Out, reduce the PC volume. . NOTE: If the Audio Out of the PC sound card supports...
... cable needed to the microphone jack of the PC sound card. Pink Connects to the Sound Card Manual). 9 AS500700700M900FINAL2.p65 9 11/11/03, 1:45 PM Rear Panel Jacks Audio In -Sky Blue AUDIO IN MIC. If the Audio Out of the PC sound card is checked before connecting. Make sure that the connecting terminal of PC sound card has only Speaker Out, reduce the PC volume. . NOTE: If the Audio Out of the PC sound card supports...

AccuSync 500, 700, 700M, 900 User's Manual
Page 12
... On Screen Display, follow these steps: 1. To make using the OSD. Use the Buttons to adjust the item to stabilize for at least 30 minutes before making image adjustments. Accept the changes by Pressing the MENU (or OSD) Button. 10 AS500700700M900FINAL2.p65 10 11/11/03, 1:45 PM Exit the OSD by pressing the SELECT (or SET) Button. 5. Controls -continued Screen Adjustment Making adjustments to the image size, position and operating parameters of the monitor is quick and...
... On Screen Display, follow these steps: 1. To make using the OSD. Use the Buttons to adjust the item to stabilize for at least 30 minutes before making image adjustments. Accept the changes by Pressing the MENU (or OSD) Button. 10 AS500700700M900FINAL2.p65 10 11/11/03, 1:45 PM Exit the OSD by pressing the SELECT (or SET) Button. 5. Controls -continued Screen Adjustment Making adjustments to the image size, position and operating parameters of the monitor is quick and...

AccuSync 500, 700, 700M, 900 User's Manual
Page 13
... indicates all the On Screen Display control, adjustment, and setting menus. Main menu Sub menu Brightness BRIGHTNESS/ CONTRAST Contrast POSITION V Position H Position V Size SIZE H Size GEOMETRY Tilt Side Pincushion S Pincushion Balance Parallelogram Trapezoid Top Corner Bottom Corner COLOR PRESET 6500K 9300K Temp R/G/B (User Control) SETUP SPECIAL Video Level Language OSD Time Degauss Recall Reset Moire H Moire V Moire Reference To adjust the brightness and contrast of the screen To adjust the position of the screen To adjust the size of the screen To adjust the shape of the...
... indicates all the On Screen Display control, adjustment, and setting menus. Main menu Sub menu Brightness BRIGHTNESS/ CONTRAST Contrast POSITION V Position H Position V Size SIZE H Size GEOMETRY Tilt Side Pincushion S Pincushion Balance Parallelogram Trapezoid Top Corner Bottom Corner COLOR PRESET 6500K 9300K Temp R/G/B (User Control) SETUP SPECIAL Video Level Language OSD Time Degauss Recall Reset Moire H Moire V Moire Reference To adjust the brightness and contrast of the screen To adjust the position of the screen To adjust the size of the screen To adjust the shape of the...

AccuSync 500, 700, 700M, 900 User's Manual
Page 14
... adjust the brightness of the image. Horizontal Position To move image up and down. Horizontal Size To adjust image width. Tilt To correct image rotation. Parallelogram To correctly adjust the skew of the screen. Vertical Size To adjust image height. Contrast To adjust the contrast of the displayed image. 12 AS500700700M900FINAL2.p65 12 11/11/03, 1:45 PM Top Corner Bottom Corner To correct an irregular distortion of the screen. Vertical Position To move image left and right. OSD Adjust...
... adjust the brightness of the image. Horizontal Position To move image up and down. Horizontal Size To adjust image width. Tilt To correct image rotation. Parallelogram To correctly adjust the skew of the screen. Vertical Size To adjust image height. Contrast To adjust the contrast of the displayed image. 12 AS500700700M900FINAL2.p65 12 11/11/03, 1:45 PM Top Corner Bottom Corner To correct an irregular distortion of the screen. Vertical Position To move image left and right. OSD Adjust...
AccuSync 500, 700, 700M, 900 User's Manual
Page 15
... monitor's input signal level. If you prefer among reddish or bluish or any color in 12 OSDlaAngdujuasgtes: English, German, French,Description Spanish, Italian, Swedish, Finnish, Portuguese, Korean, Chinese , Russian and Polish. OSD Menus are displayed. RED GREEN BLUE Set your own color levels. TEMP Select the screen temperature which the control names are available in between. the length of time a menu will remain on the mode...
... monitor's input signal level. If you prefer among reddish or bluish or any color in 12 OSDlaAngdujuasgtes: English, German, French,Description Spanish, Italian, Swedish, Finnish, Portuguese, Korean, Chinese , Russian and Polish. OSD Menus are displayed. RED GREEN BLUE Set your own color levels. TEMP Select the screen temperature which the control names are available in between. the length of time a menu will remain on the mode...
AccuSync 500, 700, 700M, 900 User's Manual
Page 18
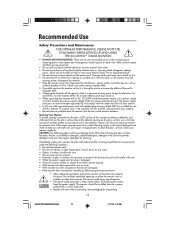
... unstable cart, stand or table, as external speakers or fans, which is the primary means of monitor. • The power cable connector is easily accessible. • Handle with this product on the glass surface, use the monitor outdoors. There are no user serviceable parts inside and opening or removing covers may fall, causing serious damage to the monitor. • Keep the monitor away from the wall outlet and...
... unstable cart, stand or table, as external speakers or fans, which is the primary means of monitor. • The power cable connector is easily accessible. • Handle with this product on the glass surface, use the monitor outdoors. There are no user serviceable parts inside and opening or removing covers may fall, causing serious damage to the monitor. • Keep the monitor away from the wall outlet and...

AccuSync 500, 700, 700M, 900 User's Manual
Page 19
... insufficient contrast For more detailed information on setting up a healthy work environment, write the American National Standard for you to its maximum setting • Use the preset Size and Position controls with standard signals • Use the preset Color Setting and Sides Left/Right controls • Use non-interlaced signals with a vertical refresh rate between 70-85Hz for the AccuSync™ • Do not use an anti-glare filter. • Clean...
... insufficient contrast For more detailed information on setting up a healthy work environment, write the American National Standard for you to its maximum setting • Use the preset Size and Position controls with standard signals • Use the preset Color Setting and Sides Left/Right controls • Use non-interlaced signals with a vertical refresh rate between 70-85Hz for the AccuSync™ • Do not use an anti-glare filter. • Clean...
AccuSync 500, 700, 700M, 900 User's Manual
Page 20
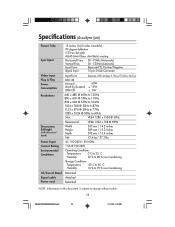
... Temperature -20˚C to 60 ˚C Humidity 10 % to 90 % non-Condensing Tilt/Swivel Stand Detached Signal cable Power cord Attached Detached NOTE: Information in this document is subject to change without notice. 18 AS500700700M900FINAL2.p65 18 11/11/03, 1:45 PM Specifications (AccuSync 500) Picture Tube Sync Input 15 inches (14.0 inches viewable) 90 degree deflection 0.27mm dot pitch AGAS (Anti-Glare, Anti-Static) coating...
... Temperature -20˚C to 60 ˚C Humidity 10 % to 90 % non-Condensing Tilt/Swivel Stand Detached Signal cable Power cord Attached Detached NOTE: Information in this document is subject to change without notice. 18 AS500700700M900FINAL2.p65 18 11/11/03, 1:45 PM Specifications (AccuSync 500) Picture Tube Sync Input 15 inches (14.0 inches viewable) 90 degree deflection 0.27mm dot pitch AGAS (Anti-Glare, Anti-Static) coating...
AccuSync 500, 700, 700M, 900 User's Manual
Page 21
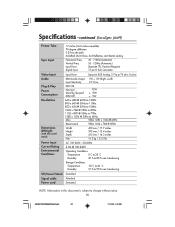
Input Form Signal Input 30 - 71kHz (Automatic) 55 - 120Hz (Automatic) Separate TTL, Positive/Negative 15 pin D-Sub Connector Video Input Plug & Play Power Consumption Input Form DDC 2B Normal Stand-by/Suspend DPM Off Separate, RGB Analog, 0.7Vp-p/75 ohm, Positive 73W ≤ 15W ≤ 5W Resolutions ... Tilt/Swivel Stand Detached Signal cable Power cord Attached Detached NOTE: Information in this document is subject to change without notice. 19 AS500700700M900FINAL2.p65 19 11/11/03, 1:45 PM Specifications -continued (AccuSync 700) Picture Tube Sync Input 17 inches (16.0 inches ...
Input Form Signal Input 30 - 71kHz (Automatic) 55 - 120Hz (Automatic) Separate TTL, Positive/Negative 15 pin D-Sub Connector Video Input Plug & Play Power Consumption Input Form DDC 2B Normal Stand-by/Suspend DPM Off Separate, RGB Analog, 0.7Vp-p/75 ohm, Positive 73W ≤ 15W ≤ 5W Resolutions ... Tilt/Swivel Stand Detached Signal cable Power cord Attached Detached NOTE: Information in this document is subject to change without notice. 19 AS500700700M900FINAL2.p65 19 11/11/03, 1:45 PM Specifications -continued (AccuSync 700) Picture Tube Sync Input 17 inches (16.0 inches ...
AccuSync 500, 700, 700M, 900 User's Manual
Page 22
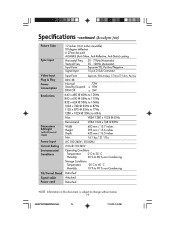
Input Form Signal Input 30 - 71kHz (Automatic) 55 - 120Hz (Automatic) Separate TTL, Positive/Negative 15 pin D-Sub Connector Video Input Audio Plug & Play Power Consumption Resolutions Dimensions &Weight (with tilt/swivel stand) Power Input Current Rating Environmental Conditions Input Form Separate, RGB Analog, 0.7Vp-p/75 ohm, Positive RMS Audio Output 1W + 1W (Right + Left) Input Sensitivity 0.7 Vrms DDC 2B Normal Stand-by/Suspend DPM Off 73W ≤ 15W ≤ 5W 640 x 480 @ 60Hz to 120Hz...
Input Form Signal Input 30 - 71kHz (Automatic) 55 - 120Hz (Automatic) Separate TTL, Positive/Negative 15 pin D-Sub Connector Video Input Audio Plug & Play Power Consumption Resolutions Dimensions &Weight (with tilt/swivel stand) Power Input Current Rating Environmental Conditions Input Form Separate, RGB Analog, 0.7Vp-p/75 ohm, Positive RMS Audio Output 1W + 1W (Right + Left) Input Sensitivity 0.7 Vrms DDC 2B Normal Stand-by/Suspend DPM Off 73W ≤ 15W ≤ 5W 640 x 480 @ 60Hz to 120Hz...
AccuSync 500, 700, 700M, 900 User's Manual
Page 24
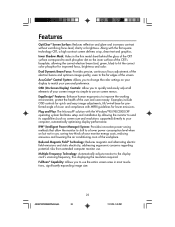
.../XP operating system facilitates setup and installation by allowing the monitor to send its capabilities (such as screen size and resolutions supported) directly to the display card's scanning frequency, thus displaying the resolution required. Examples include OSD controls for quick and easy image adjustments, tilt/swivel base for preferred angle of the CRT's faceplate, allowing the correct electron beam (red, green, blue) to match your display to hit the correct color phosphor for lower emissions...
.../XP operating system facilitates setup and installation by allowing the monitor to send its capabilities (such as screen size and resolutions supported) directly to the display card's scanning frequency, thus displaying the resolution required. Examples include OSD controls for quick and easy image adjustments, tilt/swivel base for preferred angle of the CRT's faceplate, allowing the correct electron beam (red, green, blue) to match your display to hit the correct color phosphor for lower emissions...
AccuSync 500, 700, 700M, 900 User's Manual
Page 25
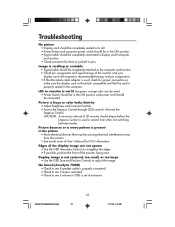
... position. • Signal cable should be completely connected to display card/computer and monitor. • Check connector for bent or pushed-in the ON position and power cord should be connected. Activate the Degauss Control. Picture bounces or a wavy pattern is present in OSD is not lit (no green, orange color can be seen) • Power Switch should be in pins. Display image is used a second time when not switching between modes. No Sound (AccuSync 700M) • Check...
... position. • Signal cable should be completely connected to display card/computer and monitor. • Check connector for bent or pushed-in the ON position and power cord should be connected. Activate the Degauss Control. Picture bounces or a wavy pattern is present in OSD is not lit (no green, orange color can be seen) • Power Switch should be in pins. Display image is used a second time when not switching between modes. No Sound (AccuSync 700M) • Check...
AccuSync 500, 700, 700M, 900 User's Manual
Page 27
... workmanship and, subject to the conditions set forth below, agrees to repair or replace (at 1-800-632-4662. 25 AS500700700M900FINAL2.p65 25 11/11/03, 1:45 PM Therefore, suitability of a Product for a specific purpose or application must have been subjected to displaying of fixed images for long periods of time resulting in image persistence (afterimage effects), accident, misuse...
... workmanship and, subject to the conditions set forth below, agrees to repair or replace (at 1-800-632-4662. 25 AS500700700M900FINAL2.p65 25 11/11/03, 1:45 PM Therefore, suitability of a Product for a specific purpose or application must have been subjected to displaying of fixed images for long periods of time resulting in image persistence (afterimage effects), accident, misuse...

AccuSync 500, 700, 700M, 900 User's Manual
Page 56
... meets the ENERGY STAR guidelines for design and specification improvements, the information in the FCC Rules. U.S. To allow for energy efficiency. NEC is a U.S. Arlington Heights Road, Suite 500 Itasca, Illinois 60143-1248 (630) 467-3000 Type of Product: Computer Monitor Equipment Classification: Class B Peripheral Models: AccuSync 500 (AS500), AccuSync 700 (AS700), AccuSync 700M (AS700M), AccuSync 900 (AS900) We hereby declare that this...
... meets the ENERGY STAR guidelines for design and specification improvements, the information in the FCC Rules. U.S. To allow for energy efficiency. NEC is a U.S. Arlington Heights Road, Suite 500 Itasca, Illinois 60143-1248 (630) 467-3000 Type of Product: Computer Monitor Equipment Classification: Class B Peripheral Models: AccuSync 500 (AS500), AccuSync 700 (AS700), AccuSync 700M (AS700M), AccuSync 900 (AS900) We hereby declare that this...


