
User Guide
Page 2
... using your phone. Large-Print Manuals A large-print version of your user's guide is protected under one or more of Motorola, Inc. ®Reg. For information on your phone. MOTOROLA, the stylized M and all other product or service ...owners. See the Wireless Data Services User's Guide for people with disabilities, contact Motorola Customer Care at 1-800-453-0920 or TTY 1-877-483-2840. Patent & Trademark Information This product is available. Important! patents listed in the User Guides. All other trademarks indicated as such herein are pending. TTY Access TTY access...
... using your phone. Large-Print Manuals A large-print version of your user's guide is protected under one or more of Motorola, Inc. ®Reg. For information on your phone. MOTOROLA, the stylized M and all other product or service ...owners. See the Wireless Data Services User's Guide for people with disabilities, contact Motorola Customer Care at 1-800-453-0920 or TTY 1-877-483-2840. Patent & Trademark Information This product is available. Important! patents listed in the User Guides. All other trademarks indicated as such herein are pending. TTY Access TTY access...

User Guide
Page 3
... 12 Battery and Charging Status 12 Turning On Your i700plus phone 13 Turning Off your i700plus phone 13 Keypad Lock 14 Activating Keypad Lock 14 Deactivating Keypad Lock 14 Receiving Incoming Calls 14 Receiving New Mail Messages 14 Receiving Voice Mail 15 Receiving Private (Two-Way Radio) Calls 15 Display Icons 16 About Modes and Menus 17 Setting the Time and Date 17 Changing the Display Language 19 Selectable Backlight Timer 19 Making Phone Calls 20 Using Other Dialing Methods 20 Scroll ...20 Speed Dial 20 Emergency Dial 21 Automatic Redial 21 Last Number...
... 12 Battery and Charging Status 12 Turning On Your i700plus phone 13 Turning Off your i700plus phone 13 Keypad Lock 14 Activating Keypad Lock 14 Deactivating Keypad Lock 14 Receiving Incoming Calls 14 Receiving New Mail Messages 14 Receiving Voice Mail 15 Receiving Private (Two-Way Radio) Calls 15 Display Icons 16 About Modes and Menus 17 Setting the Time and Date 17 Changing the Display Language 19 Selectable Backlight Timer 19 Making Phone Calls 20 Using Other Dialing Methods 20 Scroll ...20 Speed Dial 20 Emergency Dial 21 Automatic Redial 21 Last Number...

User Guide
Page 5
Table of Contents Making Group Calls 41 Receiving a Group Call 41 Adding and Storing a Talkgroup 41 Area Selection 42 Private/Group Mode Speaker 42 Using Mail Services 43 Net mail ...43 Voice Mail 44 Message Mail 45 Saving and Erasing Mail 45 Auto Call Back 46 Mail Memory Full 46 Using Your Phone as a Modem 47 Setting Programming Menus 48 About Status Messages 53 Accessories 55 Batteries...55 Charging the Battery 55 Battery Operating Instructions 55 Travel Chargers 56 Using the Rapid Travel...
Table of Contents Making Group Calls 41 Receiving a Group Call 41 Adding and Storing a Talkgroup 41 Area Selection 42 Private/Group Mode Speaker 42 Using Mail Services 43 Net mail ...43 Voice Mail 44 Message Mail 45 Saving and Erasing Mail 45 Auto Call Back 46 Mail Memory Full 46 Using Your Phone as a Modem 47 Setting Programming Menus 48 About Status Messages 53 Accessories 55 Batteries...55 Charging the Battery 55 Battery Operating Instructions 55 Travel Chargers 56 Using the Rapid Travel...

User Guide
Page 9
... the Wireless Data Services User's Guide for circuit data faxes and file transfers. NOTE: This manual describes the features of Net Mode, see the Net Mode User's Guide. 9 For information on using the micro-browser and other components of your phone as Turbo Dial® and the Last 10 Calls Received and Sent lists, help to quickly make and return phone calls. See Page 41. •Net Mode-for cellular phone operation. Contact your Service Provider for more information, check...
... the Wireless Data Services User's Guide for circuit data faxes and file transfers. NOTE: This manual describes the features of Net Mode, see the Net Mode User's Guide. 9 For information on using the micro-browser and other components of your phone as Turbo Dial® and the Last 10 Calls Received and Sent lists, help to quickly make and return phone calls. See Page 41. •Net Mode-for cellular phone operation. Contact your Service Provider for more information, check...

User Guide
Page 10
... Net Mode micro-browser. (Subscription dependent features not available in all areas) NOTE: Remove the plastic film lens protector from the display before you use your i700plus 1. Features of the phone's User's Guide is available on the keypad backlight. Send/End Key 18. Speaker Key 22. Large-Print Manuals A large-print version of your phone for complete instructions. Earpiece 3. Scroll Key 6. www.mot.com/iDEN 10 Push-to turn...
... Net Mode micro-browser. (Subscription dependent features not available in all areas) NOTE: Remove the plastic film lens protector from the display before you use your i700plus 1. Features of the phone's User's Guide is available on the keypad backlight. Send/End Key 18. Speaker Key 22. Large-Print Manuals A large-print version of your phone for complete instructions. Earpiece 3. Scroll Key 6. www.mot.com/iDEN 10 Push-to turn...

User Guide
Page 11
.... 8. Alphanumeric Keypad Enter telephone numbers, Private Call IDs, and alphanumeric characters. 19. Bottom Accessory Connect accessories and the data cable. Microphone Use to your i700plus phone on the display. 14. Speaker Key Press to hear the other party. 3. Welcome 1. Volume Control Press to listen. 5. Mode Key Press to the micro-browser Home menu. 21. Punctuation Key Add punctuation in the micro-browser (within T9™ Text Input). 9. Home Key Press to return to change modes...
.... 8. Alphanumeric Keypad Enter telephone numbers, Private Call IDs, and alphanumeric characters. 19. Bottom Accessory Connect accessories and the data cable. Microphone Use to your i700plus phone on the display. 14. Speaker Key Press to hear the other party. 3. Welcome 1. Volume Control Press to listen. 5. Mode Key Press to the micro-browser Home menu. 21. Punctuation Key Add punctuation in the micro-browser (within T9™ Text Input). 9. Home Key Press to return to change modes...

User Guide
Page 14
... call to answer the call. Once Keypad Lock is pressed, while in Keypad Keypad Locked Lock mode, the "Keypad Locked" message dis- NOTE: Whenever a key is activated, you can only perform the following tasks (unless you receive a new mail message (see "Using Mail Services" on page 43 for more information), the keypad lock will be temporarily disabled. Deactivating Keypad Lock From the Phone Ready screen, simultaneously press and . The message Keypad Unlocked displays on your phone. Or, • Press P under "Later" to return to incoming calls...
... call to answer the call. Once Keypad Lock is pressed, while in Keypad Keypad Locked Lock mode, the "Keypad Locked" message dis- NOTE: Whenever a key is activated, you can only perform the following tasks (unless you receive a new mail message (see "Using Mail Services" on page 43 for more information), the keypad lock will be temporarily disabled. Deactivating Keypad Lock From the Phone Ready screen, simultaneously press and . The message Keypad Unlocked displays on your phone. Or, • Press P under "Later" to return to incoming calls...

User Guide
Page 15
...; When New Voice Mail Waiting displays, press P under "Dial" to Phone Ready and reactivate the lock. Once the call (see "Voice Mail" on page 37) the phone will be temporarily disabled. You will display. Receiving Private (Two-Way Radio) Calls When you have disabled the Message Mail Notification, v icon will display, however, "New Voice Mail Waiting" will return to Phone Ready and reactivate the lock. Welcome • Press P under "Save" or "Erase". Once you receive an incoming private (two-way radio) call is...
...; When New Voice Mail Waiting displays, press P under "Dial" to Phone Ready and reactivate the lock. Once the call (see "Voice Mail" on page 37) the phone will be temporarily disabled. You will display. Receiving Private (Two-Way Radio) Calls When you have disabled the Message Mail Notification, v icon will display, however, "New Voice Mail Waiting" will return to Phone Ready and reactivate the lock. Welcome • Press P under "Save" or "Erase". Once you receive an incoming private (two-way radio) call is...

User Guide
Page 16
... active phone line (1 or 2). Some of the display. More Information Indicates that incoming phone calls are waiting in your voice mail box. See the following icons may not be sent or received in your packet data information is more information, see the Wireless Data User's Guide. Six bars indicate the strongest signal. Call Forward Indicates that there is encrypted during transmission. Packet Data Indicates packet data registration. Secure Packet Data Connection Indicates that unplayed messages...
... active phone line (1 or 2). Some of the display. More Information Indicates that incoming phone calls are waiting in your voice mail box. See the following icons may not be sent or received in your packet data information is more information, see the Wireless Data User's Guide. Six bars indicate the strongest signal. Call Forward Indicates that there is encrypted during transmission. Packet Data Indicates packet data registration. Secure Packet Data Connection Indicates that unplayed messages...

User Guide
Page 17
...-browser use. Setting the Time and Date If your carrier provides this feature is turned off, it . Welcome About Modes and Menus Modes and menus are four modes: • Phone-for one-to-one radio calls. Pressing the Mode key N takes you see the desired menu option, then press P under the desired menu option to select it continues to display the current time during a loss of service. To change modes...
...-browser use. Setting the Time and Date If your carrier provides this feature is turned off, it . Welcome About Modes and Menus Modes and menus are four modes: • Phone-for one-to-one radio calls. Pressing the Mode key N takes you see the desired menu option, then press P under the desired menu option to select it continues to display the current time during a loss of service. To change modes...

User Guide
Page 20
... call. 3. Enter the assigned speed-dial number (1-100). To end the call , press S. To end the call waiting, put calls on hold, and create and use stored lists. From the "Phone Ready" screen, using the keypad, enter the desired number. Phone Ready Line1 10:42a 11/06 Exit Ok Using Other Dialing Methods To use call , press S. Select "Spd#". 3. Making Phone Calls In addition to making and receiving phone calls in Phone mode, you can place a call by entering the phone number on the keypad...
... call. 3. Enter the assigned speed-dial number (1-100). To end the call , press S. To end the call waiting, put calls on hold, and create and use stored lists. From the "Phone Ready" screen, using the keypad, enter the desired number. Phone Ready Line1 10:42a 11/06 Exit Ok Using Other Dialing Methods To use call , press S. Select "Spd#". 3. Making Phone Calls In addition to making and receiving phone calls in Phone mode, you can place a call by entering the phone number on the keypad...

User Guide
Page 21
... number dialed. Turbo Dial® feature The Turbo Dial® feature enables you to have your carrier. Making Phone Calls Name Search 1. From the Phone Ready screen, select "Name". 2. Emergency Dial You can dial the emergency phone number even if the keypad is successful. If you are on an active call, you are eight Turbo Dial positions, 1 through all the names starting with "B" until the phone displays "EMERGENCY". The emergency phone number will hear a ring-back tone when the call...
... number dialed. Turbo Dial® feature The Turbo Dial® feature enables you to have your carrier. Making Phone Calls Name Search 1. From the Phone Ready screen, select "Name". 2. Emergency Dial You can dial the emergency phone number even if the keypad is successful. If you are on an active call, you are eight Turbo Dial positions, 1 through all the names starting with "B" until the phone displays "EMERGENCY". The emergency phone number will hear a ring-back tone when the call...
User Guide
Page 22
..." changes to display your own phone number. Ending a Phone Call Press S. Keypad numbers 0 and 9 are set a vibration alert for all services or for selecting all services or selecting individual services to activate Turbo Dial. www.mot.com/iDEN 22 s Df b Phone Ready 1 Cancl 2. Press *,#,1 to "Phone-In Use". From the Phone Ready screen: 1. Press and hold the desired key for two seconds to vibrate. Or press any country -without entering the local international access code. 1. s Df b Incoming Phone Call...
..." changes to display your own phone number. Ending a Phone Call Press S. Keypad numbers 0 and 9 are set a vibration alert for all services or for selecting all services or selecting individual services to activate Turbo Dial. www.mot.com/iDEN 22 s Df b Phone Ready 1 Cancl 2. Press *,#,1 to "Phone-In Use". From the Phone Ready screen: 1. Press and hold the desired key for two seconds to vibrate. Or press any country -without entering the local international access code. 1. s Df b Incoming Phone Call...
User Guide
Page 28
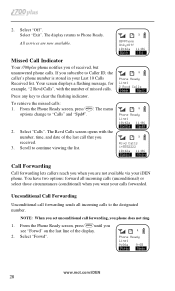
... display. 2. NOTE: When you set unconditional call that you phone does not ring. 1. The display returns to "Calls" and "Spd#". 2. The menu options change to Phone Ready. 2. s Df b 80=Phone Only:Off 10:42a 11/06 Exit On Missed Call Indicator Your i700plus phone notifies you want your calls forwarded. Press any key to Caller ID, the caller's phone number is stored in your iDEN phone. Select "Off". Select "Exit". The Rcvd Calls screen opens...
... display. 2. NOTE: When you set unconditional call that you phone does not ring. 1. The display returns to "Calls" and "Spd#". 2. The menu options change to Phone Ready. 2. s Df b 80=Phone Only:Off 10:42a 11/06 Exit On Missed Call Indicator Your i700plus phone notifies you want your calls forwarded. Press any key to Caller ID, the caller's phone number is stored in your iDEN phone. Select "Off". Select "Exit". The Rcvd Calls screen opens...

User Guide
Page 35
... phone number displays. To add the number to enter the programming menu. To use Quickstore to store the last number that you dialed, press R. • To view the Received and Sent Calls list, press M until you see "Calls", then select it. 2. Cancl Store s Df b Enter Name - Cancl Store 35 Use the Scroll key to view each entry. NOTE: As you see the "Sent" menu option. Select "Store". The Enter Name screen displays. Creating, Editing, and Using...
... phone number displays. To add the number to enter the programming menu. To use Quickstore to store the last number that you dialed, press R. • To view the Received and Sent Calls list, press M until you see "Calls", then select it. 2. Cancl Store s Df b Enter Name - Cancl Store 35 Use the Scroll key to view each entry. NOTE: As you see the "Sent" menu option. Select "Store". The Enter Name screen displays. Creating, Editing, and Using...

User Guide
Page 43
... message services listed. For example, to view, then select "Ok". The Alerts inbox opens and displays the type of alert that you receive alerts from any mode: 1. To select a message service, scroll to a mail service indicates new mail. Select "Mail". 2. s jf b Inbox 1 Email 2 Fax Ok Del 43 Using Mail Services Using Mail Services NOTE: Some features may be network dependent or subscription only, and may not be available in all areas. Contact your Message Mail, press 2. s Dt b 1>Voice Mail *2>Mesg Mail...
... message services listed. For example, to view, then select "Ok". The Alerts inbox opens and displays the type of alert that you receive alerts from any mode: 1. To select a message service, scroll to a mail service indicates new mail. Select "Mail". 2. s jf b Inbox 1 Email 2 Fax Ok Del 43 Using Mail Services Using Mail Services NOTE: Some features may be network dependent or subscription only, and may not be available in all areas. Contact your Message Mail, press 2. s Dt b 1>Voice Mail *2>Mesg Mail...

User Guide
Page 45
... Your message shows the time and date that you mail later: 4. A list of all your mailbox. 1>Voice Mail 2>Mesg Mail 3>Net Mail Exit Ok s Df b Message Mail 2 New 0 Saved Next, a list of all messages will display. Your phone can be either a numeric page or a text message of new and saved messages in your mail now, select "Now". To read you have unread messages. To postpone reading your display to clear the display, select "Later". The icon stops flashing but...
... Your message shows the time and date that you mail later: 4. A list of all your mailbox. 1>Voice Mail 2>Mesg Mail 3>Net Mail Exit Ok s Df b Message Mail 2 New 0 Saved Next, a list of all messages will display. Your phone can be either a numeric page or a text message of new and saved messages in your mail now, select "Now". To read you have unread messages. To postpone reading your display to clear the display, select "Later". The icon stops flashing but...

User Guide
Page 47
... Data Services User's Guide and contact your i700plus phone as e-mail, a field service report, or files. This allows you must install the iDEN Wireless Data Services software. Using Your Phone as a Modem Using Your Phone as e-mail. Your computer screen and keyboard replace the standard TTY device. This type of wireless connection uses one of two types of data connection: circuit-switched data and packet data. • Circuit-switched data is typically used for sending and receiving faxes and for transferring large files. • Packet data is used for Packet and Circuit Data calls...
... Data Services User's Guide and contact your i700plus phone as e-mail, a field service report, or files. This allows you must install the iDEN Wireless Data Services software. Using Your Phone as a Modem Using Your Phone as e-mail. Your computer screen and keyboard replace the standard TTY device. This type of wireless connection uses one of two types of data connection: circuit-switched data and packet data. • Circuit-switched data is typically used for sending and receiving faxes and for transferring large files. • Packet data is used for Packet and Circuit Data calls...

User Guide
Page 50
.... 32 Mail Volume Set the volume of incoming Message Mail, Voice Mail, and Net alert tones using the volume control keys, or lower the volume to silence the mail alert tones. 33 Earpiece Volume Set the default earpiece volume using the volume control keys, or lower the volume to 100 frequently called phone numbers and associated names. See "Editing and Erasing Phone List Entries" on page 34. 23 Talkgrp List Program Add/Edit/Erase numbers and associated names for incoming phone calls. See "Selecting a Ring Style" on page 24. 31 Set Ring Style...
.... 32 Mail Volume Set the volume of incoming Message Mail, Voice Mail, and Net alert tones using the volume control keys, or lower the volume to silence the mail alert tones. 33 Earpiece Volume Set the default earpiece volume using the volume control keys, or lower the volume to 100 frequently called phone numbers and associated names. See "Editing and Erasing Phone List Entries" on page 34. 23 Talkgrp List Program Add/Edit/Erase numbers and associated names for incoming phone calls. See "Selecting a Ring Style" on page 24. 31 Set Ring Style...

User Guide
Page 52
... 6: Programming Menu Options (Continued) Keypad Number 63 Menu Option IP Address Function Use the scroll keys to do not select the "Advanced Encryption New" key. You could damage your carrier. www.mot.com/iDEN 52 NOTE: Important! See the Wireless Data Services User's Guide. 65 Lines per Screen View the display in your phone. See "Setting the Time and Date" on page 19. 71 Time/Date 80 Phone Only Select the format for your phone is English...
... 6: Programming Menu Options (Continued) Keypad Number 63 Menu Option IP Address Function Use the scroll keys to do not select the "Advanced Encryption New" key. You could damage your carrier. www.mot.com/iDEN 52 NOTE: Important! See the Wireless Data Services User's Guide. 65 Lines per Screen View the display in your phone. See "Setting the Time and Date" on page 19. 71 Time/Date 80 Phone Only Select the format for your phone is English...

