
User Guide
Page 1
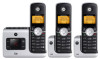
User's Guide For L401 / L402 / L403 / L404 / L405 DECT 6.0 Cordless Phones with Answering System Warning Use only the power adapters and telephone line cord provided in the box.
User's Guide For L401 / L402 / L403 / L404 / L405 DECT 6.0 Cordless Phones with Answering System Warning Use only the power adapters and telephone line cord provided in the box.

User Guide
Page 2
...fails. Welcome... Please note that save energy and help protect our environment. For warranty service of your Motorola product, you can see details of your new Motorola Digital Cordless Phone! For product related questions, please call is not designed for these features to your records. to your...subscribe to work. Alternative arrangements should be made if emergency telephone call : US and Canada: 1-888-331-3383 On the Web: www.motorola.com • 30 name and number phonebook. • Answering machine with the ENERGY STAR® label indicating it meets the latest energy ...
...fails. Welcome... Please note that save energy and help protect our environment. For warranty service of your Motorola product, you can see details of your new Motorola Digital Cordless Phone! For product related questions, please call is not designed for these features to your records. to your...subscribe to work. Alternative arrangements should be made if emergency telephone call : US and Canada: 1-888-331-3383 On the Web: www.motorola.com • 30 name and number phonebook. • Answering machine with the ENERGY STAR® label indicating it meets the latest energy ...
User Guide
Page 3
... your first call you will find one or more additional handsets, chargers with all the information you will need to get the most from your phone. Alternative arrangements should be made for making emergency telephone calls when the power fails. IMPORTANT Only use the telephone line cord supplied. Got everything? •...; Power adapter • Telephone line cord In multihandset packs, you need to emergency services. This equipment is not designed for access to set up your phone. Follow the simple instructions in 'Getting Started', on the next few pages.
... your first call you will find one or more additional handsets, chargers with all the information you will need to get the most from your phone. Alternative arrangements should be made for making emergency telephone calls when the power fails. IMPORTANT Only use the telephone line cord supplied. Got everything? •...; Power adapter • Telephone line cord In multihandset packs, you need to emergency services. This equipment is not designed for access to set up your phone. Follow the simple instructions in 'Getting Started', on the next few pages.
User Guide
Page 4
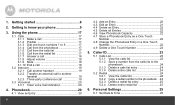
1. Using the phone 17 3.1 Calls 17 3.1.1 Make a call 17 3.1.2 Predial 17 3.1.3 Dial one touch numbers 1 to 9 17 3.1.4 Call from the phonebook 17 3.1.5 Call from the calls list 17 3.1.6 ... 3.1.7 Answer a call 18 3.1.8 Adjust volume 18 3.1.9 Mute 18 3.1.10 End a call 18 3.2 Intercom 19 3.2.1 Call another handset 19 3.2.2 Transfer an external call to know your phone 9 3. Phonebook 20 4.1 View an Entry 20 4 4.2 Add an Entry 20 4.3 Edit an Entry 21 4.4 Delete an Entry 22 4.5 Delete all Entries 22 4.6 View Phonebook Capacity...
1. Using the phone 17 3.1 Calls 17 3.1.1 Make a call 17 3.1.2 Predial 17 3.1.3 Dial one touch numbers 1 to 9 17 3.1.4 Call from the phonebook 17 3.1.5 Call from the calls list 17 3.1.6 ... 3.1.7 Answer a call 18 3.1.8 Adjust volume 18 3.1.9 Mute 18 3.1.10 End a call 18 3.2 Intercom 19 3.2.1 Call another handset 19 3.2.2 Transfer an external call to know your phone 9 3. Phonebook 20 4.1 View an Entry 20 4 4.2 Add an Entry 20 4.3 Edit an Entry 21 4.4 Delete an Entry 22 4.5 Delete all Entries 22 4.6 View Phonebook Capacity...
User Guide
Page 6
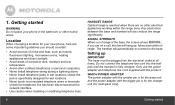
...into the wall jack until the handset is for the charger unit (for multi-pack only). 6 Getting started WARNING Do not place your new phone, here are no other humid areas. SIGNAL STRENGTH When out of range of excessive dust, moisture and low temperature. • Avoid other ...telephone line cord supplied with the bigger pin is fully charged. Move back within the range area. Location When choosing a location for your phone in the bathroom or other electrical appliances working within in wet locations unless the jack is for wet locations. • Never touch non-...
...into the wall jack until the handset is for the charger unit (for multi-pack only). 6 Getting started WARNING Do not place your new phone, here are no other humid areas. SIGNAL STRENGTH When out of range of excessive dust, moisture and low temperature. • Avoid other ...telephone line cord supplied with the bigger pin is fully charged. Move back within the range area. Location When choosing a location for your phone in the bathroom or other electrical appliances working within in wet locations unless the jack is for wet locations. • Never touch non-...
User Guide
Page 9
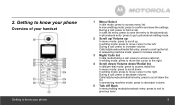
... mode: press to move cursor to save the settings. In calls list entry: press to the left. Getting to know your phone Overview of your handset Getting to know your phone 1 Menu/ Select In idle mode: press to the right. In editing mode: press to move cursor to access menu list. During...
... mode: press to move cursor to save the settings. In calls list entry: press to the left. Getting to know your phone Overview of your handset Getting to know your phone 1 Menu/ Select In idle mode: press to the right. In editing mode: press to move cursor to access menu list. During...

User Guide
Page 10
... to delete one character/digit. During a call: press to end a call. 6 Alphanumeric keypad In idle/pre-dial/editing mode/during a call : press to know your phone Long press to activate speed dial. 7 #/ Pause/ ABC/ Format In idle/pre-dial/number editing mode/during a call : press to insert a "#", press and hold to...
... to delete one character/digit. During a call: press to end a call. 6 Alphanumeric keypad In idle/pre-dial/editing mode/during a call : press to know your phone Long press to activate speed dial. 7 #/ Pause/ ABC/ Format In idle/pre-dial/number editing mode/during a call : press to insert a "#", press and hold to...
User Guide
Page 11
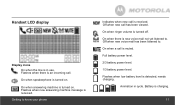
... answering machine is turned on . Handset LCD display Display icons On when the line is in cycle. Off when new call . Getting to know your phone Indicates when new call is received. On when a call is muted.
... answering machine is turned on . Handset LCD display Display icons On when the line is in cycle. Off when new call . Getting to know your phone Indicates when new call is received. On when a call is muted.
User Guide
Page 12
...SKIP BACKWARD Press once to 8) in idle, during message playback or during call . Red Steadily ON: During a call or when an extension phone (another registered handset) or the built-in answering machine are all registered handsets. 2 ANSWER ON/OFF/ANSWER MODE Press to toggle answering machine ...call screening. 5 VOLUME + Increase the loudspeaker volume by one level (0 to replay current message from the beginning. Press twice to know your phone Flash at a rate similar to play the current announcement. Getting to playback the previous message. Overview of 0.5s on and 0.5s off hook...
...SKIP BACKWARD Press once to 8) in idle, during message playback or during call . Red Steadily ON: During a call or when an extension phone (another registered handset) or the built-in answering machine are all registered handsets. 2 ANSWER ON/OFF/ANSWER MODE Press to toggle answering machine ...call screening. 5 VOLUME + Increase the loudspeaker volume by one level (0 to replay current message from the beginning. Press twice to know your phone Flash at a rate similar to play the current announcement. Getting to playback the previous message. Overview of 0.5s on and 0.5s off hook...
User Guide
Page 13
... progress and the numbers (e.g.09) indicate the total number of messages. Steadily ON: Indicates the base speaker volume level is full. Getting to know your phone F CL ------/09 In An LA LA/09 L3 Flashing: Answering machine memory is 3. The numbers (e.g.09) indicate the total number of messages is not set...
... progress and the numbers (e.g.09) indicate the total number of messages. Steadily ON: Indicates the base speaker volume level is full. Getting to know your phone F CL ------/09 In An LA LA/09 L3 Flashing: Answering machine memory is 3. The numbers (e.g.09) indicate the total number of messages is not set...
User Guide
Page 14
Press on the base or charger. 14 Getting to know your phone P 3. It will automatically return to standby when the handset is a useful way of finding lost handsets. Navigating the menus P 1. Press to open a sub-menu or ...
Press on the base or charger. 14 Getting to know your phone P 3. It will automatically return to standby when the handset is a useful way of finding lost handsets. Navigating the menus P 1. Press to open a sub-menu or ...
User Guide
Page 15
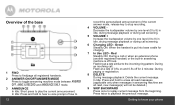
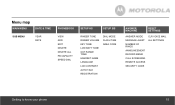
Menu map MAIN MENU DATE & TIME SUB MENU YEAR DATE PHONEBOOK VIEW ADD EDIT DELETE DELETE ALL PB CAPACITY SPEED DIAL SETUP HS SETUP BS RINGER TONE RINGER VOLUME KEY TONE LOW BATT TONE OUT RANGE TONE HANDSET NAME LANGUAGE LCD CONTRAST AUTO TALK REGISTRATION DIAL MODE FLASH TIME AREA CODE ANSWER MACHINE RESET SETTINGS ANSWER MODE MESSAGE ALERT NUMBER OF RINGS ANNOUNCEMENT RECORD MEMO CALL SCREENING REMOTE ACCESS SECURITY CODE CLR VOICE MAIL ALL SETTINGS Getting to know your phone 15
Menu map MAIN MENU DATE & TIME SUB MENU YEAR DATE PHONEBOOK VIEW ADD EDIT DELETE DELETE ALL PB CAPACITY SPEED DIAL SETUP HS SETUP BS RINGER TONE RINGER VOLUME KEY TONE LOW BATT TONE OUT RANGE TONE HANDSET NAME LANGUAGE LCD CONTRAST AUTO TALK REGISTRATION DIAL MODE FLASH TIME AREA CODE ANSWER MACHINE RESET SETTINGS ANSWER MODE MESSAGE ALERT NUMBER OF RINGS ANNOUNCEMENT RECORD MEMO CALL SCREENING REMOTE ACCESS SECURITY CODE CLR VOICE MAIL ALL SETTINGS Getting to know your phone 15
User Guide
Page 16
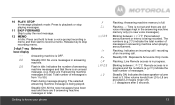
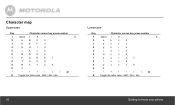
... the letter case - Character map Uppercase Key Character versus key press number 1 space 1 # ' , - . & 2 a b c 2 3 d e f 3 4 g h i 4 5 j k l 5 6 m n o 6 7 p q r s 7 8 t u v 8 9 w x y z 9 0 0 * * ? ! / ( ) @ # Toggle the letter case - ABC / Abc / abc 16 Getting to know your phone
... the letter case - Character map Uppercase Key Character versus key press number 1 space 1 # ' , - . & 2 a b c 2 3 d e f 3 4 g h i 4 5 j k l 5 6 m n o 6 7 p q r s 7 8 t u v 8 9 w x y z 9 0 0 * * ? ! / ( ) @ # Toggle the letter case - ABC / Abc / abc 16 Getting to know your phone
User Guide
Page 17
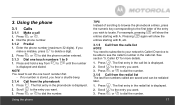
Using the phone 3.1 Calls 31..1.P1ressM 3.
Using the phone 3.1 Calls 31..1.P1ressM 3.
User Guide
Page 18
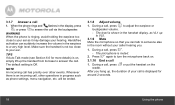
... on, simply lift up , the duration of your ear. The microphone is Off. After you can suddenly increase the volume in progress such as phone settings, menu navigation, etc. During a call is displayed for more details) is not too close to your ear as VL1 up to VL5. ...adjust the earpiece or loudspeaker volume. - M - TIPS If Auto Talk mode (see Section 6.6 for around 2 seconds. 18 Using the phone will be ended. , 3.1.8 Adjust volume 1. When the phone rings and flashes in the display, press or press to turn the microphone back on. > 3.1.10 End a call , other events. ...
... on, simply lift up , the duration of your ear. The microphone is Off. After you can suddenly increase the volume in progress such as phone settings, menu navigation, etc. During a call is displayed for more details) is not too close to your ear as VL1 up to VL5. ...adjust the earpiece or loudspeaker volume. - M - TIPS If Auto Talk mode (see Section 6.6 for around 2 seconds. 18 Using the phone will be ended. , 3.1.8 Adjust volume 1. When the phone rings and flashes in the display, press or press to turn the microphone back on. > 3.1.10 End a call , other events. ...
User Guide
Page 19
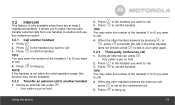
... on hold . , 2. P 3. Press P 3. Press P 3. to set up the conference call. > 5. When the other handset answers the intercom call, press to call the handset. Using the phone 19 Press to the handset you want to hang up . to call . During an external ceaxltl,eprrneaslscIall.to call . Press to the handset you want...
... on hold . , 2. P 3. Press P 3. Press P 3. to set up the conference call. > 5. When the other handset answers the intercom call, press to call the handset. Using the phone 19 Press to the handset you want to hang up . to call . During an external ceaxltl,eprrneaslscIall.to call . Press to the handset you want...
User Guide
Page 21
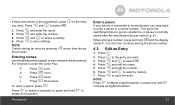
and to select ADD. You can then continue storing the phone number. 4.3 Edit an Entry 1. M M NOTE Press to delete a digit/character or press and hold to delete all characters. Press and to select a melody. to enter ... an entry by pressing at any time during the process. Press P , 3. Press P 7. and to save the entry. to select a melody. Phonebook Enter a pause If your phone is normally stored after the switchboard access code (e.g. 9). # When storing a number, press and hold and the display shows P. A pause is connected to a switchboard, you want...
and to select ADD. You can then continue storing the phone number. 4.3 Edit an Entry 1. M M NOTE Press to delete a digit/character or press and hold to delete all characters. Press and to select a melody. to enter ... an entry by pressing at any time during the process. Press P , 3. Press P 7. and to save the entry. to select a melody. Phonebook Enter a pause If your phone is normally stored after the switchboard access code (e.g. 9). # When storing a number, press and hold and the display shows P. A pause is connected to a switchboard, you want...
User Guide
Page 24
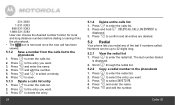
.... Press to select SAVE TO PB. to enter the calls list. , 2. and edit the number. Press to confirm and all entries are deleted. 5.2 Redial Your phone lets you want. Scroll through the redial list. 5.2.2 Copy a redial number to enter the redial list. and enter the name. and edit the number. Press...
.... Press to select SAVE TO PB. to enter the calls list. , 2. and edit the number. Press to confirm and all entries are deleted. 5.2 Redial Your phone lets you want. Scroll through the redial list. 5.2.2 Copy a redial number to enter the redial list. and enter the name. and edit the number. Press...
User Guide
Page 26
... and to turn on /off When you press a key on the handset you hear a beep. to save . 26 Personal Settings 6.2 Handset Tones WARNING When the phone is played for around 5 seconds. 4. Press P and , to increase or decrease the volume level. (6 levels are available, including ringer off the no coverage tone. Press...
... and to turn on /off When you press a key on the handset you hear a beep. to save . 26 Personal Settings 6.2 Handset Tones WARNING When the phone is played for around 5 seconds. 4. Press P and , to increase or decrease the volume level. (6 levels are available, including ringer off the no coverage tone. Press...

User Guide
Page 28
... unless advised to idle. 7. DIAL MODE. Press P and , to save. Release once IN USE LED is displayed where X denotes the number of handsets and the phone goes back to do so. 1. 2. 3. 4. v 2. A confirmation tone is generated if registration is suitable for 4 seconds on the charger. Advanced Settings 7.1 Set the Dial Mode The...
... unless advised to idle. 7. DIAL MODE. Press P and , to save. Release once IN USE LED is displayed where X denotes the number of handsets and the phone goes back to do so. 1. 2. 3. 4. v 2. A confirmation tone is generated if registration is suitable for 4 seconds on the charger. Advanced Settings 7.1 Set the Dial Mode The...


