
Getting Started Guide
Page 3
... Local Network 13 Connecting to an Ethernet Network 14 Chapter 4 - Contents Contents 3 Chapter 1 - Making the Physical Connections 7 Find a Location 7 What You Need 7 Important Safety Instructions 8 Identify the Connectors and Attach the Cables 9 G Netopia 4652 SDSL/IDSL Router Status Lights 11 Chapter 3 - Easy Setup 29 Easy Setup Console Screens 29 Accessing the Easy Setup console screens 29 Quick Easy Setup Connection Path 31 DSL Line Configuration 33 Console-Based Management 25 Connecting through the Console...
... Local Network 13 Connecting to an Ethernet Network 14 Chapter 4 - Contents Contents 3 Chapter 1 - Making the Physical Connections 7 Find a Location 7 What You Need 7 Important Safety Instructions 8 Identify the Connectors and Attach the Cables 9 G Netopia 4652 SDSL/IDSL Router Status Lights 11 Chapter 3 - Easy Setup 29 Easy Setup Console Screens 29 Accessing the Easy Setup console screens 29 Quick Easy Setup Connection Path 31 DSL Line Configuration 33 Console-Based Management 25 Connecting through the Console...
Getting Started Guide
Page 5
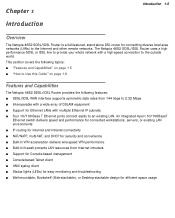
...; Support for Console-based management ■ Console-based Telnet client ■ UNIX syslog client ■ Status lights (LEDs) for easy monitoring and troubleshooting ■ Wall-mountable, Bookshelf (Side-stackable), or Desktop-stackable design for efficient space usage An integrated 4-port 10/100BaseT Ethernet switch delivers speed and performance for connected workstations, servers, or existing LAN environments ■ IP routing for Internet and Intranet connectivity ■ NAT/NATP, multi-NAT, and DHCP for security...
...; Support for Console-based management ■ Console-based Telnet client ■ UNIX syslog client ■ Status lights (LEDs) for easy monitoring and troubleshooting ■ Wall-mountable, Bookshelf (Side-stackable), or Desktop-stackable design for efficient space usage An integrated 4-port 10/100BaseT Ethernet switch delivers speed and performance for connected workstations, servers, or existing LAN environments ■ IP routing for Internet and Intranet connectivity ■ NAT/NATP, multi-NAT, and DHCP for security...

Getting Started Guide
Page 7
... install the Netopia 4652 in your router package are: ■ The Netopia 4652 SDSL/IDSL Router ■ A power adapter and cord with a mini-DIN8 connector ■ One Category 5 Ethernet cable ■ One Category 5 DSL WAN (or Line) cable ■ A DB-9 to the back of the unit for checking and changing cables ■ Cable length and network size limitations when expanding networks For small networks, install the Netopia 4652 near one of the LANs...
... install the Netopia 4652 in your router package are: ■ The Netopia 4652 SDSL/IDSL Router ■ A power adapter and cord with a mini-DIN8 connector ■ One Category 5 Ethernet cable ■ One Category 5 DSL WAN (or Line) cable ■ A DB-9 to the back of the unit for checking and changing cables ■ Cable length and network size limitations when expanding networks For small networks, install the Netopia 4652 near one of the LANs...

Getting Started Guide
Page 8
... electrical shock from lightning. 3. TELECOMMUNICATION INSTALLATION CAUTIONS When using a telephone (other than a cordless type) during an electrical storm. Do not use only with Ethernet connectivity for configuring the Netopia 4652. 2-8 Getting Started Guide You will need: ■ A Windows-based PC or a Macintosh computer with a CSA Certified or UL Listed Limited Power Source or Class 2 power supply, rated 12Vdc, 1.5A. CAUTION (North America...
... electrical shock from lightning. 3. TELECOMMUNICATION INSTALLATION CAUTIONS When using a telephone (other than a cordless type) during an electrical storm. Do not use only with Ethernet connectivity for configuring the Netopia 4652. 2-8 Getting Started Guide You will need: ■ A Windows-based PC or a Macintosh computer with a CSA Certified or UL Listed Limited Power Source or Class 2 power supply, rated 12Vdc, 1.5A. CAUTION (North America...

Getting Started Guide
Page 10
2-10 Getting Started Guide Netopia 4652 back panel DSL Ethernet 4 3 2 1 Console Power DSL port Ethernet ports Console port Power port . The Netopia 4652 supports connections to either connect your computer and the Netopia 4652 to an Ethernet port using a direct serial connection. For a new installation, use the console connection to run console-based management using the supplied Category 5 Ethernet cable, or connect both your computer directly to an existing LAN environment. Connect the mini-DIN8 connector from the power adapter to the power port, and plug the other ...
2-10 Getting Started Guide Netopia 4652 back panel DSL Ethernet 4 3 2 1 Console Power DSL port Ethernet ports Console port Power port . The Netopia 4652 supports connections to either connect your computer and the Netopia 4652 to an Ethernet port using a direct serial connection. For a new installation, use the console connection to run console-based management using the supplied Category 5 Ethernet cable, or connect both your computer directly to an existing LAN environment. Connect the mini-DIN8 connector from the power adapter to the power port, and plug the other ...

Getting Started Guide
Page 14
Connecting to an Ethernet Network You can connect a standard 10/100Base-T Ethernet network to the Netopia 4652 through the Ethernet ports, use standard Category 5 Ethernet cables with RJ-45 connectors. Netopia 4652 back panel DSL Ethernet 4 3 2 1 Console Power Ethernet ports The Netopia 4652 in place will be able to connect to the Internet or other remote IP networks. 3-14 Getting Started Guide Once the Netopia 4652 is properly configured and connected to your LAN, PC and Macintosh computers that have...
Connecting to an Ethernet Network You can connect a standard 10/100Base-T Ethernet network to the Netopia 4652 through the Ethernet ports, use standard Category 5 Ethernet cables with RJ-45 connectors. Netopia 4652 back panel DSL Ethernet 4 3 2 1 Console Power Ethernet ports The Netopia 4652 in place will be able to connect to the Internet or other remote IP networks. 3-14 Getting Started Guide Once the Netopia 4652 is properly configured and connected to your LAN, PC and Macintosh computers that have...

Getting Started Guide
Page 21
... use these instructions to configuring TCP/IP for dynamic addressing do the following : ■ You must have either Open Transport or Classic Networking (MacTCP) installed. Go to the Edit menu and select User Mode. Configuring TCP/IP in your Macintosh. Dynamic configuration (recommended) The Dynamic Host Configuration Protocol (DHCP), which enables dynamic addressing, is a quick guide...
... use these instructions to configuring TCP/IP for dynamic addressing do the following : ■ You must have either Open Transport or Classic Networking (MacTCP) installed. Go to the Edit menu and select User Mode. Configuring TCP/IP in your Macintosh. Dynamic configuration (recommended) The Dynamic Host Configuration Protocol (DHCP), which enables dynamic addressing, is a quick guide...

Getting Started Guide
Page 25
WAN Configuration... Quick View... minimal configuration. Easy Setup menus contain up and running quickly. Console-based management provides access to access the console-based management screens. Utilities & Diagnostics... Statistics & Logs... The number of features that the router supports. System Configuration... The entry points are displayed in the Main Menu shown below , see the Firmware User's Guide. ■ The WAN Configuration menu displays and permits changing your individual setup. Quick Menus... You can customize these values...
WAN Configuration... Quick View... minimal configuration. Easy Setup menus contain up and running quickly. Console-based management provides access to access the console-based management screens. Utilities & Diagnostics... Statistics & Logs... The number of features that the router supports. System Configuration... The entry points are displayed in the Main Menu shown below , see the Firmware User's Guide. ■ The WAN Configuration menu displays and permits changing your individual setup. Quick Menus... You can customize these values...
Getting Started Guide
Page 26
... the router. 5-26 Getting Started Guide may be configured through the console screens. For more than one service provider or remote site. ■ The System Configuration menus display and permit changing: ■ IP Setup ■ Filter Sets ■ IP Address Serving ■ Network Address Translation (NAT) ■ Date and Time ■ Console Configuration ■ SNMP (Simple Network Management Protocol) ■ Security ■ Upgrade Feature Set ■ Change Device to a Bridge ■ Logging...
... the router. 5-26 Getting Started Guide may be configured through the console screens. For more than one service provider or remote site. ■ The System Configuration menus display and permit changing: ■ IP Setup ■ Filter Sets ■ IP Address Serving ■ Network Address Translation (NAT) ■ Date and Time ■ Console Configuration ■ SNMP (Simple Network Management Protocol) ■ Security ■ Upgrade Feature Set ■ Change Device to a Bridge ■ Logging...
Getting Started Guide
Page 27
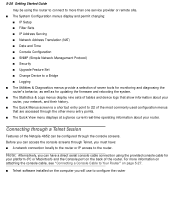
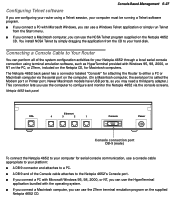
... provided with Microsoft Windows, you can use the computer to your hard disk. You install NCSA Telnet by simply dragging the application from the Start menu. ■ If you connect a Macintosh computer, you can use the ZTerm terminal emulation program on the Netopia 4652 CD. Netopia 4652 back panel DSL Ethernet 4 3 2 1 Console Power Console connection port DB-9 (male) To connect the Netopia 4652 to your computer for serial console communication, use a console cable appropriate to...
... provided with Microsoft Windows, you can use the computer to your hard disk. You install NCSA Telnet by simply dragging the application from the Start menu. ■ If you connect a Macintosh computer, you can use the ZTerm terminal emulation program on the Netopia 4652 CD. Netopia 4652 back panel DSL Ethernet 4 3 2 1 Console Power Console connection port DB-9 (male) To connect the Netopia 4652 to your computer for serial console communication, use a console cable appropriate to...
Getting Started Guide
Page 28
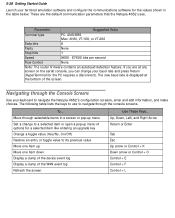
... open a pop-up menu of options for the values shown in a screen or pop-up menu Set a change your baud rate and press Return (HyperTerminal for the PC requires a disconnect). To... 5-28 Getting Started Guide Launch your terminal emulation software and configure the communications software for a selected item like entering an upgrade key Change a toggle value (Yes/No, On/Off) Restore...
... open a pop-up menu of options for the values shown in a screen or pop-up menu Set a change your baud rate and press Return (HyperTerminal for the PC requires a disconnect). To... 5-28 Getting Started Guide Launch your terminal emulation software and configure the communications software for a selected item like entering an upgrade key Change a toggle value (Yes/No, On/Off) Restore...

Getting Started Guide
Page 29
Easy Setup Console Screens Using four Easy Setup console screens, you for the connection to your ISP or remote location ■ Set up IP addresses and IP address serving ■ Password-protect configuration access to your Netopia 4652 Accessing the Easy Setup console screens To access the console screens, Telnet to the Netopia Router over your Ethernet network or physically connect with a serial console cable and access the Netopia Router with a terminal emulation program. See "Connecting through a Telnet Session...
Easy Setup Console Screens Using four Easy Setup console screens, you for the connection to your ISP or remote location ■ Set up IP addresses and IP address serving ■ Password-protect configuration access to your Netopia 4652 Accessing the Easy Setup console screens To access the console screens, Telnet to the Netopia Router over your Ethernet network or physically connect with a serial console cable and access the Netopia Router with a terminal emulation program. See "Connecting through a Telnet Session...
Getting Started Guide
Page 30
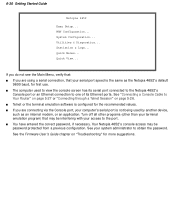
... "Connecting a Console Cable to one of its Ethernet ports. 6-30 Getting Started Guide Netopia 4652 Easy Setup... Statistics & Logs... Your Netopia 4652's console access may be password protected from a previous configuration. See the Firmware User's Guide chapter on page 5-26. ■ Telnet or the terminal emulation software is not being used to view the console screen has its serial port connected to the Netopia 4652's Console port or an Ethernet connection to Your Router" on page 5-27 or "Connecting through a Telnet Session...
... "Connecting a Console Cable to one of its Ethernet ports. 6-30 Getting Started Guide Netopia 4652 Easy Setup... Statistics & Logs... Your Netopia 4652's console access may be password protected from a previous configuration. See the Firmware User's Guide chapter on page 5-26. ■ Telnet or the terminal emulation software is not being used to view the console screen has its serial port connected to the Netopia 4652's Console port or an Ethernet connection to Your Router" on page 5-27 or "Connecting through a Telnet Session...
Getting Started Guide
Page 31
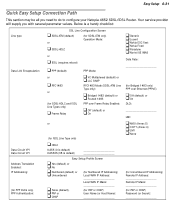
... over Ethernet (PPPoE) ❑ Off (default) or ❑ On DLCI LMI: ❑ ANSI (Annex D) ❑ CCITT (Annex A) ❑ LMI ❑ None (for Unnumbered IP Addressing) Remote IP Address Remote IP Mask for PAP or CHAP) Password (or Secret Your service provider will supply you need to do to configure your Netopia 4652 SDSL/IDSL Router. Easy Setup 6-31 Quick Easy Setup Connection Path This...
... over Ethernet (PPPoE) ❑ Off (default) or ❑ On DLCI LMI: ❑ ANSI (Annex D) ❑ CCITT (Annex A) ❑ LMI ❑ None (for Unnumbered IP Addressing) Remote IP Address Remote IP Mask for PAP or CHAP) Password (or Secret Your service provider will supply you need to do to configure your Netopia 4652 SDSL/IDSL Router. Easy Setup 6-31 Quick Easy Setup Connection Path This...
Getting Started Guide
Page 32
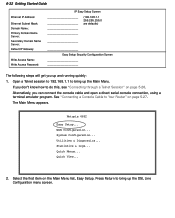
... Name Ser ver: Default IP Gateway: Write Access Name: Write Access Password: IP Easy Setup Screen (192.168.1.1 255.255.255.0 are defaults) Easy Setup Security Configuration Screen The following steps will get you up the DSL Line Configuration menu screen. System Configuration... Press Return to bring up and running quickly: 1. If you can connect the console cable and open a direct serial console connection, using a terminal emulator program...
... Name Ser ver: Default IP Gateway: Write Access Name: Write Access Password: IP Easy Setup Screen (192.168.1.1 255.255.255.0 are defaults) Easy Setup Security Configuration Screen The following steps will get you up the DSL Line Configuration menu screen. System Configuration... Press Return to bring up and running quickly: 1. If you can connect the console cable and open a direct serial console connection, using a terminal emulator program...

Getting Started Guide
Page 35
.... Enter the Virtual Path Identifier and Virtual Channel Identifier values that control the Netopia 4652's connection to 15 more information on Network Address Translation, see the Firmware User's Guide chapter on the settings in the previous screen. 1. To enable address translation, toggle Address Translation Enabled to enter a DLCI value (16 is the default for a total of this screen varies, depending on "Multiple Network Address Translation (MultiNAT...
.... Enter the Virtual Path Identifier and Virtual Channel Identifier values that control the Netopia 4652's connection to 15 more information on Network Address Translation, see the Firmware User's Guide chapter on the settings in the previous screen. 1. To enable address translation, toggle Address Translation Enabled to enter a DLCI value (16 is the default for a total of this screen varies, depending on "Multiple Network Address Translation (MultiNAT...

Getting Started Guide
Page 36
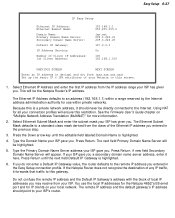
... Netopia Router's: ■ Ethernet IP address ■ Ethernet Subnet mask ■ Domain Name ■ Domain Name Server IP address ■ Default gateway IP address Consult with your ISP gave you will need. However, you can enter another specific address if you want to obtain the information you . Enter the mask address your network administrator to use static addressing. If you selected PPP data link encapsulation...
... Netopia Router's: ■ Ethernet IP address ■ Ethernet Subnet mask ■ Domain Name ■ Domain Name Server IP address ■ Default gateway IP address Consult with your ISP gave you will need. However, you can enter another specific address if you want to obtain the information you . Enter the mask address your network administrator to use static addressing. If you selected PPP data link encapsulation...
Getting Started Guide
Page 37
... of the Ethernet IP address you entered in the Easy Setup connection profile. Because this screen. 1. Press the Down arrow key until the next field Default IP Gateway is highlighted. 6. You use within a range reserved by the Internet address administration authority for all your ISP gave you a secondary domain name server address, enter it should point to the remote IP address you entered...
... of the Ethernet IP address you entered in the Easy Setup connection profile. Because this screen. 1. Press the Down arrow key until the next field Default IP Gateway is highlighted. 6. You use within a range reserved by the Internet address administration authority for all your ISP gave you a secondary domain name server address, enter it should point to the remote IP address you entered...

Getting Started Guide
Page 38
..., access via serial, Telnet, and SNMP will provide 100 IP addresses automatically to workstations on your LAN can also restart the system at any of Client IP Addresses if you have specified every time you will be password-protected. Select RESTART DEVICE. Normally, you configure this if you have typed here, because you log in the Utilities and Diagnostics menu, or by turning...
..., access via serial, Telnet, and SNMP will provide 100 IP addresses automatically to workstations on your LAN can also restart the system at any of Client IP Addresses if you have specified every time you will be password-protected. Select RESTART DEVICE. Normally, you configure this if you have typed here, because you log in the Utilities and Diagnostics menu, or by turning...

Getting Started Guide
Page 41
... internal flash memory; field upgrades done via download to internal flash memory via XMODEM or TFTP Routing: TCP/IP Internet Protocol Suite, RIP WAN support: PPP, HDLC, ATM, Frame Relay Security: PAP, CHAP, MS-CHAP, IP firewalls, and UI password security SNMP network management: SNMPv1, MIB-II (RFC 1213), Interface MIB (RFC 1229), Ethernet MIB (RFC 1643), Netopia 4652 MIB, SNMPv2. and a DB-9 Console port.
... internal flash memory; field upgrades done via download to internal flash memory via XMODEM or TFTP Routing: TCP/IP Internet Protocol Suite, RIP WAN support: PPP, HDLC, ATM, Frame Relay Security: PAP, CHAP, MS-CHAP, IP firewalls, and UI password security SNMP network management: SNMPv1, MIB-II (RFC 1213), Interface MIB (RFC 1229), Ethernet MIB (RFC 1643), Netopia 4652 MIB, SNMPv2. and a DB-9 Console port.


