User Guide
Page 1
... NOT REMOVE COVER (OR BACK). The user could lose the authority to operate this equipment if an unauthorized change or modification is intended to alert the user to the presence of uninsulated dangerous voltage within an equilateral triangle is a trademark of electric shock to this equipment may generate or use radio frequency energy. REFER SERVICING TO QUALIFIED SERVICE PERSONNEL...
... NOT REMOVE COVER (OR BACK). The user could lose the authority to operate this equipment if an unauthorized change or modification is intended to alert the user to the presence of uninsulated dangerous voltage within an equilateral triangle is a trademark of electric shock to this equipment may generate or use radio frequency energy. REFER SERVICING TO QUALIFIED SERVICE PERSONNEL...
User Guide
Page 2
... NMB-003 du Canada. 2 This Class B digital apparatus complies with Class B digital device regulations. SURGE PROTECTORS: It is recommended to use a surge protector for this equipment does cause harmful interference to radio or television reception, which can radiate radio frequency energy and, if not installed and used in accordance with the instructions, may cause harmful interference to which the...
... NMB-003 du Canada. 2 This Class B digital apparatus complies with Class B digital device regulations. SURGE PROTECTORS: It is recommended to use a surge protector for this equipment does cause harmful interference to radio or television reception, which can radiate radio frequency energy and, if not installed and used in accordance with the instructions, may cause harmful interference to which the...
User Guide
Page 3
... fun and excitement your hearing. We Want You Listening For A Lifetime Used wisely, your new sound equipment will help to higher volumes of the Deafness Research Foundation. 3 We Want You LISTENING For A Lifetime ELECTR N NIC O IND U EIA EST. 1924 S SO C I A TIO Dear Customer: Selecting fine audio equipment such as the unit you've just purchased is only...
... fun and excitement your hearing. We Want You Listening For A Lifetime Used wisely, your new sound equipment will help to higher volumes of the Deafness Research Foundation. 3 We Want You LISTENING For A Lifetime ELECTR N NIC O IND U EIA EST. 1924 S SO C I A TIO Dear Customer: Selecting fine audio equipment such as the unit you've just purchased is only...
User Guide
Page 4
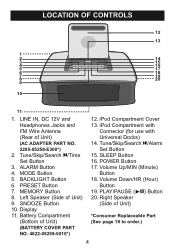
... Set Button 15. POWER Button 17. Volume Up/MIN (Minute) Button 18. PRESET Button 7. PLAY/PAUSE (®p) Button 20. MEMORY Button 8. Left Speaker (Side of Unit) (AC ADAPTER PART NO. 2295-05258-E300*) 2. Display 11. iPod Compartment Cover 13. SLEEP Button 16. LINE IN, DC 12V and Headphones Jacks and FM Wire Antenna (Rear of Unit) 9. iPod Compartment with Connector (for use with Universal Docks) 14. LOCATION OF CONTROLS 12...
... Set Button 15. POWER Button 17. Volume Up/MIN (Minute) Button 18. PRESET Button 7. PLAY/PAUSE (®p) Button 20. MEMORY Button 8. Left Speaker (Side of Unit) (AC ADAPTER PART NO. 2295-05258-E300*) 2. Display 11. iPod Compartment Cover 13. SLEEP Button 16. LINE IN, DC 12V and Headphones Jacks and FM Wire Antenna (Rear of Unit) 9. iPod Compartment with Connector (for use with Universal Docks) 14. LOCATION OF CONTROLS 12...
User Guide
Page 5
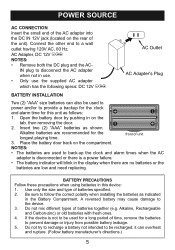
... this device: 1. Open the battery door by pushing in the display when there are no batteries or the batteries are used to back-up the clock and alarm times when the AC adapter is disconnected or there is not to follow the correct polarity when installing the batteries as shown. NOTES: • The batteries are low and need replacing. Alkaline, Rechargeable and Carbon-zinc) or old batteries...
... this device: 1. Open the battery door by pushing in the display when there are no batteries or the batteries are used to back-up the clock and alarm times when the AC adapter is disconnected or there is not to follow the correct polarity when installing the batteries as shown. NOTES: • The batteries are low and need replacing. Alkaline, Rechargeable and Carbon-zinc) or old batteries...

User Guide
Page 6
... unit is connected, this unit will change to select LINE IN mode; OPENING THE iPod COMPARTMENT COVER Press the rear center of this unit's speakers. Repeatedly press the MODE button to LINE IN mode automatically. "LINE IN" will appear in the display. iPod will appear in the display. OPTIONAL CONNECTION LINE IN JACK (REAR OF UNIT) Insert one end of the audio cable (not included...
... unit is connected, this unit will change to select LINE IN mode; OPENING THE iPod COMPARTMENT COVER Press the rear center of this unit's speakers. Repeatedly press the MODE button to LINE IN mode automatically. "LINE IN" will appear in the display. iPod will appear in the display. OPTIONAL CONNECTION LINE IN JACK (REAR OF UNIT) Insert one end of the audio cable (not included...
User Guide
Page 7
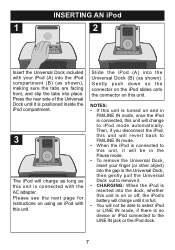
... unit is on or off, the iPod's battery will charge until it is full. • You will not be able to select iPod or LINE IN mode, if there is connected, this unit is turned on and in the Pause mode. • To remove the Universal Dock, insert your iPod (A) into... place. Gently push down so the connector on the iPod slides onto the connector on using an iPod with this unit. INSERTING AN iPod 1 2 (B) (A) (B) (A) Insert the Universal Dock included with the AC adapter. Please see the next page for instructions...
... unit is on or off, the iPod's battery will charge until it is full. • You will not be able to select iPod or LINE IN mode, if there is connected, this unit is turned on and in the Pause mode. • To remove the Universal Dock, insert your iPod (A) into... place. Gently push down so the connector on the iPod slides onto the connector on using an iPod with this unit. INSERTING AN iPod 1 2 (B) (A) (B) (A) Insert the Universal Dock included with the AC adapter. Please see the next page for instructions...
User Guide
Page 8
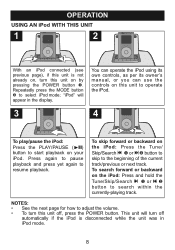
... the display. Repeatedly press the MODE button 2 to resume playback. To skip forward or backward on your iPod. To search forward or backward on by pressing the POWER button 1. "iPod" will turn off automatically if the iPod is not already on, turn this unit on the iPod: Press and hold the Tune/Skip/Search o 1 or n 2 button to adjust the volume. • To turn...
... the display. Repeatedly press the MODE button 2 to resume playback. To skip forward or backward on your iPod. To search forward or backward on by pressing the POWER button 1. "iPod" will turn off automatically if the iPod is not already on, turn this unit on the iPod: Press and hold the Tune/Skip/Search o 1 or n 2 button to adjust the volume. • To turn...
User Guide
Page 9
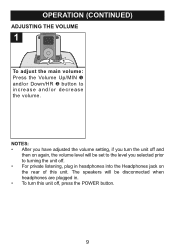
The speakers will be disconnected when headphones are plugged in headphones into the Headphones jack on the rear of this unit off, press the POWER button. 9 OPERATION (CONTINUED) ADJUSTING THE VOLUME 1 2 1 To adjust the main volume: Press the Volume Up/MIN 1 and/or Down/HR 2 button to turning the unit off. • For private listening, plug in . • To turn this unit. NOTES: • After you have adjusted the volume setting, if you turn the unit off and then on again, the volume level will be set to the level you selected prior to increase and/or decrease the volume.
The speakers will be disconnected when headphones are plugged in headphones into the Headphones jack on the rear of this unit off, press the POWER button. 9 OPERATION (CONTINUED) ADJUSTING THE VOLUME 1 2 1 To adjust the main volume: Press the Volume Up/MIN 1 and/or Down/HR 2 button to turning the unit off. • For private listening, plug in . • To turn this unit. NOTES: • After you have adjusted the volume setting, if you turn the unit off and then on again, the volume level will be set to the level you selected prior to increase and/or decrease the volume.

User Guide
Page 10
... actual time will appear in the display. 3 1 2 Repeatedly press the Tune/ Skip/Search o 1 or n 2 button to adjust the volume. • To turn this step until the desired frequency appears in the display up or down until the frequency in the display. • See the previous page for best reception. 10 OPERATION (CONTINUED) USING THE RADIO 1 2 Turn this unit on the next strong station...
... actual time will appear in the display. 3 1 2 Repeatedly press the Tune/ Skip/Search o 1 or n 2 button to adjust the volume. • To turn this step until the desired frequency appears in the display up or down until the frequency in the display. • See the previous page for best reception. 10 OPERATION (CONTINUED) USING THE RADIO 1 2 Turn this unit on the next strong station...
User Guide
Page 11
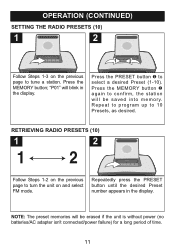
... on and select FM mode. RETRIEVING RADIO PRESETS (10) 1 2 Follow Steps 1-2 on the previous page to tune a station. Repeatedly press the PRESET button until the desired Preset number appears in the display. OPERATION (CONTINUED) SETTING THE RADIO PRESETS (10) 1 2 1 2 Follow Steps 1-3 on the previous page to confirm, the station will be erased if the unit is without power (no batteries/AC adapter isn't connected/power failure) for a long period of time. 11
... on and select FM mode. RETRIEVING RADIO PRESETS (10) 1 2 Follow Steps 1-2 on the previous page to tune a station. Repeatedly press the PRESET button until the desired Preset number appears in the display. OPERATION (CONTINUED) SETTING THE RADIO PRESETS (10) 1 2 1 2 Follow Steps 1-3 on the previous page to confirm, the station will be erased if the unit is without power (no batteries/AC adapter isn't connected/power failure) for a long period of time. 11
User Guide
Page 12
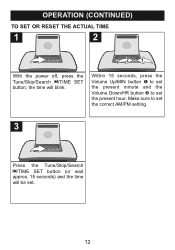
Make sure to set . 12 the time will be set the present hour. OPERATION (CONTINUED) TO SET OR RESET THE ACTUAL TIME 1 2 2 1 With the power off, press the Tune/Skip/Search o/TIME SET button; Within 15 seconds, press the Volume Up/MIN button 1 to set the present minute and the Volume Down/HR button 2 to set the correct AM/PM setting. 3 Press the Tune/Skip/Search o/TIME SET button (or wait approx. 15 seconds) and the time will blink.
Make sure to set . 12 the time will be set the present hour. OPERATION (CONTINUED) TO SET OR RESET THE ACTUAL TIME 1 2 2 1 With the power off, press the Tune/Skip/Search o/TIME SET button; Within 15 seconds, press the Volume Up/MIN button 1 to set the present minute and the Volume Down/HR button 2 to set the correct AM/PM setting. 3 Press the Tune/Skip/Search o/TIME SET button (or wait approx. 15 seconds) and the time will blink.
User Guide
Page 13
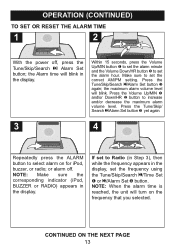
... display. Make sure to set the correct AM/PM setting. the Alarm time will blink. NOTE: When the alarm time is reached, the unit will turn on for iPod, buzzer, or radio; If set the frequency using the Tune/Skip/Search o/Time Set 1 or n/Alarm Set 2 button. OPERATION (CONTINUED) TO SET OR RESET THE ALARM TIME 1 2 3 2 1 With the power off . Press the Volume Up/MIN 1 and/or Down/HR 2 button to Radio...
... display. Make sure to set the correct AM/PM setting. the Alarm time will blink. NOTE: When the alarm time is reached, the unit will turn on for iPod, buzzer, or radio; If set the frequency using the Tune/Skip/Search o/Time Set 1 or n/Alarm Set 2 button. OPERATION (CONTINUED) TO SET OR RESET THE ALARM TIME 1 2 3 2 1 With the power off . Press the Volume Up/MIN 1 and/or Down/HR 2 button to Radio...
User Guide
Page 14
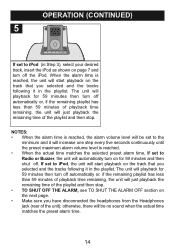
... minutes of playback time remaining, the unit will automatically turn on page 7 and turn off automatically or, if the remaining playlist has less than 59 minutes of playback time remaining, the unit will be set to iPod, the unit will be no sound when the actual time matches the preset alarm time. 14 When the alarm time is reached, the unit will start playback on...
... minutes of playback time remaining, the unit will automatically turn on page 7 and turn off automatically or, if the remaining playlist has less than 59 minutes of playback time remaining, the unit will be set to iPod, the unit will be no sound when the actual time matches the preset alarm time. 14 When the alarm time is reached, the unit will start playback on...
User Guide
Page 15
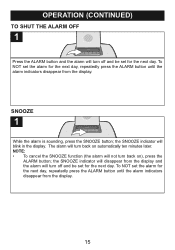
... indicator will disappear from the display and the alarm will turn off and be set for the next day. OPERATION (CONTINUED) TO SHUT THE ALARM OFF 1 Press the ALARM button and the alarm will turn off and be set for the next day. To NOT set the alarm for the next day, repeatedly press the ALARM button until the alarm indicators...
... indicator will disappear from the display and the alarm will turn off and be set for the next day. OPERATION (CONTINUED) TO SHUT THE ALARM OFF 1 Press the ALARM button and the alarm will turn off and be set for the next day. To NOT set the alarm for the next day, repeatedly press the ALARM button until the alarm indicators...
User Guide
Page 16
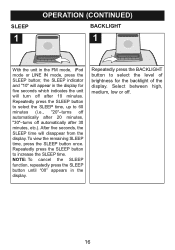
... cancel the SLEEP function, repeatedly press the SLEEP button until "00" appears in the display for the backlight of the display. To view the remaining SLEEP time, press the SLEEP button once. SLEEP 1 OPERATION (CONTINUED) BACKLIGHT 1 With the unit in the FM mode, iPod mode or LINE IN mode, press the SLEEP button; Repeatedly press the SLEEP button to select the level of...
... cancel the SLEEP function, repeatedly press the SLEEP button until "00" appears in the display for the backlight of the display. To view the remaining SLEEP time, press the SLEEP button once. SLEEP 1 OPERATION (CONTINUED) BACKLIGHT 1 With the unit in the FM mode, iPod mode or LINE IN mode, press the SLEEP button; Repeatedly press the SLEEP button to select the level of...
User Guide
Page 17
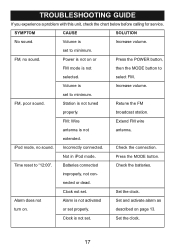
... as turn on. Incorrectly connected. Press the MODE button. Set the clock. Not in iPod mode. Alarm does not Alarm is not antenna. set . FM, poor sound. iPod mode, no sound. Time reset to selected. improperly, not con- or set . Clock not set properly. Clock is Increase volume. Volume is not set to minimum. extended. Batteries connected Check the batteries. TROUBLESHOOTING GUIDE If you experience a problem with this unit, check the chart below before calling for service. Volume...
... as turn on. Incorrectly connected. Press the MODE button. Set the clock. Not in iPod mode. Alarm does not Alarm is not antenna. set . FM, poor sound. iPod mode, no sound. Time reset to selected. improperly, not con- or set . Clock not set properly. Clock is Increase volume. Volume is not set to minimum. extended. Batteries connected Check the batteries. TROUBLESHOOTING GUIDE If you experience a problem with this unit, check the chart below before calling for service. Volume...
User Guide
Page 18
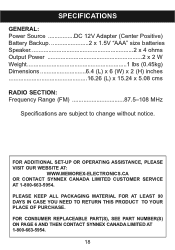
... "AAA" size batteries Speaker 2 x 4 ohms Output Power 2 x 2 W Weight 1 lbs (0.45kg) Dimensions 6.4 (L) x 6 (W) x 2 (H) inches 16.26 (L) x 15.24 x 5.08 cms RADIO SECTION: Frequency Range (FM 87.5-108 MHz Specifications are subject to change without notice. FOR CONSUMER REPLACEABLE PART(S), SEE PART NUMBER(S) ON PAGE 6 AND THEN CONTACT SYNNEX CANADA LIMITED AT 1-800-663-5954. 18 FOR ADDITIONAL SET-UP OR OPERATING ASSISTANCE, PLEASE VISIT...
... "AAA" size batteries Speaker 2 x 4 ohms Output Power 2 x 2 W Weight 1 lbs (0.45kg) Dimensions 6.4 (L) x 6 (W) x 2 (H) inches 16.26 (L) x 15.24 x 5.08 cms RADIO SECTION: Frequency Range (FM 87.5-108 MHz Specifications are subject to change without notice. FOR CONSUMER REPLACEABLE PART(S), SEE PART NUMBER(S) ON PAGE 6 AND THEN CONTACT SYNNEX CANADA LIMITED AT 1-800-663-5954. 18 FOR ADDITIONAL SET-UP OR OPERATING ASSISTANCE, PLEASE VISIT...
User Guide
Page 19
... apply to extend, enlarge or transfer this warranty - Any installation, setup and/or programming charges. g. Replacement parts furnished in connection with respect to Friday 9:00am - 5:00pm Eastern Time. 03.2008 19 d. This warranty constitutes the entire express warranty granted by normal wear and tear. CARRY-IN PARTS & LABOUR WARRANTY PERIODS: • LCD & Plasma Display TV: 1 Year (Remote Control - 90 Days) • Boom...
... apply to extend, enlarge or transfer this warranty - Any installation, setup and/or programming charges. g. Replacement parts furnished in connection with respect to Friday 9:00am - 5:00pm Eastern Time. 03.2008 19 d. This warranty constitutes the entire express warranty granted by normal wear and tear. CARRY-IN PARTS & LABOUR WARRANTY PERIODS: • LCD & Plasma Display TV: 1 Year (Remote Control - 90 Days) • Boom...


