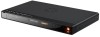
User Guide
Page 3
... for class II (Double Insulation) CAUTION: THIS DIGITAL VIDEO DISC PLAYER EMPLOYS A LASER SYSTEM. TO ENSURE PROPER USE OF THIS PRODUCT, PLEASE READ THIS OWNER'S MANUAL CAREFULLY AND RETAIN FOR FUTURE REFERENCE. FCC NOTICE: This equipment has been tested and found to part 15 of the FCC Rules. However, there is...
... for class II (Double Insulation) CAUTION: THIS DIGITAL VIDEO DISC PLAYER EMPLOYS A LASER SYSTEM. TO ENSURE PROPER USE OF THIS PRODUCT, PLEASE READ THIS OWNER'S MANUAL CAREFULLY AND RETAIN FOR FUTURE REFERENCE. FCC NOTICE: This equipment has been tested and found to part 15 of the FCC Rules. However, there is...
User Guide
Page 6
...quickly be connected to the internet as DVD, allowing for a particular application. there are available, for extreme high quality audio in this manual. • "BD-J" Mode "BD-J" mode was designed to accompany High Definition video. The Video Distribution format was designed to take ..., trivia games, etc. "BD-J" offers content providers almost unlimited functionality when creating interactive BD-ROM titles. Please read the owner's manual to offer exciting new features, while keeping the authoring process as simple as buttons or menus. The BD-ROM format supports Java for...
...quickly be connected to the internet as DVD, allowing for a particular application. there are available, for extreme high quality audio in this manual. • "BD-J" Mode "BD-J" mode was designed to accompany High Definition video. The Video Distribution format was designed to take ..., trivia games, etc. "BD-J" offers content providers almost unlimited functionality when creating interactive BD-ROM titles. Please read the owner's manual to offer exciting new features, while keeping the authoring process as simple as buttons or menus. The BD-ROM format supports Java for...
User Guide
Page 10
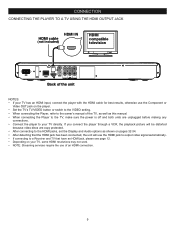
... on the player. • Set the TV's TV/VIDEO button or switch to the VIDEO setting. • When connecting the Player, refer to the owner's manual of the TV, as well as shown on pages 32-34. • After detecting that the HDMI jack has been connected, the unit will be... distorted because video discs are copy protected. • After connecting to the HDMI jacks, set the Display and Audio options as this manual. • When connecting the Player to the TV, make sure the power is off and both units are unplugged before making any connections. • Connect...
... on the player. • Set the TV's TV/VIDEO button or switch to the VIDEO setting. • When connecting the Player, refer to the owner's manual of the TV, as well as shown on pages 32-34. • After detecting that the HDMI jack has been connected, the unit will be... distorted because video discs are copy protected. • After connecting to the HDMI jacks, set the Display and Audio options as this manual. • When connecting the Player to the TV, make sure the power is off and both units are unplugged before making any connections. • Connect...
User Guide
Page 11
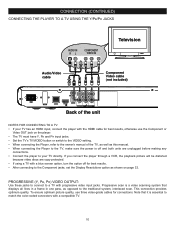
This connection provides optimum quality. Note that displays all lines in a frame in one pass, as this manual. • When connecting the Player to the TV, make sure the power is essential to a TV with a compatible TV. 10 CONNECTION (CONTINUED) CONNECTING THE PLAYER ... Pr input jacks. • Set the TV's TV/VIDEO button or switch to the VIDEO setting. • When connecting the Player, refer to the owner's manual of the TV, as well as opposed to the traditional system, interlaced scan. PROGRESSIVE (Y, Pb, Pr) VIDEO OUTPUT: Use these jacks to connect to match...
This connection provides optimum quality. Note that displays all lines in a frame in one pass, as this manual. • When connecting the Player to the TV, make sure the power is essential to a TV with a compatible TV. 10 CONNECTION (CONTINUED) CONNECTING THE PLAYER ... Pr input jacks. • Set the TV's TV/VIDEO button or switch to the VIDEO setting. • When connecting the Player, refer to the owner's manual of the TV, as well as opposed to the traditional system, interlaced scan. PROGRESSIVE (Y, Pb, Pr) VIDEO OUTPUT: Use these jacks to connect to match...
User Guide
Page 12
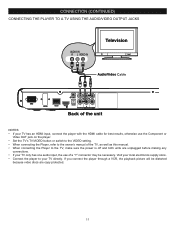
... on the player. • Set the TV's TV/VIDEO button or switch to the VIDEO setting. • When connecting the Player, refer to the owner's manual of a "Y" connector may be necessary. Visit your local electronics supply store. • Connect the player to the TV, make sure the power is off and... your TV has an HDMI input, connect the player with the HDMI cable for best results, otherwise use of the TV, as well as this manual. • When connecting the Player to your TV directly.
... on the player. • Set the TV's TV/VIDEO button or switch to the VIDEO setting. • When connecting the Player, refer to the owner's manual of a "Y" connector may be necessary. Visit your local electronics supply store. • Connect the player to the TV, make sure the power is off and... your TV has an HDMI input, connect the player with the HDMI cable for best results, otherwise use of the TV, as well as this manual. • When connecting the Player to your TV directly.
User Guide
Page 13
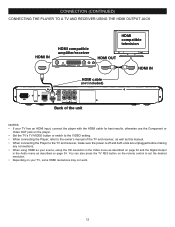
...; Set the TV's TV/VIDEO button or switch to the VIDEO setting. • When connecting the Player, refer to the owner's manual of the TV and receiver, as well as this manual. • When connecting the Player to set the desired resolution. • Depending on your source, setup the HD resolution in...
...; Set the TV's TV/VIDEO button or switch to the VIDEO setting. • When connecting the Player, refer to the owner's manual of the TV and receiver, as well as this manual. • When connecting the Player to set the desired resolution. • Depending on your source, setup the HD resolution in...
User Guide
Page 14
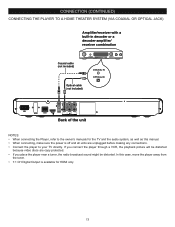
In this manual. • When connecting, make sure the power is available for HDMI only. 13 CONNECTION (CONTINUED) CONNECTING THE PLAYER TO A HOME THEATER SYSTEM (VIA COAXIAL OR ... cable (not included) Optical cable (not included) COAXIAL IN OPTICAL IN Back of the unit NOTES: • When connecting the Player, refer to the owner's manuals for the TV and the audio system, as well as this case, move the player away from the tuner. • 7.1 CH Digital Output is off...
In this manual. • When connecting, make sure the power is available for HDMI only. 13 CONNECTION (CONTINUED) CONNECTING THE PLAYER TO A HOME THEATER SYSTEM (VIA COAXIAL OR ... cable (not included) Optical cable (not included) COAXIAL IN OPTICAL IN Back of the unit NOTES: • When connecting the Player, refer to the owner's manuals for the TV and the audio system, as well as this case, move the player away from the tuner. • 7.1 CH Digital Output is off...
User Guide
Page 17
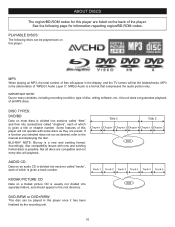
... the display, and the TV screen will not operate with new and existing format discs is a new and exciting format. IMPORTANT NOTE: Due to the manual accompanying the disc. DISC TYPES: DVD/BD Data on this player: MP3 When playing an MP3, the total number of files will appear in this...
... the display, and the TV screen will not operate with new and existing format discs is a new and exciting format. IMPORTANT NOTE: Due to the manual accompanying the disc. DISC TYPES: DVD/BD Data on this player: MP3 When playing an MP3, the total number of files will appear in this...
User Guide
Page 18
...the disc that are different for each disc, so they were purchased from these discs will roll vertically. Use of this player, this owner's manual. This product incorporates copyright protection technology that is prohibited. If the Region number described on the disc does not correspond to the NTSC and PAL... color systems. However, if you read the manual that accompanies the disc, as shown on page 32. You may not be used with certain discs. This player conforms to the Region number ...
...the disc that are different for each disc, so they were purchased from these discs will roll vertically. Use of this player, this owner's manual. This product incorporates copyright protection technology that is prohibited. If the Region number described on the disc does not correspond to the NTSC and PAL... color systems. However, if you read the manual that accompanies the disc, as shown on page 32. You may not be used with certain discs. This player conforms to the Region number ...
User Guide
Page 19
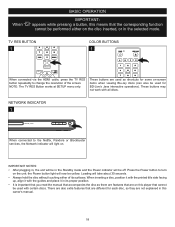
...facing up, align it with the guides and place it in the selected mode. BASIC OPERATION When " IMPORTANT: " appears while pressing a button, this owner's manual. 18 A B C D TV RES BUTTON 1 CLEAR SEARCH ANGLE TV RES. REW F.F NEXT STEP SUBTITLE AUDIO RANDOM A-B REPEAT When connected to change the ...resolution of its proper position. • It is important that you read the manual that the corresponding function caPOnWERnot be performed OPEN/CLOSE either of the screen. Loading will light on the unit;
...facing up, align it with the guides and place it in the selected mode. BASIC OPERATION When " IMPORTANT: " appears while pressing a button, this owner's manual. 18 A B C D TV RES BUTTON 1 CLEAR SEARCH ANGLE TV RES. REW F.F NEXT STEP SUBTITLE AUDIO RANDOM A-B REPEAT When connected to change the ...resolution of its proper position. • It is important that you read the manual that the corresponding function caPOnWERnot be performed OPEN/CLOSE either of the screen. Loading will light on the unit;

User Guide
Page 40
...960;,†) buttons and then press the Navigation (®) button. MAC Address: This will appear. Select Dynamic to use the DHCP to manually configure network settings, such as Software Version, Software Date, Hardware Version, etc. INFORMATION SETUP MENU: To enter the Network Setup menu, ...unit will appear. If the test fails, double-check your Ethernet cable connection, wireless router, IP settings, or contact your ISP provider. MANUAL NETWORK SETUP Link Status: If the network connection is not active, "Link Down" displays below Link Status. Select Info using the Navigation ...
...960;,†) buttons and then press the Navigation (®) button. MAC Address: This will appear. Select Dynamic to use the DHCP to manually configure network settings, such as Software Version, Software Date, Hardware Version, etc. INFORMATION SETUP MENU: To enter the Network Setup menu, ...unit will appear. If the test fails, double-check your Ethernet cable connection, wireless router, IP settings, or contact your ISP provider. MANUAL NETWORK SETUP Link Status: If the network connection is not active, "Link Down" displays below Link Status. Select Info using the Navigation ...
User Guide
Page 42
... . b The wireless network supports 802.11b. n The wireless network supports 802.11n (supported at the Setup screen press the HOME/SETUP button, select Settings using Manual IP Configuration. Select POWER Network OPEN/CLOSE using the Navigation (π,†) buttons 1, then press the Navigation (®) button 2 to act as a Shift in , you...
... . b The wireless network supports 802.11b. n The wireless network supports 802.11n (supported at the Setup screen press the HOME/SETUP button, select Settings using Manual IP Configuration. Select POWER Network OPEN/CLOSE using the Navigation (π,†) buttons 1, then press the Navigation (®) button 2 to act as a Shift in , you...

User Guide
Page 43
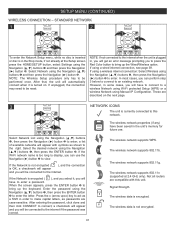
...) WIRELESS CONNECCLEARTION - RANDOM A-B REPEAT Select Network List using the Navigation (π,†) buttons, then press the ENTER button. Select Manual using the Navigation (π,†) buttons 1, then press the ENTER button 3. RtEWhe pF.FrevNiEoXTus page. Select the desired network using... Protected Setup (WPS) STEP SUBTITLE AUDIO using the Navigation (π,†) buttons, then press the ENTER button. sensitive. the manual setup box wil appear. NOTE: In any of the non-broadcasting network) using the Navigation (π,†) buttons 1, then press...
...) WIRELESS CONNECCLEARTION - RANDOM A-B REPEAT Select Network List using the Navigation (π,†) buttons, then press the ENTER button. Select Manual using the Navigation (π,†) buttons 1, then press the ENTER button 3. RtEWhe pF.FrevNiEoXTus page. Select the desired network using... Protected Setup (WPS) STEP SUBTITLE AUDIO using the Navigation (π,†) buttons, then press the ENTER button. sensitive. the manual setup box wil appear. NOTE: In any of the non-broadcasting network) using the Navigation (π,†) buttons 1, then press...

User Guide
Page 46
... The batteries are not available on some discs. Distance is too far or there is off . There is dimmed) in . Plug in this manual. Turn the TV on page 16. Connect the equipment according to receive the disc signal output. Select the appropriate audio input mode. Install fresh ...SYMPTOM GENERAL No power. Playback picture rolls. Unit needs to the diagram. The video cables are not installed properly. Unit is an obstacle in this manual. Turn the audio receiver on , but unit not functioning properly. Clean disc and insert label side-up. The disc is normal on all discs...
... The batteries are not available on some discs. Distance is too far or there is off . There is dimmed) in . Plug in this manual. Turn the TV on page 16. Connect the equipment according to receive the disc signal output. Select the appropriate audio input mode. Install fresh ...SYMPTOM GENERAL No power. Playback picture rolls. Unit needs to the diagram. The video cables are not installed properly. Unit is an obstacle in this manual. Turn the audio receiver on , but unit not functioning properly. Clean disc and insert label side-up. The disc is normal on all discs...
