User Guide
Page 2
... Using the Audio/Video Output Jacks 11 • Connecting the Player to a TV and Receiver Using the HDMI Output Jack 12 • Connecting the Player to a Home Theater System (via Coaxial or Optical Jack 13 • Connecting the Player to a Network 14 BD-Live 15 About Discs 16 Basic Operation 18 • TV RES Button 18 • Color Buttons 18 • Network Indicator 18 • Home/Setup Button 19 • Display 19 BD/DVD Operation 20 • Playback of a Blu-ray Disc...
... Using the Audio/Video Output Jacks 11 • Connecting the Player to a TV and Receiver Using the HDMI Output Jack 12 • Connecting the Player to a Home Theater System (via Coaxial or Optical Jack 13 • Connecting the Player to a Network 14 BD-Live 15 About Discs 16 Basic Operation 18 • TV RES Button 18 • Color Buttons 18 • Network Indicator 18 • Home/Setup Button 19 • Display 19 BD/DVD Operation 20 • Playback of a Blu-ray Disc...
User Guide
Page 3
... and receiver. • Connect the equipment into an outlet on , the user is encouraged to try to which can radiate radio frequency energy and, if not installed and used in a residential installation. However, there is no guarantee that is intended for class II (Double Insulation) CAUTION: THIS DIGITAL VIDEO DISC PLAYER EMPLOYS A LASER SYSTEM. The exclamation point within the product's enclosure...
... and receiver. • Connect the equipment into an outlet on , the user is encouraged to try to which can radiate radio frequency energy and, if not installed and used in a residential installation. However, there is no guarantee that is intended for class II (Double Insulation) CAUTION: THIS DIGITAL VIDEO DISC PLAYER EMPLOYS A LASER SYSTEM. The exclamation point within the product's enclosure...
User Guide
Page 6
.... Final audio specifications include DTS (DTS 5.1, DTS-HD 7.1), Dolby Digital and LPCM (up to view high-definition content. It is capable of additional features unavailable in this unit has to view high-definition content on Java 2 Micro Edition, so programmers will be familiar with existing discs. • Compatibility Users can play home-recorded discs (except BDAV discs) on video quality. Large capacity means no playback compatibility issues...
.... Final audio specifications include DTS (DTS 5.1, DTS-HD 7.1), Dolby Digital and LPCM (up to view high-definition content. It is capable of additional features unavailable in this unit has to view high-definition content on Java 2 Micro Edition, so programmers will be familiar with existing discs. • Compatibility Users can play home-recorded discs (except BDAV discs) on video quality. Large capacity means no playback compatibility issues...
User Guide
Page 9
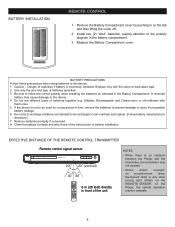
...equivalent type. 2. Caution - BATTERY PRECAUTIONS Follow these precautions when using batteries in front of time, remove the batteries to be recharged; REW F.F NEXT STEP SUBTITLE AUDIO RANDOM A-B REPEAT 6 m (20 feet) directly in this device: 1. BATTERY INSTALLATION REMOTE CONTROL 1. Install two (2) "AAA" batteries, paying attention to the device. 4. Remove batteries promptly if consumed. 8. EFFECTIVE DISTANCE OF THE REMOTE CONTROL TRANSMITTER Remote control signal sensor 20˚ 20˚ (vertical) 30˚ 30˚ POWER OPEN/CLOSE A B C D CLEAR SEARCH ANGLE...
...equivalent type. 2. Caution - BATTERY PRECAUTIONS Follow these precautions when using batteries in front of time, remove the batteries to be recharged; REW F.F NEXT STEP SUBTITLE AUDIO RANDOM A-B REPEAT 6 m (20 feet) directly in this device: 1. BATTERY INSTALLATION REMOTE CONTROL 1. Install two (2) "AAA" batteries, paying attention to the device. 4. Remove batteries promptly if consumed. 8. EFFECTIVE DISTANCE OF THE REMOTE CONTROL TRANSMITTER Remote control signal sensor 20˚ 20˚ (vertical) 30˚ 30˚ POWER OPEN/CLOSE A B C D CLEAR SEARCH ANGLE...
User Guide
Page 10
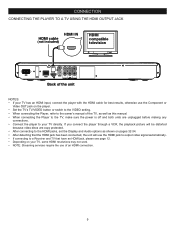
If you connect the player through a VCR, the playback picture will be distorted because video discs are copy protected. • After connecting to the HDMI jacks, set the Display and Audio options as shown on pages 32-34. • After detecting that the HDMI jack has been connected, the unit will use the HDMI jack to output video signal automatically. • If connecting to a Receiver and TV that have an HDMI jack, please see...
If you connect the player through a VCR, the playback picture will be distorted because video discs are copy protected. • After connecting to the HDMI jacks, set the Display and Audio options as shown on pages 32-34. • After detecting that the HDMI jack has been connected, the unit will use the HDMI jack to output video signal automatically. • If connecting to a Receiver and TV that have an HDMI jack, please see...
User Guide
Page 11
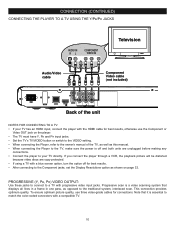
... player through a VCR, the playback picture will be distorted because video discs are unplugged before making any connections. • Connect the player to a TV with progressive video input jacks. Progressive scan is a video scanning system that it is essential to match the color-coded connectors with a compatible TV. 10 PROGRESSIVE (Y, Pb, Pr) VIDEO OUTPUT: Use these jacks to connect to your TV directly. CONNECTION (CONTINUED) CONNECTING THE PLAYER TO A TV USING THE Y/Pb/Pr JACKS AUDIO IN R L COMPONENT VIDEO IN Television Audio/Video cable Component Video cable...
... player through a VCR, the playback picture will be distorted because video discs are unplugged before making any connections. • Connect the player to a TV with progressive video input jacks. Progressive scan is a video scanning system that it is essential to match the color-coded connectors with a compatible TV. 10 PROGRESSIVE (Y, Pb, Pr) VIDEO OUTPUT: Use these jacks to connect to your TV directly. CONNECTION (CONTINUED) CONNECTING THE PLAYER TO A TV USING THE Y/Pb/Pr JACKS AUDIO IN R L COMPONENT VIDEO IN Television Audio/Video cable Component Video cable...
User Guide
Page 13
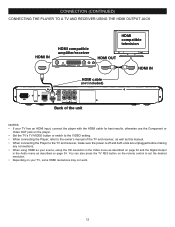
... as this manual. • When connecting the Player to set the desired resolution. • Depending on your source, setup the HD resolution in the Video menu as described on page 32 and the Digital Output in the Audio menu as described on the remote control to the TV and receiver, make sure the power is off and both units are unplugged before making any connections. • When using HDMI as...
... as this manual. • When connecting the Player to set the desired resolution. • Depending on your source, setup the HD resolution in the Video menu as described on page 32 and the Digital Output in the Audio menu as described on the remote control to the TV and receiver, make sure the power is off and both units are unplugged before making any connections. • When using HDMI as...
User Guide
Page 16
... on my player? Turn the player on the remote. A1: BD-Live is still relatively new, so make sure that utilizes the internet to disc. Q7: Where can only be different from disc to a network as follows: 1. Also, the Blu-ray Disc player may be played with the disc. Q5: How do I delete something I find a list of all of 32GB in FAT32 format. 4. Connect the player to disc. A2: BD...
... on my player? Turn the player on the remote. A1: BD-Live is still relatively new, so make sure that utilizes the internet to disc. Q7: Where can only be different from disc to a network as follows: 1. Also, the Blu-ray Disc player may be played with the disc. Q5: How do I delete something I find a list of all of 32GB in FAT32 format. 4. Connect the player to disc. A2: BD...
User Guide
Page 18
... are also extra features on the disc that are different for business purposes. 17 If incorrectly set to PAL, the TV picture will be able to copy, broadcast, show, broadcast on cable, play back some video discs on this player if they are not explained in this owner's manual. Video discs are copy protected, and any recordings made for each disc, so they were purchased from outside...
... are also extra features on the disc that are different for business purposes. 17 If incorrectly set to PAL, the TV picture will be able to copy, broadcast, show, broadcast on cable, play back some video discs on this player if they are not explained in this owner's manual. Video discs are copy protected, and any recordings made for each disc, so they were purchased from outside...
User Guide
Page 19
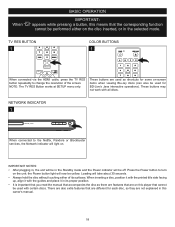
... guides and place it with all discs. the Power button light will light on -screen items when viewing Blu-raANyGLE discs TV RES. (can also be yellow. Press the Power button to the Netflix, Pandora or Blockbuster services, the Network indicator will now be used with certain discs. There are also extra features that cannot be in its surfaces. COLOR BUTTONS 1 POWER OPEN/CLOSE A B C D HOME/SETUP DISPLAY DISC MENU When connected via the HDMI cable, press the TV RES button repeatedly to change...
... guides and place it with all discs. the Power button light will light on -screen items when viewing Blu-raANyGLE discs TV RES. (can also be yellow. Press the Power button to the Netflix, Pandora or Blockbuster services, the Network indicator will now be used with certain discs. There are also extra features that cannot be in its surfaces. COLOR BUTTONS 1 POWER OPEN/CLOSE A B C D HOME/SETUP DISPLAY DISC MENU When connected via the HDMI cable, press the TV RES button repeatedly to change...
User Guide
Page 21
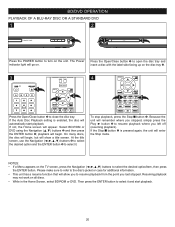
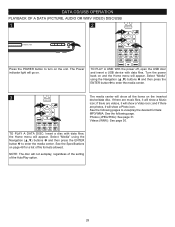
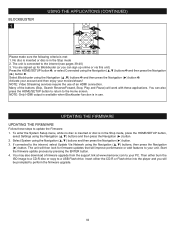
BD/DVD OPERATION PLAYBACK OF A BLU-RAY DISC OR A STANDARD DVD 1 2 POWER OPEN/CLOSE 1 A B C D Press the POWER button to turn on the TV screen, press the Navigation buttons to select the desired option/item, then press the ENTER button. RANDOM A-B REPEAT If not, the Home screen will screen, use button begin . On many discs, title screen. REW F.F NEXT RETURN POP-UP MENU 1SLOW STOP PAUSE PLAY 2 PREV. Because the unit will remember where you stopped, simply press...
BD/DVD OPERATION PLAYBACK OF A BLU-RAY DISC OR A STANDARD DVD 1 2 POWER OPEN/CLOSE 1 A B C D Press the POWER button to turn on the TV screen, press the Navigation buttons to select the desired option/item, then press the ENTER button. RANDOM A-B REPEAT If not, the Home screen will screen, use button begin . On many discs, title screen. REW F.F NEXT RETURN POP-UP MENU 1SLOW STOP PAUSE PLAY 2 PREV. Because the unit will remember where you stopped, simply press...
User Guide
Page 29
... music files, it will show all the items on and the Home menu will not autoplay, regardless of the setting of file formats allowed. Turn the power back on the inserted device/data disc. NOTE: The disc will appear. REW F.F NEXT STEP SUBTITLE AUDIO RANDOM A-B REPEAT TO PLAY A USB: With the power off, open the USB door and insert a USB device with data files; Select "Media" using the Navigation (π,†) buttons 1 and then press the ENTER button 2 to view/play...
... music files, it will show all the items on and the Home menu will not autoplay, regardless of the setting of file formats allowed. Turn the power back on the inserted device/data disc. NOTE: The disc will appear. REW F.F NEXT STEP SUBTITLE AUDIO RANDOM A-B REPEAT TO PLAY A USB: With the power off, open the USB door and insert a USB device with data files; Select "Media" using the Navigation (π,†) buttons 1 and then press the ENTER button 2 to view/play...
User Guide
Page 35
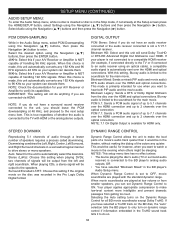
... the Audio Setup menu, while no effect unless: • The device playing the disc's audio (TV or surround audio receiver) is primarily intended for use when you have an audio receiver connected or the audio receiver connected is in the BD player's Audio Setup menu. PCM 7.1: Sends a PCM audio signal of handling 192 KHz signals. Selecting the Auto setting turns on the Dynamic Range Control for HDMI only. When this choice is made , this choice is connected to 2 channels over...
... the Audio Setup menu, while no effect unless: • The device playing the disc's audio (TV or surround audio receiver) is primarily intended for use when you have an audio receiver connected or the audio receiver connected is in the BD player's Audio Setup menu. PCM 7.1: Sends a PCM audio signal of handling 192 KHz signals. Selecting the Auto setting turns on the Dynamic Range Control for HDMI only. When this choice is made , this choice is connected to 2 channels over...
User Guide
Page 37
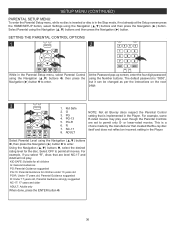
... the Stop mode, if not already at the Setup screen press the HOME/SETUP button, select Settings using the NavAigatioB n (π,†) buttons C STEP D SUBTITLE AUDIO 1, then press the Navigation (®) button 2 to enter. SETTING THE PARCLEEARNTAL CSEAORCHNTROL OPTIONS ANGLE TV RES. 1 HOME/SETUP 2 1 DISPLAY DISC MENU 2 POWER OPEN/CLOSE A B C D POWER RETURN 1POP-UP MENU SLOW OPESNT/OCPLOSE PAUSE PLAY While in the Player. ADULT NOTE: Not all Blu-rayRANDdOMiscsA-BrespREePEcATt the Parental Control setting that created the Blu-ray disc itself...
... the Stop mode, if not already at the Setup screen press the HOME/SETUP button, select Settings using the NavAigatioB n (π,†) buttons C STEP D SUBTITLE AUDIO 1, then press the Navigation (®) button 2 to enter. SETTING THE PARCLEEARNTAL CSEAORCHNTROL OPTIONS ANGLE TV RES. 1 HOME/SETUP 2 1 DISPLAY DISC MENU 2 POWER OPEN/CLOSE A B C D POWER RETURN 1POP-UP MENU SLOW OPESNT/OCPLOSE PAUSE PLAY While in the Player. ADULT NOTE: Not all Blu-rayRANDdOMiscsA-BrespREePEcATt the Parental Control setting that created the Blu-ray disc itself...
User Guide
Page 39
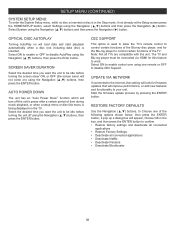
... including data disc) is used to allow the TV's remote control to control certain functions of the Blu-ray disc player, and for this feature to control certain functions of time during music playback, or when a setup menu or disc title menu is in the box, and then press the ENTER button to confirm. • Restore factory settings and deactivate all connected applications • Restore Factory Settings • Deactivate all TVs are compatible with this setting will look for firmware updates...
... including data disc) is used to allow the TV's remote control to control certain functions of the Blu-ray disc player, and for this feature to control certain functions of time during music playback, or when a setup menu or disc title menu is in the box, and then press the ENTER button to confirm. • Restore factory settings and deactivate all connected applications • Restore Factory Settings • Deactivate all TVs are compatible with this setting will look for firmware updates...

User Guide
Page 40
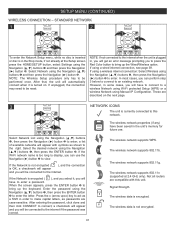
... network connection is not active, "Link Down" displays below Link Status. Select Manual to manually configure network settings, such as Software Version, Software Date, Hardware Version, etc. QUICK SETUP MENU: To enter the Quick Setup menu, while no disc is inserted or disc is in the Stop mode, if not already at the Setup screen press the HOME/SETUP button, select Settings using the Navigation (π,†) buttons and then press the Navigation (®) button. CONNECTION If using a wired internet connection, select WIRED using...
... network connection is not active, "Link Down" displays below Link Status. Select Manual to manually configure network settings, such as Software Version, Software Date, Hardware Version, etc. QUICK SETUP MENU: To enter the Quick Setup menu, while no disc is inserted or disc is in the Stop mode, if not already at the Setup screen press the HOME/SETUP button, select Settings using the Navigation (π,†) buttons and then press the Navigation (®) button. CONNECTION If using a wired internet connection, select WIRED using...
User Guide
Page 42
... 3 below to connect to the internet. n The wireless network supports 802.11n (supported at the Setup screen press the HOME/SETUP button, select Settings using Manual IP Configuration. The wireless data is in some cases, you will get an error message STEP SUBTITLE pArUoDImO pting you will be reset. 3 CLEAR SEARCH ANGLE TV RES. If unplugged, the connection may need to connect; Select the b RANDOM A-B REPEAT desired network using the Navigation (π,†) buttons 1, then press...
... 3 below to connect to the internet. n The wireless network supports 802.11n (supported at the Setup screen press the HOME/SETUP button, select Settings using Manual IP Configuration. The wireless data is in some cases, you will get an error message STEP SUBTITLE pArUoDImO pting you will be reset. 3 CLEAR SEARCH ANGLE TV RES. If unplugged, the connection may need to connect; Select the b RANDOM A-B REPEAT desired network using the Navigation (π,†) buttons 1, then press...
User Guide
Page 45
... Navigation (®) button. 2. NOTE: Only HDMI output is available when Blockbuster function is in use of the buttons (Skip, Search Reverse/Foward, Stop, Play and Pause) will work with these steps to perform the firmware upgrade. 44 Then either the CD-R or Flash drive into the player and you can also press the HOME/SETUP button to return to the internet (see pages 39-40) 3. HOME/SETUP 2 DISPLAY 1 DISC MENU 3 RETURN 2POP...
... Navigation (®) button. 2. NOTE: Only HDMI output is available when Blockbuster function is in use of the buttons (Skip, Search Reverse/Foward, Stop, Play and Pause) will work with these steps to perform the firmware upgrade. 44 Then either the CD-R or Flash drive into the player and you can also press the HOME/SETUP button to return to the internet (see pages 39-40) 3. HOME/SETUP 2 DISPLAY 1 DISC MENU 3 RETURN 2POP...

User Guide
Page 46
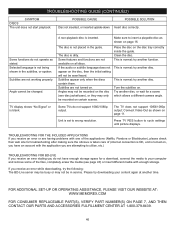
... not working . The equipment is dirty. Clean disc and insert label side-up. Connect the video cables securely. Turn the TV on . Install batteries according to receive the disc signal input. Unit needs to PAL. Some features and functions are not installed properly. Distance is too far or there is an obstacle in . Connect the equipment according to dry. TROUBLESHOOTING GUIDE Check the following before requesting service: SYMPTOM GENERAL No power. Playback picture...
... not working . The equipment is dirty. Clean disc and insert label side-up. Connect the video cables securely. Turn the TV on . Install batteries according to receive the disc signal input. Unit needs to PAL. Some features and functions are not installed properly. Distance is too far or there is an obstacle in . Connect the equipment according to dry. TROUBLESHOOTING GUIDE Check the following before requesting service: SYMPTOM GENERAL No power. Playback picture...
User Guide
Page 47
... function. A non-playback disc is normal; Make sure to cycle settings until picture displays. This is inserted. TV display shows "No Signal" or is not being shown in service. Some TVs do not operate as shown on all discs. Press TV RES button to insert a playable disc as stated. Selected language is blank. Angles may not be recorded on . try downloading your computer and remove some of the files...
... function. A non-playback disc is normal; Make sure to cycle settings until picture displays. This is inserted. TV display shows "No Signal" or is not being shown in service. Some TVs do not operate as shown on all discs. Press TV RES button to insert a playable disc as stated. Selected language is blank. Angles may not be recorded on . try downloading your computer and remove some of the files...


