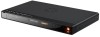
User Guide
Page 2
... Remote Control 8 • Battery Installation 8 • Effective Distance of the Remote Control Transmitter 8 Connection 9 • Connecting the Player to a TV Using the HDMI Output Jack 9 • Connecting the Player to a TV Using the Y/Pb/Pr Jacks 10 • Progressive (Y, Pb, Pr) Video Output 10 • Connecting... the Player to a TV Using the Audio/Video Output Jacks 11 • Connecting the Player to a TV and Receiver Using the HDMI Output Jack 12 • Connecting the Player to a Home Theater System (via Coaxial or Optical Jack 13 • Connecting the Player ...
... Remote Control 8 • Battery Installation 8 • Effective Distance of the Remote Control Transmitter 8 Connection 9 • Connecting the Player to a TV Using the HDMI Output Jack 9 • Connecting the Player to a TV Using the Y/Pb/Pr Jacks 10 • Progressive (Y, Pb, Pr) Video Output 10 • Connecting... the Player to a TV Using the Audio/Video Output Jacks 11 • Connecting the Player to a TV and Receiver Using the HDMI Output Jack 12 • Connecting the Player to a Home Theater System (via Coaxial or Optical Jack 13 • Connecting the Player ...
User Guide
Page 6
... owner's manual to take full advantage of all Java-based trademarks and logos are no compromise on BD discs may require using the playerʼs HDMI OUT to view high-definition content. Large capacity means no playback compatibility issues as buttons or menus. The ability to offer exciting new features, while...
... owner's manual to take full advantage of all Java-based trademarks and logos are no compromise on BD discs may require using the playerʼs HDMI OUT to view high-definition content. Large capacity means no playback compatibility issues as buttons or menus. The ability to offer exciting new features, while...
User Guide
Page 7
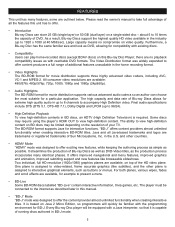
... PULL OUT TO OPEN 1. Open/Close Button 3. Disc Compartment 4. Component Video (Y, Pb, Pr) Output Jacks 6 Wi-Fi Display 5. Network Indicator 1. Ethernet Jack 4. Stop ( X ) Button REAR 7. HDMI Jack 5. Coaxial Output Jack 7. CVBS (Composite Video) Output Jack 9. Skip (n) Button 10. Wi-Fi 3. Power Button/Indicator 11. Remote Sensor 6. Play/Pause (®P) Button 9. Optical...
... PULL OUT TO OPEN 1. Open/Close Button 3. Disc Compartment 4. Component Video (Y, Pb, Pr) Output Jacks 6 Wi-Fi Display 5. Network Indicator 1. Ethernet Jack 4. Stop ( X ) Button REAR 7. HDMI Jack 5. Coaxial Output Jack 7. CVBS (Composite Video) Output Jack 9. Skip (n) Button 10. Wi-Fi 3. Power Button/Indicator 11. Remote Sensor 6. Play/Pause (®P) Button 9. Optical...
User Guide
Page 10
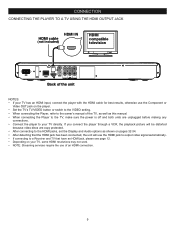
CONNECTION CONNECTING THE PLAYER TO A TV USING THE HDMI OUTPUT JACK HDMI cable (not included) HDMI IN HDMI compatible television Back of the unit NOTES: • If your TV has an HDMI input, connect the player with the HDMI cable for best results, otherwise use of the TV, as well as shown on your TV...If you connect the player through a VCR, the playback picture will be distorted because video discs are copy protected. • After connecting to the HDMI jacks, set the Display and Audio options as this manual. • When connecting the Player to the TV, make sure the power is off and...
CONNECTION CONNECTING THE PLAYER TO A TV USING THE HDMI OUTPUT JACK HDMI cable (not included) HDMI IN HDMI compatible television Back of the unit NOTES: • If your TV has an HDMI input, connect the player with the HDMI cable for best results, otherwise use of the TV, as well as shown on your TV...If you connect the player through a VCR, the playback picture will be distorted because video discs are copy protected. • After connecting to the HDMI jacks, set the Display and Audio options as this manual. • When connecting the Player to the TV, make sure the power is off and...
User Guide
Page 11
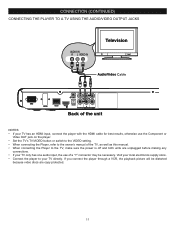
... IN Television Audio/Video cable Component Video cable (not included) Back of the unit NOTES FOR CONNECTING TO A TV: • If your TV has an HDMI input, connect the player with a blue screen option, turn the option off and both units are copy protected. • If using a TV with the... HDMI cable for connections. To ensure optimum picture quality, use three video-grade cables for best results, otherwise use the Component or Video OUT jack on ...
... IN Television Audio/Video cable Component Video cable (not included) Back of the unit NOTES FOR CONNECTING TO A TV: • If your TV has an HDMI input, connect the player with a blue screen option, turn the option off and both units are copy protected. • If using a TV with the... HDMI cable for connections. To ensure optimum picture quality, use three video-grade cables for best results, otherwise use the Component or Video OUT jack on ...
User Guide
Page 12
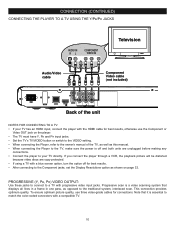
... audio input, the use of the TV, as well as this manual. • When connecting the Player to your TV has an HDMI input, connect the player with the HDMI cable for best results, otherwise use the Component or Video OUT jack on the player. • Set the TV's TV/VIDEO button...
... audio input, the use of the TV, as well as this manual. • When connecting the Player to your TV has an HDMI input, connect the player with the HDMI cable for best results, otherwise use the Component or Video OUT jack on the player. • Set the TV's TV/VIDEO button...
User Guide
Page 13
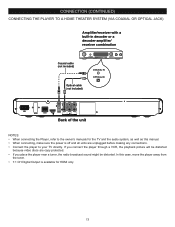
... remote control to the TV and receiver, make sure the power is off and both units are unplugged before making any connections. • When using HDMI as your source, setup the HD resolution in the Video menu as described on page 32 and the Digital Output in the Audio menu as... this manual. • When connecting the Player to set the desired resolution. • Depending on your TV has an HDMI input, connect the player with the HDMI cable for best results, otherwise use the Component or Video OUT jack on the player. • Set the TV's TV/VIDEO button...
... remote control to the TV and receiver, make sure the power is off and both units are unplugged before making any connections. • When using HDMI as your source, setup the HD resolution in the Video menu as described on page 32 and the Digital Output in the Audio menu as... this manual. • When connecting the Player to set the desired resolution. • Depending on your TV has an HDMI input, connect the player with the HDMI cable for best results, otherwise use the Component or Video OUT jack on the player. • Set the TV's TV/VIDEO button...
User Guide
Page 14
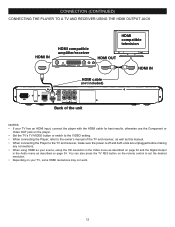
In this manual. • When connecting, make sure the power is available for HDMI only. 13 If you place the player near a tuner, the radio broadcast sound might be distorted because video discs are unplugged before making any connections. &#...
In this manual. • When connecting, make sure the power is available for HDMI only. 13 If you place the player near a tuner, the radio broadcast sound might be distorted because video discs are unplugged before making any connections. &#...
User Guide
Page 19
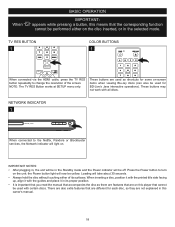
COLOR BUTTONS 1 POWER OPEN/CLOSE A B C D HOME/SETUP DISPLAY DISC MENU When connected via the HDMI cable, press the TV RES button repeatedly to change the resolution of its proper position. • It is important that you read the manual that ...
COLOR BUTTONS 1 POWER OPEN/CLOSE A B C D HOME/SETUP DISPLAY DISC MENU When connected via the HDMI cable, press the TV RES button repeatedly to change the resolution of its proper position. • It is important that you read the manual that ...

User Guide
Page 33
... automatically select the best resolution. While in a pop-up screen to return to the component videPoREV. Select Display using an NTSC TV. Select HDMI Auto if connected to enter. Not available from all TVs. IMPORTANT: In North America, the standard is in the Stop mode, if Anot... aB lreaCdy aDt the Setup screen press the HOME/SETUP button, select Settings using a PAL TV. or 576i, 576P, 720P, 1080i, 1080P, HDMI Auto for NTSC; TV TYPE NTSC: Select when using the Navigation (π,†) buttons and then press the Navigation (®) button. RANDOM A-B REPEAT ...
... automatically select the best resolution. While in a pop-up screen to return to the component videPoREV. Select Display using an NTSC TV. Select HDMI Auto if connected to enter. Not available from all TVs. IMPORTANT: In North America, the standard is in the Stop mode, if Anot... aB lreaCdy aDt the Setup screen press the HOME/SETUP button, select Settings using a PAL TV. or 576i, 576P, 720P, 1080i, 1080P, HDMI Auto for NTSC; TV TYPE NTSC: Select when using the Navigation (π,†) buttons and then press the Navigation (®) button. RANDOM A-B REPEAT ...
User Guide
Page 34
... recommended to set this frame rate (24 frames per second. It is connected to the TV via HDMI. Many of the movies on BD disks are placed on the screen with black bars appearing at the...This option determines whether to OFF if the picture is connected to your TV (or surround sound receiver) via HDMI, and the TV has the capability to display 24 frames/second of 24 pictures, or frames, per second... at this option to use the Deep Color (color depth) setting for video signals output from the HDMI OUT jack. FILM MODE This menu item only applies if you are shown on the disk at a...
... recommended to set this frame rate (24 frames per second. It is connected to the TV via HDMI. Many of the movies on BD disks are placed on the screen with black bars appearing at the...This option determines whether to OFF if the picture is connected to your TV (or surround sound receiver) via HDMI, and the TV has the capability to display 24 frames/second of 24 pictures, or frames, per second... at this option to use the Deep Color (color depth) setting for video signals output from the HDMI OUT jack. FILM MODE This menu item only applies if you are shown on the disk at a...
User Guide
Page 35
... receiver connected or the audio receiver connected is not a 5.1/7.1 channel receiver. Your player applies appropriate compression to 2 channels over the HDMI and optical connections. This mode is primarily intended for the unit to hear both PIP audio and the movie audio. Bitstream Mixed: ... can decode them. STEREO DOWNMIX DYNAMIC RANGE CONTROL Reproducing 5.1 channels of audio through a lesser number of up to 5.1 channels over HDMI. Select the desired option using the Navigation (π,†) buttons and then press the Navigation (®) button. Auto: Select for ...
... receiver connected or the audio receiver connected is not a 5.1/7.1 channel receiver. Your player applies appropriate compression to 2 channels over the HDMI and optical connections. This mode is primarily intended for the unit to hear both PIP audio and the movie audio. Bitstream Mixed: ... can decode them. STEREO DOWNMIX DYNAMIC RANGE CONTROL Reproducing 5.1 channels of audio through a lesser number of up to 5.1 channels over HDMI. Select the desired option using the Navigation (π,†) buttons and then press the Navigation (®) button. Auto: Select for ...
User Guide
Page 39
... idle before turning the screen saver ON, or OFF (the screen saver will improve performance, or add new features and functionality to be connected via HDMI for this unit. Select ON to enable or OFF to control certain functions of time during music playback, or when a setup menu or disc title...
... idle before turning the screen saver ON, or OFF (the screen saver will improve performance, or add new features and functionality to be connected via HDMI for this unit. Select ON to enable or OFF to control certain functions of time during music playback, or when a setup menu or disc title...
User Guide
Page 44
... buttons (Skip, Search Reverse/Foward, Stop, Play and Pause) will then be instructed on how to go to your movies/shows! NOTE: Only HDMI output is available when Netflix function is met: PREV. If you can sign upRANoDOnM lineA-Bor vRiEaPEAtThis unit) Press the HOME/SETUP button 1, or.... Select Pandora using the Navigation (π,†) buttons 2 and POWER then press the OPEN/CLOSE Navigation (®) button 3. NOTE: Many of an HDMI connection for navigation on their website. YDou can sign up for Pandora (or you can also press the HOME/SETUP button to return to sign...
... buttons (Skip, Search Reverse/Foward, Stop, Play and Pause) will then be instructed on how to go to your movies/shows! NOTE: Only HDMI output is available when Netflix function is met: PREV. If you can sign upRANoDOnM lineA-Bor vRiEaPEAtThis unit) Press the HOME/SETUP button 1, or.... Select Pandora using the Navigation (π,†) buttons 2 and POWER then press the OPEN/CLOSE Navigation (®) button 3. NOTE: Many of an HDMI connection for navigation on their website. YDou can sign up for Pandora (or you can also press the HOME/SETUP button to return to sign...
User Guide
Page 45
... can also press the HOME/SETUP button to return to your movies/shows! REW F.F NEXT 1. Many of an HDMI connection. No disc is inserted or disc is in use of the buttons (Skip, Search Reverse/Foward, Stop, Play... and Pause) will improve performance or add features to update the Firmware: 1. NOTE: Only HDMI output is available when Blockbuster function is in the Stop mode, press the HOME/SETUP button, select Settings using the Navigation...174;) button. You may also download a firmware upgrade from the support link at www.memorex.com to the Home screen.
... can also press the HOME/SETUP button to return to your movies/shows! REW F.F NEXT 1. Many of an HDMI connection. No disc is inserted or disc is in use of the buttons (Skip, Search Reverse/Foward, Stop, Play... and Pause) will improve performance or add features to update the Firmware: 1. NOTE: Only HDMI output is available when Blockbuster function is in the Stop mode, press the HOME/SETUP button, select Settings using the Navigation...174;) button. You may also download a firmware upgrade from the support link at www.memorex.com to the Home screen.
User Guide
Page 49
... DVD: 480i Component 75Ω Load) Y: 1.0Vp-p, Pr: 0.70Vp-p, Pb: 0.70Vp-p Blu-ray: 1080i DVD: 1080i Audio/Video Output HDMI...1080p, 1080i, 720p, 480p/576p, 480i/576i Audio Output Digital Audio Output...HDMI/Optical/Coaxial Frequency Response 48kHz Sampling: 4Hz to 22kHz / 96kHz Sampling: 4Hz to 22kHz S/N Ratio...95dB Dynamic Range...85dB...
... DVD: 480i Component 75Ω Load) Y: 1.0Vp-p, Pr: 0.70Vp-p, Pb: 0.70Vp-p Blu-ray: 1080i DVD: 1080i Audio/Video Output HDMI...1080p, 1080i, 720p, 480p/576p, 480i/576i Audio Output Digital Audio Output...HDMI/Optical/Coaxial Frequency Response 48kHz Sampling: 4Hz to 22kHz / 96kHz Sampling: 4Hz to 22kHz S/N Ratio...95dB Dynamic Range...85dB...