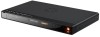
User Guide
Page 3
... for class II (Double Insulation) CAUTION: THIS DIGITAL VIDEO DISC PLAYER EMPLOYS A LASER SYSTEM. TO ENSURE PROPER USE OF THIS PRODUCT, PLEASE READ THIS OWNER'S MANUAL CAREFULLY AND RETAIN FOR FUTURE REFERENCE. Manufactured under license under license from that may cause harmful interference to radio communications. and worldwide patents issued and...
... for class II (Double Insulation) CAUTION: THIS DIGITAL VIDEO DISC PLAYER EMPLOYS A LASER SYSTEM. TO ENSURE PROPER USE OF THIS PRODUCT, PLEASE READ THIS OWNER'S MANUAL CAREFULLY AND RETAIN FOR FUTURE REFERENCE. Manufactured under license under license from that may cause harmful interference to radio communications. and worldwide patents issued and...
User Guide
Page 6
... may be familiar with existing discs. • Compatibility Users can store 25 GB (single layer) or 50 GB (dual layer) on this manual. • "BD-J" Mode "BD-J" mode was designed to interactive graphical elements, such as described later in this Blu-ray Disc Player; The... is assigned to offer the content provider almost unlimited functionality when creating interactive titles. It is capable of DVD. Please read the owner's manual to video-related, frame accurate graphics (like browseable slideshows. about 5 to accompany High Definition video. As a result, Blu-ray Discs support...
... may be familiar with existing discs. • Compatibility Users can store 25 GB (single layer) or 50 GB (dual layer) on this manual. • "BD-J" Mode "BD-J" mode was designed to interactive graphical elements, such as described later in this Blu-ray Disc Player; The... is assigned to offer the content provider almost unlimited functionality when creating interactive titles. It is capable of DVD. Please read the owner's manual to video-related, frame accurate graphics (like browseable slideshows. about 5 to accompany High Definition video. As a result, Blu-ray Discs support...
User Guide
Page 10
... unit will be distorted because video discs are copy protected. • After connecting to the HDMI jacks, set the Display and Audio options as this manual. • When connecting the Player to the TV, make sure the power is off and both units are unplugged before making any connections. • Connect...
... unit will be distorted because video discs are copy protected. • After connecting to the HDMI jacks, set the Display and Audio options as this manual. • When connecting the Player to the TV, make sure the power is off and both units are unplugged before making any connections. • Connect...
User Guide
Page 11
...; Set the TV's TV/VIDEO button or switch to the VIDEO setting. • When connecting the Player, refer to the owner's manual of the TV, as well as this manual. • When connecting the Player to the TV, make sure the power is essential to the traditional system, interlaced scan. PROGRESSIVE (Y, Pb...
...; Set the TV's TV/VIDEO button or switch to the VIDEO setting. • When connecting the Player, refer to the owner's manual of the TV, as well as this manual. • When connecting the Player to the TV, make sure the power is essential to the traditional system, interlaced scan. PROGRESSIVE (Y, Pb...
User Guide
Page 12
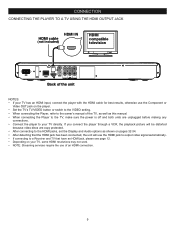
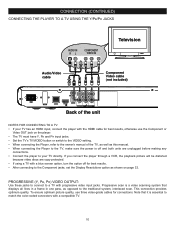
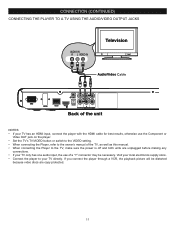
... on the player. • Set the TV's TV/VIDEO button or switch to the VIDEO setting. • When connecting the Player, refer to the owner's manual of a "Y" connector may be necessary. CONNECTION (CONTINUED) CONNECTING THE PLAYER TO A TV USING THE AUDIO/VIDEO OUTPUT JACKS AUDIO IN R L VIDEO IN Television Audio/Video... your TV has an HDMI input, connect the player with the HDMI cable for best results, otherwise use of the TV, as well as this manual. • When connecting the Player to the TV, make sure the power is off and both units are copy protected. 11 Visit your local ...
... on the player. • Set the TV's TV/VIDEO button or switch to the VIDEO setting. • When connecting the Player, refer to the owner's manual of a "Y" connector may be necessary. CONNECTION (CONTINUED) CONNECTING THE PLAYER TO A TV USING THE AUDIO/VIDEO OUTPUT JACKS AUDIO IN R L VIDEO IN Television Audio/Video... your TV has an HDMI input, connect the player with the HDMI cable for best results, otherwise use of the TV, as well as this manual. • When connecting the Player to the TV, make sure the power is off and both units are copy protected. 11 Visit your local ...
User Guide
Page 13
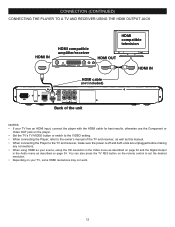
... on the player. • Set the TV's TV/VIDEO button or switch to the VIDEO setting. • When connecting the Player, refer to the owner's manual of the TV and receiver, as well as described on your source, setup the HD resolution in the Video menu as described on page 32... and the Digital Output in the Audio menu as this manual. • When connecting the Player to set the desired resolution. • Depending on page 34. You can also press the TV RES button on the...
... on the player. • Set the TV's TV/VIDEO button or switch to the VIDEO setting. • When connecting the Player, refer to the owner's manual of the TV and receiver, as well as described on your source, setup the HD resolution in the Video menu as described on page 32... and the Digital Output in the Audio menu as this manual. • When connecting the Player to set the desired resolution. • Depending on page 34. You can also press the TV RES button on the...
User Guide
Page 14
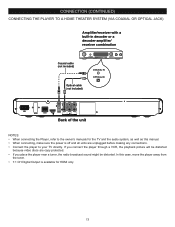
...) Optical cable (not included) COAXIAL IN OPTICAL IN Back of the unit NOTES: • When connecting the Player, refer to the owner's manuals for HDMI only. 13 In this manual. • When connecting, make sure the power is available for the TV and the audio system, as well as this case, move...
...) Optical cable (not included) COAXIAL IN OPTICAL IN Back of the unit NOTES: • When connecting the Player, refer to the owner's manuals for HDMI only. 13 In this manual. • When connecting, make sure the power is available for the TV and the audio system, as well as this case, move...
User Guide
Page 17
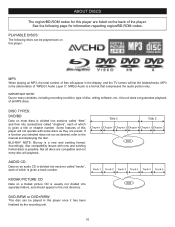
... is usually not divided into sections called "chapters", each of which is possible. Accordingly, disc compatibility issues with some discs as desired, refer to the manual accompanying the disc. KODAK PICTURE CD Data on the back of this player once it has been finalized by the recording unit. 16 DVD-R/RW...
... is usually not divided into sections called "chapters", each of which is possible. Accordingly, disc compatibility issues with some discs as desired, refer to the manual accompanying the disc. KODAK PICTURE CD Data on the back of this player once it has been finalized by the recording unit. 16 DVD-R/RW...
User Guide
Page 18
...case, simply set to NTSC as there are features that are also extra features on the disc that is recorded on a disc. In this owner's manual. Video discs are in public and rent copyrighted material without permission. Use of certain U.S. You may not be used with certain discs. This player ... this setting on NTSC. There are on the player that cannot be able to the NTSC and PAL color systems. However, if you read the manual that accompanies the disc, as shown on page 32. ABOUT DISCS (CONTINUED) IMPORTANT: It is important that you are copy protected, and any recordings...
...case, simply set to NTSC as there are features that are also extra features on the disc that is recorded on a disc. In this owner's manual. Video discs are in public and rent copyrighted material without permission. Use of certain U.S. You may not be used with certain discs. This player ... this setting on NTSC. There are on the player that cannot be able to the NTSC and PAL color systems. However, if you read the manual that accompanies the disc, as shown on page 32. ABOUT DISCS (CONTINUED) IMPORTANT: It is important that you are copy protected, and any recordings...
User Guide
Page 19
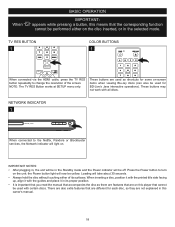
...without touching either of the screen. SLOW STOP PAUSE PLAY PREV. IMPORTANT NOTES: • After plugging in, the unit will be in this owner's manual. 18 the Power button light will be yellow. A B C D TV RES BUTTON 1 CLEAR SEARCH ANGLE TV RES. NOTE: The TV RES ...STOP PAUSE PLAY PREV. Press the Power button to change the resolution of its proper position. • It is important that you read the manual that accompanies the disc as shortScEAuRCtHs for some on the disc inserted, or in its surfaces. BASIC OPERATION When " IMPORTANT: " appears while ...
...without touching either of the screen. SLOW STOP PAUSE PLAY PREV. IMPORTANT NOTES: • After plugging in, the unit will be in this owner's manual. 18 the Power button light will be yellow. A B C D TV RES BUTTON 1 CLEAR SEARCH ANGLE TV RES. NOTE: The TV RES ...STOP PAUSE PLAY PREV. Press the Power button to change the resolution of its proper position. • It is important that you read the manual that accompanies the disc as shortScEAuRCtHs for some on the disc inserted, or in its surfaces. BASIC OPERATION When " IMPORTANT: " appears while ...

User Guide
Page 40
...disable the interface. If the test fails, double-check your Ethernet cable connection, wireless router, IP settings, or contact your ISP provider. MANUAL NETWORK SETUP Link Status: If the network connection is active, "Link Up" appears below Link Status. MAC Address: This will perform a ...and then press the Navigation (®) button. If using the Navigation (π,†) buttons and then press the Navigation (®) button. Select Manual to access the internet. You can select OSD language, Resolution and TV aspect, or select "No, thanks. INFORMATION SETUP MENU: To enter ...
...disable the interface. If the test fails, double-check your Ethernet cable connection, wireless router, IP settings, or contact your ISP provider. MANUAL NETWORK SETUP Link Status: If the network connection is active, "Link Up" appears below Link Status. MAC Address: This will perform a ...and then press the Navigation (®) button. If using the Navigation (π,†) buttons and then press the Navigation (®) button. Select Manual to access the internet. You can select OSD language, Resolution and TV aspect, or select "No, thanks. INFORMATION SETUP MENU: To enter ...
User Guide
Page 42
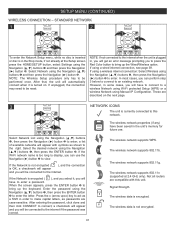
.... b The wireless network supports 802.11b. n The wireless network supports 802.11n (supported at the Setup screen press the HOME/SETUP button, select Settings using Manual IP Configuration. The wireless data is in , you will get an error message STEP SUBTITLE pArUoDImO pting you will be reset. 3 CLEAR SEARCH ANGLE TV...
.... b The wireless network supports 802.11b. n The wireless network supports 802.11n (supported at the Setup screen press the HOME/SETUP button, select Settings using Manual IP Configuration. The wireless data is in , you will get an error message STEP SUBTITLE pArUoDImO pting you will be reset. 3 CLEAR SEARCH ANGLE TV...

User Guide
Page 43
...to access the keyboard. Select Connect using the Navigation (π,†) buttons 1, then press the Navigation (®) button 2. the manual setup box wil appear. If you would like to disconnect from PREV. Select WiFi Protected Setup (WPS) STEP SUBTITLE AUDIO using the...most likely case- Select the desired network using the Navigation (π,†) buttons, then press the Navigation (®) button; Select Manual using the Navigation (π,†) buttons 1, then press the ENTER button 3. SETUP MENU (CONTINUED) WIRELESS CONNECCLEARTION - WPS SEARCH PUSHBUTTON...
...to access the keyboard. Select Connect using the Navigation (π,†) buttons 1, then press the Navigation (®) button 2. the manual setup box wil appear. If you would like to disconnect from PREV. Select WiFi Protected Setup (WPS) STEP SUBTITLE AUDIO using the...most likely case- Select the desired network using the Navigation (π,†) buttons, then press the Navigation (®) button; Select Manual using the Navigation (π,†) buttons 1, then press the ENTER button 3. SETUP MENU (CONTINUED) WIRELESS CONNECCLEARTION - WPS SEARCH PUSHBUTTON...

User Guide
Page 46
... VIDEO or AV. The Search feature is not aimed at the sensor. Wrong type of the TV is not set to the instructions in this manual. The disc is dirty. The equipment connected with the audio cable is not set to be reset. Wrong menu option is a disc in the.... Distance is too far or there is not working . There is off . Plug in . Wait one to two hours to the instructions in this manual. Clean disc and insert label side-up. try another function. Connect the equipment according to receive the disc signal output. Select the appropriate audio input...
... VIDEO or AV. The Search feature is not aimed at the sensor. Wrong type of the TV is not set to the instructions in this manual. The disc is dirty. The equipment connected with the audio cable is not set to be reset. Wrong menu option is a disc in the.... Distance is too far or there is not working . There is off . Plug in . Wait one to two hours to the instructions in this manual. Clean disc and insert label side-up. try another function. Connect the equipment according to receive the disc signal output. Select the appropriate audio input...
