User Guide
Page 1
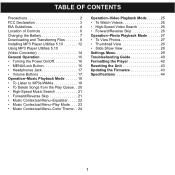
TABLE OF CONTENTS Precautions 2 FCC Declaration 3 EIA Guidelines 4 Location of Controls 6 Charging the Battery 7 Downloading and Transferring Files 8 Installing MP3 Player Utilities 5.10 12 Using MP3 Player Utilities 5.10 (Video Converter 14 General Operation 16 • Turning the Power On/Off 16 • MENU/Lock Button 16 • Headphones Jack 17 • ...
TABLE OF CONTENTS Precautions 2 FCC Declaration 3 EIA Guidelines 4 Location of Controls 6 Charging the Battery 7 Downloading and Transferring Files 8 Installing MP3 Player Utilities 5.10 12 Using MP3 Player Utilities 5.10 (Video Converter 14 General Operation 16 • Turning the Power On/Off 16 • MENU/Lock Button 16 • Headphones Jack 17 • ...
User Guide
Page 8
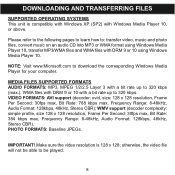
...Per Second: 30fps max, Bit Rate: 768 kbps max, Frequency Range: 8-48kHz, Audio Format: 128kbps, 48kHz, Stereo CBR); IMPORTANT! MEDIA FILES SUPPORTED FORMATS AUDIO FORMATS: MP3, MPEG 1/2/2.5 Layer 3 with a bit rate up to 320 kbps (max.), WMA files with DRM 9 or 10 with a bit rate up to be played. 8... CBR). PHOTO FORMATS: Baseline JPEGs. Make sure the video resolution is compatible with Windows XP (SP2) with DRM 9 or 10 using Windows Media Player 10. DOWNLOADING AND TRANSFERRING FILES SUPPORTED OPERATING SYSTEMS This unit is 128 x 128; Please refer to the following pages to learn how to...
...Per Second: 30fps max, Bit Rate: 768 kbps max, Frequency Range: 8-48kHz, Audio Format: 128kbps, 48kHz, Stereo CBR); IMPORTANT! MEDIA FILES SUPPORTED FORMATS AUDIO FORMATS: MP3, MPEG 1/2/2.5 Layer 3 with a bit rate up to 320 kbps (max.), WMA files with DRM 9 or 10 with a bit rate up to be played. 8... CBR). PHOTO FORMATS: Baseline JPEGs. Make sure the video resolution is compatible with Windows XP (SP2) with DRM 9 or 10 using Windows Media Player 10. DOWNLOADING AND TRANSFERRING FILES SUPPORTED OPERATING SYSTEMS This unit is 128 x 128; Please refer to the following pages to learn how to...
User Guide
Page 9
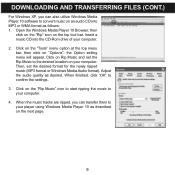
... the desired location on "Options"; When the music tracks are ripped, you can transfer them to your player using Windows Media Player 10 as described on the next page. 9 Insert a music CD into MP3 or WMA format as desired. Adjust the audio quality as follows: 1. When finished, click "OK" ... Click on Rip Music and set the desired format for the newly ripped music (MP3 format or Windows Media Audio format). DOWNLOADING AND TRANSFERRING FILES (CONT.) For Windows XP, you can also utilize Windows Media Player 10 software to convert music on an audio CD into the CD-Rom drive of...
... the desired location on "Options"; When the music tracks are ripped, you can transfer them to your player using Windows Media Player 10 as described on the next page. 9 Insert a music CD into MP3 or WMA format as desired. Adjust the audio quality as follows: 1. When finished, click "OK" ... Click on Rip Music and set the desired format for the newly ripped music (MP3 format or Windows Media Audio format). DOWNLOADING AND TRANSFERRING FILES (CONT.) For Windows XP, you can also utilize Windows Media Player 10 software to convert music on an audio CD into the CD-Rom drive of...
User Guide
Page 10
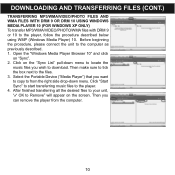
..." will appear on the screen. Click "Start Sync" to start transferring music files to the player, follow the procedure described below using WMP (Windows Media Player) 10. DOWNLOADING AND TRANSFERRING FILES (CONT.) TRANSFERRING MP3/WMA/VIDEO/PHOTO FILES AND WMA FILES WITH DRM 9 OR DRM 10 USING WINDOWS MEDIA... PLAYER 10 (FOR WINDOWS XP ONLY) To transfer MP3/WMA/VIDEO/PHOTO/WMA files with DRM 9 or 10 to the player. 4. Then you ...
..." will appear on the screen. Click "Start Sync" to start transferring music files to the player, follow the procedure described below using WMP (Windows Media Player) 10. DOWNLOADING AND TRANSFERRING FILES (CONT.) TRANSFERRING MP3/WMA/VIDEO/PHOTO FILES AND WMA FILES WITH DRM 9 OR DRM 10 USING WINDOWS MEDIA... PLAYER 10 (FOR WINDOWS XP ONLY) To transfer MP3/WMA/VIDEO/PHOTO/WMA files with DRM 9 or 10 to the player. 4. Then you ...
User Guide
Page 11
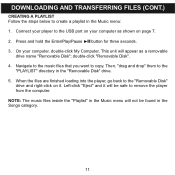
...Pause ®p button for three seconds. 3. On your player to the "Removable Disk" drive and right-click on page 7. 2. Navigate to the music files that you want to create a playlist in the "Removable Disk" drive. 5. DOWNLOADING AND TRANSFERRING FILES (CONT.) CREATING A PLAYLIST Follow the ...steps below to copy. double-click "Removable Disk". 4. Left-click "Eject" and it . Then, "drag and drop" them to remove the player from the computer. When the files are finished...
...Pause ®p button for three seconds. 3. On your player to the "Removable Disk" drive and right-click on page 7. 2. Navigate to the music files that you want to create a playlist in the "Removable Disk" drive. 5. DOWNLOADING AND TRANSFERRING FILES (CONT.) CREATING A PLAYLIST Follow the ...steps below to copy. double-click "Removable Disk". 4. Left-click "Eject" and it . Then, "drag and drop" them to remove the player from the computer. When the files are finished...
User Guide
Page 40
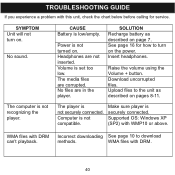
... files to the unit as described on page 7. The player is not recognizing the player. Supported OS: Windows XP (SP2) with DRM Incorrect downloading See page 10 to turn on the power. methods. SYMPTOM Unit will not turn on . No sound. The computer is not...the volume using the Volume + button. Computer is set too low. No files are not inserted. Make sure player is low/empty. Power is not turned on pages 8-11. Download uncorrupted files. CAUSE Battery is securely connected. The media files are corrupted. SOLUTION Recharge battery as described on ....
... files to the unit as described on page 7. The player is not recognizing the player. Supported OS: Windows XP (SP2) with DRM Incorrect downloading See page 10 to turn on the power. methods. SYMPTOM Unit will not turn on . No sound. The computer is not...the volume using the Volume + button. Computer is set too low. No files are not inserted. Make sure player is low/empty. Power is not turned on pages 8-11. Download uncorrupted files. CAUSE Battery is securely connected. The media files are corrupted. SOLUTION Recharge battery as described on ....


