User Guide
Page 1
TABLE OF CONTENTS Precautions 2 FCC Declaration 3 EIA Guidelines 4 Location of Controls 6 Charging the Battery 7 Downloading and Transferring Files 8 Installing MP3 Player Utilities 5.10 12 Using MP3 Player Utilities 5.10 (Video Converter 14 General Operation 16 • Turning the Power On/Off 16 • MENU/Lock Button 16 • Headphones Jack 17 &#...Mode 27 • To View Photos 27 • Thumbnail View 28 • Slide Show View 28 Settings Menu 29 Troubleshooting Guide 40 Formatting the Player 42 Resetting the Unit 43 Updating the Firmware 43 Specifications 44 1
TABLE OF CONTENTS Precautions 2 FCC Declaration 3 EIA Guidelines 4 Location of Controls 6 Charging the Battery 7 Downloading and Transferring Files 8 Installing MP3 Player Utilities 5.10 12 Using MP3 Player Utilities 5.10 (Video Converter 14 General Operation 16 • Turning the Power On/Off 16 • MENU/Lock Button 16 • Headphones Jack 17 &#...Mode 27 • To View Photos 27 • Thumbnail View 28 • Slide Show View 28 Settings Menu 29 Troubleshooting Guide 40 Formatting the Player 42 Resetting the Unit 43 Updating the Firmware 43 Specifications 44 1

User Guide
Page 6
Display 3. Button 10. Headphone Jack (HEADPHONES PART NO. 261-32000-E010*) 2. Navigation † Button 6. Volume - Power On/Off Button 12. Navigation π Button 4. Navigation √/Skip/Search o Button 5. PA-E558* *Consumer Replaceable Part (See page 45 to order.) 6 LOCATION OF CONTROLS 1 7 8 2 9 10 3 11 4 12 5 13 6 1. USB Jack (USB CABLE PART NO. 337-01000-E050*) 7. Volume + Button 9. Reset Button (Inside the Recess Hole) 8. Enter/Play/Pause ®p Button 13. MENU/Lock Button 11. Navigation ®/Skip/Search n Button SOFTWARE DISC PART NO.
Display 3. Button 10. Headphone Jack (HEADPHONES PART NO. 261-32000-E010*) 2. Navigation † Button 6. Volume - Power On/Off Button 12. Navigation π Button 4. Navigation √/Skip/Search o Button 5. PA-E558* *Consumer Replaceable Part (See page 45 to order.) 6 LOCATION OF CONTROLS 1 7 8 2 9 10 3 11 4 12 5 13 6 1. USB Jack (USB CABLE PART NO. 337-01000-E050*) 7. Volume + Button 9. Reset Button (Inside the Recess Hole) 8. Enter/Play/Pause ®p Button 13. MENU/Lock Button 11. Navigation ®/Skip/Search n Button SOFTWARE DISC PART NO.
User Guide
Page 38
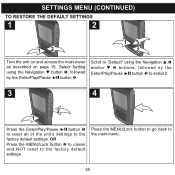
OR Press the MENU/Lock button 2 to cancel and NOT reset to the main menu. 38 Press the MENU/Lock button to go back to the factory default settings. Select Setting using the Navigation L 1 and/or M 2 ... to "Default" using the Navigation M button 1, followed by the Enter/Play/Pause ®p button 3 to select it. 3 4 2 1 Press the Enter/Play/Pause ®p button 1 to reset all of the unit's settings to the factory default settings. SETTINGS MENU (CONTINUED) TO RESTORE THE DEFAULT SETTINGS 1 2 12 13 2 Turn the unit on and...
OR Press the MENU/Lock button 2 to cancel and NOT reset to the main menu. 38 Press the MENU/Lock button to go back to the factory default settings. Select Setting using the Navigation L 1 and/or M 2 ... to "Default" using the Navigation M button 1, followed by the Enter/Play/Pause ®p button 3 to select it. 3 4 2 1 Press the Enter/Play/Pause ®p button 1 to reset all of the unit's settings to the factory default settings. SETTINGS MENU (CONTINUED) TO RESTORE THE DEFAULT SETTINGS 1 2 12 13 2 Turn the unit on and...

User Guide
Page 41
Unit acting erratically. CAUSE SOLUTION The Lock feature is Deactivate Lock feature as activated. Unit needs to be reset Reset unit and/or or firmware needs to be update firmware, see updated. page 43. 41 Unit needs to be reset Reset unit and/or or firmware needs to be update firmware, see updated. described on page 16. page 43. TROUBLESHOOTING GUIDE (CONTINUED) SYMPTOM No buttons work.
Unit acting erratically. CAUSE SOLUTION The Lock feature is Deactivate Lock feature as activated. Unit needs to be reset Reset unit and/or or firmware needs to be update firmware, see updated. page 43. 41 Unit needs to be reset Reset unit and/or or firmware needs to be update firmware, see updated. described on page 16. page 43. TROUBLESHOOTING GUIDE (CONTINUED) SYMPTOM No buttons work.
User Guide
Page 43
After upgrading, format the unit to check if there is new firmware available. FOR FIRMWARE UPGRADE Please visit our Web site at www.memorexelectronics.com to complete the upgrade procedure. 43 IMPORTANT NOTE: Before upgrading the firmware, please backup all of your media files on your computer. For the Reset button, see page 6 for the button's location. RESETTING THE UNIT If the unit acts erratically, reset the unit by inserting a thin object (such as a paper clip) into the recessed Reset button.
After upgrading, format the unit to check if there is new firmware available. FOR FIRMWARE UPGRADE Please visit our Web site at www.memorexelectronics.com to complete the upgrade procedure. 43 IMPORTANT NOTE: Before upgrading the firmware, please backup all of your media files on your computer. For the Reset button, see page 6 for the button's location. RESETTING THE UNIT If the unit acts erratically, reset the unit by inserting a thin object (such as a paper clip) into the recessed Reset button.