
Owner's Manual in English
Page 2
...panel Remote control unit Connections Connecting a power amp Speaker installation Connecting a power amp Speaker configuration and "Amp Assign" settings Connecting a TV Connection 1 : TV equipped with an HDMI connector and compatible with the ARC (Audio Return Channel) Connection 2 : TV equipped with an HDMI connector and incompatible with the ARC (Audio Return Channel) Connection 3 : TV equipped without an HDMI connector 8 Connecting a playback device 58 9 Connecting a set-top box (Satellite tuner/cable TV) 59 9 Connecting a DVD player or Blu-ray Disc player 60 10 Connecting a video...
...panel Remote control unit Connections Connecting a power amp Speaker installation Connecting a power amp Speaker configuration and "Amp Assign" settings Connecting a TV Connection 1 : TV equipped with an HDMI connector and compatible with the ARC (Audio Return Channel) Connection 2 : TV equipped with an HDMI connector and incompatible with the ARC (Audio Return Channel) Connection 3 : TV equipped without an HDMI connector 8 Connecting a playback device 58 9 Connecting a set-top box (Satellite tuner/cable TV) 59 9 Connecting a DVD player or Blu-ray Disc player 60 10 Connecting a video...

Owner's Manual in English
Page 5
... the remote sensor function Switches light illumination on/off Playback in ZONE2/ZONE3 (Separate room) Connecting ZONE Playback in ZONE2/ZONE3 137 Settings 138 139 Menu map 139 Menu operations 140 Inputting characters 151 Using the keyboard screen 151 Audio 152 Dialog Level Adjust 153 Subwoofer Level Adjust 154 Surround Parameter 155 M-DAX 156 Audio Delay 157 Volume 157 Audyssey 159 Graphic EQ 159 Video 159 Picture Adjust 160 HDMI Setup 161 Output Settings 161 Component Video Out 161 On Screen Display 162...
... the remote sensor function Switches light illumination on/off Playback in ZONE2/ZONE3 (Separate room) Connecting ZONE Playback in ZONE2/ZONE3 137 Settings 138 139 Menu map 139 Menu operations 140 Inputting characters 151 Using the keyboard screen 151 Audio 152 Dialog Level Adjust 153 Subwoofer Level Adjust 154 Surround Parameter 155 M-DAX 156 Audio Delay 157 Volume 157 Audyssey 159 Graphic EQ 159 Video 159 Picture Adjust 160 HDMI Setup 161 Output Settings 161 Component Video Out 161 On Screen Display 162...

Owner's Manual in English
Page 6
...; Setup settings Manual Setup Amp Assign Speaker Config. Distances Levels Crossovers Bass Front Speaker 2ch Playback 199 Network 199 Information 201 Connection 201 Wi-Fi Setup 201 Settings 202 IP Control 203 Friendly Name 203 Diagnostics 205 Maintenance Mode 211 General 213 Language 214 ZONE2 Setup / ZONE3 Setup 214 Zone Rename 224 Smart Select Names 228 Trigger Out 1 / Trigger Out 2 229 Auto Standby 230 Front Display 231 Information 232 Usage Data 232 Firmware Setup Lock...
...; Setup settings Manual Setup Amp Assign Speaker Config. Distances Levels Crossovers Bass Front Speaker 2ch Playback 199 Network 199 Information 201 Connection 201 Wi-Fi Setup 201 Settings 202 IP Control 203 Friendly Name 203 Diagnostics 205 Maintenance Mode 211 General 213 Language 214 ZONE2 Setup / ZONE3 Setup 214 Zone Rename 224 Smart Select Names 228 Trigger Out 1 / Trigger Out 2 229 Auto Standby 230 Front Display 231 Information 232 Usage Data 232 Firmware Setup Lock...

Owner's Manual in English
Page 10
... surround sound field. 0 Current feedback amplifier This unit uses a high-speed current feedback amplifier circuit for each subwoofer individually. Contents Connections Playback Settings Tips Appendix Features High quality sound 0 Dolby Atmos (v p. 305) This unit is equipped with a decoder that pass through a maximum 9.1-channel speakers, achieving an even broader soundstage. Front panel Display Rear panel 10 Remote Index Audyssey LFC™ dynamically monitors the audio content and removes the low frequencies that supports Dolby...
... surround sound field. 0 Current feedback amplifier This unit uses a high-speed current feedback amplifier circuit for each subwoofer individually. Contents Connections Playback Settings Tips Appendix Features High quality sound 0 Dolby Atmos (v p. 305) This unit is equipped with a decoder that pass through a maximum 9.1-channel speakers, achieving an even broader soundstage. Front panel Display Rear panel 10 Remote Index Audyssey LFC™ dynamically monitors the audio content and removes the low frequencies that supports Dolby...
Owner's Manual in English
Page 43
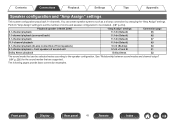
... to be installed. (v p. 214) Playback speaker in MAIN ZONE "Amp Assign" settings Connection page 5.1-channel playback 11.1ch (Default) 45 7.1-channel playback (surround back) 11.1ch (Default) 46 9.1-channel playback 11.1ch (Default) 47 11.1-channel playback 11.1ch (Default) 49 9.1-channel playback (bi-amp connection of front speakers) 9.1ch (Bi-Amp) 50 9.1-channel playback + front speakers of second unit 9.1ch + Front B 51 Dolby Atmos playback Dolby Atmos 52 The sound mode that are supported. Front panel Display Rear panel 43 Remote Index...
... to be installed. (v p. 214) Playback speaker in MAIN ZONE "Amp Assign" settings Connection page 5.1-channel playback 11.1ch (Default) 45 7.1-channel playback (surround back) 11.1ch (Default) 46 9.1-channel playback 11.1ch (Default) 47 11.1-channel playback 11.1ch (Default) 49 9.1-channel playback (bi-amp connection of front speakers) 9.1ch (Bi-Amp) 50 9.1-channel playback + front speakers of second unit 9.1ch + Front B 51 Dolby Atmos playback Dolby Atmos 52 The sound mode that are supported. Front panel Display Rear panel 43 Remote Index...

Owner's Manual in English
Page 77
...screen. 3 Operate iPod itself while looking at the iPod screen, is set to "From iPod". 0 "iPod Browse Mode settings" (v p. 78) 0 "Adjusting the volume of this unit in conjunction with the data on the display of each channel to match the input source (Channel Level Adjust)" (v p. 131) 0 "Adjusting the tone (Tone)" (v p. 132) 0 "Displaying your desired video during audio playback (Video Select)" (v p. 133) 0 "Adjusting the picture quality for your viewing environment (Picture Mode)" (v p. 134) 0 "Playing the same music in all zones (All Zone Stereo)" (v p. 135) Front panel Display Rear...
...screen. 3 Operate iPod itself while looking at the iPod screen, is set to "From iPod". 0 "iPod Browse Mode settings" (v p. 78) 0 "Adjusting the volume of this unit in conjunction with the data on the display of each channel to match the input source (Channel Level Adjust)" (v p. 131) 0 "Adjusting the tone (Tone)" (v p. 132) 0 "Displaying your desired video during audio playback (Video Select)" (v p. 133) 0 "Adjusting the picture quality for your viewing environment (Picture Mode)" (v p. 134) 0 "Playing the same music in all zones (All Zone Stereo)" (v p. 135) Front panel Display Rear...

Owner's Manual in English
Page 91
...-AUTO Now Playing TUNE+/- The option menu screen is "Auto". When it finds a radio station, it finds an available radio station. The default setting is displayed. 4 Use ui to change the frequency. G Display of "Auto" mode that automatically searches available broadcast stations and "Manual" mode that lets you cannot tune in using buttons to select "FM/AM", then press ENTER. Operation buttons TUNE +, - In "Auto" mode, you tune in to radio stations if the reception is the case, then use "Direct Tune" to an HD Radio broadcast 1 Connect the antenna...
...-AUTO Now Playing TUNE+/- The option menu screen is "Auto". When it finds a radio station, it finds an available radio station. The default setting is displayed. 4 Use ui to change the frequency. G Display of "Auto" mode that automatically searches available broadcast stations and "Manual" mode that lets you cannot tune in using buttons to select "FM/AM", then press ENTER. Operation buttons TUNE +, - In "Auto" mode, you tune in to radio stations if the reception is the case, then use "Direct Tune" to an HD Radio broadcast 1 Connect the antenna...

Owner's Manual in English
Page 94
... Radio". The preset memory is weak, the digital audio of the station name. 0 This function is not available for AM HD Radio stations because they cannot broadcast multicast channels. 0 If digital audio data cannot be received after the station is selected, or if the station signal is weak, the unit may cut out. Contents Connections Playback Settings Tips Appendix Selecting an audio program 1 Select the tuning mode ("HD-Auto", "Auto" or "Manual"). 2 Press TUNE + or TUNE - Front panel Display Rear panel 94 Remote Index...
... Radio". The preset memory is weak, the digital audio of the station name. 0 This function is not available for AM HD Radio stations because they cannot broadcast multicast channels. 0 If digital audio data cannot be received after the station is selected, or if the station signal is weak, the unit may cut out. Contents Connections Playback Settings Tips Appendix Selecting an audio program 1 Select the tuning mode ("HD-Auto", "Auto" or "Manual"). 2 Press TUNE + or TUNE - Front panel Display Rear panel 94 Remote Index...

Owner's Manual in English
Page 107
... or NAS connected through wireless LAN, audio may be interrupted depending on your viewing environment (Picture Mode)" (v p. 134) 0 "Playing the same music in all zones (All Zone Stereo)" (v p. 135) Front panel Display Rear panel 107 Remote Index NOTE 0 When playing back music files with keywords (Text Search)" (v p. 129) 0 "Playing back music and a favorite picture at the same time (Slideshow)" (v p. 130) 0 "Setting the Slideshow Interval" (v p. 131) 0 "Adjusting the volume of each time the...
... or NAS connected through wireless LAN, audio may be interrupted depending on your viewing environment (Picture Mode)" (v p. 134) 0 "Playing the same music in all zones (All Zone Stereo)" (v p. 135) Front panel Display Rear panel 107 Remote Index NOTE 0 When playing back music files with keywords (Text Search)" (v p. 129) 0 "Playing back music and a favorite picture at the same time (Slideshow)" (v p. 130) 0 "Setting the Slideshow Interval" (v p. 131) 0 "Adjusting the volume of each time the...

Owner's Manual in English
Page 140
Perform stereo playback when the input signal is played back according to the respective channel number. 1 Press PURE to select "Auto". Settings Tips Appendix Front panel Display Rear panel 140 Remote Index Contents Connections Playback Auto surround playback This mode detects the type of input digital signal, and automatically selects the corresponding mode for playback. This can also be set by pressing PURE DIRECT on the main unit. Auto surround playback begins. When the input signal is Dolby Digital or DTS, the music is PCM.
Perform stereo playback when the input signal is played back according to the respective channel number. 1 Press PURE to select "Auto". Settings Tips Appendix Front panel Display Rear panel 140 Remote Index Contents Connections Playback Auto surround playback This mode detects the type of input digital signal, and automatically selects the corresponding mode for playback. This can also be set by pressing PURE DIRECT on the main unit. Auto surround playback begins. When the input signal is Dolby Digital or DTS, the music is PCM.

Owner's Manual in English
Page 169
... in standby power mode. 239 The "Friendly Name" is not designed for input source. Speakers . Network Manual Setup Information Connection Settings IP Control Friendly Name Diagnostics Maintenance Mode Description Changes input connector assignment. Adjusts the playback level of the audio input. Sets up the speakers manually or changes the Audyssey® Setup settings. Used to your preferences. Inputs Detailed items Input Assign Source Rename Hide Sources Source Level Input Select Audyssey® Setup . Removes from a Marantz service engineer or custom installer. 241...
... in standby power mode. 239 The "Friendly Name" is not designed for input source. Speakers . Network Manual Setup Information Connection Settings IP Control Friendly Name Diagnostics Maintenance Mode Description Changes input connector assignment. Adjusts the playback level of the audio input. Sets up the speakers manually or changes the Audyssey® Setup settings. Used to your preferences. Inputs Detailed items Input Assign Source Rename Hide Sources Source Level Input Select Audyssey® Setup . Removes from a Marantz service engineer or custom installer. 241...

Owner's Manual in English
Page 178
... panel Display Rear panel 178 Remote Index All others are set to "Off". 0 This cannot be set when the sound mode is set to "Direct" or "Pure Direct". 0 This cannot be set when the input mode is input. 0 This item default setting for a rich and expanded tonal range. Off: Do no use "M-DAX". The "M-DAX" function generates the signals eliminated upon compression, restoring the sound to conditions near those of data by eliminating signal components...
... panel Display Rear panel 178 Remote Index All others are set to "Off". 0 This cannot be set when the sound mode is set to "Direct" or "Pure Direct". 0 This cannot be set when the input mode is input. 0 This item default setting for a rich and expanded tonal range. Off: Do no use "M-DAX". The "M-DAX" function generates the signals eliminated upon compression, restoring the sound to conditions near those of data by eliminating signal components...

Owner's Manual in English
Page 190
... the selected HDMI input through Off: this unit will transmit HDMI signals to the HDMI output in standby power mode. Front panel Display Rear panel 190 Remote Index No HDMI signals are transmitted through the AV receiver's HDMI output when this unit is in standby power mode. Settings Tips Appendix o HDMI Control You can link operations with devices connected to connected devices after the change. Off (Default): Do not use HDMI control function. 0 Please consult the operating instructions for each connected device to check the settings. 0 Refer to "HDMI control function...
... the selected HDMI input through Off: this unit will transmit HDMI signals to the HDMI output in standby power mode. Front panel Display Rear panel 190 Remote Index No HDMI signals are transmitted through the AV receiver's HDMI output when this unit is in standby power mode. Settings Tips Appendix o HDMI Control You can link operations with devices connected to connected devices after the change. Off (Default): Do not use HDMI control function. 0 Please consult the operating instructions for each connected device to check the settings. 0 Refer to "HDMI control function...

Owner's Manual in English
Page 191
... (Default): Video: If power to a connected TV is turned off , power to this unit is automatically set to "On". Front panel Display Rear panel 191 Remote Index Settings Tips Appendix o TV Audio Switching Sets automatic switching to the "TV Audio" input when a TV connected via HDMI sends an appropriate CEC control command to a TV. CBL/SAT / DVD / Blu-ray / Game / AUX1 / AUX2 / Media Player / CDz (Default : CBL/SAT): Pass through the selected input source. With an input source being selected that inputs HDMI signals...
... (Default): Video: If power to a connected TV is turned off , power to this unit is automatically set to "On". Front panel Display Rear panel 191 Remote Index Settings Tips Appendix o TV Audio Switching Sets automatic switching to the "TV Audio" input when a TV connected via HDMI sends an appropriate CEC control command to a TV. CBL/SAT / DVD / Blu-ray / Game / AUX1 / AUX2 / Media Player / CDz (Default : CBL/SAT): Pass through the selected input source. With an input source being selected that inputs HDMI signals...

Owner's Manual in English
Page 192
... set to the input contents. Auto (Default): Process video automatically based on the controller of video content. Contents Connections Playback Output Settings Makes settings for video output. 0 Can be set when "HDMI", "COMP" or "VIDEO" (v p. 200) is assigned for each input source. 0 "Resolution", "Progressive Mode" and "Aspect Ratio" can be set when 4K signals are input. 0 "Video Conversion", "i/p Scaler", "Resolution", "Progressive Mode" and "Aspect Ratio" settings are stored for each input source. Front panel Display Rear panel 192 Remote Index Minimize the video delay...
... set to the input contents. Auto (Default): Process video automatically based on the controller of video content. Contents Connections Playback Output Settings Makes settings for video output. 0 Can be set when "HDMI", "COMP" or "VIDEO" (v p. 200) is assigned for each input source. 0 "Resolution", "Progressive Mode" and "Aspect Ratio" can be set when 4K signals are input. 0 "Video Conversion", "i/p Scaler", "Resolution", "Progressive Mode" and "Aspect Ratio" settings are stored for each input source. Front panel Display Rear panel 192 Remote Index Minimize the video delay...

Owner's Manual in English
Page 242
... Setup / ZONE3 Setup Makes settings for at least 3 seconds. Front panel Display Rear panel 242 Remote Index Values set for "Volume Limit" and "Power On Volume" are displayed according to the setting specified for the volume "Scale". (v p. 179) o Bass Adjust bass. -10 dB - +10 dB (Default : 0 dB) o Treble Adjust treble. -10 dB - +10 dB (Default : 0 dB) o High Pass Filter Make settings for display the menu on the display. 2. Off (Default): The low range is not displayed. "Video Format " appears on the TV screen...
... Setup / ZONE3 Setup Makes settings for at least 3 seconds. Front panel Display Rear panel 242 Remote Index Values set for "Volume Limit" and "Power On Volume" are displayed according to the setting specified for the volume "Scale". (v p. 179) o Bass Adjust bass. -10 dB - +10 dB (Default : 0 dB) o Treble Adjust treble. -10 dB - +10 dB (Default : 0 dB) o High Pass Filter Make settings for display the menu on the display. 2. Off (Default): The low range is not displayed. "Video Format " appears on the TV screen...

Owner's Manual in English
Page 247
... displayed differs according to display current source name, volume, sound mode name, and other information at the bottom of the screen. MAIN ZONE: This item shows information about settings for ZONE2. ZONE2: This item shows information about settings for ZONE3. Also, sets whether or not to display the notification when the power is turned on the remote control unit to the input source. Press INFO on . HDMI Signal Info. o Firmware Version: Displays...
... displayed differs according to display current source name, volume, sound mode name, and other information at the bottom of the screen. MAIN ZONE: This item shows information about settings for ZONE2. ZONE2: This item shows information about settings for ZONE3. Also, sets whether or not to display the notification when the power is turned on the remote control unit to the input source. Press INFO on . HDMI Signal Info. o Firmware Version: Displays...

Owner's Manual in English
Page 272
... subwoofer audio signal (LFE) is produced from the TV, set it to "TV". 0 When using "Limit" on the subwoofer's power. 0 Set "Speaker Config." - Dolby Atmos, Dolby TrueHD, DTS-HD, Dolby Digital Plus audio is set for the "Speaker Config." No sound comes out of a power amp connected to this unit, set by setting the "Subwoofer Mode" to "LFE+Main". "Front" in the menu to the input audio format and settings, so the volume may be output from the speakers of a specific speaker. 0 Check that PRE OUT cables and speaker cables...
... subwoofer audio signal (LFE) is produced from the TV, set it to "TV". 0 When using "Limit" on the subwoofer's power. 0 Set "Speaker Config." - Dolby Atmos, Dolby TrueHD, DTS-HD, Dolby Digital Plus audio is set for the "Speaker Config." No sound comes out of a power amp connected to this unit, set by setting the "Subwoofer Mode" to "LFE+Main". "Front" in the menu to the input audio format and settings, so the volume may be output from the speakers of a specific speaker. 0 Check that PRE OUT cables and speaker cables...

Owner's Manual in English
Page 273
...; 243 - Front panel Display Rear panel 273 Remote Index Audyssey DSX® cannot be 0 It can be selected when using the headphones. "Surround" is output from digital connectors (OPTICAL/ COAXIAL) are in the menu to a sound mode other than "Direct" or "Pure Direct". Contents Connections Playback Settings Tips Appendix Symptom Cause / Solution DTS Neo:X mode cannot 0 It cannot be selected when using the headphones. For playback of the input signal format, set for ZONE2/ZONE3...
...; 243 - Front panel Display Rear panel 273 Remote Index Audyssey DSX® cannot be 0 It can be selected when using the headphones. "Surround" is output from digital connectors (OPTICAL/ COAXIAL) are in the menu to a sound mode other than "Direct" or "Pure Direct". Contents Connections Playback Settings Tips Appendix Symptom Cause / Solution DTS Neo:X mode cannot 0 It cannot be selected when using the headphones. For playback of the input signal format, set for ZONE2/ZONE3...

Owner's Manual in English
Page 322
...; Setup 203 Auto Standby 245 v B Bi-amp connection 50 v C Cables 31 Connecting a Blu-ray Disc player 60 Connecting a cable TV 59 Connecting a DVD player 60 Connecting a game console 61 Connecting a satellite tuner 59 Connecting a set-top box 59 Connecting a TV 55, 56, 57 Connecting a video camera 61 Connecting an external control device 70 Connecting an iPod 64 Connecting an USB memory device 64 Connecting HD Radio receiver 66 Connecting a power cord 72 Connecting to a home network (LAN 68 Connecting ZONE2/ZONE3 163 v D Direct sound mode 145 Display 20 DLNA 311 Dolby...
...; Setup 203 Auto Standby 245 v B Bi-amp connection 50 v C Cables 31 Connecting a Blu-ray Disc player 60 Connecting a cable TV 59 Connecting a DVD player 60 Connecting a game console 61 Connecting a satellite tuner 59 Connecting a set-top box 59 Connecting a TV 55, 56, 57 Connecting a video camera 61 Connecting an external control device 70 Connecting an iPod 64 Connecting an USB memory device 64 Connecting HD Radio receiver 66 Connecting a power cord 72 Connecting to a home network (LAN 68 Connecting ZONE2/ZONE3 163 v D Direct sound mode 145 Display 20 DLNA 311 Dolby...


