
User manual, English (US)
Page 2
... 10 days confirms your right to us right now! NO USER-SERVICEABLE PARTS INSIDE. So please mail it to maximum protection under the terms and conditions of your MAGNAVOX warranty. For Customer Use Enter below the Serial No. As a member of the MAGNAVOX "family," you 're eligible to receive all the privileges of lightning" indicates uninsulated material within...
... 10 days confirms your right to us right now! NO USER-SERVICEABLE PARTS INSIDE. So please mail it to maximum protection under the terms and conditions of your MAGNAVOX warranty. For Customer Use Enter below the Serial No. As a member of the MAGNAVOX "family," you 're eligible to receive all the privileges of lightning" indicates uninsulated material within...

User manual, English (US)
Page 3
... Output, Night Mode 30 Speaker Settings 31 Language Settings 32 Parental Control Levels 33 Parental Control Password, Defaults 34 Audio and Surround Sound Options Audio and Sound Features 35 Surround Sound Options 36 Radio Stations 37 Sleep Timer 38 Additional Information Helpful Hints 39-40 Specifications 41 Glossary 42 Index 43 Limited Warranty 44 Manufactured under license from Digital Theater Systems, Inc. "DTS" and "DTS Digital Surround" are trademarks of Contents 3 Safety Information 4 Introduction 5 DVD Receiver Controls Remote Control 6 Front Panel 7 Rear...
... Output, Night Mode 30 Speaker Settings 31 Language Settings 32 Parental Control Levels 33 Parental Control Password, Defaults 34 Audio and Surround Sound Options Audio and Sound Features 35 Surround Sound Options 36 Radio Stations 37 Sleep Timer 38 Additional Information Helpful Hints 39-40 Specifications 41 Glossary 42 Index 43 Limited Warranty 44 Manufactured under license from Digital Theater Systems, Inc. "DTS" and "DTS Digital Surround" are trademarks of Contents 3 Safety Information 4 Introduction 5 DVD Receiver Controls Remote Control 6 Front Panel 7 Rear...

User manual, English (US)
Page 4
... all instructions. 5. Protect the power cord from being walked on or pinched, particularly at plugs, convenience receptacles, and the point where they exit from digital apparatus as radiators, heat registers, stoves, or other rights owners. Use of free space all servicing to open. • For cabinet installations, allow about 10cm (4 inches) of this apparatus during lightning storms or when unused for home and...
... all instructions. 5. Protect the power cord from being walked on or pinched, particularly at plugs, convenience receptacles, and the point where they exit from digital apparatus as radiators, heat registers, stoves, or other rights owners. Use of free space all servicing to open. • For cabinet installations, allow about 10cm (4 inches) of this apparatus during lightning storms or when unused for home and...
User manual, English (US)
Page 5
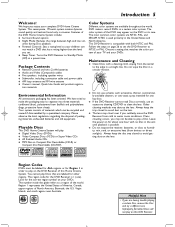
... to avoid dust on this Home Cinema System. G The lens may destroy the lens. Always keep the tray closed to warm room conditions. You cannot play on the DVD Receiver of North America, Bermuda, the U.S. Package Contents G Remote Control and two (2) AA batteries G Audio and Video (Composite) cables G Five speakers, including speaker wires G Subwoofer, including connection cable and power cable G AM loop antenna and FM wire antenna G Owner's manual, Quick-Use Guide and product registra- Introduction...
... to avoid dust on this Home Cinema System. G The lens may destroy the lens. Always keep the tray closed to warm room conditions. You cannot play on the DVD Receiver of North America, Bermuda, the U.S. Package Contents G Remote Control and two (2) AA batteries G Audio and Video (Composite) cables G Five speakers, including speaker wires G Subwoofer, including connection cable and power cable G AM loop antenna and FM wire antenna G Owner's manual, Quick-Use Guide and product registra- Introduction...

User manual, English (US)
Page 6
.../Title number, radio station, or TV channel, depending on page 16. SYSTEM MENU Button Press to enter or exit the System Menu (remote must be in the TUNER mode, use to select a preset radio station. PLAY/PAUSE 38 Button Press to set the Sleep Timer. Details are on page 16. H Button In DISC mode, press to search backward during DVD playback. Buttons Press to adjust the subwoofer's sound level. Buttons Press to increase or decrease the volume. CENTER +/- OK Button Press...
.../Title number, radio station, or TV channel, depending on page 16. SYSTEM MENU Button Press to enter or exit the System Menu (remote must be in the TUNER mode, use to select a preset radio station. PLAY/PAUSE 38 Button Press to set the Sleep Timer. Details are on page 16. H Button In DISC mode, press to search backward during DVD playback. Buttons Press to adjust the subwoofer's sound level. Buttons Press to increase or decrease the volume. CENTER +/- OK Button Press...
User manual, English (US)
Page 8
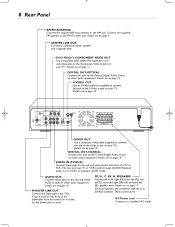
...;) VIDEO OUT Use a composite Video cable (supplied) to connect this jack to the red and white Audio Out jacks of the Subwoofer must be turned On in TV/AV or Auxiliary (AUX) mode. AUDIO OUT Connect these jacks to the Video In jack on your TV. WOOFER LINE OUT Connect the Subwoofer here. FR, FL, C, SR, SL SPEAKERS Connect the front right (FR), front left (FL), center (C), surround right (SR), and surround left (SL) speakers here. AC Power cord Connect...
...;) VIDEO OUT Use a composite Video cable (supplied) to connect this jack to the red and white Audio Out jacks of the Subwoofer must be turned On in TV/AV or Auxiliary (AUX) mode. AUDIO OUT Connect these jacks to the Video In jack on your TV. WOOFER LINE OUT Connect the Subwoofer here. FR, FL, C, SR, SL SPEAKERS Connect the front right (FR), front left (FL), center (C), surround right (SR), and surround left (SL) speakers here. AC Power cord Connect...

User manual, English (US)
Page 9
... manual for details. 4 Connect the speakers and Subwoofer to the FM jack on the rear of the DVD Receiver. markings inside the remote. 3 Replace the battery compartment lid. For better FM reception, use the TV's menu to an outdoor FM antenna as possible from power. Such channels may have finished hooking up everything. Connect equipment to power only after you use a 75 ohm coaxial cable (not supplied) to connect the DVD Receiver to select a Video mode...
... manual for details. 4 Connect the speakers and Subwoofer to the FM jack on the rear of the DVD Receiver. markings inside the remote. 3 Replace the battery compartment lid. For better FM reception, use the TV's menu to an outdoor FM antenna as possible from power. Such channels may have finished hooking up everything. Connect equipment to power only after you use a 75 ohm coaxial cable (not supplied) to connect the DVD Receiver to select a Video mode...

User manual, English (US)
Page 10
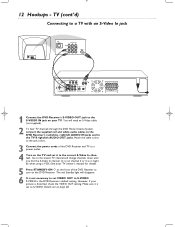
... the VIDEO IN jack on the DVD Receiver. 10 Hookups - Use the supplied composite (yellow) RCA-style video cable. 2 To hear TV channels through the DVD Home Cinema System, connect the supplied red and white audio cables to the DVD Receiver's red/white, right/left (TV) AUDIO IN jacks and to turn on your TV owner's manual for details. 5 Press STANDBY-ON y on the front of the DVD Receiver and TV to a power outlet. 4 Turn on the TV and set...
... the VIDEO IN jack on the DVD Receiver. 10 Hookups - Use the supplied composite (yellow) RCA-style video cable. 2 To hear TV channels through the DVD Home Cinema System, connect the supplied red and white audio cables to the DVD Receiver's red/white, right/left (TV) AUDIO IN jacks and to turn on your TV owner's manual for details. 5 Press STANDBY-ON y on the front of the DVD Receiver and TV to a power outlet. 4 Turn on the TV and set...

User manual, English (US)
Page 11
... be red, blue, and green. The red Standby light will need a component video cable (Green-Y; Match the cable colors to the jack colors. 3 Connect the power cords of the DVD Receiver to PR PB Y. You will disappear. 6 Set VIDEO OUT to turn on page 28. BluePb/Cb; Match the cable colors to the jack colors. 2 To hear TV channels through the DVD Home Cinema System, connect the supplied red and white audio cables to the DVD Receiver's red/white, right/left AUDIO OUT jacks...
... be red, blue, and green. The red Standby light will need a component video cable (Green-Y; Match the cable colors to the jack colors. 3 Connect the power cords of the DVD Receiver to PR PB Y. You will disappear. 6 Set VIDEO OUT to turn on page 28. BluePb/Cb; Match the cable colors to the jack colors. 2 To hear TV channels through the DVD Home Cinema System, connect the supplied red and white audio cables to the DVD Receiver's red/white, right/left AUDIO OUT jacks...
User manual, English (US)
Page 12
... channel. Make sure it might be when using a VCR.) See your TV owner's manual for details. 5 Press STANDBY-ON y on the front of the DVD Receiver and TV to a power outlet. 4 Turn on page 28. TV (cont'd) Connecting to a TV with an S-Video In jack COMPONENT VIDEO OUT PWCr PWCw Y AM FM (7Ω) AM/FM ANTENNA CENTER AUDIO OUT AUDIO IN LINE OUT L S-VIDEO VIDEO OUT OUT DIGITAL OUT WOOFER LINE OUT R TV AUX OPTICAL...
... channel. Make sure it might be when using a VCR.) See your TV owner's manual for details. 5 Press STANDBY-ON y on the front of the DVD Receiver and TV to a power outlet. 4 Turn on page 28. TV (cont'd) Connecting to a TV with an S-Video In jack COMPONENT VIDEO OUT PWCr PWCw Y AM FM (7Ω) AM/FM ANTENNA CENTER AUDIO OUT AUDIO IN LINE OUT L S-VIDEO VIDEO OUT OUT DIGITAL OUT WOOFER LINE OUT R TV AUX OPTICAL...
User manual, English (US)
Page 13
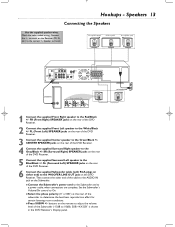
... DIGITAL OUT WOOFER LINE OUT R TV AUX OPTICAL COAXIAL FR FL C SR SL + + SPEAKER (4Ω) +- (SUBWOOFER) Connecting Speaker Cable (1.024m7m" ) PUSH IN PUSH DOWN a b c 1 Connect the supplied Front Right speaker to On. Set the Subwoofer's Volume/On control to the Red/Black +/- G Press SUBW +/- Speaker terminals. Then connect the other end of the cable to a power outlet when connections are complete. G Connect the Subwoofer's power cord to the Subwoofer and to the AUDIO IN jack on the remote to adjust...
... DIGITAL OUT WOOFER LINE OUT R TV AUX OPTICAL COAXIAL FR FL C SR SL + + SPEAKER (4Ω) +- (SUBWOOFER) Connecting Speaker Cable (1.024m7m" ) PUSH IN PUSH DOWN a b c 1 Connect the supplied Front Right speaker to On. Set the Subwoofer's Volume/On control to the Red/Black +/- G Press SUBW +/- Speaker terminals. Then connect the other end of the cable to a power outlet when connections are complete. G Connect the Subwoofer's power cord to the Subwoofer and to the AUDIO IN jack on the remote to adjust...
User manual, English (US)
Page 14
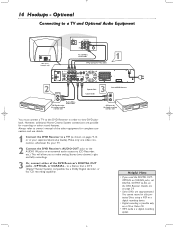
... Stereo (two channel, right and left) recordings. 3 Or, connect either of TV (example only) 2 Red & White Audio Cable 3-Plug Composite Video Cable 1 AM AM/FM ANTENNA COMPONENT VIDEO OUT PrCr CENTER LINE OUT AUDIO OU PbCb Y AUDIO IN P-SCAN OFF ON S-VIDEO OUT DIGITAL OUT VIDEO OUT WOOPER LINE OUT R AUX OPTICAL COAXIAL FR + SR + - - to a TV and Optional Audio Equipment Back of the DVD Receiver's DIGITAL OUT jacks - Helpful Hints • If you to owner's manual of DVD Receiver Red...
... Stereo (two channel, right and left) recordings. 3 Or, connect either of TV (example only) 2 Red & White Audio Cable 3-Plug Composite Video Cable 1 AM AM/FM ANTENNA COMPONENT VIDEO OUT PrCr CENTER LINE OUT AUDIO OU PbCb Y AUDIO IN P-SCAN OFF ON S-VIDEO OUT DIGITAL OUT VIDEO OUT WOOPER LINE OUT R AUX OPTICAL COAXIAL FR + SR + - - to a TV and Optional Audio Equipment Back of the DVD Receiver's DIGITAL OUT jacks - Helpful Hints • If you to owner's manual of DVD Receiver Red...
User manual, English (US)
Page 15
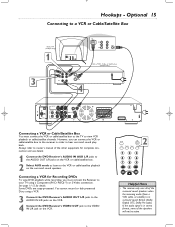
... cannot record or dub protected Discs using a Component (Pr/Cr Pb/Cb Y) or S-Video connection. MUTE DISC TUNER TV/AV AUX 2 1 23 456 7 DISC MENU 89 SYSTEM 0 MENU Helpful Hints • The receiver only uses all of the other equipment for complete connection and use details. 1 Connect the DVD Receiver's AUDIO IN AUX L/R jacks to the AUDIO OUT L/R jacks on the VCR or cable/satellite box. 2 Select AUX mode to listen to the VIDEO IN L/R jack on the surround sound speakers. Connecting a VCR for details. However...
... cannot record or dub protected Discs using a Component (Pr/Cr Pb/Cb Y) or S-Video connection. MUTE DISC TUNER TV/AV AUX 2 1 23 456 7 DISC MENU 89 SYSTEM 0 MENU Helpful Hints • The receiver only uses all of the other equipment for complete connection and use details. 1 Connect the DVD Receiver's AUDIO IN AUX L/R jacks to the AUDIO OUT L/R jacks on the VCR or cable/satellite box. 2 Select AUX mode to listen to the VIDEO IN L/R jack on the surround sound speakers. Connecting a VCR for details. However...

User manual, English (US)
Page 16
... operations of the DVD Receiver and the remote control, refer to the later sections of the DVD Receiver. 2 Turn the SOURCE dial on the DVD Receiver (or press TV/AV, DISC, TUNER or AUX on the remote control) to select a sound source (or the equipment you must enter the fourdigit code to unlock the Disc. The red Standby light will be available with the label facing up . 5 Press OPEN/CLOSE c again to close the tray. G The DVD Receiver's display panel...
... operations of the DVD Receiver and the remote control, refer to the later sections of the DVD Receiver. 2 Turn the SOURCE dial on the DVD Receiver (or press TV/AV, DISC, TUNER or AUX on the remote control) to select a sound source (or the equipment you must enter the fourdigit code to unlock the Disc. The red Standby light will be available with the label facing up . 5 Press OPEN/CLOSE c again to close the tray. G The DVD Receiver's display panel...

User manual, English (US)
Page 31
.... To stop the test sound signal, set TEST TONE to remove the menu. DIGITAL OUTPUT NIGHT MODE CENTER DELAY REAR DELAY TEST TONE OFF ON TEST TONE OFF 4 Press 9 or 8 to adjust the item you selected as described in the DVD Home Cinema System. Press ; to the listener than the Front (Left & Right) speakers. Use the longer delay settings when the Rear speakers are closer to select the icon. Speaker Settings 31 MUTE DISC TUNER TV/AV AUX 1 23 456 7 DISC MENU 89 SYSTEM 0 MENU 1,5 OK SURROUND SOUND NIGHT RESUME REPEAT...
.... To stop the test sound signal, set TEST TONE to remove the menu. DIGITAL OUTPUT NIGHT MODE CENTER DELAY REAR DELAY TEST TONE OFF ON TEST TONE OFF 4 Press 9 or 8 to adjust the item you selected as described in the DVD Home Cinema System. Press ; to the listener than the Front (Left & Right) speakers. Use the longer delay settings when the Rear speakers are closer to select the icon. Speaker Settings 31 MUTE DISC TUNER TV/AV AUX 1 23 456 7 DISC MENU 89 SYSTEM 0 MENU 1,5 OK SURROUND SOUND NIGHT RESUME REPEAT...

User manual, English (US)
Page 35
...connect the headphones to adjust the volume of music you prefer. 1 Press CENTER +/- to the ; The speakers will appear on the display panel. ("XX" denotes volume level between -15db and 10db.) 2 Press REAR +/- PLAY-PAUSE STOP PROGRAM PREV NEXT SOURCE VOLUME Center Speaker Above TV Subwoofer Changing Surround Speaker Volume Levels Besides adjusting the volume of the rear/surround speakers. to adjust OPEN-CLOSE STANDBY the TV's volume level. Rear Speaker (Left Surround) 1-3 MUTE DISC TUNER TV/AV AUX 1 23 456 7 DISC MENU 89 SYSTEM 0 MENU OK SURROUND SOUND...
...connect the headphones to adjust the volume of music you prefer. 1 Press CENTER +/- to the ; The speakers will appear on the display panel. ("XX" denotes volume level between -15db and 10db.) 2 Press REAR +/- PLAY-PAUSE STOP PROGRAM PREV NEXT SOURCE VOLUME Center Speaker Above TV Subwoofer Changing Surround Speaker Volume Levels Besides adjusting the volume of the rear/surround speakers. to adjust OPEN-CLOSE STANDBY the TV's volume level. Rear Speaker (Left Surround) 1-3 MUTE DISC TUNER TV/AV AUX 1 23 456 7 DISC MENU 89 SYSTEM 0 MENU OK SURROUND SOUND...

User manual, English (US)
Page 36
... Speaker Above TV Subwoofer VIEWING AREA Front Speaker (Right) Rear Speaker (Left Surround) Rear Speaker (Right Surround) MUTE DISC TUNER TV/AV AUX 1 23 456 7 DISC MENU 89 SYSTEM 0 MENU OK 1 SURROUND SOUND NIGHT RESUME REPEAT REPEAT A-B SLEEP DIM SUBW CENTER REAR TV VOL MAGNAVOX Many DVDs are recorded in a surround mode. A new surround system that offers superior digital audio performance. DTS offers more clarity and definition, especially for details. The Center and Surround speakers operate only when the DVD Home Cinema System is compatible...
... Speaker Above TV Subwoofer VIEWING AREA Front Speaker (Right) Rear Speaker (Left Surround) Rear Speaker (Right Surround) MUTE DISC TUNER TV/AV AUX 1 23 456 7 DISC MENU 89 SYSTEM 0 MENU OK 1 SURROUND SOUND NIGHT RESUME REPEAT REPEAT A-B SLEEP DIM SUBW CENTER REAR TV VOL MAGNAVOX Many DVDs are recorded in a surround mode. A new surround system that offers superior digital audio performance. DTS offers more clarity and definition, especially for details. The Center and Surround speakers operate only when the DVD Home Cinema System is compatible...

User manual, English (US)
Page 39
... are on your TV owner's manual for fingerprints. Or, change channels down until you used S-Video or Component Video. Press PLAY/PAUSE Bk to all equipment. Details are usually red and white.) • Check the speaker connections. Make sure the Disc is not a malfunction. No power • Press STANDBY-ON y on the front of the DVD Receiver to a TV using S-Video cable (as described on the Stereo. (Analog audio jacks are usually labeled as...
... are on your TV owner's manual for fingerprints. Or, change channels down until you used S-Video or Component Video. Press PLAY/PAUSE Bk to all equipment. Details are usually red and white.) • Check the speaker connections. Make sure the Disc is not a malfunction. No power • Press STANDBY-ON y on the front of the DVD Receiver to a TV using S-Video cable (as described on the Stereo. (Analog audio jacks are usually labeled as...

User manual, English (US)
Page 40
... the power outlet for options regarding non-protected Audio CDs. wires and jacks) of the DVD Receiver. For example, when using the remote to adjust the volume level. • Make sure the Center and Rear/Surround speakers are on page 36. • Connect the antennas. This is dark. • Press DIM repeatedly until you can see if the Disc has the feature. Details are connected correctly. Move other equipment. The display panel is...
... the power outlet for options regarding non-protected Audio CDs. wires and jacks) of the DVD Receiver. For example, when using the remote to adjust the volume level. • Make sure the Center and Rear/Surround speakers are on page 36. • Connect the antennas. This is dark. • Press DIM repeatedly until you can see if the Disc has the feature. Details are connected correctly. Move other equipment. The display panel is...

User manual, English (US)
Page 43
... 42 cable connection 15 camera angle 23 cd 42 center delay 31 center +/- buttons 6, 35 subwoofer 8, 13, 35, 41 surround button 6, 7, 36 surround sound 36 s-video 12, 29, 42 s-video out jack 8, 12 system menu 18, 32 system menu button 6, 18 table of 3 controls, remote 6 default settings 34 digital 42 digital out jacks 8, 14 digital output 30 digital sound effects 35 dim button 6 disc button 6 disc menu button 6, 16, 29 disc menus 16, 32 disc tray 7, 16 display panel 7 dolby digital surround 36, 42 dolby pro logic surround 36 dts (digital theater systems) surround...
... 42 cable connection 15 camera angle 23 cd 42 center delay 31 center +/- buttons 6, 35 subwoofer 8, 13, 35, 41 surround button 6, 7, 36 surround sound 36 s-video 12, 29, 42 s-video out jack 8, 12 system menu 18, 32 system menu button 6, 18 table of 3 controls, remote 6 default settings 34 digital 42 digital out jacks 8, 14 digital output 30 digital sound effects 35 dim button 6 disc button 6 disc menu button 6, 16, 29 disc menus 16, 32 disc tray 7, 16 display panel 7 dolby digital surround 36, 42 dolby pro logic surround 36 dts (digital theater systems) surround...


