User Manual
Page 3
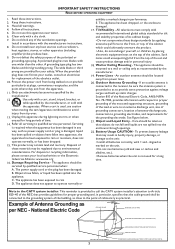
... standards for a long time. Tilt/Stability - Wall or Ceiling Mounting - Outdoor Antenna Grounding - Object and Liquid Entry - National Electric Code GROUND CLAMP ANTENNA LEAD IN WIRE ANTENNA DISCHARGE UNIT (NEC SECTION 810-20) ELECTRIC SERVICE EQUIPMENT 3 GROUNDING CONDUCTORS (NEC SECTION 810-21) GROUND CLAMPS POWER SERVICE GROUNDING ELECTRODE SYSTEM (NEC ART 250, PART H) Read these instructions. 3. When a cart is connected to avoid injury from...
... standards for a long time. Tilt/Stability - Wall or Ceiling Mounting - Outdoor Antenna Grounding - Object and Liquid Entry - National Electric Code GROUND CLAMP ANTENNA LEAD IN WIRE ANTENNA DISCHARGE UNIT (NEC SECTION 810-20) ELECTRIC SERVICE EQUIPMENT 3 GROUNDING CONDUCTORS (NEC SECTION 810-21) GROUND CLAMPS POWER SERVICE GROUNDING ELECTRODE SYSTEM (NEC ART 250, PART H) Read these instructions. 3. When a cart is connected to avoid injury from...
User Manual
Page 4
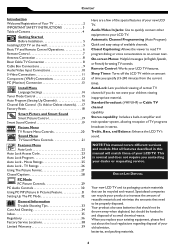
...12 PC (Monitor) Connection 13 Install Menu Language Settings 14 Tuner Mode Control 15 Auto Program (Setting Up Channels 16 Channel Edit Control (To Add or Delete channels) . . . .17 Factory Reset 18 Smart Picture and Smart Sound Smart Picture Control 19 Smart Sound Control 19 Picture Menu TV Picture Menu Controls 20 Sound Menu TV Sound Menu Controls 21 Features Menu Auto Lock 22 Auto Lock Access Code 23 Auto Lock Program 24 Auto Lock - Audio/Video In Jacks: Use to quickly connect other equipment to your LCD TV. Remote Control: Works your children viewing inappropriate material...
...12 PC (Monitor) Connection 13 Install Menu Language Settings 14 Tuner Mode Control 15 Auto Program (Setting Up Channels 16 Channel Edit Control (To Add or Delete channels) . . . .17 Factory Reset 18 Smart Picture and Smart Sound Smart Picture Control 19 Smart Sound Control 19 Picture Menu TV Picture Menu Controls 20 Sound Menu TV Sound Menu Controls 21 Features Menu Auto Lock 22 Auto Lock Access Code 23 Auto Lock Program 24 Auto Lock - Audio/Video In Jacks: Use to quickly connect other equipment to your LCD TV. Remote Control: Works your children viewing inappropriate material...

User Manual
Page 7
Number buttons Press to select the video input source: AV, S-Video, HD, PC, TV. Source button Press to select TV channels. Smart Picture button Press repeatedly to exit the onscreen menu. Smart Sound button Press repeatedly to toggle among the 4 settings; Picture Format button Press the FORMAT button repeatedly to select among the four screen format sizes; 4:3, EXPAND 4:3, COMPRESS 16:9, or HD 4:3. The LCD TV will appear on or off. Personal, News, Music, or Theater. PIP button Press repeatedly to...
Number buttons Press to select the video input source: AV, S-Video, HD, PC, TV. Source button Press to select TV channels. Smart Picture button Press repeatedly to exit the onscreen menu. Smart Sound button Press repeatedly to toggle among the 4 settings; Picture Format button Press the FORMAT button repeatedly to select among the four screen format sizes; 4:3, EXPAND 4:3, COMPRESS 16:9, or HD 4:3. The LCD TV will appear on or off. Personal, News, Music, or Theater. PIP button Press repeatedly to...
User Manual
Page 9
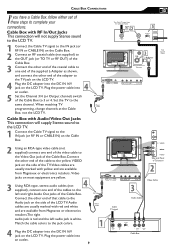
...; Video Cable � Audio Cable � CABLE IN OUTPUT CH 3 4 TO TV L R AUDIO OUT VIDEO OUT Cable Box Match the cable colors to the same channel. When watching TV programming, change channels at the Cable Box, not the LCD TV. VIDEO AUDIO VIDEO Side Jack Panel of Television 75 � Coaxial Cable VGA PC DC Adapter Power Cable VGA PC DC Adapter Power Cable Cable TV signal S - Video jacks on the LCD TV. Set the TV to the jack colors. 4 Plug the DC adapter into an outlet. 9 The Cable TV signal from Magnavox or electronics retailers. CABLE BOX CONNECTIONS...
...; Video Cable � Audio Cable � CABLE IN OUTPUT CH 3 4 TO TV L R AUDIO OUT VIDEO OUT Cable Box Match the cable colors to the same channel. When watching TV programming, change channels at the Cable Box, not the LCD TV. VIDEO AUDIO VIDEO Side Jack Panel of Television 75 � Coaxial Cable VGA PC DC Adapter Power Cable VGA PC DC Adapter Power Cable Cable TV signal S - Video jacks on the LCD TV. Set the TV to the jack colors. 4 Plug the DC adapter into an outlet. 9 The Cable TV signal from Magnavox or electronics retailers. CABLE BOX CONNECTIONS...
User Manual
Page 11
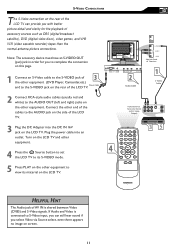
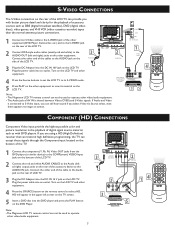
... sources such as DBS (digital broadcast satellite), DVD (digital video discs), video games, and VHS VCR (video cassette recorder) tapes than the normal antenna picture connections. Turn on the LCD TV and other equipment. 4 Press the SOURCE Source button to set the LCD TV to its S-VIDEO mode. 5 Press PLAY on the other equipment to view its material on the other end of the cables to complete the connection on the LCD TV. VIDEO AUDIO VIDEO � 2 Connect RCA-style audio cables (usually red and white...
... sources such as DBS (digital broadcast satellite), DVD (digital video discs), video games, and VHS VCR (video cassette recorder) tapes than the normal antenna picture connections. Turn on the LCD TV and other equipment. 4 Press the SOURCE Source button to set the LCD TV to its S-VIDEO mode. 5 Press PLAY on the other equipment to view its material on the other end of the cables to complete the connection on the LCD TV. VIDEO AUDIO VIDEO � 2 Connect RCA-style audio cables (usually red and white...

User Manual
Page 12
.... VGA PC COMPONENT VIDEO CABLES (Green, Blue, Red) 2 Audio Cable 2 1 S-VIDEO VIDEO AUDIO R OUT OUT OUT L COMP VIDEO Y Pb Pr 3 ACCESSORY DEVICE 5 EQUIPPED WITH COMPONENT VIDEO OUTPUTS. 4 MENU OK SOURCE PIP CC 12 HD will appear in the playback of digital signal source material, such as with DVD players. Connect the other equipment. 4 Press the SOURCE SOURCE button on the remote control to 3 the COMP(onent) VIDEO Input jacks on the LCD TV. COMPONENT (YPBPR) CONNECTIONS Component Video input provide the highest possible color and picture resolution in the upper...
.... VGA PC COMPONENT VIDEO CABLES (Green, Blue, Red) 2 Audio Cable 2 1 S-VIDEO VIDEO AUDIO R OUT OUT OUT L COMP VIDEO Y Pb Pr 3 ACCESSORY DEVICE 5 EQUIPPED WITH COMPONENT VIDEO OUTPUTS. 4 MENU OK SOURCE PIP CC 12 HD will appear in the playback of digital signal source material, such as with DVD players. Connect the other equipment. 4 Press the SOURCE SOURCE button on the remote control to 3 the COMP(onent) VIDEO Input jacks on the LCD TV. COMPONENT (YPBPR) CONNECTIONS Component Video input provide the highest possible color and picture resolution in the upper...
User Manual
Page 13
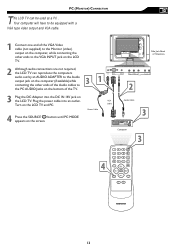
... TV. 3 Plug the DC Adapter into an outlet. ��� Turn on the LCD TV and PC. 4 Press the SOURCE SOURCE button until PC MODE appears on the LCD TV. PC (MONITOR) CONNECTION T his LCD TV can be equipped with a VGA type video output and VGA cable. 1 Connect one end of the VGA Video cable (not supplied) to the Monitor (video) output on the computer, while connecting the other ends to the VGA INPUT jack on the LCD TV. 2 Although audio connections...
... TV. 3 Plug the DC Adapter into an outlet. ��� Turn on the LCD TV and PC. 4 Press the SOURCE SOURCE button until PC MODE appears on the LCD TV. PC (MONITOR) CONNECTION T his LCD TV can be equipped with a VGA type video output and VGA cable. 1 Connect one end of the VGA Video cable (not supplied) to the Monitor (video) output on the computer, while connecting the other ends to the VGA INPUT jack on the LCD TV. 2 Although audio connections...
User Manual
Page 16
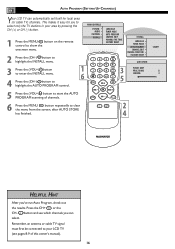
.... 1 Press the MENU MENU button on the remote control to show the onscreen menu. Press the CH+ or the CH- AUTO PROGRAM (SETTING UP CHANNELS) Your LCD TV can select. button and see pages 8-9 of channels. SOURCE 3 5 PIP INSTALL LANGUAGE TUNER MODE AUTO PROGRAM CHANNEL EDIT MANUAL FINE TUNE FACTORY RESET AUTO STORE PLEASE WAIT PROG.FOUND CHANNEL 6 Press the MENU MENU button repeatedly to start the AUTO PROGRAM scanning of this owner's manual). 16 MAIN CONTROLS PICTURE AUDIO FEATURES INSTALL LANGUAGE TUNER MODE AUTO PROGRAM CHANNEL EDIT MANUAL FINE TUNE FACTORY RESET 2 Press the...
.... 1 Press the MENU MENU button on the remote control to show the onscreen menu. Press the CH+ or the CH- AUTO PROGRAM (SETTING UP CHANNELS) Your LCD TV can select. button and see pages 8-9 of channels. SOURCE 3 5 PIP INSTALL LANGUAGE TUNER MODE AUTO PROGRAM CHANNEL EDIT MANUAL FINE TUNE FACTORY RESET AUTO STORE PLEASE WAIT PROG.FOUND CHANNEL 6 Press the MENU MENU button repeatedly to start the AUTO PROGRAM scanning of this owner's manual). 16 MAIN CONTROLS PICTURE AUDIO FEATURES INSTALL LANGUAGE TUNER MODE AUTO PROGRAM CHANNEL EDIT MANUAL FINE TUNE FACTORY RESET 2 Press the...
User Manual
Page 22
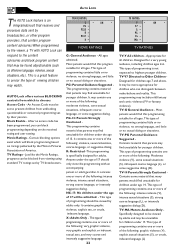
... or censored programming set by TV broadcasters. All ages admitted. PG: Parental Guidance Suggested This programming contains material that parents may find unsuitable for younger children. R: Restricted -This programming is specifically designed for a very young audience, including children ages 2-6. This type of programming should only view this programming with AUTO Lock can block programming depending on ratings patterned by the Motion Pictures Association...
... or censored programming set by TV broadcasters. All ages admitted. PG: Parental Guidance Suggested This programming contains material that parents may find unsuitable for younger children. R: Restricted -This programming is specifically designed for a very young audience, including children ages 2-6. This type of programming should only view this programming with AUTO Lock can block programming depending on ratings patterned by the Motion Pictures Association...

User Manual
Page 26
...65533; MENU OK SOURCE CC � � � � � PIP � AUTOLOCK ACCESS CODE ---- AUTO LOCK - MAIN CONTROLS PICTURE AUDIO FEATURES INSTALL SOURCE PICTURE FORMAT PICTURE ALIGNMENT AUTOLOCK CLOSED CAPTION � FEATURES SOURCE PICTURE FORMAT PICTURE ALIGNMENT AUTOLOCK CLOSED CAPTION LOCK PROGRAM CHANG CODE CLEAR ALL BLOCK OPTION MOVIE RATING TV RATING 2 Press the (CH-) button to highlight the FEATURES menu. 3 Press the (VOL+) button to enter the FEATURES menu. 4 Press the (CH-) button to highlight AUTO Lock. 5 Press the (VOL+) button, INPUT USER CODE will...
...65533; MENU OK SOURCE CC � � � � � PIP � AUTOLOCK ACCESS CODE ---- AUTO LOCK - MAIN CONTROLS PICTURE AUDIO FEATURES INSTALL SOURCE PICTURE FORMAT PICTURE ALIGNMENT AUTOLOCK CLOSED CAPTION � FEATURES SOURCE PICTURE FORMAT PICTURE ALIGNMENT AUTOLOCK CLOSED CAPTION LOCK PROGRAM CHANG CODE CLEAR ALL BLOCK OPTION MOVIE RATING TV RATING 2 Press the (CH-) button to highlight the FEATURES menu. 3 Press the (VOL+) button to enter the FEATURES menu. 4 Press the (CH-) button to highlight AUTO Lock. 5 Press the (VOL+) button, INPUT USER CODE will...

User Manual
Page 30
... breaks or channel changes. The 3 factory-set controls and a personal control. Virtual Sound: Adds greater depth and dimension to show the onscreen menu. 2 Press the (CH-) AUDIO menu. When ON, AVL will go into standby mode. OK 5 SOURCE CC 2 4 5 Press the (VOL+) or (VOL-) buttons to adjust the item. 4 3 PIP 5 6 Press MENU MENU repeatedly to select from 3 factory-set controls (News, Music, and Theatre) enhance the particular program you are watching. AUDIO SMART SOUND SETTINGS STEREO...
... breaks or channel changes. The 3 factory-set controls and a personal control. Virtual Sound: Adds greater depth and dimension to show the onscreen menu. 2 Press the (CH-) AUDIO menu. When ON, AVL will go into standby mode. OK 5 SOURCE CC 2 4 5 Press the (VOL+) or (VOL-) buttons to adjust the item. 4 3 PIP 5 6 Press MENU MENU repeatedly to select from 3 factory-set controls (News, Music, and Theatre) enhance the particular program you are watching. AUDIO SMART SOUND SETTINGS STEREO...
User Manual
Page 33
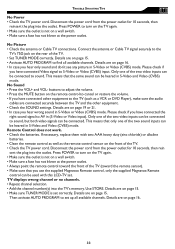
... AUTO PROGRAM to the TV (such as the remote control sensor on page 15. • Make sure TUNER MODE is not on the rear of the TV. • Check the TV power cord. buttons to adjust the volume. • Press the MUTE button on the remote control to sound. Only one of the two video inputs can be connected to sound, but both video signals can be connected to cancel or restore the volume. • If you use the supplied Magnavox Remote control...
... AUTO PROGRAM to the TV (such as the remote control sensor on page 15. • Make sure TUNER MODE is not on the rear of the TV. • Check the TV power cord. buttons to adjust the volume. • Press the MUTE button on the remote control to sound. Only one of the two video inputs can be connected to sound, but both video signals can be connected to cancel or restore the volume. • If you use the supplied Magnavox Remote control...
User Manual
Page 36
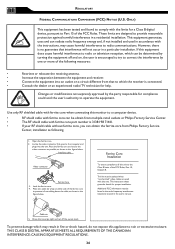
..., Part 15, Subpart B. Changes or modifications not expressly approved by turning the equipment off the excess leads. Interface cable Video connector Ferrite Core 3. Place two cable tie wrap on either side of the FCC Rules. This instruction sheet gives the details for compliance could void the user's authority to operate the equipment. Open the ferrite core. 2. Locate the video...
..., Part 15, Subpart B. Changes or modifications not expressly approved by turning the equipment off the excess leads. Interface cable Video connector Ferrite Core 3. Place two cable tie wrap on either side of the FCC Rules. This instruction sheet gives the details for compliance could void the user's authority to operate the equipment. Open the ferrite core. 2. Locate the video...
Product Spec Sheet
Page 1
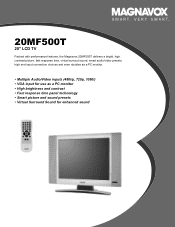
20MF500T 20" LCD TV Packed with performance features, the Magnavox 20MF500T delivers a bright, high contrast picture, fast response time, virtual surroud sound, smart audio/video presets, high end input connection choices and even doubles as a PC monitor. • Multiple Audio/Video inputs (480i/p, 720p, 1080i) • VGA input for use as a PC monitor • High brightness and contrast • Fast response time panel technology • Smart picture and sound presets • Virtual Surround Sound for enhanced sound
20MF500T 20" LCD TV Packed with performance features, the Magnavox 20MF500T delivers a bright, high contrast picture, fast response time, virtual surroud sound, smart audio/video presets, high end input connection choices and even doubles as a PC monitor. • Multiple Audio/Video inputs (480i/p, 720p, 1080i) • VGA input for use as a PC monitor • High brightness and contrast • Fast response time panel technology • Smart picture and sound presets • Virtual Surround Sound for enhanced sound
Product Spec Sheet
Page 2
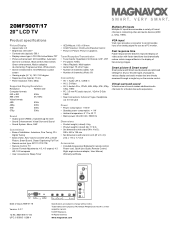
Fast response time Faster response time delivers improved display of video action with stand in the display of fast-moving images. Smart picture & Smart sound Smart picture and Smart sound presets are directly accessed through a single key on the remote control. 20MF500T/17 20" LCD TV Multiple AV inputs Multiple AV inputs accommodate a variety of format choices in D-Sub 15HD • Rear Connections: Antenna F-type, Headphone out 3.5 mm jack Power • Power consumption: < 60 W • Standby power consumption: < 1 W •...
Fast response time Faster response time delivers improved display of video action with stand in the display of fast-moving images. Smart picture & Smart sound Smart picture and Smart sound presets are directly accessed through a single key on the remote control. 20MF500T/17 20" LCD TV Multiple AV inputs Multiple AV inputs accommodate a variety of format choices in D-Sub 15HD • Rear Connections: Antenna F-type, Headphone out 3.5 mm jack Power • Power consumption: < 60 W • Standby power consumption: < 1 W •...

Quick Start Guide
Page 2
...3 Rear connectors Remove the cable cover to install the LCD TV on the wall, please consult a professional technician for installation a professional technician. LCD TV Quick Use and Hookup Guide CONTENTS TV CHANNEL INSTALLATION 1 UNFOLD THE BASE 1 INSTALLING LCD TV ON THE WALL . . 2 PRESENTATION OF THE LCD TV . . . . . 2 ACCESSORIES 3 BATTERY INSTALLATION 3 REMOTE CONTROL OPERATION 3 ANTENNA TV 4 BASIC CABLE TV CONNECTION . . . . . 4 TUNER MODE CONTROL 5 AUTO PROGRAM (SETTING UP CHANNELS 5 CABLE BOX (WITH RF IN/OUTPUTS) . . 6 CABLE BOX (WITH AUDIO/VIDEO OUTPUTS 6 S-VIDEO...
...3 Rear connectors Remove the cable cover to install the LCD TV on the wall, please consult a professional technician for installation a professional technician. LCD TV Quick Use and Hookup Guide CONTENTS TV CHANNEL INSTALLATION 1 UNFOLD THE BASE 1 INSTALLING LCD TV ON THE WALL . . 2 PRESENTATION OF THE LCD TV . . . . . 2 ACCESSORIES 3 BATTERY INSTALLATION 3 REMOTE CONTROL OPERATION 3 ANTENNA TV 4 BASIC CABLE TV CONNECTION . . . . . 4 TUNER MODE CONTROL 5 AUTO PROGRAM (SETTING UP CHANNELS 5 CABLE BOX (WITH RF IN/OUTPUTS) . . 6 CABLE BOX (WITH AUDIO/VIDEO OUTPUTS 6 S-VIDEO...
Quick Start Guide
Page 3
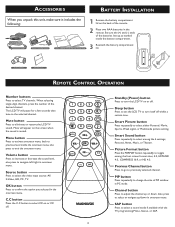
...: Power adapter & cable Owner`s Manual & Quick Use and Hookup Guide 1 Remove the battery compartment lid on the back of the batteries line up Guide Tuner L-Adapter Warranty Card Warranty Card � � � REMOTE CONTROL OPERATION Number buttons Press to navigate left/right in onscreen menu. Tuner L-Adapter Warranty Card up as marked inside the onscreen menu, also press to eliminate or restore the LCD TV sound. Mute will pause for a few seconds then tune to change the size...
...: Power adapter & cable Owner`s Manual & Quick Use and Hookup Guide 1 Remove the battery compartment lid on the back of the batteries line up Guide Tuner L-Adapter Warranty Card Warranty Card � � � REMOTE CONTROL OPERATION Number buttons Press to navigate left/right in onscreen menu. Tuner L-Adapter Warranty Card up as marked inside the onscreen menu, also press to eliminate or restore the LCD TV sound. Mute will pause for a few seconds then tune to change the size...

Quick Start Guide
Page 4
... of the supplied L-Adapter as shown, and connect the other end of the adapter to the TV jack on the LCD TV. 2 Plug the DC adapter into your home may not operate properly. 2 DC Adapter Power Cable Rear Jack panel of Television 2 BASIC CABLE TV CONNECTION Your Cable TV input into the DC IN 16V jack on your remote control, before installing TV channels. 3 Outdoor or Indoor Antenna (Combination VHF/UHF) Twin-lead wire to the screws on the LCD TV.
... of the supplied L-Adapter as shown, and connect the other end of the adapter to the TV jack on the LCD TV. 2 Plug the DC adapter into your home may not operate properly. 2 DC Adapter Power Cable Rear Jack panel of Television 2 BASIC CABLE TV CONNECTION Your Cable TV input into the DC IN 16V jack on your remote control, before installing TV channels. 3 Outdoor or Indoor Antenna (Combination VHF/UHF) Twin-lead wire to the screws on the LCD TV.
Quick Start Guide
Page 6
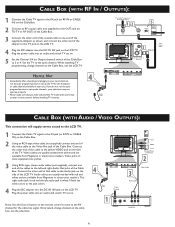
... Magnavox or electronics retailers. Match the cable colors to the jack colors. 4 Plug the DC adapter into the DC IN 16V jack on the LCD TV. VGA � PC DC Adapter Power Cable Cable TV signal S - Set the TV to the left audio jack is red and the left and right Audio Out jacks of �elevision � Video Cable � Audio Cable � CABLE IN OUTPUT CH 3 4 TO TV L R AUDIO OUT VIDEO OUT Cable Box 6 Note: Use the Source button on the remote control...
... Magnavox or electronics retailers. Match the cable colors to the jack colors. 4 Plug the DC adapter into the DC IN 16V jack on the LCD TV. VGA � PC DC Adapter Power Cable Cable TV signal S - Set the TV to the left audio jack is red and the left and right Audio Out jacks of �elevision � Video Cable � Audio Cable � CABLE IN OUTPUT CH 3 4 TO TV L R AUDIO OUT VIDEO OUT Cable Box 6 Note: Use the Source button on the remote control...
Quick Start Guide
Page 7
... TV screen. 5 Insert a DVD disc into the DVD player and press the PLAY button on the rear of the accessory device to view its S-VIDEO mode. 5 Press PLAY on the other video/audio equipment. � � � � � ��� � � �� �� � ACCESSORY DEVICE EQUIPPED WITH COMPONENT VIDEO OUTPUTS. � � MENU OK SOURCE PIP CC 7 Note: • The Magnavox LCD TV remote control can not be used to operate...
... TV screen. 5 Insert a DVD disc into the DVD player and press the PLAY button on the rear of the accessory device to view its S-VIDEO mode. 5 Press PLAY on the other video/audio equipment. � � � � � ��� � � �� �� � ACCESSORY DEVICE EQUIPPED WITH COMPONENT VIDEO OUTPUTS. � � MENU OK SOURCE PIP CC 7 Note: • The Magnavox LCD TV remote control can not be used to operate...


