
User Manual
Page 1
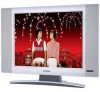
Owner`s Manual 15MF/20MF Series LCD TV NEED HELP?CALL US! MAGNAVOX REPRESENTATIVES ARE READY TO HELP YOU WITH ANY QUESTIONS ABOUT YOUR NEW PRODUCT. Model No: Serial No: 3138 155 23435 CALL US BEFORE YOU CONSIDER RETURNING THE PRODUCT. 1- 80 0 -705 -20 0 0 OR VISIT US ON THE WEB AT WWW.USASUPPORT.MAGNAVOX.COM Important! WE CAN GUIDE YOU THROUGH CONNECTIONS, FIRST-TIME SETUP, AND ANY OF THE FEATURES. Return your Warranty Registration Card within 10 days. WE WANT YOU TO START ENJOYING YOUR NEW PRODUCT RIGHT AWAY.
Owner`s Manual 15MF/20MF Series LCD TV NEED HELP?CALL US! MAGNAVOX REPRESENTATIVES ARE READY TO HELP YOU WITH ANY QUESTIONS ABOUT YOUR NEW PRODUCT. Model No: Serial No: 3138 155 23435 CALL US BEFORE YOU CONSIDER RETURNING THE PRODUCT. 1- 80 0 -705 -20 0 0 OR VISIT US ON THE WEB AT WWW.USASUPPORT.MAGNAVOX.COM Important! WE CAN GUIDE YOU THROUGH CONNECTIONS, FIRST-TIME SETUP, AND ANY OF THE FEATURES. Return your Warranty Registration Card within 10 days. WE WANT YOU TO START ENJOYING YOUR NEW PRODUCT RIGHT AWAY.
User Manual
Page 4
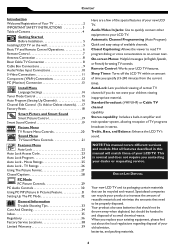
.... . . .17 Factory Reset 18 Smart Picture and Smart Sound Smart Picture Control 19 Smart Sound Control 19 Picture Menu TV Picture Menu Controls 20 Sound Menu TV Sound Menu Controls 21 Features Menu Auto Lock 22 Auto Lock Access Code 23 Auto Lock Program 24 Auto Lock - Specialized ... the current time). NOTE:This manual covers different versions and models. Automatic Channel Programming (Auto Program): Quick and easy setup of your LCD TV. This is normal and does not require you replace your existing equipment, please find out about the local regulations regarding disposal of...
.... . . .17 Factory Reset 18 Smart Picture and Smart Sound Smart Picture Control 19 Smart Sound Control 19 Picture Menu TV Picture Menu Controls 20 Sound Menu TV Sound Menu Controls 21 Features Menu Auto Lock 22 Auto Lock Access Code 23 Auto Lock Program 24 Auto Lock - Specialized ... the current time). NOTE:This manual covers different versions and models. Automatic Channel Programming (Auto Program): Quick and easy setup of your LCD TV. This is normal and does not require you replace your existing equipment, please find out about the local regulations regarding disposal of...
User Manual
Page 5
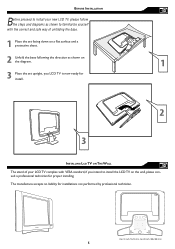
The manufacture accepts no liability for proper installing. BEFORE INSTALLATION Before proceed to install your new LCD TV, please follow the steps and diagrams as shown to familiarize yourself with the correct and safe way of unfolding the base. 1 Place the ...the direction as shown on the diagram. 1 3 Place the set upright, you LCD TV is now ready for install. 2 3 INSTALLING LCD TV ON THE WALL The stand of your LCD TV complies with VESA standard, if you intend to install the LCD TV on the wall, please consult a professional technician for installations not performed by professional ...
The manufacture accepts no liability for proper installing. BEFORE INSTALLATION Before proceed to install your new LCD TV, please follow the steps and diagrams as shown to familiarize yourself with the correct and safe way of unfolding the base. 1 Place the ...the direction as shown on the diagram. 1 3 Place the set upright, you LCD TV is now ready for install. 2 3 INSTALLING LCD TV ON THE WALL The stand of your LCD TV complies with VESA standard, if you intend to install the LCD TV on the wall, please consult a professional technician for installations not performed by professional ...
User Manual
Page 6
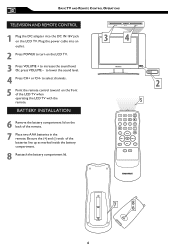
...; � 6 Be sure the (+) and (-) ends of the LCD TV when operating the LCD TV with the remote. to select channels. 5 Point the remote control toward on the LCD TV. BATTERY INSTALLATION 6 Remove the battery compartment lid on the LCD TV. 3 Press VOLUME + to increase the sound level. BASIC TV AND REMOTE CONTROL OPERATIONS TELEVISION AND REMOTE CONTROL 1 Plug...
...; � 6 Be sure the (+) and (-) ends of the LCD TV when operating the LCD TV with the remote. to select channels. 5 Point the remote control toward on the LCD TV. BATTERY INSTALLATION 6 Remove the battery compartment lid on the LCD TV. 3 Press VOLUME + to increase the sound level. BASIC TV AND REMOTE CONTROL OPERATIONS TELEVISION AND REMOTE CONTROL 1 Plug...

User Manual
Page 7
...exit the onscreen menu. REMOTE CONTROL MENU OK SOURCE PIP CC 7 Standby (Power) button Press to turn the LCD TV on or off within a certain time. Sleep button Press to set the LCD TV to turn itself off . Also press to toggle among the 4 settings; Personal, News, Music, or Theater....Press to select either Personal, Movie, Sports, Weak signal, or Multimedia picture setting. Smart Picture button Press repeatedly to eliminate or restore the LCD TV sound. PIP button Press repeatedly to the selected channel. Mute will pause for a few seconds then tune to change the size of the ...
...exit the onscreen menu. REMOTE CONTROL MENU OK SOURCE PIP CC 7 Standby (Power) button Press to turn the LCD TV on or off within a certain time. Sleep button Press to set the LCD TV to turn itself off . Also press to toggle among the 4 settings; Personal, News, Music, or Theater....Press to select either Personal, Movie, Sports, Weak signal, or Multimedia picture setting. Smart Picture button Press repeatedly to eliminate or restore the LCD TV sound. PIP button Press repeatedly to the selected channel. Mute will pause for a few seconds then tune to change the size of the ...
User Manual
Page 8
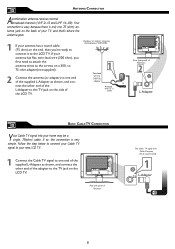
...to your home may be a single, 75(•ohm) cable. to 75-ohm adapter(not supplied). 2 Connect the antenna (or adapter) to the LCD TV. If so, this connection is only one 75 (ohm) antenna jack on a 300- ANTENNA CONNECTION Acombination antenna receives normal broadcast channels (VHF 2-13 ... shown, and connect the other end of Television � OR Antenna with 75 � cable L-Adapter BASIC CABLE TV CONNECTION Y our Cable TV signal into your new LCD TV. 1 Connect the Cable TV signal to one end of the supplied L-Adapter as shown, and connect the other end of the L-Adapter to the...
...to your home may be a single, 75(•ohm) cable. to 75-ohm adapter(not supplied). 2 Connect the antenna (or adapter) to the LCD TV. If so, this connection is only one 75 (ohm) antenna jack on a 300- ANTENNA CONNECTION Acombination antenna receives normal broadcast channels (VHF 2-13 ... shown, and connect the other end of Television � OR Antenna with 75 � cable L-Adapter BASIC CABLE TV CONNECTION Y our Cable TV signal into your new LCD TV. 1 Connect the Cable TV signal to one end of the supplied L-Adapter as shown, and connect the other end of the L-Adapter to the...
User Manual
Page 9
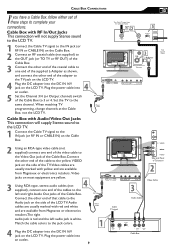
...the cables to complete your connections. Video jacks on most equipment are available from Magnavox or electronics retailers.The right audio jack is white. Match the cable colors to the TV jack on the side of the LCD TV.Audio cables are usually marked with red and white and are available from... Magnavox or electronics retailers. Cable Box with RF In/Out Jacks This connection will supply ...
...the cables to complete your connections. Video jacks on most equipment are available from Magnavox or electronics retailers.The right audio jack is white. Match the cable colors to the TV jack on the side of the LCD TV.Audio cables are usually marked with red and white and are available from... Magnavox or electronics retailers. Cable Box with RF In/Out Jacks This connection will supply ...
User Manual
Page 10
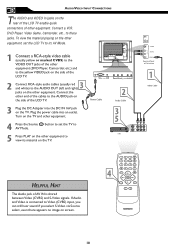
Connect the other equipment. VIDEO AUDIO VIDEO Rear Jack Panel of Tele vision 1 Video Cable HELPFUL HINT The Audio jack of the LCD TV. 3 Plug the DC Adapter into an outlet. If Audio and Video is shared between Video (CVBS) and S-Video signals. Connect a VCR, DVD Player, Video Game, ... CVBS) to the VIDEO OUT jacks of the other equipment (DVD Player, Camcorder, etc.) and to the yellow VIDEO jack on the side of the LCD TV. 2 3 Connect RCA-style audio cables (usually red and white) to the AUDIO OUT (left and right) jacks on the other end of the cables to...
Connect the other equipment. VIDEO AUDIO VIDEO Rear Jack Panel of Tele vision 1 Video Cable HELPFUL HINT The Audio jack of the LCD TV. 3 Plug the DC Adapter into an outlet. If Audio and Video is shared between Video (CVBS) and S-Video signals. Connect a VCR, DVD Player, Video Game, ... CVBS) to the VIDEO OUT jacks of the other equipment (DVD Player, Camcorder, etc.) and to the yellow VIDEO jack on the side of the LCD TV. 2 3 Connect RCA-style audio cables (usually red and white) to the AUDIO OUT (left and right) jacks on the other end of the cables to...
User Manual
Page 11
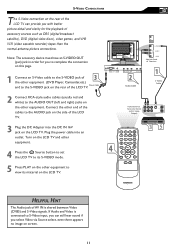
...AUDIO VIDEO � 2 Connect RCA-style audio cables (usually red and white) to the AUDIO OUT (left and right) jacks on the rear of the LCD TV. � S - VGA PC 1 Connect an S-Video cable to the S-VIDEO jack of the other equipment (DVD Player, Camcorder, etc.) � and... to the S-VIDEO jack on the other equipment. S-VIDEO CONNECTIONS T he S-Video connection on the rear of the LCD TV can still hear sound if you with better picture detail and clarity for you to complete the connection on this page. Connect the other equipment...
...AUDIO VIDEO � 2 Connect RCA-style audio cables (usually red and white) to the AUDIO OUT (left and right) jacks on the rear of the LCD TV. � S - VGA PC 1 Connect an S-Video cable to the S-VIDEO jack of the other equipment (DVD Player, Camcorder, etc.) � and... to the S-VIDEO jack on the other equipment. S-VIDEO CONNECTIONS T he S-Video connection on the rear of the LCD TV can still hear sound if you with better picture detail and clarity for you to complete the connection on this page. Connect the other equipment...

User Manual
Page 12
... Y Pb Pr 3 ACCESSORY DEVICE 5 EQUIPPED WITH COMPONENT VIDEO OUTPUTS. 4 MENU OK SOURCE PIP CC 12 Turn on the LCD TV and other end of the cable to the Audio jack on the rear of LCD TV. 3 Plug the DC Adapter into the DC IN 16 V jack on the rear of the accessory device to.... 5 Insert a DVD disc into an outlet. HD will appear in the upper left ad right) output jacks on the LCD TV. Plug the power cable into the DVD player and press the PLAY button on the remote control to 3 the COMP(onent) VIDEO Input jacks on ...
... Y Pb Pr 3 ACCESSORY DEVICE 5 EQUIPPED WITH COMPONENT VIDEO OUTPUTS. 4 MENU OK SOURCE PIP CC 12 Turn on the LCD TV and other end of the cable to the Audio jack on the rear of LCD TV. 3 Plug the DC Adapter into the DC IN 16 V jack on the rear of the accessory device to.... 5 Insert a DVD disc into an outlet. HD will appear in the upper left ad right) output jacks on the LCD TV. Plug the power cable into the DVD player and press the PLAY button on the remote control to 3 the COMP(onent) VIDEO Input jacks on ...
User Manual
Page 13
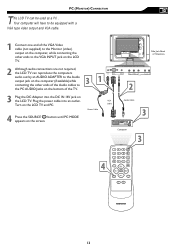
...video output and VGA cable. 1 Connect one end of Television � � � MENU OK SOURCE PIP CC 13 PC (MONITOR) CONNECTION T his LCD TV can reproduce the computers VGA PC audio out by an AUDIO ADAPTER to the Audio output jack on the computer (if available) while � �...; connecting the other ends of the Audio cables to the PC AUDIO Jacks on the bottom of the TV. 3 Plug the DC Adapter into an outlet. ��� Turn on the LCD TV and PC. 4 Press the SOURCE SOURCE button until PC MODE appears on the screen. � Side...
...video output and VGA cable. 1 Connect one end of Television � � � MENU OK SOURCE PIP CC 13 PC (MONITOR) CONNECTION T his LCD TV can reproduce the computers VGA PC audio out by an AUDIO ADAPTER to the Audio output jack on the computer (if available) while � �...; connecting the other ends of the Audio cables to the PC AUDIO Jacks on the bottom of the TV. 3 Plug the DC Adapter into an outlet. ��� Turn on the LCD TV and PC. 4 Press the SOURCE SOURCE button until PC MODE appears on the screen. � Side...
User Manual
Page 15
...(antenna), or AUTO. 1 6 MENU OK 5 SOURCE CC 2 4 3 PIP 5 6 Press the MENU MENU button repeatedly to clear the menu from a cable TV signal or an antenna signal. 1 Press the Menu MENU button to see the onscreen menu. HELPFUL HINT •When CABLE is selected, channels 1-125 are... available. •When ANTENNA is selected, channels 2-69 are available. •When AUTO is selected, your LCD TV will search automatically for the LCD TV to know if you to change the LCD TV's signal input to highlight the INSTALL menu. 3 Press the (VOL+) INSTALL menu. MAIN CONTROLS PICTURE AUDIO ...
...(antenna), or AUTO. 1 6 MENU OK 5 SOURCE CC 2 4 3 PIP 5 6 Press the MENU MENU button repeatedly to clear the menu from a cable TV signal or an antenna signal. 1 Press the Menu MENU button to see the onscreen menu. HELPFUL HINT •When CABLE is selected, channels 1-125 are... available. •When ANTENNA is selected, channels 2-69 are available. •When AUTO is selected, your LCD TV will search automatically for the LCD TV to know if you to change the LCD TV's signal input to highlight the INSTALL menu. 3 Press the (VOL+) INSTALL menu. MAIN CONTROLS PICTURE AUDIO ...
User Manual
Page 16
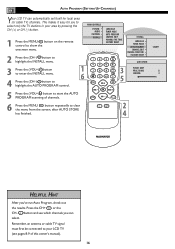
...on the remote control to show the onscreen menu. Press the CH+ or the CH- This makes it easy for local area (or cable TV) channels. button and see pages 8-9 of channels. MAIN CONTROLS PICTURE AUDIO FEATURES INSTALL LANGUAGE TUNER MODE AUTO PROGRAM CHANNEL EDIT MANUAL FINE TUNE ...the menu from the screen, after AUTO STORE CC has finished. 2 4 START? 0 3 HELPFUL HINT After you to select only the TV stations in your LCD TV (see which channels you can automatically set itself for you 've run Auto Program, check out the results. AUTO PROGRAM (SETTING UP CHANNELS) Your...
...on the remote control to show the onscreen menu. Press the CH+ or the CH- This makes it easy for local area (or cable TV) channels. button and see pages 8-9 of channels. MAIN CONTROLS PICTURE AUDIO FEATURES INSTALL LANGUAGE TUNER MODE AUTO PROGRAM CHANNEL EDIT MANUAL FINE TUNE ...the menu from the screen, after AUTO STORE CC has finished. 2 4 START? 0 3 HELPFUL HINT After you to select only the TV stations in your LCD TV (see which channels you can automatically set itself for you 've run Auto Program, check out the results. AUTO PROGRAM (SETTING UP CHANNELS) Your...
User Manual
Page 17
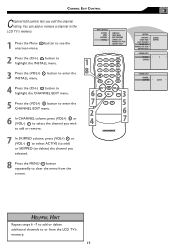
... the channel listing. CHANNEL EDIT CONTROL Channel Edit control lets you selected. 8 Press the MENU MENU button repeatedly to clear the menu from the LCD TV's memory. 17 MAIN CONTROLS PICTURE AUDIO FEATURES INSTALL LANGUAGE TUNER MODE AUTO PROGRAM CHANNEL EDIT MANUAL FINE TUNE FACTORY RESET � � MENU OK... to add or delete additional channels to highlight the INSTALL menu. 3 Press the (VOL+) INSTALL menu. You can add or remove a channel in the LCD TV's memory. 1 Press the Menu MENU button to see the onscreen menu. 2 Press the (CH-) button to or from the screen.
... the channel listing. CHANNEL EDIT CONTROL Channel Edit control lets you selected. 8 Press the MENU MENU button repeatedly to clear the menu from the LCD TV's memory. 17 MAIN CONTROLS PICTURE AUDIO FEATURES INSTALL LANGUAGE TUNER MODE AUTO PROGRAM CHANNEL EDIT MANUAL FINE TUNE FACTORY RESET � � MENU OK... to add or delete additional channels to highlight the INSTALL menu. 3 Press the (VOL+) INSTALL menu. You can add or remove a channel in the LCD TV's memory. 1 Press the Menu MENU button to see the onscreen menu. 2 Press the (CH-) button to or from the screen.

User Manual
Page 19
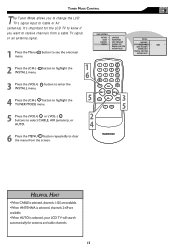
... be adjusted in sound control within the onscreen menu. The three user presets(News, Music, and Theatre) enable you Personal to tailor the TV sound so as to select either Personal, Movies, Sports, Weak Signal, Multimedia, and Night Smart Picture settings. The current Smart Sound setting ... can be adjusted in picture options within the onscreen menu. SMART PICTURE CONTROL Whether you're watching a movie or a video game, your LCD TV has video control preset that will appears on the screen. 2 Press the Sound button repeatedly to you own preferences through the onscreen Sound menu...
... be adjusted in sound control within the onscreen menu. The three user presets(News, Music, and Theatre) enable you Personal to tailor the TV sound so as to select either Personal, Movies, Sports, Weak Signal, Multimedia, and Night Smart Picture settings. The current Smart Sound setting ... can be adjusted in picture options within the onscreen menu. SMART PICTURE CONTROL Whether you're watching a movie or a video game, your LCD TV has video control preset that will appears on the screen. 2 Press the Sound button repeatedly to you own preferences through the onscreen Sound menu...
User Manual
Page 20
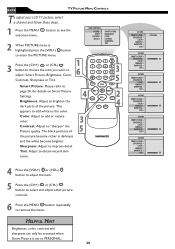
... SMART PICTURE BRIGHTNESS COLOR CONTRAST SHARPNESS TINT 3 Press the (CH+) or (CH-) button to choose the item you want to PERSONAL. 20 The black portions of the picture. HELPFUL HINT Brightness, color, contrast and sharpness can only be accessed when Smart Picture is highlighted,press ...the (VOL+) to page 20, for details on Smart Picture Settings. MENU Smart Picture: Please refer to enter the PICTURE menu. TV PICTURE MENU CONTROLS T o adjust your LCD TV picture, select a channel and follow these steps. 1 Press the MENU ...
... SMART PICTURE BRIGHTNESS COLOR CONTRAST SHARPNESS TINT 3 Press the (CH+) or (CH-) button to choose the item you want to PERSONAL. 20 The black portions of the picture. HELPFUL HINT Brightness, color, contrast and sharpness can only be accessed when Smart Picture is highlighted,press ...the (VOL+) to page 20, for details on Smart Picture Settings. MENU Smart Picture: Please refer to enter the PICTURE menu. TV PICTURE MENU CONTROLS T o adjust your LCD TV picture, select a channel and follow these steps. 1 Press the MENU ...
User Manual
Page 21
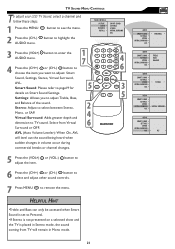
...Smart Sound Settings. Virtual Surround: Adds greater depth and � dimension to select between Stereo, � Mono, or SAP. TV SOUND MENU CONTROLS T o adjust your LCD TV Sound, select a channel and follow these steps. 1 Press the MENU MENU button to page19 for OK � SOURCE details... on a selected show and the TV is set to adjust: Smart MENU Sound, Settings, Stereo, Virtual Surround, AVL. Smart Sound: ...
...Smart Sound Settings. Virtual Surround: Adds greater depth and � dimension to select between Stereo, � Mono, or SAP. TV SOUND MENU CONTROLS T o adjust your LCD TV Sound, select a channel and follow these steps. 1 Press the MENU MENU button to page19 for OK � SOURCE details... on a selected show and the TV is set to adjust: Smart MENU Sound, Settings, Stereo, Virtual Surround, AVL. Smart Sound: ...
User Manual
Page 29
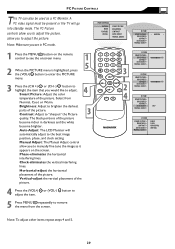
...the (VOL+) or (VOL-) button to adjust the item. 5 Press MENU MENU repeatedly to adjust the picture. PC PICTURE CONTROLS T his TV can also be present or the TV will automatically adjust to manually fine tune the image as a PC Monitor. allow you to the best image position, phase, and... clock setting. Auto Adjust: The LCD Monitor will go into standby mode. Manual Adjust: The Manual Adjust control allow you would...
...the (VOL+) or (VOL-) button to adjust the item. 5 Press MENU MENU repeatedly to adjust the picture. PC PICTURE CONTROLS T his TV can also be present or the TV will automatically adjust to manually fine tune the image as a PC Monitor. allow you to the best image position, phase, and... clock setting. Auto Adjust: The LCD Monitor will go into standby mode. Manual Adjust: The Manual Adjust control allow you would...
User Manual
Page 32
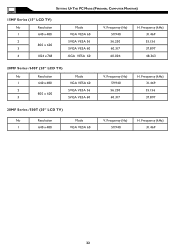
....940 56.250 60.317 60.004 H. Frequency (kHz) 31.469 32 Frequency (kHz) 31.469 35.156 37.897 48.363 20MF Series /605T (20" LCD TV) No Resolution Mode 1 640 x 480 VGA VESA 60 2 SVGA VESA 56 800 x 600 3 SVGA VESA 60 V. Frequency (Hz) 59.940 56.250 60.317 H. Frequency... (kHz) 31.469 35.156 37.897 20MF Series /500T (20" LCD TV) No Resolution Mode 1 640 x 480 VGA VESA 60 V. Frequency (Hz) 59.940 H. SETTING UP THE PC MODE (PERSONAL COMPUTER MONITOR) 15MF Series (15...
....940 56.250 60.317 60.004 H. Frequency (kHz) 31.469 32 Frequency (kHz) 31.469 35.156 37.897 48.363 20MF Series /605T (20" LCD TV) No Resolution Mode 1 640 x 480 VGA VESA 60 2 SVGA VESA 56 800 x 600 3 SVGA VESA 60 V. Frequency (Hz) 59.940 56.250 60.317 H. Frequency... (kHz) 31.469 35.156 37.897 20MF Series /500T (20" LCD TV) No Resolution Mode 1 640 x 480 VGA VESA 60 V. Frequency (Hz) 59.940 H. SETTING UP THE PC MODE (PERSONAL COMPUTER MONITOR) 15MF Series (15...
User Manual
Page 33
... of the two video inputs can be connected to AV in S-Video and Video (CVBS) mode. Please check if you use the supplied Magnavox Remote control, only the supplied Magnavox Remote control can be used with two AAA heavy duty (zinc chloride) or alkaline batteries. • Clean the remote control as well.... • In case you have connected the right sound signal to sound, but both video signals can be connected. If necessary, replace them with this LCD-TV set correctly. Remote Control does not work. • Check the batteries. TROUBLE SHOOTING TIPS No Power • Check the...
... of the two video inputs can be connected to AV in S-Video and Video (CVBS) mode. Please check if you use the supplied Magnavox Remote control, only the supplied Magnavox Remote control can be used with two AAA heavy duty (zinc chloride) or alkaline batteries. • Clean the remote control as well.... • In case you have connected the right sound signal to sound, but both video signals can be connected. If necessary, replace them with this LCD-TV set correctly. Remote Control does not work. • Check the batteries. TROUBLE SHOOTING TIPS No Power • Check the...


