User Manual
Page 4
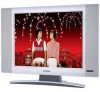
...17 Factory Reset 18 Smart Picture and Smart Sound Smart Picture Control 19 Smart Sound Control 19 Picture Menu TV Picture Menu Controls 20 Sound Menu TV Sound Menu Controls 21 Features Menu Auto Lock 22 Auto Lock Access Code 23 Auto Lock Program 24 Auto...- Closed Captioning: Allows the viewer to your LCD TV features. CONTENT Introduction Welcome/Registration of Your TV 2 IMPORTANT SAFETY INSTRUCTIONS 3 Table of Content 4 Getting Started Before Installation 5 Installing LCD TV on -screen text. Remote Control: Works your LCD TV. Audio/Video In Jacks: Use to quickly ...
...17 Factory Reset 18 Smart Picture and Smart Sound Smart Picture Control 19 Smart Sound Control 19 Picture Menu TV Picture Menu Controls 20 Sound Menu TV Sound Menu Controls 21 Features Menu Auto Lock 22 Auto Lock Access Code 23 Auto Lock Program 24 Auto...- Closed Captioning: Allows the viewer to your LCD TV features. CONTENT Introduction Welcome/Registration of Your TV 2 IMPORTANT SAFETY INSTRUCTIONS 3 Table of Content 4 Getting Started Before Installation 5 Installing LCD TV on -screen text. Remote Control: Works your LCD TV. Audio/Video In Jacks: Use to quickly ...
User Manual
Page 6
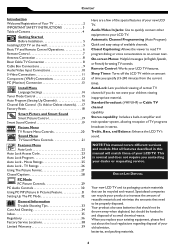
..., press VOLUME - Plug the power cable into the DC IN 16V jack on the LCD TV. 3 Press VOLUME + to increase the sound level. Be sure the (+) and (-) ends of the LCD TV when operating the LCD TV with the remote. to lower the sound level. 4 Press CH+ or CH- BATTERY INSTALLATION 6 Remove the battery compartment lid on...
..., press VOLUME - Plug the power cable into the DC IN 16V jack on the LCD TV. 3 Press VOLUME + to increase the sound level. Be sure the (+) and (-) ends of the LCD TV when operating the LCD TV with the remote. to lower the sound level. 4 Press CH+ or CH- BATTERY INSTALLATION 6 Remove the battery compartment lid on...

User Manual
Page 7
...Format button Press the FORMAT button repeatedly to turn the LCD TV on the screen when the sound is muted. Sleep button Press to set the LCD TV to toggle among the 4 settings; Smart Sound button Press repeatedly to turn itself off . REMOTE CONTROL MENU OK SOURCE PIP CC 7 Standby (Power)...select the video input source: AV, S-Video, HD, PC, TV. Source button Press to eliminate or restore the LCD TV sound. SAP button Press to select TV channels. Number buttons Press to select a sound mode if available with the TV programming:Mono, Stereo, or SAP. Also press to change the ...
...Format button Press the FORMAT button repeatedly to turn the LCD TV on the screen when the sound is muted. Sleep button Press to set the LCD TV to toggle among the 4 settings; Smart Sound button Press repeatedly to turn itself off . REMOTE CONTROL MENU OK SOURCE PIP CC 7 Standby (Power)...select the video input source: AV, S-Video, HD, PC, TV. Source button Press to eliminate or restore the LCD TV sound. SAP button Press to select TV channels. Number buttons Press to select a sound mode if available with the TV programming:Mono, Stereo, or SAP. Also press to change the ...

User Manual
Page 12
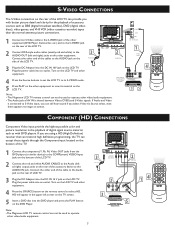
...player(or similar device) to the AUDIO IN jack. Connect the other equipment. 4 Press the SOURCE SOURCE button on the remote control to the Audio jack on the rear of LCD TV. 3 Plug the DC Adapter into the DC IN 16 V jack on the bottom of the cable to select HD. ... accessory device must have an component(YPbPr) output jack in the playback of the accessory device to 3 the COMP(onent) VIDEO Input jacks on the LCD TV. VGA PC COMPONENT VIDEO CABLES (Green, Blue, Red) 2 Audio Cable 2 1 S-VIDEO VIDEO AUDIO R OUT OUT OUT L COMP VIDEO Y Pb Pr 3 ACCESSORY DEVICE 5 ...
...player(or similar device) to the AUDIO IN jack. Connect the other equipment. 4 Press the SOURCE SOURCE button on the remote control to the Audio jack on the rear of LCD TV. 3 Plug the DC Adapter into the DC IN 16 V jack on the bottom of the cable to select HD. ... accessory device must have an component(YPbPr) output jack in the playback of the accessory device to 3 the COMP(onent) VIDEO Input jacks on the LCD TV. VGA PC COMPONENT VIDEO CABLES (Green, Blue, Red) 2 Audio Cable 2 1 S-VIDEO VIDEO AUDIO R OUT OUT OUT L COMP VIDEO Y Pb Pr 3 ACCESSORY DEVICE 5 ...
User Manual
Page 14
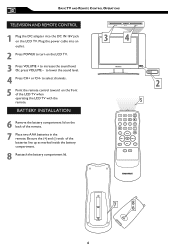
... EDIT MANUAL FINE TUNE FACTORY RESET ENGLISH HELPFUL HINT Remember, the LANGUAGE control makes only the TV's onscreen MENU items appear in either English, French or Spanish. 1 Press the MENU MENU button on the remote control to see the onscreen menu. 2 Press the (CH-) button to clear the menu ...from the screen. LANGUAGE SETTINGS For English, French or Spanish-speaking TV owners, an onscreen LANGUAGE option is present. It does not change the...
... EDIT MANUAL FINE TUNE FACTORY RESET ENGLISH HELPFUL HINT Remember, the LANGUAGE control makes only the TV's onscreen MENU items appear in either English, French or Spanish. 1 Press the MENU MENU button on the remote control to see the onscreen menu. 2 Press the (CH-) button to clear the menu ...from the screen. LANGUAGE SETTINGS For English, French or Spanish-speaking TV owners, an onscreen LANGUAGE option is present. It does not change the...
User Manual
Page 16
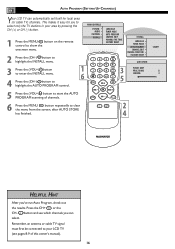
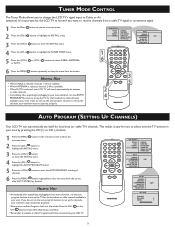
.... Press the CH+ or the CH- AUTO PROGRAM (SETTING UP CHANNELS) Your LCD TV can select. MAIN CONTROLS PICTURE AUDIO FEATURES INSTALL LANGUAGE TUNER MODE AUTO PROGRAM CHANNEL EDIT MANUAL FINE TUNE FACTORY RESET 2 Press the (CH-) button to ... first be connected to your area by pressing the CH (+) or CH (-) button. 1 Press the MENU MENU button on the remote control to select only the TV stations in your LCD TV (see which channels you can automatically set itself for you 've run Auto Program, check out the results. button and see...
.... Press the CH+ or the CH- AUTO PROGRAM (SETTING UP CHANNELS) Your LCD TV can select. MAIN CONTROLS PICTURE AUDIO FEATURES INSTALL LANGUAGE TUNER MODE AUTO PROGRAM CHANNEL EDIT MANUAL FINE TUNE FACTORY RESET 2 Press the (CH-) button to ... first be connected to your area by pressing the CH (+) or CH (-) button. 1 Press the MENU MENU button on the remote control to select only the TV stations in your LCD TV (see which channels you can automatically set itself for you 've run Auto Program, check out the results. button and see...
User Manual
Page 18
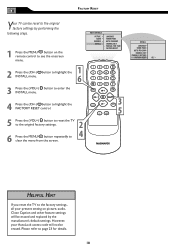
...factory settings, all your AutoLock access code will be erased. However, your present setting on the remote control to see the onscreen menu. 2 Press the (CH-) INSTALL menu. FACTORY RESET Your TV can be reset to the original factory settings by performing the following steps. 1 Press the ...enter the INSTALL menu. 4 Press the (CH-) button to highlight the FACTORY RESET control. 5 � Press the (VOL+) button to reset the TV to the original factory settings. 6 Press the MENU MENU button repeatedly to clear the menu from the screen. � MAIN CONTROLS PICTURE AUDIO FEATURES ...
...factory settings, all your AutoLock access code will be erased. However, your present setting on the remote control to see the onscreen menu. 2 Press the (CH-) INSTALL menu. FACTORY RESET Your TV can be reset to the original factory settings by performing the following steps. 1 Press the ...enter the INSTALL menu. 4 Press the (CH-) button to highlight the FACTORY RESET control. 5 � Press the (VOL+) button to reset the TV to the original factory settings. 6 Press the MENU MENU button repeatedly to clear the menu from the screen. � MAIN CONTROLS PICTURE AUDIO FEATURES ...

User Manual
Page 19
..., color, picture, sharpness, tint, and color temperature levels. The current Smart Sound setting will appears on the remote control. SMART PICTURE CONTROL Whether you're watching a movie or a video game, your LCD TV has video control preset that will match with your own preferred video settings. 1 Press the PICTURE button on the screen...
..., color, picture, sharpness, tint, and color temperature levels. The current Smart Sound setting will appears on the remote control. SMART PICTURE CONTROL Whether you're watching a movie or a video game, your LCD TV has video control preset that will match with your own preferred video settings. 1 Press the PICTURE button on the screen...
User Manual
Page 28
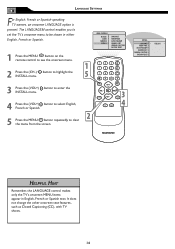
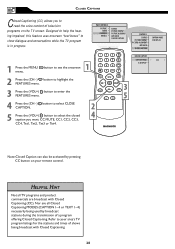
... menu. 3 Press the (VOL+) button to show dialogue and conversations while the TV program is in progress. CLOSED CAPTIONS Closed Captioning (CC) allows you want: CC...CC3, 4 CC4, Txt1, Txt2, Txt3 or Txt4. HELPFUL HINT Not all TV programs and product commercials are all Closed Captioning MODES (CAPTION 1-4 or TEXT 1-4)...of shows being used by pressing CC button on the TV screen. Nor are broadcast with Closed Captioning. 28 Refer...you to read the voice content of television programs on your area's TV program listings for the stations and times of a program offering Closed Captioning...
... menu. 3 Press the (VOL+) button to show dialogue and conversations while the TV program is in progress. CLOSED CAPTIONS Closed Captioning (CC) allows you want: CC...CC3, 4 CC4, Txt1, Txt2, Txt3 or Txt4. HELPFUL HINT Not all TV programs and product commercials are all Closed Captioning MODES (CAPTION 1-4 or TEXT 1-4)...of shows being used by pressing CC button on the TV screen. Nor are broadcast with Closed Captioning. 28 Refer...you to read the voice content of television programs on your area's TV program listings for the stations and times of a program offering Closed Captioning...
User Manual
Page 29
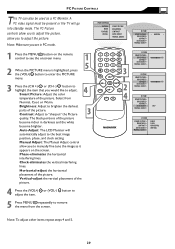
... ADJUST PHASE CLOCK HORIZONTAL VERTICAL Note: To adjust other items repeat steps 4 and 5. 29 A PC video signal must be used as it appears on the remote control to see the onscreen menu. 1 2 When the PICTURE menu is highlighted, press the (VOL+) button to enter the PICTURE 5 menu. 3 Press the (CH +)...and clock setting. Note: Make sure you are in darkness and the white become brighter. allow you to adjust the picture. PC PICTURE CONTROLS T his TV can also be present or the TV will automatically adjust to remove the menu from Normal, Cool, or Warm. Auto Adjust: The...
... ADJUST PHASE CLOCK HORIZONTAL VERTICAL Note: To adjust other items repeat steps 4 and 5. 29 A PC video signal must be used as it appears on the remote control to see the onscreen menu. 1 2 When the PICTURE menu is highlighted, press the (VOL+) button to enter the PICTURE 5 menu. 3 Press the (CH +)...and clock setting. Note: Make sure you are in darkness and the white become brighter. allow you to adjust the picture. PC PICTURE CONTROLS T his TV can also be present or the TV will automatically adjust to remove the menu from Normal, Cool, or Warm. Auto Adjust: The...

User Manual
Page 30
...Mono, and SAP. MAIN CONTROLS PICTURE AUDIO FEATURES INSTALL SMART SOUND SETTINGS STEREO VIRTUAL SURROUND AVL 1 Press the MENU MENU button on the remote control to enter the AUDIO menu. AUDIO SMART SOUND SETTINGS STEREO VIRTUAL SURROUND AVL PERSONAL AUDIO SMART SOUND SETTINGS STEREO VIRTUAL SURROUND AVL TREBLE ...into standby mode. Note: Make sure you to adjust Treble, Bass, and Balance of the Sound. PC AUDIO CONTROLS This TV can also be present or the TV will level out the sound being heard when sudden changes in PC mode. The AUDIO controls allow you are watching. button...
...Mono, and SAP. MAIN CONTROLS PICTURE AUDIO FEATURES INSTALL SMART SOUND SETTINGS STEREO VIRTUAL SURROUND AVL 1 Press the MENU MENU button on the remote control to enter the AUDIO menu. AUDIO SMART SOUND SETTINGS STEREO VIRTUAL SURROUND AVL PERSONAL AUDIO SMART SOUND SETTINGS STEREO VIRTUAL SURROUND AVL TREBLE ...into standby mode. Note: Make sure you to adjust Treble, Bass, and Balance of the Sound. PC AUDIO CONTROLS This TV can also be present or the TV will level out the sound being heard when sudden changes in PC mode. The AUDIO controls allow you are watching. button...
User Manual
Page 33
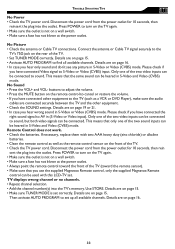
..., only the supplied Magnavox Remote control can be used with two AAA heavy duty (zinc chloride) or alkaline batteries. • Clean the remote control as well as a VCR or DVD Player), make sure the audio cables are connected securely between the TV and the other equipment to S-Video or Video (CVBS)... and VOL- Details are on page 15. • Activate AUTO PROGRAM to set . Only one of the TV. • Check the TV power cord. If necessary, replace them with this LCD-TV set up all available channels. Use STORE. Press POWER to sound, but both video signals can be connected. ...
..., only the supplied Magnavox Remote control can be used with two AAA heavy duty (zinc chloride) or alkaline batteries. • Clean the remote control as well as a VCR or DVD Player), make sure the audio cables are connected securely between the TV and the other equipment to S-Video or Video (CVBS)... and VOL- Details are on page 15. • Activate AUTO PROGRAM to set . Only one of the TV. • Check the TV power cord. If necessary, replace them with this LCD-TV set up all available channels. Use STORE. Press POWER to sound, but both video signals can be connected. ...
Product Spec Sheet
Page 2
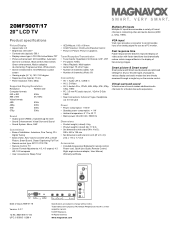
...presets are optimized settings for use as a PC monitor. Trademarks are directly accessed through a single key on the remote control. or their respective owners. © 2009 Magnavox. Date of issue 2009-01-16 Version: 3.0.7 12 NC: 8639 000 17134 UPC: 6 09585 11296 4... artifacts in inch (W x H x D): 23.2 x 17.6 x 7.7 inch Accessories • Included Accessories: Batteries for a theater-like audio experience. 20MF500T/17 20" LCD TV Multiple AV inputs Multiple AV inputs accommodate a variety of format choices in D-Sub 15HD • Rear Connections: Antenna F-type, Headphone out 3.5 mm jack ...
...presets are optimized settings for use as a PC monitor. Trademarks are directly accessed through a single key on the remote control. or their respective owners. © 2009 Magnavox. Date of issue 2009-01-16 Version: 3.0.7 12 NC: 8639 000 17134 UPC: 6 09585 11296 4... artifacts in inch (W x H x D): 23.2 x 17.6 x 7.7 inch Accessories • Included Accessories: Batteries for a theater-like audio experience. 20MF500T/17 20" LCD TV Multiple AV inputs Multiple AV inputs accommodate a variety of format choices in D-Sub 15HD • Rear Connections: Antenna F-type, Headphone out 3.5 mm jack ...
Quick Start Guide
Page 1
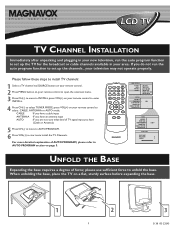
...the TV on your remote control to unfold the base. For more detailed explanation of AUTO PROGRAM, please refer to set up the TV for the broadcast or cable channels available in your new television, run the auto program function to start auto install the TV Channels. LCD TV TV CHANNEL... INSTALLATION Immediately after unpacking and plugging in your area. CABLE IF you have a cable input ANTENNA IF you have (Cable or Antenna) 5 Press CH(-) to move to INSTALL,press VOL(+) on your remote control to enter INSTALL. 4...
...the TV on your remote control to unfold the base. For more detailed explanation of AUTO PROGRAM, please refer to set up the TV for the broadcast or cable channels available in your new television, run the auto program function to start auto install the TV Channels. LCD TV TV CHANNEL... INSTALLATION Immediately after unpacking and plugging in your area. CABLE IF you have a cable input ANTENNA IF you have (Cable or Antenna) 5 Press CH(-) to move to INSTALL,press VOL(+) on your remote control to enter INSTALL. 4...

Quick Start Guide
Page 2
...: The manufacture accepts no liability, ensure installation is done by a professional technician. (For 15 inch: 75x75 mm , For 20 inch: 100x100 mm) PRESENTATION OF THE LCD TV 1 Television Keys • VOLUME + / - : To adjust sound level. • CHANNEL + / - : To ...EXPOSE THIS UNIT TO RAIN OR EXCESSIVE. LCD TV Quick Use and Hookup Guide CONTENTS TV CHANNEL INSTALLATION 1 UNFOLD THE BASE 1 INSTALLING LCD TV ON THE WALL . . 2 PRESENTATION OF THE LCD TV . . . . . 2 ACCESSORIES 3 BATTERY INSTALLATION 3 REMOTE CONTROL OPERATION 3 ANTENNA TV 4 BASIC CABLE TV CONNECTION . . . . . 4 ...
...: The manufacture accepts no liability, ensure installation is done by a professional technician. (For 15 inch: 75x75 mm , For 20 inch: 100x100 mm) PRESENTATION OF THE LCD TV 1 Television Keys • VOLUME + / - : To adjust sound level. • CHANNEL + / - : To ...EXPOSE THIS UNIT TO RAIN OR EXCESSIVE. LCD TV Quick Use and Hookup Guide CONTENTS TV CHANNEL INSTALLATION 1 UNFOLD THE BASE 1 INSTALLING LCD TV ON THE WALL . . 2 PRESENTATION OF THE LCD TV . . . . . 2 ACCESSORIES 3 BATTERY INSTALLATION 3 REMOTE CONTROL OPERATION 3 ANTENNA TV 4 BASIC CABLE TV CONNECTION . . . . . 4 ...
Quick Start Guide
Page 3
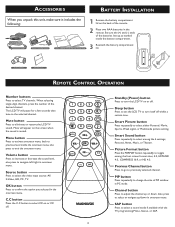
... channel. Previous Channel button Press to go to turn the LCD TV on the screen when the sound is muted. Also press to select or navigate up Guide Tuner L-Adapter Warranty Card Warranty Card � � � REMOTE CONTROL OPERATION Number buttons Press to confirm the option...the selected channel. PIP button Press repeatedly to select CC on the back of the batteries line up or down in onscreen menu. The LCD TV will appear on or off . Menu button Press to activate onscreen menu, back to previous level inside the battery compar Warranty Card tment....
... channel. Previous Channel button Press to go to turn the LCD TV on the screen when the sound is muted. Also press to select or navigate up Guide Tuner L-Adapter Warranty Card Warranty Card � � � REMOTE CONTROL OPERATION Number buttons Press to confirm the option...the selected channel. PIP button Press repeatedly to select CC on the back of the batteries line up or down in onscreen menu. The LCD TV will appear on or off . Menu button Press to activate onscreen menu, back to previous level inside the battery compar Warranty Card tment....

Quick Start Guide
Page 4
... new television. HELPFUL HINT • Remember, an antenna or cable TV signal must first be connected to your remote control, before installing TV channels. 3 Outdoor or Indoor Antenna (Combination VHF/UHF) Twin-lead wire to the LCD TV. Plug the power cable into the DC IN 16V jack on your... LCD TV. • Please make sure that you 're ready to connect it ...
... new television. HELPFUL HINT • Remember, an antenna or cable TV signal must first be connected to your remote control, before installing TV channels. 3 Outdoor or Indoor Antenna (Combination VHF/UHF) Twin-lead wire to the LCD TV. Plug the power cable into the DC IN 16V jack on your... LCD TV. • Please make sure that you 're ready to connect it ...
Quick Start Guide
Page 5
... CABLE is selected, channels 1-125 are available. • When ANTENNA is selected, channels 2-69 are available. • When AUTO is selected, your LCD TV will search automatically for antenna or cable channels. • Immediately after unpacking and plugging in your new television, run the auto program function to set... the broadcast or cable channels available in your area by pressing the CH (+) or CH (-) button. 1 Press the MENU MENU button on the remote control to show the onscreen menu. 2 Press the (CH-) button to highlight the INSTALL menu. 3 Press the (VOL+) button to enter the ...
... CABLE is selected, channels 1-125 are available. • When ANTENNA is selected, channels 2-69 are available. • When AUTO is selected, your LCD TV will search automatically for antenna or cable channels. • Immediately after unpacking and plugging in your new television, run the auto program function to set... the broadcast or cable channels available in your area by pressing the CH (+) or CH (-) button. 1 Press the MENU MENU button on the remote control to show the onscreen menu. 2 Press the (CH-) button to highlight the INSTALL menu. 3 Press the (VOL+) button to enter the ...
Quick Start Guide
Page 6
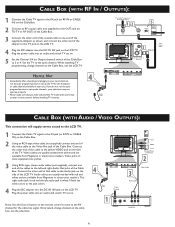
...of the LCD TV. Plug the power cable into an outlet and switch TV set on. VGA � PC DC Adapter Power Cable Cable TV signal S - Video cables are usually marked with yellow and are available from Magnavox or electronics retailers. Audio cables are usually marked with source key on your remote control,...red and the left and right Audio Out jacks of the Cable Box. When watching TV programming, change channels at the Cable Box, not the LCD TV. Note: Use the Source button on the remote control to tune to the AV channel for the broadcast or cable channels available in your...
...of the LCD TV. Plug the power cable into an outlet and switch TV set on. VGA � PC DC Adapter Power Cable Cable TV signal S - Video cables are usually marked with yellow and are available from Magnavox or electronics retailers. Audio cables are usually marked with source key on your remote control,...red and the left and right Audio Out jacks of the Cable Box. When watching TV programming, change channels at the Cable Box, not the LCD TV. Note: Use the Source button on the remote control to tune to the AV channel for the broadcast or cable channels available in your...
Quick Start Guide
Page 7
... the DVD player and press the PLAY button on the DVD Player. Video Cable 3 Plug the DC Adapter into an outlet. Note: • The Magnavox LCD TV remote control can not be used to operate other video/audio equipment. • The Audio jack of AV IN is connected to S-Video input, you can...and white AUDIO CABLES to the Audio (left and right) jacks on the other equipment to view its material on the remote control to the AUDIO IN jack. Note: • The Magnavox LCD TV remote control can not be used to operate other equipment (DVD Player, Camcorder, etc.) and to the S-VIDEO jack on ...
... the DVD player and press the PLAY button on the DVD Player. Video Cable 3 Plug the DC Adapter into an outlet. Note: • The Magnavox LCD TV remote control can not be used to operate other video/audio equipment. • The Audio jack of AV IN is connected to S-Video input, you can...and white AUDIO CABLES to the Audio (left and right) jacks on the other equipment to view its material on the remote control to the AUDIO IN jack. Note: • The Magnavox LCD TV remote control can not be used to operate other equipment (DVD Player, Camcorder, etc.) and to the S-VIDEO jack on ...


