
User manual, English (US)
Page 5
... 5 Introduction 6 Playable Discs 7 Getting Started Remote Control Setup 8 Hooking Up the TV/DVD 9-10 Optional Connections 11 Watching TV 12 Playing a Disc 13 Front Panel 14 Remote Control Buttons 15-16 Rear Panel 17 TV Settings Menu Language, Auto Channel Programming . . . .18 Adding/Deleting Channels 19 ...Additional TV Features Picture Control 20 Sleep Timer 21 Closed Captions 22 Setting V-Chip 23-27 Disc Features DVD Disc Menus,Title Menus 28 Fast ...
... 5 Introduction 6 Playable Discs 7 Getting Started Remote Control Setup 8 Hooking Up the TV/DVD 9-10 Optional Connections 11 Watching TV 12 Playing a Disc 13 Front Panel 14 Remote Control Buttons 15-16 Rear Panel 17 TV Settings Menu Language, Auto Channel Programming . . . .18 Adding/Deleting Channels 19 ...Additional TV Features Picture Control 20 Sleep Timer 21 Closed Captions 22 Setting V-Chip 23-27 Disc Features DVD Disc Menus,Title Menus 28 Fast ...

User manual, English (US)
Page 6
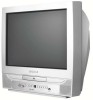
...setup menus: one for the TV features while the unit is in TV mode, and one for the unit's DVD player. If you cannot use the setup menus of the TV screen if you try to select the TV setup menu. This manual describes the 20MC4204 and 13MDTD20.These two models...; Setup menus in size and design, but operate identically.The 20MC4204 is stopped. Details are different in English, French or Spanish • Sleep Timer • V-Chip (Parental Control) Features - Some instructions explain how to use the TV/DVD to make it available. Press the SETUP button once to access...
...setup menus: one for the TV features while the unit is in TV mode, and one for the unit's DVD player. If you cannot use the setup menus of the TV screen if you try to select the TV setup menu. This manual describes the 20MC4204 and 13MDTD20.These two models...; Setup menus in size and design, but operate identically.The 20MC4204 is stopped. Details are different in English, French or Spanish • Sleep Timer • V-Chip (Parental Control) Features - Some instructions explain how to use the TV/DVD to make it available. Press the SETUP button once to access...

User manual, English (US)
Page 7
... may damage the disc, and the TV/DVD may not read it meets the requirements for other formats.The color system of the DVD may play on the DVD player of this TV/DVD. DVD+Rs can only play a DVD, make sure it correctly. DVD+RW: DVD Rewritable. If these region symbols do ...not appear on your DVDs. Color Systems DVDs are NTSC (which is a trademark of DVD Format/Logo Licensing Corporation. DVD+RWs can be...
... may damage the disc, and the TV/DVD may not read it meets the requirements for other formats.The color system of the DVD may play on the DVD player of this TV/DVD. DVD+Rs can only play a DVD, make sure it correctly. DVD+RW: DVD Rewritable. If these region symbols do ...not appear on your DVDs. Color Systems DVDs are NTSC (which is a trademark of DVD Format/Logo Licensing Corporation. DVD+RWs can be...

User manual, English (US)
Page 8
Do not put objects between the remote and the TV/DVD. Details are on disposal of your product to increase the amount that may result in the Remote Control 1 Remove the battery compartment lid on the ... unit will not be used for a long time. Please find out about the local regulations on page 14. Specialized companies can be disposed of the TV/DVD. Using the Remote Control Point the remote control at the remote sensor on the lid. 2 Place two AA batteries inside the battery compartment with their...
Do not put objects between the remote and the TV/DVD. Details are on disposal of your product to increase the amount that may result in the Remote Control 1 Remove the battery compartment lid on the ... unit will not be used for a long time. Please find out about the local regulations on page 14. Specialized companies can be disposed of the TV/DVD. Using the Remote Control Point the remote control at the remote sensor on the lid. 2 Place two AA batteries inside the battery compartment with their...
User manual, English (US)
Page 9
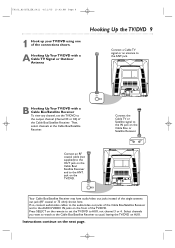
... Receiver and to the ANT. Instructions continue on the TV/DVD. Select channels you want to the output channel (channel 03 or 04) of the TV/DVD. B Hooking Up Your TV/DVD with a Cable TV Signal or Outdoor Antenna Hooking Up the TV/DVD 9 Connect a Cable TV signal or an antenna to the AUDIO/VIDEO IN jacks...on the Cable Box/ Satellite Receiver and to the IN jack on the remote to set the TV/DVD to watch at the Cable Box/Satellite Receiver. ANT. jack. Connect the Cable TV or Satellite signal to the ANT. OUT IN Your Cable Box/Satellite Receiver may have audio/video...
... Receiver and to the ANT. Instructions continue on the TV/DVD. Select channels you want to the output channel (channel 03 or 04) of the TV/DVD. B Hooking Up Your TV/DVD with a Cable TV Signal or Outdoor Antenna Hooking Up the TV/DVD 9 Connect a Cable TV signal or an antenna to the AUDIO/VIDEO IN jacks...on the Cable Box/ Satellite Receiver and to the IN jack on the remote to set the TV/DVD to watch at the Cable Box/Satellite Receiver. ANT. jack. Connect the Cable TV or Satellite signal to the ANT. OUT IN Your Cable Box/Satellite Receiver may have audio/video...
User manual, English (US)
Page 10
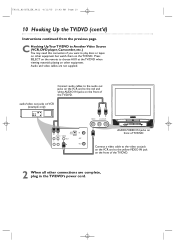
... the video out jack on the VCR and to the red and white AUDIO IN jacks on the front of the TV/DVD. Audio and video cables are complete, plug in the TV/DVD's power cord. Connect audio cables to the audio out jacks on the VCR and to the yellow VIDEO IN jack... to play discs or tapes on other equipment. T9103_8103UD_EN_0411 4/11/05 10:43 AM Page 10 10 Hooking Up the TV/DVD (cont'd) Instructions continued from the previous page. C Hooking UpYour TV/DVD to Another Video Source (VCR, DVD player, Camcorder, etc.) You may need this connection if you want to choose AUX at the...
... the video out jack on the VCR and to the red and white AUDIO IN jacks on the front of the TV/DVD. Audio and video cables are complete, plug in the TV/DVD's power cord. Connect audio cables to the audio out jacks on the VCR and to the yellow VIDEO IN jack... to play discs or tapes on other equipment. T9103_8103UD_EN_0411 4/11/05 10:43 AM Page 10 10 Hooking Up the TV/DVD (cont'd) Instructions continued from the previous page. C Hooking UpYour TV/DVD to Another Video Source (VCR, DVD player, Camcorder, etc.) You may need this connection if you want to choose AUX at the...
User manual, English (US)
Page 11
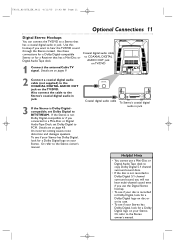
...instead. Or, refer to BITSTREAM. T9103_8103UD_EN_0411 4/11/05 10:43 AM Page 11 Optional Connections 11 Digital Stereo Hookups You can connect the TV/DVD to the Stereo owner's manual. Use this hookup if you connected to a Mini-Disc or Digital Audio Tape Deck, set Dolby Digital ...to the Stereo owner's manual. An incorrect setting causes noise distortion and damages speakers. Details are on the TV/DVD. Or, refer to a Stereo that has a Mini-Disc or to PCM. Use these connections for a Dolby Digital-compatible Coaxial digital audio ...
...instead. Or, refer to BITSTREAM. T9103_8103UD_EN_0411 4/11/05 10:43 AM Page 11 Optional Connections 11 Digital Stereo Hookups You can connect the TV/DVD to the Stereo owner's manual. Use this hookup if you connected to a Mini-Disc or Digital Audio Tape Deck, set Dolby Digital ...to the Stereo owner's manual. An incorrect setting causes noise distortion and damages speakers. Details are on the TV/DVD. Or, refer to a Stereo that has a Mini-Disc or to PCM. Use these connections for a Dolby Digital-compatible Coaxial digital audio ...
User manual, English (US)
Page 12
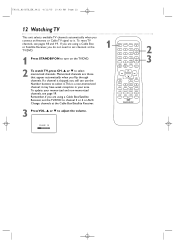
... channel is a non-memorized channel; T9103_8103UD_EN_0411 4/11/05 10:43 AM Page 12 12 Watching TV This unit selects available TV channels automatically when you connect an Antenna or Cable TV signal to select it.This is skipped, you still can use the Number buttons to it may...memorized channels. Memorized channels are using a Cable Box or Satellite Receiver, you flip through channels. Change channels at the 1 TV/DVD. 2 1 Press STANDBY-ON to turn on the TV/DVD. 3 2 To watch TV, press CH. ▲ or ▼ to adjust the volume. it . Remember, if you are those that appear...
... channel is a non-memorized channel; T9103_8103UD_EN_0411 4/11/05 10:43 AM Page 12 12 Watching TV This unit selects available TV channels automatically when you connect an Antenna or Cable TV signal to select it.This is skipped, you still can use the Number buttons to it may...memorized channels. Memorized channels are using a Cable Box or Satellite Receiver, you flip through channels. Change channels at the 1 TV/DVD. 2 1 Press STANDBY-ON to turn on the TV/DVD. 3 2 To watch TV, press CH. ▲ or ▼ to adjust the volume. it . Remember, if you are those that appear...

User manual, English (US)
Page 13
...will close the tray by unplugging the power cord or due to a power failure, it will begin , turn on the TV/DVD. 2 Press OPEN/CLOSE A to open the disc tray. Helpful Hints • Even if you turn off turns on... the label facing up . Make sure other equipment is off the unit in TV/DVD mode. Details are recorded on the tray. The tray will be distorted or playback may appear on again with ...the TV/DVD. • If a disc is not a malfunction. The unit will play MP3 or JPEG files, ...
...will close the tray by unplugging the power cord or due to a power failure, it will begin , turn on the TV/DVD. 2 Press OPEN/CLOSE A to open the disc tray. Helpful Hints • Even if you turn off turns on... the label facing up . Make sure other equipment is off the unit in TV/DVD mode. Details are recorded on the tray. The tray will be distorted or playback may appear on again with ...the TV/DVD. • If a disc is not a malfunction. The unit will play MP3 or JPEG files, ...

User manual, English (US)
Page 14
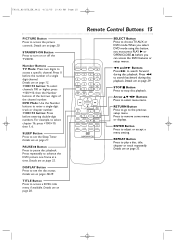
...chapter or track. CHANNEL K/L Buttons Press to open or close the disc tray. OPEN/CLOSE A Button Press to select TV channels. Details are on page 10. AUDIO - Remote Sensor Receives a signal from your remote control so you watch ...disc here. Details are on page 13. STANDBY-ON y Button Press to turn the TV/DVD on the other equipment when you choose AUX at the TV/DVD. PLAY B Button Press to stop disc playback. Details are on page 12. R ...PAUSE F Button Press to the audio and video out jacks of a Camcorder, DVD player, etc.This lets you can operate the TV/DVD from a distance.
...chapter or track. CHANNEL K/L Buttons Press to open or close the disc tray. OPEN/CLOSE A Button Press to select TV channels. Details are on page 10. AUDIO - Remote Sensor Receives a signal from your remote control so you watch ...disc here. Details are on page 13. STANDBY-ON y Button Press to turn the TV/DVD on the other equipment when you choose AUX at the TV/DVD. PLAY B Button Press to stop disc playback. Details are on page 12. R ...PAUSE F Button Press to the audio and video out jacks of a Camcorder, DVD player, etc.This lets you can operate the TV/DVD from a distance.
User manual, English (US)
Page 15
... to enter a single-digit track or chapter number. +100/+10 button: Press before entering double-digit numbers. Details are on or off the TV/DVD. DVD Mode: Use the Number buttons to adjust or accept a menu setting. Details are on page 29. PAUSE k Button Press to advance the... DVD picture one frame at a time. Press repeatedly to pause disc playback. REPEAT Button Press to choose TV, AUX or DVD mode.When you select DVD mode using this button, you can access the...
... to enter a single-digit track or chapter number. +100/+10 button: Press before entering double-digit numbers. Details are on or off the TV/DVD. DVD Mode: Use the Number buttons to adjust or accept a menu setting. Details are on page 29. PAUSE k Button Press to advance the... DVD picture one frame at a time. Press repeatedly to pause disc playback. REPEAT Button Press to choose TV, AUX or DVD mode.When you select DVD mode using this button, you can access the...

User manual, English (US)
Page 16
...on page 36. T9103_8103UD_EN_0411 4/11/05 10:43 AM Page 16 16 Remote Control Buttons (cont'd) OPEN/CLOSE A Button Press to access or remove the TV/DVD's setup menus. SETUP Button Press to open or close the disc tray. Details are on page 28. PLAY B Button Press to play a section ... camera angle and watch a sequence from a different perspective. Details are on page 41. Details are on page 34. CLEAR Button Press to access DVD disc menus. o/p while the sound is muted will restore the volume. DISC MENU Button Press to reset or erase wrong information. AUDIO Button Press...
...on page 36. T9103_8103UD_EN_0411 4/11/05 10:43 AM Page 16 16 Remote Control Buttons (cont'd) OPEN/CLOSE A Button Press to access or remove the TV/DVD's setup menus. SETUP Button Press to open or close the disc tray. Details are on page 28. PLAY B Button Press to play a section ... camera angle and watch a sequence from a different perspective. Details are on page 41. Details are on page 34. CLEAR Button Press to access DVD disc menus. o/p while the sound is muted will restore the volume. DISC MENU Button Press to reset or erase wrong information. AUDIO Button Press...

User manual, English (US)
Page 17
... DIGITAL AUDIO OUT jack Connect this jack), you will not receive any TV channels. ANT. jack (Antenna In) Connect an antenna or Cable TV signal here. If you do not connect an antenna or Cable TV signal to the TV/DVD (or connect to a Cable Box/Satellite Receiver through this jack to ...a Mini-Disc or Digital Audio Tape deck. Details are on page 11. This brings TV channels to a standard AC outlet (120V/60Hz). Use this connection when connecting the TV/DVD to a Digital Stereo using a coaxial digital audio cable (not supplied). Details are on pages 9. You may...
... DIGITAL AUDIO OUT jack Connect this jack), you will not receive any TV channels. ANT. jack (Antenna In) Connect an antenna or Cable TV signal here. If you do not connect an antenna or Cable TV signal to the TV/DVD (or connect to a Cable Box/Satellite Receiver through this jack to ...a Mini-Disc or Digital Audio Tape deck. Details are on page 11. This brings TV channels to a standard AC outlet (120V/60Hz). Use this connection when connecting the TV/DVD to a Digital Stereo using a coaxial digital audio cable (not supplied). Details are on pages 9. You may...
User manual, English (US)
Page 18
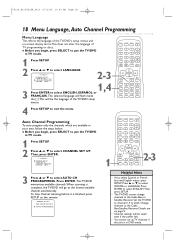
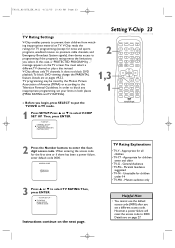
...CH PROGRAMMING. Press ENTER. ADD / DELETE CH (CATV) B AUTO CH PROGRAMMING 1 2-3 Helpful Hints • If you begin , press SELECT to put the TV/DVD in TV mode. 1 Press SETUP. 2 Press ▲ or ▼ to select CHANNEL SET UP. Press ENTER to select IDIOMA or LANGAGE. Then, press ENTER. -... To stop channel scanning before it is complete, the TV/DVD will go to the lowest available channel automatically. T9103_8103UD_EN_0411 4/11/05 10:43 AM Page 18 18 Menu Language, Auto Channel Programming Menu ...
...CH PROGRAMMING. Press ENTER. ADD / DELETE CH (CATV) B AUTO CH PROGRAMMING 1 2-3 Helpful Hints • If you begin , press SELECT to put the TV/DVD in TV mode. 1 Press SETUP. 2 Press ▲ or ▼ to select CHANNEL SET UP. Press ENTER to select IDIOMA or LANGAGE. Then, press ENTER. -... To stop channel scanning before it is complete, the TV/DVD will go to the lowest available channel automatically. T9103_8103UD_EN_0411 4/11/05 10:43 AM Page 18 18 Menu Language, Auto Channel Programming Menu ...
User manual, English (US)
Page 19
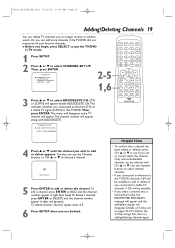
... wish to add or delete appears. CHANNEL SET UP - Use the Number buttons to select deleted channels. • If you connected an Antenna to the TV/DVD, channels 2-69 will be selected with ADD/DELETE. - If you no longer receive or seldom watch. B CHANNEL SET UP V-CHIP SET UP LANGUAGE [ENGLISH]... select a channel that a channel has been added or deleted, press CH. ▲ or ▼ to see if you connected an Antenna (TV) or a Cable TV signal (CATV) to the TV/DVD. T9103_8103UD_EN_0411 4/11/05 10:43 AM Page 19 Adding/Deleting Channels 19 You can use the Number buttons or CH. ▲ or...
... wish to add or delete appears. CHANNEL SET UP - Use the Number buttons to select deleted channels. • If you connected an Antenna to the TV/DVD, channels 2-69 will be selected with ADD/DELETE. - If you no longer receive or seldom watch. B CHANNEL SET UP V-CHIP SET UP LANGUAGE [ENGLISH]... select a channel that a channel has been added or deleted, press CH. ▲ or ▼ to see if you connected an Antenna (TV) or a Cable TV signal (CATV) to the TV/DVD. T9103_8103UD_EN_0411 4/11/05 10:43 AM Page 19 Adding/Deleting Channels 19 You can use the Number buttons or CH. ▲ or...
User manual, English (US)
Page 20
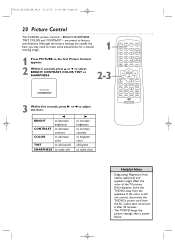
...you may need to make clear Helpful Hints • Degaussing: Magnetism from nearby appliances and speakers might affect the color of the TV picture. Although the factory settings are preset to adjust the item. s BRIGHT to decrease brightness CONTRAST to decrease contrast COLOR to decrease... the color is still not correct, disconnect the TV/DVD's power cord from the appliance. BRIGHT, SHARPNESS, TINT, COLOR and CONTRAST - If this happens, move the TV/DVD away from the AC outlet, then reconnect it after 30 minutes. • The TV/DVD keeps the picture settings after a power failure. ...
...you may need to make clear Helpful Hints • Degaussing: Magnetism from nearby appliances and speakers might affect the color of the TV picture. Although the factory settings are preset to adjust the item. s BRIGHT to decrease brightness CONTRAST to decrease contrast COLOR to decrease... the color is still not correct, disconnect the TV/DVD's power cord from the appliance. BRIGHT, SHARPNESS, TINT, COLOR and CONTRAST - If this happens, move the TV/DVD away from the AC outlet, then reconnect it after 30 minutes. • The TV/DVD keeps the picture settings after a power failure. ...
User manual, English (US)
Page 21
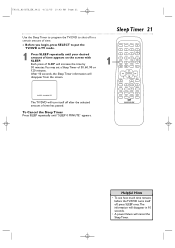
Each press of SLEEP will turn itself off, press SLEEP once.The information will disappear in TV mode. 1 Press SLEEP repeatedly until "SLEEP 0 MINUTE" appears. Sleep Timer 21 1 SLEEP 120 MINUTE The TV/DVD will increase the time by 30 minutes.You may set a Sleep Timer of 30, 60, 90 or 120 minutes.... Helpful Hints • To see how much time remains before the TV/DVD turns itself off after the selected amount of time has passed. To Cancel the Sleep Timer Press SLEEP repeatedly until your desired amount of time...
Each press of SLEEP will turn itself off, press SLEEP once.The information will disappear in TV mode. 1 Press SLEEP repeatedly until "SLEEP 0 MINUTE" appears. Sleep Timer 21 1 SLEEP 120 MINUTE The TV/DVD will increase the time by 30 minutes.You may set a Sleep Timer of 30, 60, 90 or 120 minutes.... Helpful Hints • To see how much time remains before the TV/DVD turns itself off after the selected amount of time has passed. To Cancel the Sleep Timer Press SLEEP repeatedly until your desired amount of time...

User manual, English (US)
Page 22
...9679; Multiplex signal reception (ghosts or screen flutter) 1-2 1,3 ● Before you cannot receive it.This does not indicate a problem with the TV/DVD. • Changing channels may delay Closed Captions for a few seconds. • Adjusting or muting the volume may contain errors, or there might...CAPTION2,TEXT1,TEXT2 or OFF. CAPTION1: Displays standard Closed Captions (what a character is not broadcast, you begin, press SELECT to put the TV/DVD in order to exit the menu. Captions will disappear after five seconds. CHANNEL SET UP V-CHIP SET UP LANGUAGE [ENGLISH] B CAPTION [...
...9679; Multiplex signal reception (ghosts or screen flutter) 1-2 1,3 ● Before you cannot receive it.This does not indicate a problem with the TV/DVD. • Changing channels may delay Closed Captions for a few seconds. • Adjusting or muting the volume may contain errors, or there might...CAPTION2,TEXT1,TEXT2 or OFF. CAPTION1: Displays standard Closed Captions (what a character is not broadcast, you begin, press SELECT to put the TV/DVD in order to exit the menu. Captions will disappear after five seconds. CHANNEL SET UP V-CHIP SET UP LANGUAGE [ENGLISH] B CAPTION [...
User manual, English (US)
Page 23
... inappropriate programming, set your limits in both places (MPAA RATING and TV RATING). ● Before you set a different access code. V-Chip affects only TV channels. It does not block DVD playback.To block DVD viewing, change the PARENTAL feature. Then, press ENTER. - Appropriate for... children under 14 • TV-MA - Unsuitable for all children • TV-Y7 - Mature audience only Helpful Hint ...
... inappropriate programming, set your limits in both places (MPAA RATING and TV RATING). ● Before you set a different access code. V-Chip affects only TV channels. It does not block DVD playback.To block DVD viewing, change the PARENTAL feature. Then, press ENTER. - Appropriate for... children under 14 • TV-MA - Unsuitable for all children • TV-Y7 - Mature audience only Helpful Hint ...

User manual, English (US)
Page 24
... that is not protected (blocked). • You cannot block a subrating (D, L, S or V) if the main category is set to BLOCK automatically. TV-Y TV-Y7 ( ) TV-G B TV-PG (DLSV) TV-I4 (DLSV) TV-MA ( LSV) [VIEW] [VIEW] [VIEW] [BLOCK] [BLOCK] [BLOCK] 4-5 6 5 Press ENTER again to VIEW. Lower ratings will turn to VIEW... to VIEW (or BLOCK) automatically. However, you turn "TV-Y" to VIEW (or BLOCK), all ratings will appear beside the rating category in the TV ratings menu. • To access the V-CHIP SET UP menu, the TV/DVD must be on the screen, change to a channel that ...
... that is not protected (blocked). • You cannot block a subrating (D, L, S or V) if the main category is set to BLOCK automatically. TV-Y TV-Y7 ( ) TV-G B TV-PG (DLSV) TV-I4 (DLSV) TV-MA ( LSV) [VIEW] [VIEW] [VIEW] [BLOCK] [BLOCK] [BLOCK] 4-5 6 5 Press ENTER again to VIEW. Lower ratings will turn to VIEW... to VIEW (or BLOCK) automatically. However, you turn "TV-Y" to VIEW (or BLOCK), all ratings will appear beside the rating category in the TV ratings menu. • To access the V-CHIP SET UP menu, the TV/DVD must be on the screen, change to a channel that ...


