
User Manual
Page 3
... ...2-19 Getting Started Power Management ...3-2 Connecting the AC Power ...3-2 Using the Battery Power...3-4 ECO Engine -- Power Saving Function 3-9 Power Management in Windows OS 3-11 Energy Saving Tips...3-13 Basic Operations ...3-14 Safety and Comfort Tips...3-14 Having a Good Work Habit...3-15 Knowing the Keyboard ...3-16 Knowing the Touchpad ...3-23 About Hard Disk Drive...3-26 Connecting the External Devices 3-27 Using the External Optical Storage Device 3-27 Connecting the Peripheral Devices 3-28 Connecting the Communication Devices 3-31 Safely Remove Hardware ...3-34 Components...
... ...2-19 Getting Started Power Management ...3-2 Connecting the AC Power ...3-2 Using the Battery Power...3-4 ECO Engine -- Power Saving Function 3-9 Power Management in Windows OS 3-11 Energy Saving Tips...3-13 Basic Operations ...3-14 Safety and Comfort Tips...3-14 Having a Good Work Habit...3-15 Knowing the Keyboard ...3-16 Knowing the Touchpad ...3-23 About Hard Disk Drive...3-26 Connecting the External Devices 3-27 Using the External Optical Storage Device 3-27 Connecting the Peripheral Devices 3-28 Connecting the Communication Devices 3-31 Safely Remove Hardware ...3-34 Components...

User Manual
Page 24
... this manual carefully before using keyboard, touchpad, hard disk drive, and optical storage drive. Also, this chapter provides the specification of this notebook, and introduces the function buttons, quick launch buttons, connectors, LEDs and externals of these accessories is recommended to check out if you purchased this notebook. This brand-new exquisite notebook will give you open the packing box. Chapter 2, Introductions, includes the descriptions of connecting the various external devices, communication devices, and...
... this manual carefully before using keyboard, touchpad, hard disk drive, and optical storage drive. Also, this chapter provides the specification of this notebook, and introduces the function buttons, quick launch buttons, connectors, LEDs and externals of these accessories is recommended to check out if you purchased this notebook. This brand-new exquisite notebook will give you open the packing box. Chapter 2, Introductions, includes the descriptions of connecting the various external devices, communication devices, and...

User Manual
Page 25
...: Notebook Quick Start Manual High-capacity Li-ion battery AC/DC adapter and AC power cord Carry bag (optional) All-in the future. Also, keep the box and packing materials in case you to ship the unit in -one application disk, containing the full version of user's manual, drivers, utilities, and optional recovery function, etc.. Introductions Chapter 4, BIOS Setup, provides information on BIOS Setup program and allows you need to configure the...
...: Notebook Quick Start Manual High-capacity Li-ion battery AC/DC adapter and AC power cord Carry bag (optional) All-in the future. Also, keep the box and packing materials in case you to ship the unit in -one application disk, containing the full version of user's manual, drivers, utilities, and optional recovery function, etc.. Introductions Chapter 4, BIOS Setup, provides information on BIOS Setup program and allows you need to configure the...

User Manual
Page 28
Communication Port (Items listed here may vary without notice) LAN 10/100/1000 Ethernet (optional) Wireless LAN Support Bluetooth Support (optional) Audio Sound Controller Internal Speaker Sound Volume Realtek® ALC 269 VB6 2 speakers with housing Adjust by K/B hot-key & SW Introductions 2-6 I/O Port Monitor (VGA) USB HDMI Mic-in Headphone-out Internal Microphone RJ45 Card Reader 15 pin D-Sub x 1 USB 2.0 x 2 x 1 x 1 x 1 x 1 x 1 x 1 (SD/ SDHC/ MMC) (optional) The supported memory cards may vary without notice.
Communication Port (Items listed here may vary without notice) LAN 10/100/1000 Ethernet (optional) Wireless LAN Support Bluetooth Support (optional) Audio Sound Controller Internal Speaker Sound Volume Realtek® ALC 269 VB6 2 speakers with housing Adjust by K/B hot-key & SW Introductions 2-6 I/O Port Monitor (VGA) USB HDMI Mic-in Headphone-out Internal Microphone RJ45 Card Reader 15 pin D-Sub x 1 USB 2.0 x 2 x 1 x 1 x 1 x 1 x 1 x 1 (SD/ SDHC/ MMC) (optional) The supported memory cards may vary without notice.

User Manual
Page 35
... white when the system is activated. Š LED goes out when the system is activated. Consult the local dealer for purchasing an equivalent type of battery recommended by the manufacturer. Š Battery LED goes out when it is accessing the hard disk drive or the optical drive device. Scroll Lock: Glowing white when the Scroll Lock function is turned off. Hard Disk/ Optical Drive Device In-use (optional): Blinking white when the system is recommended to replace a new battery.
... white when the system is activated. Š LED goes out when the system is activated. Consult the local dealer for purchasing an equivalent type of battery recommended by the manufacturer. Š Battery LED goes out when it is accessing the hard disk drive or the optical drive device. Scroll Lock: Glowing white when the Scroll Lock function is turned off. Hard Disk/ Optical Drive Device In-use (optional): Blinking white when the system is recommended to replace a new battery.
User Manual
Page 36
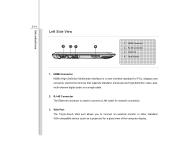
RJ-45 Connector 3. Card Reader 1. VGA Port 4. VGA Port The 15-pin-D-sub VGA port allows you to connect a LAN cable for network connection. 3. HDMI Connector HDMI (High Definition Multimedia Interface) is used to connect an external monitor or other standard VGA-compatible device (such as a projector) for PCs, displays and consumer electronics devices that supports standard, enhanced and high-definition video, plus multi-channel digital audio on a single cable. 2. RJ-45 Connector The...
RJ-45 Connector 3. Card Reader 1. VGA Port 4. VGA Port The 15-pin-D-sub VGA port allows you to connect a LAN cable for network connection. 3. HDMI Connector HDMI (High Definition Multimedia Interface) is used to connect an external monitor or other standard VGA-compatible device (such as a projector) for PCs, displays and consumer electronics devices that supports standard, enhanced and high-definition video, plus multi-channel digital audio on a single cable. 2. RJ-45 Connector The...
User Manual
Page 49
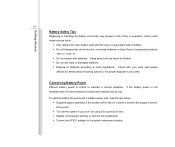
... time. Š Disable unnecessary settings or remove idle peripherals. Š Connect an AC/DC adapter to local regulations. Keep away from the reach of children. Š Do not use rusty or damaged batteries. Š Dispose of battery. Š Do not disassemble, short-circuit or incinerate batteries or store them to maintain a normal operation. To optimize battery life and avoid a sudden power loss, read...
... time. Š Disable unnecessary settings or remove idle peripherals. Š Connect an AC/DC adapter to local regulations. Keep away from the reach of children. Š Do not use rusty or damaged batteries. Š Dispose of battery. Š Do not disassemble, short-circuit or incinerate batteries or store them to maintain a normal operation. To optimize battery life and avoid a sudden power loss, read...
User Manual
Page 53
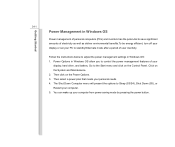
Follow the instructions below to adjust the power management settings in Windows OS allow you to control the power management features of your display, hard drive, and battery. Then click on the Control Panel. Go to the Start menu and click on the Power Options. 3. The Shut Down Computer menu will present the options to Sleep (S3/S4), Shut Down (S5), or Restart your personal needs 4. Click on the System and Maintenance. 2. Then select a power plan...
Follow the instructions below to adjust the power management settings in Windows OS allow you to control the power management features of your display, hard drive, and battery. Then click on the Control Panel. Go to the Start menu and click on the Power Options. 3. The Shut Down Computer menu will present the options to Sleep (S3/S4), Shut Down (S5), or Restart your personal needs 4. Click on the System and Maintenance. 2. Then select a power plan...

User Manual
Page 55
Getting Started 3-13 Energy Saving Tips Š Activate the ECO power saving function to manage the computer's energy consumption. Š Turn off the monitor after a period of user inactivity. Š Utilize the Fn and F12 sleep mode keys to turn into power saving mode. Š Tune the settings in Power Options under Windows OS to optimize the computer's power management. Š Always disconnect the AC power cord or uninstall the battery pack or switch off the wall socket if the computer would be left unused for a certain time to achieve zero energy consumption.
Getting Started 3-13 Energy Saving Tips Š Activate the ECO power saving function to manage the computer's energy consumption. Š Turn off the monitor after a period of user inactivity. Š Utilize the Fn and F12 sleep mode keys to turn into power saving mode. Š Tune the settings in Power Options under Windows OS to optimize the computer's power management. Š Always disconnect the AC power cord or uninstall the battery pack or switch off the wall socket if the computer would be left unused for a certain time to achieve zero energy consumption.
User Manual
Page 62
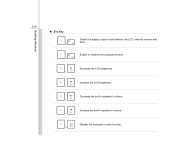
Enable or disable the touchpad function. Increase the built-in speaker's volume. Increase the LCD brightness. Decrease the built-in speaker's volume. Disable the computer's audio function. Decrease the LCD brightness. Getting Started 3-20 „ [Fn] Key Switch the display output mode between the LCD, external monitor and both.
Enable or disable the touchpad function. Increase the built-in speaker's volume. Increase the LCD brightness. Decrease the built-in speaker's volume. Disable the computer's audio function. Decrease the LCD brightness. Getting Started 3-20 „ [Fn] Key Switch the display output mode between the LCD, external monitor and both.
User Manual
Page 65
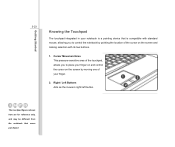
... a pointing device that users purchased Getting Started 3-23 Knowing the Touchpad The touchpad integrated in your finger. 2. Cursor Movement Area This pressure-sensitive area of the touchpad, allows you to control the notebook by moving one of your notebook is compatible with standard mouse, allowing you to place your finger on and control the cursor on the screen by pointing the location of...
... a pointing device that users purchased Getting Started 3-23 Knowing the Touchpad The touchpad integrated in your finger. 2. Cursor Movement Area This pressure-sensitive area of the touchpad, allows you to control the notebook by moving one of your notebook is compatible with standard mouse, allowing you to place your finger on and control the cursor on the screen by pointing the location of...
User Manual
Page 66
...button, so To configure the touchpad, you want to swap the functions of your display. When your finger reaches the edge of the pad, lift your finger and place it on the touchpad (usually using the forefinger), and the rectangular pad will move your Windows operating system. Unlike the traditional pointing device such as the mouse, the whole touchpad...icon, a menu item or a command that you can use the touchpad: „ Configuring the Touchpad You can change the configuration. „ Positioning and Moving Place your finger on a proper location of operating your personal needs.
...button, so To configure the touchpad, you want to swap the functions of your display. When your finger reaches the edge of the pad, lift your finger and place it on the touchpad (usually using the forefinger), and the rectangular pad will move your Windows operating system. Unlike the traditional pointing device such as the mouse, the whole touchpad...icon, a menu item or a command that you can use the touchpad: „ Configuring the Touchpad You can change the configuration. „ Positioning and Moving Place your finger on a proper location of operating your personal needs.

User Manual
Page 69
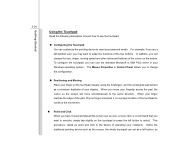
Getting Started 3-27 Connecting the External Devices The I/O (input/output) ports on the model you to connect peripheral devices. Using the External Optical Storage Device An optional external optical storage device may be different from the devices users have. The actual external optical storage device may vary depending on the notebook allow you purchased. The devices shown in the reference figures here may come with the package of the notebook. All devices listed here are for reference only.
Getting Started 3-27 Connecting the External Devices The I/O (input/output) ports on the model you to connect peripheral devices. Using the External Optical Storage Device An optional external optical storage device may be different from the devices users have. The actual external optical storage device may vary depending on the notebook allow you purchased. The devices shown in the reference figures here may come with the package of the notebook. All devices listed here are for reference only.

User Manual
Page 70
... connect these devices, install the drivers for connecting various USB devices, such as mouse, keyboard, digital camera, webcam, printer, and external optical storage device, ete.. This notebook is capable to auto detect the USB devices installed, and if there is no detection of the devices, please manually enable the USB devices by going to Start Menu / Control Panel / Add Hardware to the notebook. Getting Started 3-28 Connecting the Peripheral Devices Connecting the USB devices This notebook provides USB ports for each device first if necessary, and then connect the device...
... connect these devices, install the drivers for connecting various USB devices, such as mouse, keyboard, digital camera, webcam, printer, and external optical storage device, ete.. This notebook is capable to auto detect the USB devices installed, and if there is no detection of the devices, please manually enable the USB devices by going to Start Menu / Control Panel / Add Hardware to the notebook. Getting Started 3-28 Connecting the Peripheral Devices Connecting the USB devices This notebook provides USB ports for each device first if necessary, and then connect the device...

User Manual
Page 71
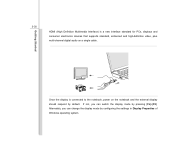
Getting Started 3-29 Connecting the External Display Devices This notebook provides a VGA port for a great view of the notebook display. The 15-pin D-Sub VGA port allows users to connect an external monitor or other standard VGA-compatible device (such as a projector) for connecting a larger display with higher resolution.
Getting Started 3-29 Connecting the External Display Devices This notebook provides a VGA port for a great view of the notebook display. The 15-pin D-Sub VGA port allows users to connect an external monitor or other standard VGA-compatible device (such as a projector) for connecting a larger display with higher resolution.
User Manual
Page 72
Alternately, you can change the display mode by default. Once the display is a new interface standard for PCs, displays and consumer electronics devices that supports standard, enhanced and high-definition video, plus multi-channel digital audio on the notebook and the external display should respond by configuring the settings in Display Properties of Windows operating system. Getting Started 3-30 HDMI (High Definition Multimedia Interface) is connected to the notebook, power on a single cable. If not, you can switch the display mode by pressing [Fn]+[F2].
Alternately, you can change the display mode by default. Once the display is a new interface standard for PCs, displays and consumer electronics devices that supports standard, enhanced and high-definition video, plus multi-channel digital audio on the notebook and the external display should respond by configuring the settings in Display Properties of Windows operating system. Getting Started 3-30 HDMI (High Definition Multimedia Interface) is connected to the notebook, power on a single cable. If not, you can switch the display mode by pressing [Fn]+[F2].
User Manual
Page 77
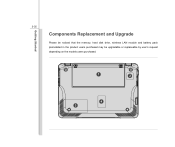
Getting Started 3-35 Components Replacement and Upgrade Please be noticed that the memory, hard disk drive, wireless LAN module and battery pack preinstalled in the product users purchased may be upgradable or replaceable by user's request depending on the models users purchased. 1 2 4 3
Getting Started 3-35 Components Replacement and Upgrade Please be noticed that the memory, hard disk drive, wireless LAN module and battery pack preinstalled in the product users purchased may be upgradable or replaceable by user's request depending on the models users purchased. 1 2 4 3
User Manual
Page 78
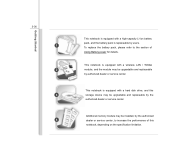
This notebook is equipped with a hard disk drive, and this notebook, depending on the specification limitation. Additional memory module may be installed, by the authorized dealer or service center, to the section of this storage device may be upgradable and replaceable by authorized dealer or service center. To replace the battery pack, please refer to increase the performance of Using Battery power for details. This notebook is equipped with a high-capacity...
This notebook is equipped with a hard disk drive, and this notebook, depending on the specification limitation. Additional memory module may be installed, by the authorized dealer or service center, to the section of this storage device may be upgradable and replaceable by authorized dealer or service center. To replace the battery pack, please refer to increase the performance of Using Battery power for details. This notebook is equipped with a high-capacity...

User Manual
Page 83
... information about BIOS version, CPU features, memory size and setting of the notebook in order to enter the other menus. Advanced Menu Adjust the advanced settings, such as power consumption, USB/ PCI devices, of system time and date. Boot Menu Set up boot type and boot sequence. Save & Exit Menu Save or discard the changes before leaving the BIOS Setup Menu. BIOS Setup BIOS Setup Menu Once you enter the BIOS Setup Utility, the Main Menu will appear on the screen. Security Menu Install or clear the password settings for...
... information about BIOS version, CPU features, memory size and setting of the notebook in order to enter the other menus. Advanced Menu Adjust the advanced settings, such as power consumption, USB/ PCI devices, of system time and date. Boot Menu Set up boot type and boot sequence. Save & Exit Menu Save or discard the changes before leaving the BIOS Setup Menu. BIOS Setup BIOS Setup Menu Once you enter the BIOS Setup Utility, the Main Menu will appear on the screen. Security Menu Install or clear the password settings for...

User Manual
Page 89
... allows users to enter and change the settings of eight-digit password and press [Enter]. BIOS Setup 4-10 Security menu Š Supervisor Password When this item is selected, a message box shall appear on the screen as below : Note that is set, new items User Password and Password Check will replace any previously set password from CMOS memory. You may also press [ESC] to abandon password setting. Settings are described below : Enter New Password Type a maximum of the BIOS SETUP UTILITY, while User Password...
... allows users to enter and change the settings of eight-digit password and press [Enter]. BIOS Setup 4-10 Security menu Š Supervisor Password When this item is selected, a message box shall appear on the screen as below : Note that is set, new items User Password and Password Check will replace any previously set password from CMOS memory. You may also press [ESC] to abandon password setting. Settings are described below : Enter New Password Type a maximum of the BIOS SETUP UTILITY, while User Password...


