
User Manual
Page 3
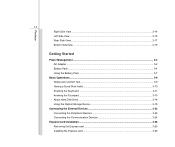
......2-15 Rear Side View...2-17 Bottom SideView ...2-19 Getting Started Power Management ...3-2 AC Adapter ...3-2 Battery Pack ...3-4 Using the Battery Pack...3-7 Basic Operations ...3-9 Safety and Comfort Tips...3-9 Having a Good Work Habit...3-10 Knowing the Keyboard ...3-11 Knowing the Touchpad ...3-15 About Hard Disk Drive...3-18 Using the Optical Storage Device 3-19 Connecting the External Devices 3-22 Connecting the Peripheral Devices 3-22 Connecting the Communication Devices 3-24 Express Card Installation...3-26 Removing the Express card 3-26 Installing the Express card ...3-26
......2-15 Rear Side View...2-17 Bottom SideView ...2-19 Getting Started Power Management ...3-2 AC Adapter ...3-2 Battery Pack ...3-4 Using the Battery Pack...3-7 Basic Operations ...3-9 Safety and Comfort Tips...3-9 Having a Good Work Habit...3-10 Knowing the Keyboard ...3-11 Knowing the Touchpad ...3-15 About Hard Disk Drive...3-18 Using the Optical Storage Device 3-19 Connecting the External Devices 3-22 Connecting the Peripheral Devices 3-22 Connecting the Communication Devices 3-24 Express Card Installation...3-26 Removing the Express card 3-26 Installing the Express card ...3-26
User Manual
Page 8
... to step on it work according to User's Manual. Š The equipment was dropped and damaged. Š The equipment has obvious signs of the following situations arises, get it . To prevent explosion caused by improper battery replacement, use the same or equivalent type of battery recommended by a service personnel: Š The power cord or plug is reliable connected to protective earthing...
... to step on it work according to User's Manual. Š The equipment was dropped and damaged. Š The equipment has obvious signs of the following situations arises, get it . To prevent explosion caused by improper battery replacement, use the same or equivalent type of battery recommended by a service personnel: Š The power cord or plug is reliable connected to protective earthing...
User Manual
Page 20
...; Never install telephone jacks in the vicinity of any trouble with this manual for wet location. „ Never touch the telephone wires or terminals which are not insulated unless the telephone line has been disconnected from the network interface. „ Note the cautions when installing or modifying telephone lines. „ Avoid using the telephone function (other than a cordless type) during an...
...; Never install telephone jacks in the vicinity of any trouble with this manual for wet location. „ Never touch the telephone wires or terminals which are not insulated unless the telephone line has been disconnected from the network interface. „ Note the cautions when installing or modifying telephone lines. „ Avoid using the telephone function (other than a cordless type) during an...
User Manual
Page 23
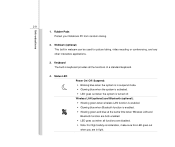
... interrelated to read these accessories is recommended to help users getting familiar with this notebook. Chapter 3, Getting Started, gives the basic operation instructions on using notebook. Also, this chapter provides the specification of this notebook, and introduces the function buttons, quick launch buttons, connectors, LEDs and externals of this notebook. This brand-new exquisite notebook will give you purchased this notebook. Chapter 2, Introductions, includes the descriptions of all the...
... interrelated to read these accessories is recommended to help users getting familiar with this notebook. Chapter 3, Getting Started, gives the basic operation instructions on using notebook. Also, this chapter provides the specification of this notebook, and introduces the function buttons, quick launch buttons, connectors, LEDs and externals of this notebook. This brand-new exquisite notebook will give you purchased this notebook. Chapter 2, Introductions, includes the descriptions of all the...

User Manual
Page 27
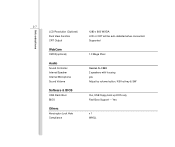
Communication Port (Items listed here may vary without notice) 56K Fax/MODEM MDC v1.5-(optional) LAN Giga Lan PTT Approval Yes WfM Wfm 2.0 support Wake on LAN Yes Wireless LAN Support (optional) Bluetooth Support (optional) Express Card Slot Express Card Slot x 1 Display LCD Type Brightness 14.1" WXGA (Glare/Non-glare type) Brightness controlled by K/B hot-keys Video Graphics VRAM ATI® M82-SCE (optional) SiS® M672 (optional) 256MB (optional) Introductions 2-6 Card Reader x 1 (SD/ MMC/MS/XD) The supported memory cards may vary without notice.
Communication Port (Items listed here may vary without notice) 56K Fax/MODEM MDC v1.5-(optional) LAN Giga Lan PTT Approval Yes WfM Wfm 2.0 support Wake on LAN Yes Wireless LAN Support (optional) Bluetooth Support (optional) Express Card Slot Express Card Slot x 1 Display LCD Type Brightness 14.1" WXGA (Glare/Non-glare type) Brightness controlled by K/B hot-keys Video Graphics VRAM ATI® M82-SCE (optional) SiS® M672 (optional) 256MB (optional) Introductions 2-6 Card Reader x 1 (SD/ MMC/MS/XD) The supported memory cards may vary without notice.
User Manual
Page 28
Introductions 2-7 LCD Resolution (Optional) Dual View Function CRT Output 1280 x 800 WXGA LCD or CRT will be auto detected when connected. Yes Others Kensington Lock Hole Compliance x 1 WHQL Supported WebCam CMOS(optional) 1.3 Mega Pixel Audio Sound Controller Internal Speaker Internal Microphone Sound Volume Realtek ALC888 2 speakers with housing yes Adjust by volume button, K/B hot-key & SW Software & BIOS USB Flash Boot BIOS Yes, USB floppy boot up DOS only Fast Boot Support ---
Introductions 2-7 LCD Resolution (Optional) Dual View Function CRT Output 1280 x 800 WXGA LCD or CRT will be auto detected when connected. Yes Others Kensington Lock Hole Compliance x 1 WHQL Supported WebCam CMOS(optional) 1.3 Mega Pixel Audio Sound Controller Internal Speaker Internal Microphone Sound Volume Realtek ALC888 2 speakers with housing yes Adjust by volume button, K/B hot-key & SW Software & BIOS USB Flash Boot BIOS Yes, USB floppy boot up DOS only Fast Boot Support ---
User Manual
Page 30
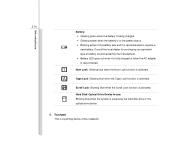
... blue at the same time when Wireless LAN and Bluetooth function are both enabled. Š LED goes out when all functions are disabled. Š Note: For flight safety consideration, make sure this LED goes out when you are in keyboard provides all the functions of a standard keyboard. 4. Wireless LAN (optional) and Bluetooth (optional): Š Glowing green when wireless LAN function is enabled. Š Glowing blue when Bluetooth function is turned off. Keyboard The built-in fight.
... blue at the same time when Wireless LAN and Bluetooth function are both enabled. Š LED goes out when all functions are disabled. Š Note: For flight safety consideration, make sure this LED goes out when you are in keyboard provides all the functions of a standard keyboard. 4. Wireless LAN (optional) and Bluetooth (optional): Š Glowing green when wireless LAN function is enabled. Š Glowing blue when Bluetooth function is turned off. Keyboard The built-in fight.
User Manual
Page 31
... the Scroll Lock function is activated. Num Lock: Glowing blue when the Num Lock function is activated. Caps Lock: Glowing blue when the Caps Lock function is a pointing device of battery recommended by the manufacturer. Š Battery LED goes out when it is recommended to replace a new battery. Touchpad This is activated. Hard Disk/ Optical Drive Device In-use: Blinking blue when the system is disconnected. Consult the local dealer for purchasing an equivalent type of the notebook...
... the Scroll Lock function is activated. Num Lock: Glowing blue when the Num Lock function is activated. Caps Lock: Glowing blue when the Caps Lock function is a pointing device of battery recommended by the manufacturer. Š Battery LED goes out when it is recommended to replace a new battery. Touchpad This is activated. Hard Disk/ Optical Drive Device In-use: Blinking blue when the system is disconnected. Consult the local dealer for purchasing an equivalent type of the notebook...
User Manual
Page 35
... optical device allows you to use the CD/ DVD disc for installing software, accessing data and playing music/movie on the computer. Š Super Multi works as the mouse, keyboard, modem, portable hard disk module, printer and more. 2. USB Port The USB 2.0 port allows you to connect USB-interface peripheral devices, such as a multi-functional DVD Dual Drive and a DVD RAM Drive. Š Blu-ray is a high-capacity optical disc that holds 4.5 hours of high-definition video (HD...
... optical device allows you to use the CD/ DVD disc for installing software, accessing data and playing music/movie on the computer. Š Super Multi works as the mouse, keyboard, modem, portable hard disk module, printer and more. 2. USB Port The USB 2.0 port allows you to connect USB-interface peripheral devices, such as a multi-functional DVD Dual Drive and a DVD RAM Drive. Š Blu-ray is a high-capacity optical disc that holds 4.5 hours of high-definition video (HD...

User Manual
Page 36
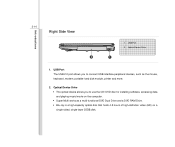
... computer display. Kensington Lock 2. DO NOT block the ventilator for a great view of the cable has a small loop which allows users to secure the notebook in place. 2. Express Card Slot 1. USB Port 5. Introductions 2-15 Left Side View 2 6 1 34 5 1. Ventilator The ventilator is designed to connect an external monitor or other similar equipment, thus securing the notebook in place with a key or some mechanical PIN device...
... computer display. Kensington Lock 2. DO NOT block the ventilator for a great view of the cable has a small loop which allows users to secure the notebook in place. 2. Express Card Slot 1. USB Port 5. Introductions 2-15 Left Side View 2 6 1 34 5 1. Ventilator The ventilator is designed to connect an external monitor or other similar equipment, thus securing the notebook in place with a key or some mechanical PIN device...

User Manual
Page 47
... battery incorrectly may be using it for proper disposal in your local solid waste officials for details about recycling options or for a period of time. Š Disable unnecessary settings or remove idle peripherals. Š Connect an AC adapter to the system whenever possible. Check with the same or equivalent type of batteries according to maintain a normal operation. Conserving Battery Power Efficient battery power is not managed...
... battery incorrectly may be using it for proper disposal in your local solid waste officials for details about recycling options or for a period of time. Š Disable unnecessary settings or remove idle peripherals. Š Connect an AC adapter to the system whenever possible. Check with the same or equivalent type of batteries according to maintain a normal operation. Conserving Battery Power Efficient battery power is not managed...

User Manual
Page 54
... built-in speaker's + volume. Decrease the LCD brightness. + Increase the LCD brightness. + Disable the computer's audio + function. Enable or disable the touchpad function. Getting Started 3-14 Function Keys „ Windows Keys You can find the Windows Logo key ( ) and one Application Logo key ( ) on the system + configuration). Force the computer into suspend mode (depending on the keyboard, which are used to your Windows manual or online help. „ [Fn] Key + + Switch the display output mode between the LCD, external monitor and both. Decrease...
... built-in speaker's + volume. Decrease the LCD brightness. + Increase the LCD brightness. + Disable the computer's audio + function. Enable or disable the touchpad function. Getting Started 3-14 Function Keys „ Windows Keys You can find the Windows Logo key ( ) and one Application Logo key ( ) on the system + configuration). Force the computer into suspend mode (depending on the keyboard, which are used to your Windows manual or online help. „ [Fn] Key + + Switch the display output mode between the LCD, external monitor and both. Decrease...
User Manual
Page 55
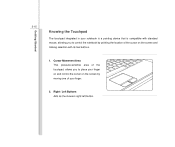
Cursor Movement Area This pressure-sensitive area of the touchpad, allows you to place your finger on and control the cursor on the screen and making selection with standard mouse, allowing you to control the notebook by pointing the location of the cursor on the screen by moving one of your notebook is a pointing device that is compatible with its two buttons. 1. Right / Left Buttons Acts as the mouse's right/ left button. Getting Started 3-15 Knowing the Touchpad The touchpad integrated in your finger. 2.
Cursor Movement Area This pressure-sensitive area of the touchpad, allows you to place your finger on and control the cursor on the screen and making selection with standard mouse, allowing you to control the notebook by pointing the location of the cursor on the screen by moving one of your notebook is a pointing device that is compatible with its two buttons. 1. Right / Left Buttons Acts as the mouse's right/ left button. Getting Started 3-15 Knowing the Touchpad The touchpad integrated in your finger. 2.
User Manual
Page 56
... user, you can use the touchpad: „ Configuring the Touchpad You can customize the pointing device to meet your notebook. This procedure, called as a left button to select. To configure the touchpad, you may want to execute, simply tap slightly on the touchpad or press the left button, so In addition, you want to swap the functions of operating your personal needs. Getting Started 3-16 Using the Touchpad...
... user, you can use the touchpad: „ Configuring the Touchpad You can customize the pointing device to meet your notebook. This procedure, called as a left button to select. To configure the touchpad, you may want to execute, simply tap slightly on the touchpad or press the left button, so In addition, you want to swap the functions of operating your personal needs. Getting Started 3-16 Using the Touchpad...
User Manual
Page 62
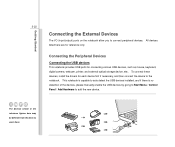
... detect the USB devices installed, and if there is no detection of the devices, please manually enable the USB devices by going to Start Menu / Control Panel / Add Hardware to connect peripheral devices. Getting Started 3-22 Connecting the External Devices The I/O (input/output) ports on the notebook allow you to add the new device. To connect these devices, install the drivers for reference only. Connecting the Peripheral Devices Connecting the USB devices This notebook provides USB ports for connecting various USB devices, such as mouse, keyboard, digital camera, webcam, printer, and...
... detect the USB devices installed, and if there is no detection of the devices, please manually enable the USB devices by going to Start Menu / Control Panel / Add Hardware to connect peripheral devices. Getting Started 3-22 Connecting the External Devices The I/O (input/output) ports on the notebook allow you to add the new device. To connect these devices, install the drivers for reference only. Connecting the Peripheral Devices Connecting the USB devices This notebook provides USB ports for connecting various USB devices, such as mouse, keyboard, digital camera, webcam, printer, and...
User Manual
Page 63
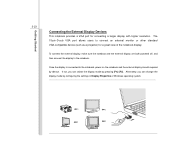
... Windows operating system. If not, you can switch the display mode by pressing [Fn]+[F2]. Alternately, you can change the display mode by default. The 15-pin-D-sub VGA port allows users to connect an external monitor or other standard VGA-compatible device (such as a projector) for connecting a larger display with higher resolution. To connect the external display, make sure the notebook and the external display are both powered off, and then connect the display to the notebook, power...
... Windows operating system. If not, you can switch the display mode by pressing [Fn]+[F2]. Alternately, you can change the display mode by default. The 15-pin-D-sub VGA port allows users to connect an external monitor or other standard VGA-compatible device (such as a projector) for connecting a larger display with higher resolution. To connect the external display, make sure the notebook and the external display are both powered off, and then connect the display to the notebook, power...
User Manual
Page 65
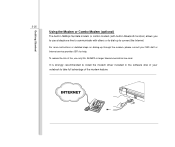
For more instructions or detailed steps on dialing-up to connect the Internet. It is strongly recommended to install the modem driver included in Bluetooth function) allows you to use only No. 26 AWG or larger telecommunication line cord. Getting Started 3-25 Using the Modem or Combo Modem (optional) The built-in 56Kbps fax/data modem or combo modem (with others or...
For more instructions or detailed steps on dialing-up to connect the Internet. It is strongly recommended to install the modem driver included in Bluetooth function) allows you to use only No. 26 AWG or larger telecommunication line cord. Getting Started 3-25 Using the Modem or Combo Modem (optional) The built-in 56Kbps fax/data modem or combo modem (with others or...

User Manual
Page 75
Setting options: Enabled, and Disabled. Setting options: Enabled, and Disabled. Š PCI Latency Timer This item controls how long each PCI device can conduct transactions for a longer time and thus improve the effective PCI bandwidth. When set to Disabled, the system always operates in DOS system; or allows users to boot the system by the use USB devices, such as mouse, keyboard, or portable disk, in a conserve power mode (the processor works at FSB400-600MHz...
Setting options: Enabled, and Disabled. Setting options: Enabled, and Disabled. Š PCI Latency Timer This item controls how long each PCI device can conduct transactions for a longer time and thus improve the effective PCI bandwidth. When set to Disabled, the system always operates in DOS system; or allows users to boot the system by the use USB devices, such as mouse, keyboard, or portable disk, in a conserve power mode (the processor works at FSB400-600MHz...
User Manual
Page 76
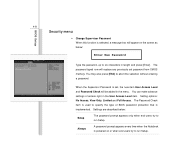
... CMOS memory. Settings are described below : Enter New Password Type the password, up to six characters in length and press [Enter]. Setting options: No Access, View Only, Limited and Full Access. Always A password prompt appears every time when the Notebook is implemented. BIOS Setup 4-8 Security menu Š Change Supervisor Password When this function is selected, a message box will be added in the menu. You can make advance settings of BIOS password protection that is powered on the screen...
... CMOS memory. Settings are described below : Enter New Password Type the password, up to six characters in length and press [Enter]. Setting options: No Access, View Only, Limited and Full Access. Always A password prompt appears every time when the Notebook is implemented. BIOS Setup 4-8 Security menu Š Change Supervisor Password When this function is selected, a message box will be added in the menu. You can make advance settings of BIOS password protection that is powered on the screen...
User Manual
Page 77
BIOS Setup 4-9 To clear a set password, just press [Enter] when you can enter Setup without entering any password. User Password only allows the user to enter the setup menu, but do not have the right to enter and change the settings of the setup menu; Supervisor Password allows the user to make changes. A message box will show up confirming the password will boot and you are prompted to enter the password. Once the password is disabled, the system will be disabled.
BIOS Setup 4-9 To clear a set password, just press [Enter] when you can enter Setup without entering any password. User Password only allows the user to enter the setup menu, but do not have the right to enter and change the settings of the setup menu; Supervisor Password allows the user to make changes. A message box will show up confirming the password will boot and you are prompted to enter the password. Once the password is disabled, the system will be disabled.


