User Guide
Page 70
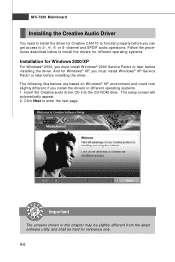
... setup screen will automatically appear. 2. Important The screens shown in different operating systems. 1. Click Next to install the drivers for different operating systems. Installation for Windows 2000/XP For W indows® 2000, you install the drivers in this chapter may be slightly different from the latest software utility and shall be...
... setup screen will automatically appear. 2. Important The screens shown in different operating systems. 1. Click Next to install the drivers for different operating systems. Installation for Windows 2000/XP For W indows® 2000, you install the drivers in this chapter may be slightly different from the latest software utility and shall be...
User Guide
Page 77
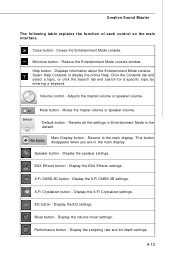
... the settings in the main display. Closes the Entertainment Mode console. Mute button - Main Display button - Mixer button - Minimize button - Reduce the Entertainment Mode console window. Display the EAX Effects settings. Display the X-Fi CMSS-3D settings. Display the volume mixer settings.
... the settings in the main display. Closes the Entertainment Mode console. Mute button - Main Display button - Mixer button - Minimize button - Reduce the Entertainment Mode console window. Display the EAX Effects settings. Display the X-Fi CMSS-3D settings. Display the volume mixer settings.
User Guide
Page 82
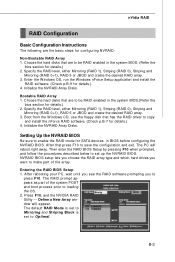
... see the RAID software prompting you want to make part of the system POST and boot process prior to loading the OS. 2. Define a New Array window will reboot right away. B-3 Specify the RAID level, either Mirroring (RAID 1), Striping (RAID 0), Striping and Mirroring (RAID 0+1), RAID 5 or JBOD and create the desired RAID...
... see the RAID software prompting you want to make part of the system POST and boot process prior to loading the OS. 2. Define a New Array window will reboot right away. B-3 Specify the RAID level, either Mirroring (RAID 1), Striping (RAID 0), Striping and Mirroring (RAID 0+1), RAID 5 or JBOD and create the desired RAID...
User Guide
Page 83
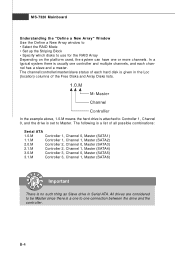
... 3, Channel 0, Master (SATA5) 3.1.M Controller 3, Channel 1, Master (SATA6) Important There is a one or more channels. MS-7320 Mainboard Understanding the "Define a New Array" Window Use the Define a New Array window to • Select the RAID Mode • Set up the Striping Block • Specify which disks to use for the RAID Array Depending...
... 3, Channel 0, Master (SATA5) 3.1.M Controller 3, Channel 1, Master (SATA6) Important There is a one or more channels. MS-7320 Mainboard Understanding the "Define a New Array" Window Use the Define a New Array window to • Select the RAID Mode • Set up the Striping Block • Specify which disks to use for the RAID Array Depending...
User Guide
Page 84
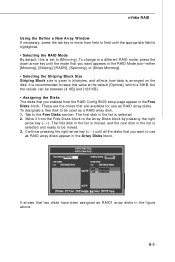
... designate a free disk to [Mirroring]. These are the drives that are available for use as a RAID array disk, 1. nVidia RAID Using the Define a New Array Window If necessary, press the tab key to move from field to field until the mode that you enabled from the RAID Config BIOS setup page...
... designate a free disk to [Mirroring]. These are the drives that are available for use as a RAID array disk, 1. nVidia RAID Using the Define a New Array Window If necessary, press the tab key to move from field to field until the mode that you enabled from the RAID Config BIOS setup page...
User Guide
Page 85
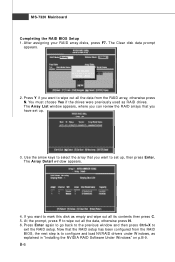
... the data, otherwise press N. 6. At the prompt, press Y to set up , then press Enter. Press Enter again to go back to the previous window and then press Ctrl+X to mark this disk as empty and wipe out all the data from the RAID array, otherwise press N. B-6 If you want... to exit the RAID setup. MS-7320 Mainboard Completing the RAID BIOS Setup 1. The Array Detail window appears. 4. Press Y if you want to configure and load NVRAID drivers under W indows, as RAID drives. Now that you can review the RAID arrays...
... the data, otherwise press N. 6. At the prompt, press Y to set up , then press Enter. Press Enter again to go back to the previous window and then press Ctrl+X to mark this disk as empty and wipe out all the data from the RAID array, otherwise press N. B-6 If you want... to exit the RAID setup. MS-7320 Mainboard Completing the RAID BIOS Setup 1. The Array Detail window appears. 4. Press Y if you want to configure and load NVRAID drivers under W indows, as RAID drives. Now that you can review the RAID arrays...
User Guide
Page 87
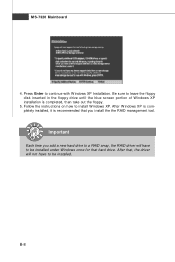
... sure to continue with W indows XP Installation. Follow the instructions on how to be installed. B-8 After that, the driver will have to be installed under Windows once for that you add a new hard drive to a RAID array, the RAID driver will not have to install W indows XP. MS-7320 Mainboard 4. Important...
... sure to continue with W indows XP Installation. Follow the instructions on how to be installed. B-8 After that, the driver will have to be installed under Windows once for that you add a new hard drive to a RAID array, the RAID driver will not have to install W indows XP. MS-7320 Mainboard 4. Important...
User Guide
Page 88
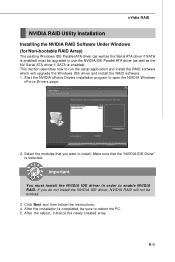
... enabled) must install the NVIDIA IDE driver in order to enable NVIDIA RAID. nVidia RAID NVIDIA RAID Utility Installation Installing the NVIDIA RAID Software Under Windows (for Non-bootable RAID Array) The existing W indows IDE Parallel ATA driver (as well as the NV Serial ATA driver if SATA is enabled). B-9 Make...
... enabled) must install the NVIDIA IDE driver in order to enable NVIDIA RAID. nVidia RAID NVIDIA RAID Utility Installation Installing the NVIDIA RAID Software Under Windows (for Non-bootable RAID Array) The existing W indows IDE Parallel ATA driver (as well as the NV Serial ATA driver if SATA is enabled). B-9 Make...
User Guide
Page 89
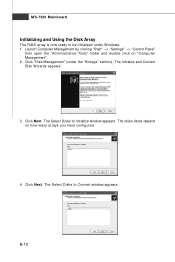
... initialized under the "Storage" section). Click Next. The disks listed depend on "Computer Management". 2. The Select Disks to Initialize window appears. B-10 Click "Disk Management" (under W indows. 1. The Select Disks to Convert window appears. Launch Computer Management by clicking "Start" --> "Settings" --> "Control Panel" then open the "Administrative Tools" folder and double click...
... initialized under the "Storage" section). Click Next. The disks listed depend on "Computer Management". 2. The Select Disks to Initialize window appears. B-10 Click "Disk Management" (under W indows. 1. The Select Disks to Convert window appears. Launch Computer Management by clicking "Start" --> "Settings" --> "Control Panel" then open the "Administrative Tools" folder and double click...
User Guide
Page 90
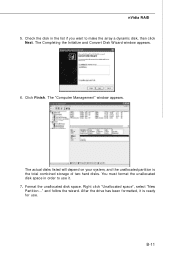
... is the total combined storage of two hard disks. Format the unallocated disk space. B-11 The Completing the Initialize and Convert Disk W izard window appears. 6. The "Computer Management" window appears. You must format the unallocated disk space in the list if you want to use . Click Finish. Right click "Unallocated space", select...
... is the total combined storage of two hard disks. Format the unallocated disk space. B-11 The Completing the Initialize and Convert Disk W izard window appears. 6. The "Computer Management" window appears. You must format the unallocated disk space in the list if you want to use . Click Finish. Right click "Unallocated space", select...
User Guide
Page 99
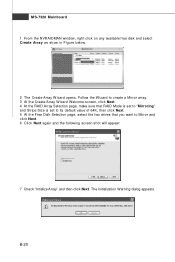
The Initialization Warning dialog appears. MS-7320 Mainboard 1 From the NVRAIDMAN window, right click on any available free disk and select Create Array as show in Figure below. 2 The Create Array W izard opens. Follow the W izard to ...
The Initialization Warning dialog appears. MS-7320 Mainboard 1 From the NVRAIDMAN window, right click on any available free disk and select Create Array as show in Figure below. 2 The Create Array W izard opens. Follow the W izard to ...
User Guide
Page 100
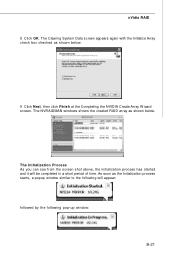
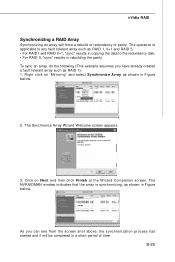
... initialization process has started and it will appear: followed by the following pop-up window: B-21 As soon as the Initialization process starts, a popup window similar to the following will be completed in a short period of time. The NVRAIDMAN windows shows the created RAID array as shown below . nVidia RAID 8 Click OK. The...
... initialization process has started and it will appear: followed by the following pop-up window: B-21 As soon as the Initialization process starts, a popup window similar to the following will be completed in a short period of time. The NVRAIDMAN windows shows the created RAID array as shown below . nVidia RAID 8 Click OK. The...
User Guide
Page 104
... will be completed in a short period of redundancy or parity. Right click on Next and then click Finish at the W izard Completion screen. The NVRAIDMAN window indicates that the array is applicable to the redundancy disk, • For RAID 5, "sync" results in rebuilding the parity To sync an array, do the...
... will be completed in a short period of redundancy or parity. Right click on Next and then click Finish at the W izard Completion screen. The NVRAIDMAN window indicates that the array is applicable to the redundancy disk, • For RAID 5, "sync" results in rebuilding the parity To sync an array, do the...
User Guide
Page 110
... spent much research and efforts to develop, helps users to monitor or configure the hardware status of MSI Mainboard & MSI Graphics card in windows, such as CPU/GPU clock, voltage, fan speed and temperature. Before you install the Dual CoreCenter, please make sure the system has meet the following ...
... spent much research and efforts to develop, helps users to monitor or configure the hardware status of MSI Mainboard & MSI Graphics card in windows, such as CPU/GPU clock, voltage, fan speed and temperature. Before you install the Dual CoreCenter, please make sure the system has meet the following ...


