
User Manual
Page 3
... View...2-20 Bottom Side View ...2-22 Getting Started Power Management ...3-2 ECO Engine -- Power Saving Function 3-2 AC Adapter ...3-4 Battery Pack ...3-6 Using the Battery Pack...3-9 Basic Operations ...3-11 Safety and Comfort Tips...3-11 Having a Good Work Habit...3-12 Knowing the Keyboard ...3-13 Knowing the Touchpad ...3-17 About Hard Disk Drive...3-20 Using the Optical Storage Device 3-21 Connecting the External Devices 3-24 Connecting the Peripheral Devices 3-25 Connecting the Communication Devices 3-27 Express Card Installation...3-29 Removing the Express card 3-29
... View...2-20 Bottom Side View ...2-22 Getting Started Power Management ...3-2 ECO Engine -- Power Saving Function 3-2 AC Adapter ...3-4 Battery Pack ...3-6 Using the Battery Pack...3-9 Basic Operations ...3-11 Safety and Comfort Tips...3-11 Having a Good Work Habit...3-12 Knowing the Keyboard ...3-13 Knowing the Touchpad ...3-17 About Hard Disk Drive...3-20 Using the Optical Storage Device 3-21 Connecting the External Devices 3-24 Connecting the Peripheral Devices 3-25 Connecting the Communication Devices 3-27 Express Card Installation...3-29 Removing the Express card 3-29
User Manual
Page 8
...the strong magnetic or electrical objects away from the equipment. When installing the coaxial cable to the TV Tuner, it is necessary to ensure that people are unlikely to step on it work according to User's Manual. Š The equipment was dropped and damaged. Š The...system of the power cord. Do not place anything on card or module. To prevent explosion caused by improper battery replacement, use the same or equivalent type of battery recommended by a service personnel: Š The power cord or plug is reliable connected to moisture. Š The equipment has not worked well or ...
...the strong magnetic or electrical objects away from the equipment. When installing the coaxial cable to the TV Tuner, it is necessary to ensure that people are unlikely to step on it work according to User's Manual. Š The equipment was dropped and damaged. Š The...system of the power cord. Do not place anything on card or module. To prevent explosion caused by improper battery replacement, use the same or equivalent type of battery recommended by a service personnel: Š The power cord or plug is reliable connected to moisture. Š The equipment has not worked well or ...

User Manual
Page 23
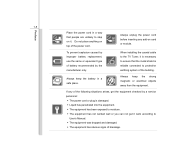
... notebook. and the procedures of this notebook. This brand-new exquisite notebook will give you purchased this notebook. Also, this chapter provides the specification of this notebook, and introduces the function buttons, quick launch buttons, connectors, LEDs and externals of connecting the various external devices, communication devices, and so on, are proud to using keyboard, touchpad, hard disk drive, and optical storage drive. Manual Map This User's Manual provides instructions and illustrations on using this notebook. If any of this notebook...
... notebook. and the procedures of this notebook. This brand-new exquisite notebook will give you purchased this notebook. Also, this chapter provides the specification of this notebook, and introduces the function buttons, quick launch buttons, connectors, LEDs and externals of connecting the various external devices, communication devices, and so on, are proud to using keyboard, touchpad, hard disk drive, and optical storage drive. Manual Map This User's Manual provides instructions and illustrations on using this notebook. If any of this notebook...

User Manual
Page 27
Supported 2-6 Introductions Storage HDD form factor Optical Device 2.5", 9.5mm High, 5400/ 7200rpm 120/ 160/ 250/ 320 GB Super Multi / Blu-ray (optional) (Devices listed here may vary without notice) Communication Port (Items listed here may vary without notice) 56K Fax/MODEM MDC ML3054 LAN 10/100/1000 Ethernet Bluetooth Supported (Optional) Wireless Lan Supported Audio Internal Speaker Sound Volume 4 speakers Adjust by volume button, K/B hot-key & SW Video LCD Dual View Function CRT Output WSXGA+ (1680x1050) WXGA+ (1440...
Supported 2-6 Introductions Storage HDD form factor Optical Device 2.5", 9.5mm High, 5400/ 7200rpm 120/ 160/ 250/ 320 GB Super Multi / Blu-ray (optional) (Devices listed here may vary without notice) Communication Port (Items listed here may vary without notice) 56K Fax/MODEM MDC ML3054 LAN 10/100/1000 Ethernet Bluetooth Supported (Optional) Wireless Lan Supported Audio Internal Speaker Sound Volume 4 speakers Adjust by volume button, K/B hot-key & SW Video LCD Dual View Function CRT Output WSXGA+ (1680x1050) WXGA+ (1440...
User Manual
Page 30
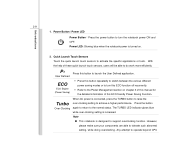
... work more efficiently. Note „ This notebook is connected, press the TURBO button to raise the Turbo Over-Clocking over -clocking setting is turned on chapter 3 of this manual for the detailed information of these quick launch touch sensors, users will be able to the Power Management section on . 2. Quick Launch Touch Sensors Touch the quick launch touch sensors to support overclocking function. When AC power is designed to activate the specific...
... work more efficiently. Note „ This notebook is connected, press the TURBO button to raise the Turbo Over-Clocking over -clocking setting is turned on chapter 3 of this manual for the detailed information of these quick launch touch sensors, users will be able to the Power Management section on . 2. Quick Launch Touch Sensors Touch the quick launch touch sensors to support overclocking function. When AC power is designed to activate the specific...
User Manual
Page 32
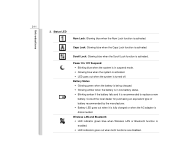
... the Scroll Lock function is enabled. Š LED indicators goes out when both functions are disabled. Battery Status Š Glowing green when the battery is being charged. Š Glowing amber when the battery is in suspend mode. Š Glowing blue when the system is activated. Š LED goes out when the system is turned off. Wireless LAN and Bluetooth: Š LED indicator glows blue when Wireless LAN or Bluetooth function is activated. Power On/ Off/ Suspend: Š Blinking...
... the Scroll Lock function is enabled. Š LED indicators goes out when both functions are disabled. Battery Status Š Glowing green when the battery is being charged. Š Glowing amber when the battery is in suspend mode. Š Glowing blue when the system is activated. Š LED goes out when the system is turned off. Wireless LAN and Bluetooth: Š LED indicator glows blue when Wireless LAN or Bluetooth function is activated. Power On/ Off/ Suspend: Š Blinking...
User Manual
Page 38
E-SATA Connector (External Serial ATA) The E-SATA Connector allows you to cool the system. Users can now utilize shielded cable outside the notebook to take advantage of the benefits the SATA interface brings to connect an external Serial ATA hard disk device. Ventilator The ventilator is designed to connect USB-interface peripheral devices, such as the mouse, keyboard, modem, portable hard disk module, printer and more. 6. USB Port The USB 2.0 port allows you to storage. 7. Introductions 2-17 5. DO NOT block the ventilator for air circulation.
E-SATA Connector (External Serial ATA) The E-SATA Connector allows you to cool the system. Users can now utilize shielded cable outside the notebook to take advantage of the benefits the SATA interface brings to connect an external Serial ATA hard disk device. Ventilator The ventilator is designed to connect USB-interface peripheral devices, such as the mouse, keyboard, modem, portable hard disk module, printer and more. 6. USB Port The USB 2.0 port allows you to storage. 7. Introductions 2-17 5. DO NOT block the ventilator for air circulation.

User Manual
Page 42
Introductions 2-21 4. Battery Pack This notebook will be powered by the battery pack when the AC adapter is disconnected. VGA Port The 15-pin-D-sub VGA port allows you to connect an external monitor or other standard VGA-compatible device (such as a projector) for a great view of the computer display. 5.
Introductions 2-21 4. Battery Pack This notebook will be powered by the battery pack when the AC adapter is disconnected. VGA Port The 15-pin-D-sub VGA port allows you to connect an external monitor or other standard VGA-compatible device (such as a projector) for a great view of the computer display. 5.
User Manual
Page 52
... options or for a while or shorten the suspend timer's time period. Š Turn off the system if you won't be lost. Getting Started 3-9 Using the Battery Pack Battery Safety Tips Replacing or handling the battery incorrectly may be using it for a period of time. Š Disable unnecessary settings or remove idle peripherals. Š Connect an AC adapter to the system whenever possible. If the battery power...
... options or for a while or shorten the suspend timer's time period. Š Turn off the system if you won't be lost. Getting Started 3-9 Using the Battery Pack Battery Safety Tips Replacing or handling the battery incorrectly may be using it for a period of time. Š Disable unnecessary settings or remove idle peripherals. Š Connect an AC adapter to the system whenever possible. If the battery power...
User Manual
Page 59
... Windows manual or online help. „ [Fn] Key + + Switch the display output mode between the LCD, external monitor and both. Getting Started 3-16 Function Keys „ Windows Keys You can find the Windows Logo key ( ) and one Application Logo key ( ) on the system + configuration). For more information of the two keys, please refer to perform Windows-specific functions, such as opening the Start menu and launching the shortcut menu. Decrease the built-in speaker's + volume. Enable or disable the touchpad function...
... Windows manual or online help. „ [Fn] Key + + Switch the display output mode between the LCD, external monitor and both. Getting Started 3-16 Function Keys „ Windows Keys You can find the Windows Logo key ( ) and one Application Logo key ( ) on the system + configuration). For more information of the two keys, please refer to perform Windows-specific functions, such as opening the Start menu and launching the shortcut menu. Decrease the built-in speaker's + volume. Enable or disable the touchpad function...
User Manual
Page 61
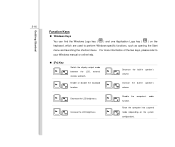
... other advanced features of the pad, lift your display. When your finger reaches the edge of the cursor on the touchpad or press the left button to select. Getting Started 3-18 Using the Touchpad Read the following description to learn how to use the standard Microsoft or IBM PS/2 driver in Control Panel allows you can change the configuration. „ Positioning and Moving...
... other advanced features of the pad, lift your display. When your finger reaches the edge of the cursor on the touchpad or press the left button to select. Getting Started 3-18 Using the Touchpad Read the following description to learn how to use the standard Microsoft or IBM PS/2 driver in Control Panel allows you can change the configuration. „ Positioning and Moving...
User Manual
Page 67
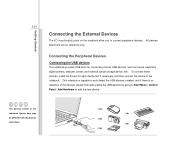
... the devices users have. All devices listed here are for connecting various USB devices, such as mouse, keyboard, digital camera, webcam, printer, and external optical storage device, ete.. To connect these devices, install the drivers for each device first if necessary, and then connect the device to add the new device. This notebook is capable to auto detect the USB devices installed, and if there is no detection of the devices, please manually enable the USB devices by going to Start Menu / Control Panel / Add Hardware...
... the devices users have. All devices listed here are for connecting various USB devices, such as mouse, keyboard, digital camera, webcam, printer, and external optical storage device, ete.. To connect these devices, install the drivers for each device first if necessary, and then connect the device to add the new device. This notebook is capable to auto detect the USB devices installed, and if there is no detection of the devices, please manually enable the USB devices by going to Start Menu / Control Panel / Add Hardware...

User Manual
Page 68
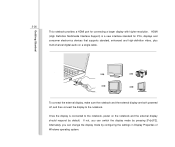
The 15-pin-D-sub VGA port allows users to connect an external monitor or other standard VGA-compatible device (such as a projector) for connecting a larger display with higher resolution. Getting Started 3-25 Connecting the External Display Devices This notebook provides a VGA port for a great view of the notebook display.
The 15-pin-D-sub VGA port allows users to connect an external monitor or other standard VGA-compatible device (such as a projector) for connecting a larger display with higher resolution. Getting Started 3-25 Connecting the External Display Devices This notebook provides a VGA port for a great view of the notebook display.
User Manual
Page 69
... display is a new interface standard for connecting a larger display with higher resolution. If not, you can switch the display mode by configuring the settings in Display Properties of Windows operating system. HDMI (High Definition Multimedia Interface Support) is connected to the notebook. Alternately, you can change the display mode by pressing [Fn]+[F2]. To connect the external display, make sure the notebook and the external display are both powered off, and then connect the display to the notebook, power on a single cable...
... display is a new interface standard for connecting a larger display with higher resolution. If not, you can switch the display mode by configuring the settings in Display Properties of Windows operating system. HDMI (High Definition Multimedia Interface Support) is connected to the notebook. Alternately, you can change the display mode by pressing [Fn]+[F2]. To connect the external display, make sure the notebook and the external display are both powered off, and then connect the display to the notebook, power on a single cable...
User Manual
Page 71
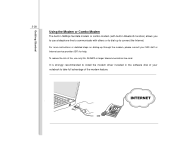
...notebook to connect the Internet. To reduce the risk of the modem feature. It is strongly recommended to install the modem driver included in Bluetooth function) allows you to use only No. 26 AWG or larger telecommunication line cord. For more instructions... or detailed steps on dialing-up to take full advantage of fire, use a telephone line to communicate with built-in the software disk of your MIS staff or Internet service...
...notebook to connect the Internet. To reduce the risk of the modem feature. It is strongly recommended to install the modem driver included in Bluetooth function) allows you to use only No. 26 AWG or larger telecommunication line cord. For more instructions... or detailed steps on dialing-up to take full advantage of fire, use a telephone line to communicate with built-in the software disk of your MIS staff or Internet service...
User Manual
Page 78
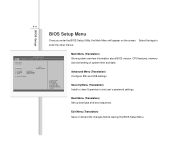
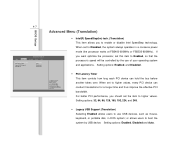
... to enter the other menus. BIOS Setup 4-4 BIOS Setup Menu Once you enter the BIOS Setup Utility, the Main Menu will appear on the screen. Exit Menu (Translation) Save or discard the changes before leaving the BIOS Setup Menu. Security Menu (Translation) Install or clear Supervisor's and user's password settings. Main Advanced BISO SETUP UTILITY Security Boot Exit Market Name Model Name System Time System Date [18:08:53] [Wed 05/14/2008] Serial ATA Serial ATA eSATA [Hard Disk] [ATAPI...
... to enter the other menus. BIOS Setup 4-4 BIOS Setup Menu Once you enter the BIOS Setup Utility, the Main Menu will appear on the screen. Exit Menu (Translation) Save or discard the changes before leaving the BIOS Setup Menu. Security Menu (Translation) Install or clear Supervisor's and user's password settings. Main Advanced BISO SETUP UTILITY Security Boot Exit Market Name Model Name System Time System Date [18:08:53] [Wed 05/14/2008] Serial ATA Serial ATA eSATA [Hard Disk] [ATAPI...

User Manual
Page 79
... devices installed in the notebook. The system clock will go on no matter you shut down the PC or get into sleep mode. Main Advanced BISO SETUP UTILITY Security Boot Exit Market Name Model Name System Time System Date [18:08:53] [Wed 05/14/2008] Serial ATA Serial ATA eSATA [Hard Disk] [ATAPI CDROM] [Not Detected] System Infomation :Select Screen :Select Item Enter: Select +/-: Change...
... devices installed in the notebook. The system clock will go on no matter you shut down the PC or get into sleep mode. Main Advanced BISO SETUP UTILITY Security Boot Exit Market Name Model Name System Time System Date [18:08:53] [Wed 05/14/2008] Serial ATA Serial ATA eSATA [Hard Disk] [ATAPI CDROM] [Not Detected] System Infomation :Select Screen :Select Item Enter: Select +/-: Change...
User Manual
Page 81
... Legacy USB Support AHCI Mode [Enabled] [64] [Enabled] [Enabled] Advanced Menu (Translation) Š Intel(R) SpeedStep(tm) tech. (Translation) This item allows you should set the item to higher values. When set to boot the system by the use USB devices, such as mouse, keyboard, or portable disk, in a conserve power mode (the processor works at FSB400-600MHz or FSB533-800MHz). Setting options: Enabled, and Disabled. :Select Screen :Select Item Enter: Select +/-: Change Opt. or allows users to...
... Legacy USB Support AHCI Mode [Enabled] [64] [Enabled] [Enabled] Advanced Menu (Translation) Š Intel(R) SpeedStep(tm) tech. (Translation) This item allows you should set the item to higher values. When set to boot the system by the use USB devices, such as mouse, keyboard, or portable disk, in a conserve power mode (the processor works at FSB400-600MHz or FSB533-800MHz). Setting options: Enabled, and Disabled. :Select Screen :Select Item Enter: Select +/-: Change Opt. or allows users to...
User Manual
Page 83
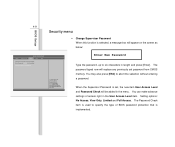
... CMOS memory. The Password Check item is used to abort the selection without entering a password. F1: General Help F2: Previous Values F9: Optimized Default F4: Save Enter New Password Type the password, up to six characters in the User Access Level item. You can make advance settings of BIOS password protection that is implemented. BIOS Setup 4-9 Security menu Š Change Supervisor Password When this function is selected, a message box will be added in the menu. Setting options...
... CMOS memory. The Password Check item is used to abort the selection without entering a password. F1: General Help F2: Previous Values F9: Optimized Default F4: Save Enter New Password Type the password, up to six characters in the User Access Level item. You can make advance settings of BIOS password protection that is implemented. BIOS Setup 4-9 Security menu Š Change Supervisor Password When this function is selected, a message box will be added in the menu. Setting options...
User Manual
Page 84
... password. To clear a set password, just press [Enter] when you can enter Setup without entering any password. Always A password prompt appears every time when the Notebook is disabled, the system will be disabled. User Password only allows the user to enter the setup menu, but do not have the right to run Setup. Once the password is powered on or when end users try to make changes. BIOS Setup 4-10 Settings are prompted to run Setup. Supervisor Password allows the user...
... password. To clear a set password, just press [Enter] when you can enter Setup without entering any password. Always A password prompt appears every time when the Notebook is disabled, the system will be disabled. User Password only allows the user to enter the setup menu, but do not have the right to run Setup. Once the password is powered on or when end users try to make changes. BIOS Setup 4-10 Settings are prompted to run Setup. Supervisor Password allows the user...


