MSI 9S7-169112-031 - X600 031US - Core 2 Solo 1.4 GHz Support and Manuals
Get Help and Manuals for this MSI item
View All Support Options Below
Free MSI 9S7-169112-031 manuals!
Problems with MSI 9S7-169112-031?
Ask a Question
Free MSI 9S7-169112-031 manuals!
Problems with MSI 9S7-169112-031?
Ask a Question
Popular MSI 9S7-169112-031 Manual Pages
User Manual - Page 7
... has been adjusted properly to the value of 100~240V before setting it up. Keep the User's Guide that could damage the equipment or cause an electrical shock. Keep...for future reference.
The openings on the equipment or user's manual should be noted. Preface
1-7
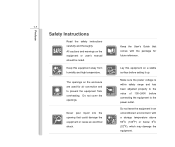
Safety Instructions
Read the safety instructions carefully and thoroughly. Lay this equipment away from overheating. Never...
User Manual - Page 8
...building.
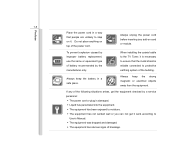
To prevent explosion caused by improper battery replacement, use the same or equivalent type of battery recommended by a service personnel: Š The power cord or ...Manual. Š The equipment was dropped and damaged. Š The equipment has obvious signs of breakage. If any add-on top of the power cord. 1-8
Preface
Place the power cord in a safe place.
When installing...
User Manual - Page 24
... for detailed information. 2-4
Introductions
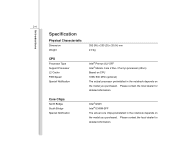
Specification
Physical Characteristic
Dimension Weight
392 (W) x 255 (D) x 25 (H) mm 2.0 kg
CPU
Processor Type Support Processor L2 Cache FSB Speed Special...model you purchased. Core Chips
North Bridge South Bridge Special Notification
Intel® GS45 Intel® ICH9M-SFF The actual core chips preinstalled in the notebook depends on the model...
User Manual - Page 27
... of the product, if you are not an authorized dealer or service center, since it may be noticed that the memory, hard disk drive, optical drive device, and battery pack preinstalled in the User's Manual. It is strongly recommended to the specification in the product users purchased may cause the warranty void. Introductions...
User Manual - Page 57
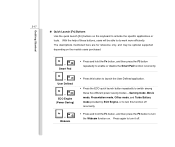
With the help of these buttons, users will be optional supported depending on the models users purchased.
+ Smart Pad
Š Press and hold the Fn button, and then press the F6 ... only, and may be able to turn the Webcam function on the keyboard to activate the specific applications or tools. Getting Started
3-17
„ Quick Launch [Fn] Buttons Use the quick launch [Fn] buttons on .
User Manual - Page 75
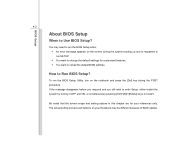
... may need to run the BIOS Setup when: Š An error message appears on the screen during the POST procedure.
The actual setting screens and options on your references only. How to restart. You may be different because of BIOS update. BIOS Setup
4-2
About BIOS Setup
When to run the BIOS Setup Utility, turn on the notebook...
User Manual - Page 76
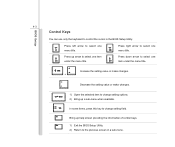
... this key to control the cursor in a sub-menu. Increase the setting value or make changes. +
Decrease the setting value or make changes.
1) Open the selected item to change setting field.
Press up arrow to the previous screen in the BIOS Setup Utility.
Press left arrow to select one menu title. Press down arrow...
User Manual - Page 77
... Setup
4-4
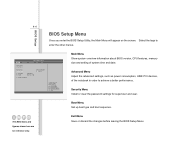
BIOS Setup Menu
Once you enter the BIOS Setup Utility, the Main Menu will appear on the screen. Main
Advanced
BISO SETUP UTILITY
Security Boot
Exit
Market Name Model Name... Opt. Boot Menu Set up boot type and boot sequence.
Exit Menu Save or discard the changes before leaving the BIOS Setup Menu. Security Menu Install or clear the password settings for reference only. Select...
User Manual - Page 78
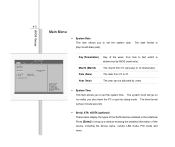
...a window showing the detailed information of the SATA devices installed in the notebook. The system clock will go on no matter you to set the system date. Year (Year)
The year can... be adjusted by BIOS (read-only).
Press [Enter] to Sat, which is [day:month:date:year]. Main
Advanced
BISO SETUP UTILITY
Security Boot
Exit
Market Name Model...
User Manual - Page 80
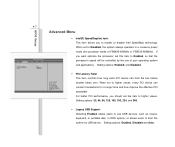
... at FSB400-600MHz or FSB533-800MHz). If you to higher values. 4-7
BIOS Setup
Main
Advanced
BISO SETUP UTILITY
Security Boot
Exit
Intel (R) Speedstep (tm) PCI Latency Timer Legacy USB Support AHCI
[Enabled] [64] [Enabled] [Enabled]
Advanced Menu
Š Intel(R) SpeedStep(tm) tech. Setting options: Enabled, and Disabled.
:Select Screen :Select Item
Enter: Select +/-: Change...
User Manual - Page 81

Setting options: Disabled and Enabled. The default setting is Disabled. BIOS Setup
4-8 Š AHCI (Advanced Host Controller Interface) Use this item to enable or disable the AHCI Mode.
User Manual - Page 82
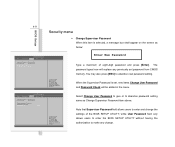
...the menu. Main
Advanced
BISO SETUP UTILITY
Security Boot
Exit
Supervisor Password :Not Installed
User Password
:Not Installed
Change Supervisor Password Change User Password Password Check
[Setup]
:Select Screen :Select Item
Enter: Select +/-: Change Opt.
Note that Supervisor Password field allows users to enter and change the settings of eight-digit password and press [Enter]. F1...
User Manual - Page 83
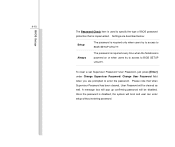
... as well. Please note that is implemented.
To clear a set Supervisor Password/ User Password, just press [Enter] under Change Supervisor Password/ Change User Password field when you are described below:
Setup
The password is required only when users try to access to BIOS SETUP UTILITY. BIOS Setup
4-10
The Password Check item is used to specify the type of BIOS...
User Manual - Page 84
... system boot.
F1: General Help F2: Previous Values F9: Optimized Default F4: Save Main
Advanced
BISO SETUP UTILITY
Security Boot
Exit
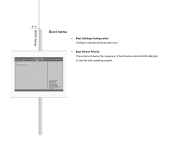
Boot Settings Configuration Boot Device Priority
Š Boot Device Priority These items showing the sequence of boot devices where BIOS attempts to load the disk operating system.
:...
User Manual - Page 85
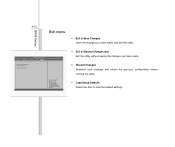
... your changes and reload the previous configuration before running the utility.
Š Load Setup Defaults Select this item to load the default settings. Main
Advanced
BISO SETUP UTILITY
Security Boot
Exit
Exit & Save Changes Exit & Discard Changes Discard Changes
Load Setup Defaults
:Select Screen :Select Item
Enter: Select +/-: Change Opt. F1: General Help F2...
MSI 9S7-169112-031 Reviews
We have not received any reviews for MSI yet.