
User Manual
Page 3
... View ...2-19 Getting Started Power Management ...3-2 Connecting the AC Power ...3-2 Using the Battery Power...3-4 ECO Engine -- Power Saving Function 3-9 Power Management in Windows OS 3-11 Energy Saving Tips...3-13 Basic Operations ...3-14 Safety and Comfort Tips...3-14 Having a Good Work Habit...3-15 Knowing the Keyboard ...3-16 Knowing the Smart Pad...3-23 About Hard Disk Drive...3-30 Using the Optical Drive Device 3-31 Connecting the External Devices 3-34 Connecting the Peripheral Devices 3-34 Connecting the Communication Devices 3-37 Components Replacement and Upgrade 3-40
... View ...2-19 Getting Started Power Management ...3-2 Connecting the AC Power ...3-2 Using the Battery Power...3-4 ECO Engine -- Power Saving Function 3-9 Power Management in Windows OS 3-11 Energy Saving Tips...3-13 Basic Operations ...3-14 Safety and Comfort Tips...3-14 Having a Good Work Habit...3-15 Knowing the Keyboard ...3-16 Knowing the Smart Pad...3-23 About Hard Disk Drive...3-30 Using the Optical Drive Device 3-31 Connecting the External Devices 3-34 Connecting the Peripheral Devices 3-34 Connecting the Communication Devices 3-37 Components Replacement and Upgrade 3-40
User Manual
Page 24
... and professional experience in using this notebook, and introduces the function buttons, quick launch buttons, connectors, LEDs and externals of installing and uninstalling the battery; Chapter 1, Preface, gives users the basic safety information and caution that is recommended to operate this notebook. Beside, the steps of this notebook. Chapter 3, Getting Started, gives the basic operation instructions on becoming an user of connecting the various external devices, communication devices, and so on how...
... and professional experience in using this notebook, and introduces the function buttons, quick launch buttons, connectors, LEDs and externals of installing and uninstalling the battery; Chapter 1, Preface, gives users the basic safety information and caution that is recommended to operate this notebook. Beside, the steps of this notebook. Chapter 3, Getting Started, gives the basic operation instructions on becoming an user of connecting the various external devices, communication devices, and so on how...
User Manual
Page 25
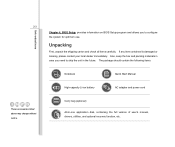
...: Notebook Quick Start Manual High-capacity Li-ion battery AC adapter and power cord Carry bag (optional) All-in the future. Unpacking First, unpack the shipping carton and check all items carefully. Also, keep the box and packing materials in case you to ship the unit in -one application disk, containing the full version of user's manual, drivers, utilities, and optional recovery function, etc. 2-3 These accessories listed...
...: Notebook Quick Start Manual High-capacity Li-ion battery AC adapter and power cord Carry bag (optional) All-in the future. Unpacking First, unpack the shipping carton and check all items carefully. Also, keep the box and packing materials in case you to ship the unit in -one application disk, containing the full version of user's manual, drivers, utilities, and optional recovery function, etc. 2-3 These accessories listed...
User Manual
Page 27
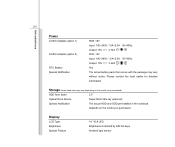
Display LCD Type Brightness Special Feature 14" 16:9 LED Brightness controlled by K/B hot-keys Ambient light sensor Storage (Items listed here may vary without notice. 2-5 Introductions Power AC/DC Adapter (option 1) AC/DC Adapter (option 2) RTC Battery Special Notification 90W, 19V Input: 100~240V, 1.5A~2.0A 50~60Hz Output: 19V 4.74A 65W, 19V Input: 100~240V, 1.5A~2.0A 50~60Hz Output: 19V 3.42A Yes The actual battery pack that...
Display LCD Type Brightness Special Feature 14" 16:9 LED Brightness controlled by K/B hot-keys Ambient light sensor Storage (Items listed here may vary without notice. 2-5 Introductions Power AC/DC Adapter (option 1) AC/DC Adapter (option 2) RTC Battery Special Notification 90W, 19V Input: 100~240V, 1.5A~2.0A 50~60Hz Output: 19V 4.74A 65W, 19V Input: 100~240V, 1.5A~2.0A 50~60Hz Output: 19V 3.42A Yes The actual battery pack that...
User Manual
Page 32
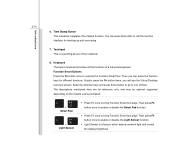
Keyboard The built-in keyboard provides all the functions of them. Then you will see the Virtual Desktop overview screen. Quickly press the Fn button twice, you can press this button to enable or disable the Light Sensor function. Š Light Sensor is a pointing device of the notebook. 8. The descriptions mentioned here are for reference only, and may be optional supported depending on the models users purchased. + Smart Pad + Light Sensor...
Keyboard The built-in keyboard provides all the functions of them. Then you will see the Virtual Desktop overview screen. Quickly press the Fn button twice, you can press this button to enable or disable the Light Sensor function. Š Light Sensor is a pointing device of the notebook. 8. The descriptions mentioned here are for reference only, and may be optional supported depending on the models users purchased. + Smart Pad + Light Sensor...
User Manual
Page 33
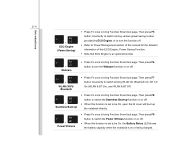
...; Refer to Power Management section of this manual for the detailed information of this function is set to be On, the Battery Status LED shows the battery capacity when the notebook is set to be On, open the lid cover will boot up Š Press Fn once to bring Function Smart tool page. Then press F9 button to switch the Power Witness function on or off . + WLAN (WiFi)/ Bluetooth Š...
...; Refer to Power Management section of this manual for the detailed information of this function is set to be On, the Battery Status LED shows the battery capacity when the notebook is set to be On, open the lid cover will boot up Š Press Fn once to bring Function Smart tool page. Then press F9 button to switch the Power Witness function on or off . + WLAN (WiFi)/ Bluetooth Š...
User Manual
Page 38
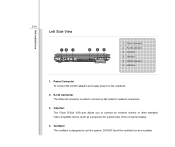
... connect a LAN cable for a great view of the computer display. 4. RJ-45 Connector 3. VGA Port 4. DO NOT block the ventilator for the notebook. 2. Power Connector To connect the AC/DC adapter and supply power for air circulation. 2-16 Left Side View Introductions 12 3 4 56 1. Ventilator 5. Ventilator The ventilator is used to connect an external monitor or other standard VGA-compatible device (such as a projector) for network connection. 3. USB Port...
... connect a LAN cable for a great view of the computer display. 4. RJ-45 Connector 3. VGA Port 4. DO NOT block the ventilator for the notebook. 2. Power Connector To connect the AC/DC adapter and supply power for air circulation. 2-16 Left Side View Introductions 12 3 4 56 1. Ventilator 5. Ventilator The ventilator is used to connect an external monitor or other standard VGA-compatible device (such as a projector) for network connection. 3. USB Port...

User Manual
Page 49
... damaged batteries. Š Dispose of time. Š Disable unnecessary settings or remove idle peripherals. Š Connect an AC/DC adapter to the system whenever possible. To optimize battery life and avoid a sudden power loss, read the tips below: Š Suspend system operation if the system will be idle for a while or shorten the suspend timer's time period. Š Turn off...
... damaged batteries. Š Dispose of time. Š Disable unnecessary settings or remove idle peripherals. Š Connect an AC/DC adapter to the system whenever possible. To optimize battery life and avoid a sudden power loss, read the tips below: Š Suspend system operation if the system will be idle for a while or shorten the suspend timer's time period. Š Turn off...

User Manual
Page 53
... power button. You can wake up your personal needs 4. Getting Started 3-11 Power Management in Windows OS Power management of personal computers (PCs) and monitors has the potential to save significant amounts of your display, hard drive, and battery. Follow the instructions below to adjust the power management settings in Windows OS allows you to control the power management features of electricity as well as following. 5. Then click on the Control Panel. Go to Sleep/ Hibernate mode...
... power button. You can wake up your personal needs 4. Getting Started 3-11 Power Management in Windows OS Power management of personal computers (PCs) and monitors has the potential to save significant amounts of your display, hard drive, and battery. Follow the instructions below to adjust the power management settings in Windows OS allows you to control the power management features of electricity as well as following. 5. Then click on the Control Panel. Go to Sleep/ Hibernate mode...

User Manual
Page 55
Getting Started 3-13 Energy Saving Tips Š Activate the ECO power saving function to manage the computer's energy consumption. Š Turn off the monitor after a period of user inactivity. Š Utilize the Fn and F12 sleep mode keys to turn into power saving mode. Š Tune the settings in Power Options under Windows OS to optimize the computer's power management. Š Always disconnect the AC power cord or uninstall the battery pack or switch off the wall socket if the computer would be left unused for a certain time to achieve zero energy consumption.
Getting Started 3-13 Energy Saving Tips Š Activate the ECO power saving function to manage the computer's energy consumption. Š Turn off the monitor after a period of user inactivity. Š Utilize the Fn and F12 sleep mode keys to turn into power saving mode. Š Tune the settings in Power Options under Windows OS to optimize the computer's power management. Š Always disconnect the AC power cord or uninstall the battery pack or switch off the wall socket if the computer would be left unused for a certain time to achieve zero energy consumption.

User Manual
Page 65
... the changes of the mouse. 1 2 This significant Smart Pad will surely bring users not only an efficient but also an enjoyable experience of your notebook allows users to perform various actions with multi-finger taps and gestures while operating the notebook, and is capable to place your finger on and control the cursor on the screen by users precisely. Getting Started Knowing...
... the changes of the mouse. 1 2 This significant Smart Pad will surely bring users not only an efficient but also an enjoyable experience of your notebook allows users to perform various actions with multi-finger taps and gestures while operating the notebook, and is capable to place your finger on and control the cursor on the screen by users precisely. Getting Started Knowing...
User Manual
Page 73
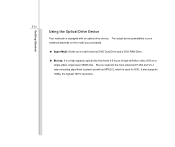
...-functional DVD Dual Drive and a DVD RAM Drive. „ Blu-ray: It is used for DVD. It also supports 1080p, the highest HDTV resolution. The actual device preinstalled in your notebook depends on the model you purchased. „ Super Multi: Works as MPEG-2, which is a high-capacity optical disc that holds 4.5 hours of high-definition video (HD) on a single-sided, single-layer 25GB disk. Getting Started 3-31 Using...
...-functional DVD Dual Drive and a DVD RAM Drive. „ Blu-ray: It is used for DVD. It also supports 1080p, the highest HDTV resolution. The actual device preinstalled in your notebook depends on the model you purchased. „ Super Multi: Works as MPEG-2, which is a high-capacity optical disc that holds 4.5 hours of high-definition video (HD) on a single-sided, single-layer 25GB disk. Getting Started 3-31 Using...
User Manual
Page 76
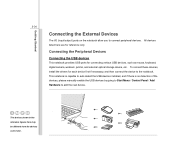
... then connect the device to add the new device. All devices listed here are for connecting various USB devices, such as mouse, keyboard, digital camera, webcam, printer, and external optical storage device, etc. Connecting the Peripheral Devices Connecting the USB devices This notebook provides USB ports for reference only. This notebook is capable to auto detect the USB devices installed, and if there is no detection of the devices, please manually enable the USB devices by going to Start Menu / Control Panel / Add Hardware to the notebook. The devices...
... then connect the device to add the new device. All devices listed here are for connecting various USB devices, such as mouse, keyboard, digital camera, webcam, printer, and external optical storage device, etc. Connecting the Peripheral Devices Connecting the USB devices This notebook provides USB ports for reference only. This notebook is capable to auto detect the USB devices installed, and if there is no detection of the devices, please manually enable the USB devices by going to Start Menu / Control Panel / Add Hardware to the notebook. The devices...
User Manual
Page 77
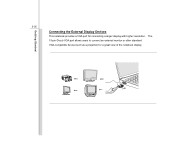
The 15-pin-D-sub VGA port allows users to connect an external monitor or other standard VGA-compatible device (such as a projector) for connecting a larger display with higher resolution. Getting Started 3-35 Connecting the External Display Devices This notebook provides a VGA port for a great view of the notebook display.
The 15-pin-D-sub VGA port allows users to connect an external monitor or other standard VGA-compatible device (such as a projector) for connecting a larger display with higher resolution. Getting Started 3-35 Connecting the External Display Devices This notebook provides a VGA port for a great view of the notebook display.
User Manual
Page 78
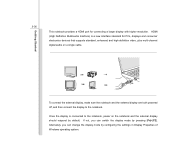
... connecting a larger display with higher resolution. To connect the external display, make sure the notebook and the external display are both powered off, and then connect the display to the notebook, power on a single cable. Getting Started 3-36 This notebook provides a HDMI port for PCs, displays and consumer electronics devices that supports standard, enhanced and high-definition video, plus multi-channel digital audio on the notebook and the external display should respond by configuring the settings in Display Properties of Windows operating...
... connecting a larger display with higher resolution. To connect the external display, make sure the notebook and the external display are both powered off, and then connect the display to the notebook, power on a single cable. Getting Started 3-36 This notebook provides a HDMI port for PCs, displays and consumer electronics devices that supports standard, enhanced and high-definition video, plus multi-channel digital audio on the notebook and the external display should respond by configuring the settings in Display Properties of Windows operating...

User Manual
Page 83
... performance of Using the Battery Power for details. Additional memory module may be upgradable and replaceable by authorized dealer or service center. Getting Started 3-41 1 2 3 4 This notebook is equipped with a high-capacity Li-ion battery pack, and the battery pack is equipped with a wireless LAN/ Bluetooth module, and the module may be installed, by users. This notebook is equipped with a hard disk drive, and this notebook, depending on the specification limitation. This notebook is replaceable by the...
... performance of Using the Battery Power for details. Additional memory module may be upgradable and replaceable by authorized dealer or service center. Getting Started 3-41 1 2 3 4 This notebook is equipped with a high-capacity Li-ion battery pack, and the battery pack is equipped with a wireless LAN/ Bluetooth module, and the module may be installed, by users. This notebook is equipped with a hard disk drive, and this notebook, depending on the specification limitation. This notebook is replaceable by the...
User Manual
Page 87
... [Ctrl]+[Alt]+[Delete] keys to Run BIOS Setup? How to restart. The actual setting screens and options on the notebook and press the [Del] key during the POST procedure. BIOS Setup 4-2 About BIOS Setup When to run the BIOS Setup Utility, turn on your references only. You may need to run the BIOS Setup when: Š An error message appears on the screen during the system booting up and is requested to Use BIOS Setup?
... [Ctrl]+[Alt]+[Delete] keys to Run BIOS Setup? How to restart. The actual setting screens and options on the notebook and press the [Del] key during the POST procedure. BIOS Setup 4-2 About BIOS Setup When to run the BIOS Setup Utility, turn on your references only. You may need to run the BIOS Setup when: Š An error message appears on the screen during the system booting up and is requested to Use BIOS Setup?
User Manual
Page 89
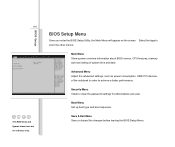
... and user. Boot Menu Set up boot type and boot sequence. Advanced Menu Adjust the advanced settings, such as power consumption, USB/ PCI devices, of system time and date. Security Menu Install or clear the password settings for reference only. Save & Exit Menu Save or discard the changes before leaving the BIOS Setup Menu. BIOS Setup BIOS Setup Menu Once you enter the BIOS Setup Utility, the Main Menu will appear on the screen. Main Menu Show system overview information about BIOS version, CPU features, memory size and setting...
... and user. Boot Menu Set up boot type and boot sequence. Advanced Menu Adjust the advanced settings, such as power consumption, USB/ PCI devices, of system time and date. Security Menu Install or clear the password settings for reference only. Save & Exit Menu Save or discard the changes before leaving the BIOS Setup Menu. BIOS Setup BIOS Setup Menu Once you enter the BIOS Setup Utility, the Main Menu will appear on the screen. Main Menu Show system overview information about BIOS version, CPU features, memory size and setting...
User Manual
Page 96
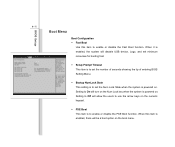
... to set the number of seconds showing the tip of entering BIOS Setting Menu. Š Bootup NumLock State This setting is to set the Num Lock State when the system is to use the arrow keys on the numeric keypad. Š PXE Boot This item is powered on. When it is enabled, the system will allow the users to enable or disable the PXE Boot function. BIOS Setup 4-11 Boot Menu Boot Configuration Š Fast Boot Use...
... to set the number of seconds showing the tip of entering BIOS Setting Menu. Š Bootup NumLock State This setting is to set the Num Lock State when the system is to use the arrow keys on the numeric keypad. Š PXE Boot This item is powered on. When it is enabled, the system will allow the users to enable or disable the PXE Boot function. BIOS Setup 4-11 Boot Menu Boot Configuration Š Fast Boot Use...
User Manual
Page 97
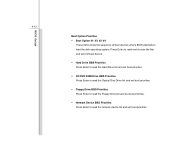
... the network device list and set boot priorities. Press Enter to read and choose the first and second boot device. Š Hard Drive BBS Priorities Press Enter to read the Hard Drive list and set boot priorities. Š CD/DVD ROM Drive BBS Priorities Press Enter to read the Optical Disc Drive list and set boot priorities. Š Floppy Drive BBS Priorities Press Enter to read the Floppy Drive list and set boot priorities. Š Network Device BBS Priorities Press Enter to load the disk operating...
... the network device list and set boot priorities. Press Enter to read and choose the first and second boot device. Š Hard Drive BBS Priorities Press Enter to read the Hard Drive list and set boot priorities. Š CD/DVD ROM Drive BBS Priorities Press Enter to read the Optical Disc Drive list and set boot priorities. Š Floppy Drive BBS Priorities Press Enter to read the Floppy Drive list and set boot priorities. Š Network Device BBS Priorities Press Enter to load the disk operating...


