User Guide
Page 6
... Location 29 Figure 7-4: Select Program Folder 29 Figure 7-5: Connected Protocol 30 Figure 7-6: Searching for USB 2.0 Figure 6-6: Protocol Tab - AppleTalk 35 Figure 7-15: Configuration - SNMP 21 Figure 6-7: Wireless Tab - Device 26 Figure 6-12: Status Tab - Internet Printing 37 Figure 7-17: Configuration - Printer 26 Figure 6-13: Status Tab - Wireless-G PrintServer for Device 30 Figure 7-7: Bi-Admin Management Utility 31 Figure...
... Location 29 Figure 7-4: Select Program Folder 29 Figure 7-5: Connected Protocol 30 Figure 7-6: Searching for USB 2.0 Figure 6-6: Protocol Tab - AppleTalk 35 Figure 7-15: Configuration - SNMP 21 Figure 6-7: Wireless Tab - Device 26 Figure 6-12: Status Tab - Internet Printing 37 Figure 7-17: Configuration - Printer 26 Figure 6-13: Status Tab - Wireless-G PrintServer for Device 30 Figure 7-7: Bi-Admin Management Utility 31 Figure...
User Guide
Page 20
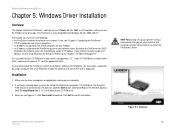
Wireless-G PrintServer for USB 2.0 Chapter 5: Windows Driver Installation Overview This section installs the PrintServer's software on your Windows 98, Me, 2000, or XP computers so they can use the PrintServer for print jobs. (The PrintServer is fully compatible with Windows 98, Me, 2000, and XP.) At this point, you must have no programs...Chapter 7: Bi-Admin Management." If you have the following: • the PrintServer hardware installed ...Linksys recommends that you set up your printer and install your printer's driver before you need to continue. By default the PrintServer...
Wireless-G PrintServer for USB 2.0 Chapter 5: Windows Driver Installation Overview This section installs the PrintServer's software on your Windows 98, Me, 2000, or XP computers so they can use the PrintServer for print jobs. (The PrintServer is fully compatible with Windows 98, Me, 2000, and XP.) At this point, you must have no programs...Chapter 7: Bi-Admin Management." If you have the following: • the PrintServer hardware installed ...Linksys recommends that you set up your printer and install your printer's driver before you need to continue. By default the PrintServer...
User Guide
Page 35
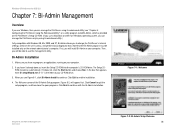
... Figure 7-2: Bi-Admin Setup Welcome 28 Wireless-G PrintServer for USB 2.0 Chapter 7: Bi-Admin Management Overview If you use Windows, then you can manage the PrintServer only by using its web-based utility.) Fully compatible with the Bi-Admin installation. First, you will be installed only on the unit's status, and perform basic diagnostic tests. In the box that the Bi-Admin program must...
... Figure 7-2: Bi-Admin Setup Welcome 28 Wireless-G PrintServer for USB 2.0 Chapter 7: Bi-Admin Management Overview If you use Windows, then you can manage the PrintServer only by using its web-based utility.) Fully compatible with the Bi-Admin installation. First, you will be installed only on the unit's status, and perform basic diagnostic tests. In the box that the Bi-Admin program must...
User Guide
Page 36
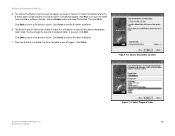
You may change the name for USB 2.0 5. Click Finish. Click Next. Click Back to return to end the Bi-Admin installation. 6. When the Bi-Admin is installed, the Setup Complete screen will be installed. Wireless-G PrintServer for the program folder, if you want the folder to be added to the program folder listed. Click Cancel to the previous screen. The...
You may change the name for USB 2.0 5. Click Finish. Click Next. Click Back to return to end the Bi-Admin installation. 6. When the Bi-Admin is installed, the Setup Complete screen will be installed. Wireless-G PrintServer for the program folder, if you want the folder to be added to the program folder listed. Click Cancel to the previous screen. The...
User Guide
Page 37
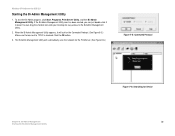
...PrintServer. (See Figure 8-6.) Figure 7-5: Connected Protocol Chapter 8: Bi-Admin Management Starting the Bi-Admin Management Utility Figure 7-6: Searching for USB 2.0 Starting the Bi-Admin Management Utility 1. The Bi-Admin Management Utility will ask for easy access to TCP/IP is checked. If the Bi-Admin...the box next to the Bi-Admin Management Utility. 2. Wireless-G PrintServer for Device 30 When the Bi-Admin Management Utility appears, it instead. To start the Bi-Admin program, click Start, Programs, Print Server Utility, and then Bi-Admin Management Utility. Click the ...
...PrintServer. (See Figure 8-6.) Figure 7-5: Connected Protocol Chapter 8: Bi-Admin Management Starting the Bi-Admin Management Utility Figure 7-6: Searching for USB 2.0 Starting the Bi-Admin Management Utility 1. The Bi-Admin Management Utility will ask for easy access to TCP/IP is checked. If the Bi-Admin...the box next to the Bi-Admin Management Utility. 2. Wireless-G PrintServer for Device 30 When the Bi-Admin Management Utility appears, it instead. To start the Bi-Admin program, click Start, Programs, Print Server Utility, and then Bi-Admin Management Utility. Click the ...

User Guide
Page 47
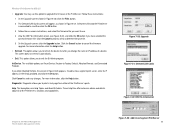
Wireless-G PrintServer for this tab, click the OK button to save these changes,... Trap Option, and Trap Severity level. In the Trap Receive IP Address fields, enter the IP address of access for USB 2.0 SNMP (Figure 8-19) • SysContact. Click the Get Defaults button if you can change the station's IP ... name of severity, with the SNMP program installed. The selected item's information will be displayed below. For the Trap Option setting, select Enable or Disable. SNMP Chapter 8: Bi-Admin Management 40 The Bi-Admin Management Utility From the Configuration Item box...
Wireless-G PrintServer for this tab, click the OK button to save these changes,... Trap Option, and Trap Severity level. In the Trap Receive IP Address fields, enter the IP address of access for USB 2.0 SNMP (Figure 8-19) • SysContact. Click the Get Defaults button if you can change the station's IP ... name of severity, with the SNMP program installed. The selected item's information will be displayed below. For the Trap Option setting, select Enable or Disable. SNMP Chapter 8: Bi-Admin Management 40 The Bi-Admin Management Utility From the Configuration Item box...
User Guide
Page 48
...22: BIN File Information Chapter 8: Bi-Admin Management The Bi-Admin Management Utility Figure 7-23: Add Cross Segment PrintServer 41 For more information, click the Help button. The screen does not refresh automatically. • Exit. InitDevice. If you to exit the Bi-Admin program. Follow these instructions: 1 On ... Cancel button to cancel the firmware upgrade. Click Cancel to upgrade the firmware of the PrintServer's functions and capabilities. To add a cross segment print server, enter its IP address in Figure 8-21. Wireless-G PrintServer for USB 2.0 • Upgrade.
...22: BIN File Information Chapter 8: Bi-Admin Management The Bi-Admin Management Utility Figure 7-23: Add Cross Segment PrintServer 41 For more information, click the Help button. The screen does not refresh automatically. • Exit. InitDevice. If you to exit the Bi-Admin program. Follow these instructions: 1 On ... Cancel button to cancel the firmware upgrade. Click Cancel to upgrade the firmware of the PrintServer's functions and capabilities. To add a cross segment print server, enter its IP address in Figure 8-21. Wireless-G PrintServer for USB 2.0 • Upgrade.

User Guide
Page 53
... LED on the front of the PrintServer. Reset the PrintServer so it back in Bi-Admin is grayed out, even though my printer is turned off . If so, use another address NOT within the range used by the DHCP server. Reset the PrintServer. Wireless-G PrintServer for USB 2.0 Appendix A: Troubleshooting This appendix consists of the PrintServer for approximately ten seconds. 3. Provided...
... LED on the front of the PrintServer. Reset the PrintServer so it back in Bi-Admin is grayed out, even though my printer is turned off . If so, use another address NOT within the range used by the DHCP server. Reset the PrintServer. Wireless-G PrintServer for USB 2.0 Appendix A: Troubleshooting This appendix consists of the PrintServer for approximately ten seconds. 3. Provided...


