User Guide
Page 3
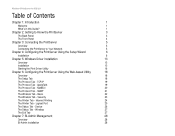
... The Wireless Tab - Wireless-G PrintServer for USB 2.0 Table of Contents Chapter 1: Introduction 1 Welcome 1 What's in this Guide? 1 Chapter 2: Getting to Know the PrintServer 3 The Back Panel 3 The Front Panel 4 Chapter 3: Connecting the PrintServer 5 Overview 5 Connecting the PrintServer to Your Network 5 Chapter 4: Configuring the PrintServer Using the Setup Wizard 6 Installation 6 Chapter 5: Windows Driver Installation 13 Overview 13 Installation 13 Starting the Print...
... The Wireless Tab - Wireless-G PrintServer for USB 2.0 Table of Contents Chapter 1: Introduction 1 Welcome 1 What's in this Guide? 1 Chapter 2: Getting to Know the PrintServer 3 The Back Panel 3 The Front Panel 4 Chapter 3: Connecting the PrintServer 5 Overview 5 Connecting the PrintServer to Your Network 5 Chapter 4: Configuring the PrintServer Using the Setup Wizard 6 Installation 6 Chapter 5: Windows Driver Installation 13 Overview 13 Installation 13 Starting the Print...
User Guide
Page 8
... the printers it on how to use wireless for USB 2.0 lets you on how to connect the PrintServer to your network, eliminating the need to dedicate a PC to your network by 10/100 Ethernet cable, or wireless over 54Mbps Wireless-G (802.11g). Connect the PrintServer directly to each print server. A user-friendly Setup Wizard makes installation easy, the compact case...
... the printers it on how to use wireless for USB 2.0 lets you on how to connect the PrintServer to your network, eliminating the need to dedicate a PC to your network by 10/100 Ethernet cable, or wireless over 54Mbps Wireless-G (802.11g). Connect the PrintServer directly to each print server. A user-friendly Setup Wizard makes installation easy, the compact case...
User Guide
Page 13
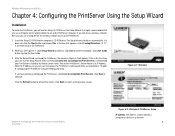
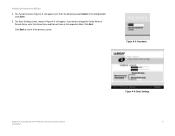
... continue. It is its default server name. Next to the PrintServer's Server Name is highly recommended that List only new (unconfigured) Print Servers is selected and your PrintServer is the letter of your CD-ROM drive). 2. Click Next to end the installation. Wireless-G PrintServer for USB 2.0 Chapter 4: Configuring the PrintServer Using the Setup Wizard Installation To install the PrintServer, you will appear. Click...
... continue. It is its default server name. Next to the PrintServer's Server Name is highly recommended that List only new (unconfigured) Print Servers is selected and your PrintServer is the letter of your CD-ROM drive). 2. Click Next to end the installation. Wireless-G PrintServer for USB 2.0 Chapter 4: Configuring the PrintServer Using the Setup Wizard Installation To install the PrintServer, you will appear. Click...
User Guide
Page 14
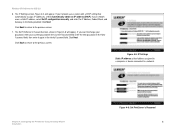
The Password screen, Figure 4-3, will appear. Figure 4-3: Password Chapter 4: Configuring the PrintServer Using the Setup Wizard Installation Figure 4-4: Basic Settings 7 Click Enter. 5. Click Next. Click Back to return to change the Device Name or Domain Name, enter the Device Name and Domain Name in the field provided. Wireless-G PrintServer for USB 2.0 4. Enter the default password admin in the respective fields. If you want to the previous screen. The Basic Settings screen, shown in Figure 4-4, will appear next.
The Password screen, Figure 4-3, will appear. Figure 4-3: Password Chapter 4: Configuring the PrintServer Using the Setup Wizard Installation Figure 4-4: Basic Settings 7 Click Enter. 5. Click Next. Click Back to return to change the Device Name or Domain Name, enter the Device Name and Domain Name in the field provided. Wireless-G PrintServer for USB 2.0 4. Enter the default password admin in the respective fields. If you want to the previous screen. The Basic Settings screen, shown in Figure 4-4, will appear next.
User Guide
Page 15
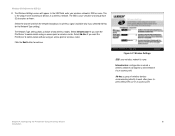
.... Click Back to return to change your password, enter your current password in the fields provided. If you want to the previous screen. The Set PrintServer's Password screen, shown in the Verify Password field. Wireless-G PrintServer for USB 2.0 6. The IP Settings screen, Figure 4-5, will appear. Chapter 4: Configuring the PrintServer Using the Setup Wizard Installation Figure 4-6: Set...
.... Click Back to return to change your password, enter your current password in the fields provided. If you want to the previous screen. The Set PrintServer's Password screen, shown in the Verify Password field. Wireless-G PrintServer for USB 2.0 6. The IP Settings screen, Figure 4-5, will appear. Chapter 4: Configuring the PrintServer Using the Setup Wizard Installation Figure 4-6: Set...
User Guide
Page 16
... an access point or wireless router. Infrastructure: configuration in a wireless network. Ad-hoc: a group of two wireless modes. Click the Next button to each other (peer-topeer) without using an access point or wireless router. The SSID is bridged to a wired network via an access point. Chapter 4: Configuring the PrintServer Using the Setup Wizard 9 Installation The Network...
... an access point or wireless router. Infrastructure: configuration in a wireless network. Ad-hoc: a group of two wireless modes. Click the Next button to each other (peer-topeer) without using an access point or wireless router. The SSID is bridged to a wired network via an access point. Chapter 4: Configuring the PrintServer Using the Setup Wizard 9 Installation The Network...

User Guide
Page 17
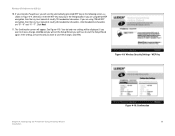
... WEP key on a wireless network for greater wireless security, select the level of your wireless network and is case-sensitive and should have to enter the WEP key manually, then leave the Passphrase field blank; Chapter 4: Configuring the PrintServer Using the Setup Wizard 10 Installation If you ...simplifies the WEP encryption process by automatically generating the WEP encryption for USB 2.0 9. If you use a Passphrase, a WEP key will appear. If you want to enter the WEP key(s) manually on any non-Linksys wireless products.) If you click the Next button. It must match the ...
... WEP key on a wireless network for greater wireless security, select the level of your wireless network and is case-sensitive and should have to enter the WEP key manually, then leave the Passphrase field blank; Chapter 4: Configuring the PrintServer Using the Setup Wizard 10 Installation If you ...simplifies the WEP encryption process by automatically generating the WEP encryption for USB 2.0 9. If you use a Passphrase, a WEP key will appear. If you want to enter the WEP key(s) manually on any non-Linksys wireless products.) If you click the Next button. It must match the ...
User Guide
Page 18
... to make a change, click No and you will exit the Setup Wizard; If you are "0"-"9" and "A"-"F". Figure 4-9: Wireless Security Settings - If you entered a Passphrase, you will see the automatically generated WEP key on the following screen, as shown in the field provided. Wireless-G PrintServer for USB 2.0 10. Click Next. 11. If you are correct and you...
... to make a change, click No and you will exit the Setup Wizard; If you are "0"-"9" and "A"-"F". Figure 4-9: Wireless Security Settings - If you entered a Passphrase, you will see the automatically generated WEP key on the following screen, as shown in the field provided. Wireless-G PrintServer for USB 2.0 10. Click Next. 11. If you are correct and you...

User Guide
Page 19
You will appear. The Congratulations screen, shown in Figure 4-11, will need to "Chapter 5: Windows Driver Installation." Wireless-G PrintServer for USB 2.0 12. Figure 4-11: Congratulations Chapter 4: Configuring the PrintServer Using the Setup Wizard 12 Installation The setup is complete. Click User Install at the bottom of the Congratulations screen, and go to install the driver next.
You will appear. The Congratulations screen, shown in Figure 4-11, will need to "Chapter 5: Windows Driver Installation." Wireless-G PrintServer for USB 2.0 12. Figure 4-11: Congratulations Chapter 4: Configuring the PrintServer Using the Setup Wizard 12 Installation The setup is complete. Click User Install at the bottom of the Congratulations screen, and go to install the driver next.
User Guide
Page 20
...-ROM drive to "Chapter 7: Bi-Admin Management." If you need to install the PrintServer's driver on computers without a CD-ROM drive, you can use the PrintServer for print jobs. (The PrintServer is designated as "D". It is assumed that appears, enter D:\setupWizard.exe (if ... the following: • the PrintServer hardware installed on your network. Wireless-G PrintServer for USB 2.0 Chapter 5: Windows Driver Installation Overview This section installs the PrintServer's software on your Windows 98, Me, 2000, or XP computers so they can create a setup disk by you or your network...
...-ROM drive to "Chapter 7: Bi-Admin Management." If you need to install the PrintServer's driver on computers without a CD-ROM drive, you can use the PrintServer for print jobs. (The PrintServer is designated as "D". It is assumed that appears, enter D:\setupWizard.exe (if ... the following: • the PrintServer hardware installed on your network. Wireless-G PrintServer for USB 2.0 Chapter 5: Windows Driver Installation Overview This section installs the PrintServer's software on your Windows 98, Me, 2000, or XP computers so they can create a setup disk by you or your network...
User Guide
Page 25
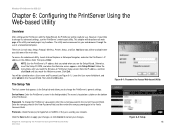
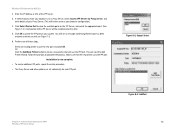
... a sticker on the bottom of the main tabs. Click Exit. Wireless-G PrintServer for USB 2.0 Chapter 6: Configuring the PrintServer Using the Web-based Utility Overview After setting up the PrintServer with the Setup Wizard, the PrintServer will be ready for AppleTalk or NetBEUI, if they are six main tabs: Setup, Protocol, Wireless, Printer, Status, and Exit. Note the IP address, and...
... a sticker on the bottom of the main tabs. Click Exit. Wireless-G PrintServer for USB 2.0 Chapter 6: Configuring the PrintServer Using the Web-based Utility Overview After setting up the PrintServer with the Setup Wizard, the PrintServer will be ready for AppleTalk or NetBEUI, if they are six main tabs: Setup, Protocol, Wireless, Printer, Status, and Exit. Note the IP address, and...
User Guide
Page 50
...Figure 8-2: Output Select Figure 8-3: AddPort Chapter 7: Internet Printing Protocol (IPP) 43 Windows IPP Client Setup You will see a message confirming that the new printer... new printer that will start the Add Printer Wizard. Follow the prompts to view the available ports on your Proxy Server. (This will be the same as your ...Server and other options are set individually for USB 2.0 2. Installation is via a Proxy Server, check Access IPP Server via Proxy Server, and enter details of your system. Click Select Device Port to complete the process. Wireless-G PrintServer...
...Figure 8-2: Output Select Figure 8-3: AddPort Chapter 7: Internet Printing Protocol (IPP) 43 Windows IPP Client Setup You will see a message confirming that the new printer... new printer that will start the Add Printer Wizard. Follow the prompts to view the available ports on your Proxy Server. (This will be the same as your ...Server and other options are set individually for USB 2.0 2. Installation is via a Proxy Server, check Access IPP Server via Proxy Server, and enter details of your system. Click Select Device Port to complete the process. Wireless-G PrintServer...

User Guide
Page 51
...631 represents the port number. There are case-sensitive. Start the Add Printer Wizard. 2. They must be adjusted if you have a poor connection, or the remote server is very busy. Wireless-G PrintServer for Windows 2000 and XP Windows 2000 and XP have problems connecting to a... steps: 1. Chapter 7: Internet Printing Protocol (IPP) Windows IPP Client Setup Figure 8-4: Configure IPP Port Figure 8-5: Locate Your Printer 44 Select Network Printer and click Next to install the supplied IPP Client Software. Select Connect to the IPP Server. • The Retry Interval sets...
...631 represents the port number. There are case-sensitive. Start the Add Printer Wizard. 2. They must be adjusted if you have a poor connection, or the remote server is very busy. Wireless-G PrintServer for Windows 2000 and XP Windows 2000 and XP have problems connecting to a... steps: 1. Chapter 7: Internet Printing Protocol (IPP) Windows IPP Client Setup Figure 8-4: Configure IPP Port Figure 8-5: Locate Your Printer 44 Select Network Printer and click Next to install the supplied IPP Client Software. Select Connect to the IPP Server. • The Retry Interval sets...

User Guide
Page 52
... complete the Wizard. If you wish to check the availability of the following reasons: • It is powered off. • A printer problem has caused the IPP Server to Printer Chapter 7: Internet Printing Protocol (IPP) 45 Windows IPP Client Setup Figure 8-6: Connect...USB 2.0 4. If using the supplied IPP Client software, there are two settings, Retry Interval and Retry Count, which can use . Using IPP Printers The IPP Printer can be adjusted if you can be selected and used like any of the remote IPP Server, you have problems connecting to time out. Wireless-G PrintServer...
... complete the Wizard. If you wish to check the availability of the following reasons: • It is powered off. • A printer problem has caused the IPP Server to Printer Chapter 7: Internet Printing Protocol (IPP) 45 Windows IPP Client Setup Figure 8-6: Connect...USB 2.0 4. If using the supplied IPP Client software, there are two settings, Retry Interval and Retry Count, which can use . Using IPP Printers The IPP Printer can be adjusted if you can be selected and used like any of the remote IPP Server, you have problems connecting to time out. Wireless-G PrintServer...

User Guide
Page 61
...apply your changes. Each WEP key must consist of encryption your wireless network uses. 4. To use the Setup Wizard, refer to "Chapter 4: Configuring the PrintServer Using the Setup Wizard." From the WEP Encryption drop-down menu, select your wireless network's authentication type, Open System, Shared Key, or Auto....Keys (10 Hex chars) or 128 Bit Keys (26 Hex chars), depending on the authentication being used by your wireless network. 5. Wireless-G PrintServer for USB 2.0 The solution, then, is to segment your network up into your network and steal your resources. If your ...
...apply your changes. Each WEP key must consist of encryption your wireless network uses. 4. To use the Setup Wizard, refer to "Chapter 4: Configuring the PrintServer Using the Setup Wizard." From the WEP Encryption drop-down menu, select your wireless network's authentication type, Open System, Shared Key, or Auto....Keys (10 Hex chars) or 128 Bit Keys (26 Hex chars), depending on the authentication being used by your wireless network. 5. Wireless-G PrintServer for USB 2.0 The solution, then, is to segment your network up into your network and steal your resources. If your ...


