User Guide
Page 4
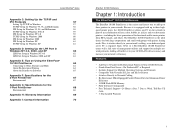
...so no dedicated print server PC is required. Because it attaches directly to your network. Instant EtherFast® Series Appendix C: Setting Up the TCP/IP and IPX Protocols 57 Setting Up TCP/IP in Windows 57 TCP/IP Setup for Windows 95, 98,...Windows XP 61 TCP/IP Setup for Windows XP 61 Appendix D: Setting Up the LPR Port in Windows NT 4.0, 2000, and XP 62 LPR Port Setup in Windows NT 4.0 62 LPR Port Setup in Windows 2000 and XP 63 Appendix E: Tips on Using the EtherFast® 10/100 PrintServer 64 Connecting to Other Switches and Hubs 64 About Bi-directional Printing...
...so no dedicated print server PC is required. Because it attaches directly to your network. Instant EtherFast® Series Appendix C: Setting Up the TCP/IP and IPX Protocols 57 Setting Up TCP/IP in Windows 57 TCP/IP Setup for Windows 95, 98,...Windows XP 61 TCP/IP Setup for Windows XP 61 Appendix D: Setting Up the LPR Port in Windows NT 4.0, 2000, and XP 62 LPR Port Setup in Windows NT 4.0 62 LPR Port Setup in Windows 2000 and XP 63 Appendix E: Tips on Using the EtherFast® 10/100 PrintServer 64 Connecting to Other Switches and Hubs 64 About Bi-directional Printing...

User Guide
Page 11
Figure 5-11 14 EtherFast 10/100 PrintServers Chapter 6: Bi-Admin: PrintServer Management The PrintServer is recommended. Continue with the PrintServer. To start the Bi-Admin program, click the Start button, select Programs, click Linksys printserver admin, and choose Bi-Admin. The Printer Port Setup screen will ... Desktop for easy access to be installed. Fully compatible with Windows 95, 98, Millennium, NT, 2000, and XP, Bi-Admin allows you must only be installed initially, which are using the PrintServer in the provided field and press the Enter key. 3. Starting...
Figure 5-11 14 EtherFast 10/100 PrintServers Chapter 6: Bi-Admin: PrintServer Management The PrintServer is recommended. Continue with the PrintServer. To start the Bi-Admin program, click the Start button, select Programs, click Linksys printserver admin, and choose Bi-Admin. The Printer Port Setup screen will ... Desktop for easy access to be installed. Fully compatible with Windows 95, 98, Millennium, NT, 2000, and XP, Bi-Admin allows you must only be installed initially, which are using the PrintServer in the provided field and press the Enter key. 3. Starting...
User Guide
Page 21
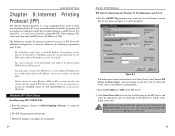
...installation. 34 EtherFast 10/100 PrintServers IPP Client Configuration for Windows 95, 98, Millennium, and NT 4.0 1. However, the following requirements must be met: · The PrintServer must also know the IPP Server's IP Address or URL. Windows IPP Client Setup Installing using Windows 2000 or XP, you must...the IPP folder. Note: Verify that the parallel port appears in Figure 8-1 will be displayed. 2. For printing via Proxy Server, and enter details of your Proxy Server. (This will be established at this time. Follow the prompts to view the available ports on your ...
...installation. 34 EtherFast 10/100 PrintServers IPP Client Configuration for Windows 95, 98, Millennium, and NT 4.0 1. However, the following requirements must be met: · The PrintServer must also know the IPP Server's IP Address or URL. Windows IPP Client Setup Installing using Windows 2000 or XP, you must...the IPP folder. Note: Verify that the parallel port appears in Figure 8-1 will be displayed. 2. For printing via Proxy Server, and enter details of your Proxy Server. (This will be established at this time. Follow the prompts to view the available ports on your ...
User Guide
Page 23
...needs to be selected and used like any of the IPP Server as shown in Figure 8-4. If the connection can be entered as shown, with the PrintServer, follow this procedure: 1. Click Next and complete the Wizard. Figure 9-5 5. An IPP Server may be displayed. To use this IPP Client with "ipp... and click Next to the port on that the printer driver is now ready for Windows 2000 and XP Instant EtherFast® Series Windows 2000 and XP have problems connecting to check the availability of the IPP Server, and 631 represents the port number. IPP Client Setup for use. Start the Add...
...needs to be selected and used like any of the IPP Server as shown in Figure 8-4. If the connection can be entered as shown, with the PrintServer, follow this procedure: 1. Click Next and complete the Wizard. Figure 9-5 5. An IPP Server may be displayed. To use this IPP Client with "ipp... and click Next to the port on that the printer driver is now ready for Windows 2000 and XP Instant EtherFast® Series Windows 2000 and XP have problems connecting to check the availability of the IPP Server, and 631 represents the port number. IPP Client Setup for use. Start the Add...

User Guide
Page 26
... Printer Manager utility on each computer that will be using Windows 95, 98, Millennium, NT 4.0, 2000, or XP, run the Nwpmw32.exe program, which should be located at F:\public\win32 on the PrintServer, in the main Printer Manager window, ready for parallel ports 1, 2, and 3, respectively.) .... Log in NetWare 5.x, 4.x and 3.x Print Server Mode To set up the PrintServer under NetWare using : Figure 10-3 quickset SC0C8A02 /un=PS /q1= epson 45 Instant EtherFast® Series 6. Type the IP address assigned to select drivers, select None. A window will be the default name of "SC"...
... Printer Manager utility on each computer that will be using Windows 95, 98, Millennium, NT 4.0, 2000, or XP, run the Nwpmw32.exe program, which should be located at F:\public\win32 on the PrintServer, in the main Printer Manager window, ready for parallel ports 1, 2, and 3, respectively.) .... Log in NetWare 5.x, 4.x and 3.x Print Server Mode To set up the PrintServer under NetWare using : Figure 10-3 quickset SC0C8A02 /un=PS /q1= epson 45 Instant EtherFast® Series 6. Type the IP address assigned to select drivers, select None. A window will be the default name of "SC"...
User Guide
Page 31
...; Some DOS application require an LPT port to the PrintServer when you need help. 54 55 Click the Apply button and then click the OK button to Spool Data Format (RAW). Reboot your network. Note: Linksys does not provide any technical support for a Device. ... and configured a WPS (Windows Printing System) printer as described in Issue Two. g. P1) and select Capture Printer Port. i. Put a check on your PC. Right-click on your network workgroup name. EtherFast 10/100 PrintServers 6. Then, select NetBEUI. You should see the PrintServer on the Reconnect at logon option ...
...; Some DOS application require an LPT port to the PrintServer when you need help. 54 55 Click the Apply button and then click the OK button to Spool Data Format (RAW). Reboot your network. Note: Linksys does not provide any technical support for a Device. ... and configured a WPS (Windows Printing System) printer as described in Issue Two. g. P1) and select Capture Printer Port. i. Put a check on your PC. Right-click on your network workgroup name. EtherFast 10/100 PrintServers 6. Then, select NetBEUI. You should see the PrintServer on the Reconnect at logon option ...
User Guide
Page 34
...for your computer. Choose Properties. 2. When the Network window reappears, click the OK button. When the Component Type window appears, select Protocol and click the Install button. 60 EtherFast 10/100 PrintServers 4. When the Component Type window appears, select Protocol and click the Add button. ...Then, click the OK button. Then, right click Local Area Connection. Instant EtherFast® Series 2. Otherwise, click the Install button. 3. If the Internet Protocol (TCP/IP) is listed for Windows XP 1. Enter an IP Address for the computer, along with a Subnet Mask ...
...for your computer. Choose Properties. 2. When the Network window reappears, click the OK button. When the Component Type window appears, select Protocol and click the Install button. 60 EtherFast 10/100 PrintServers 4. When the Component Type window appears, select Protocol and click the Add button. ...Then, click the OK button. Then, right click Local Area Connection. Instant EtherFast® Series 2. Otherwise, click the Install button. 3. If the Internet Protocol (TCP/IP) is listed for Windows XP 1. Enter an IP Address for the computer, along with a Subnet Mask ...
User Guide
Page 35
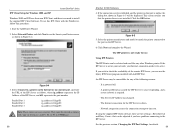
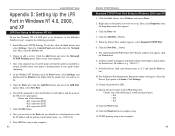
... the Add Port... When the Printer Ports window appears, select Standard TCP/IP Port. 6. Another window will be prompted to enter the PrintServer's IP address and the name of the NT server's print queue. The Additional Port Information Required window will appear, click the Next button. 8.... print queue name, e.g., 10.0.0.1:L1. 9. Click the Finish button to add a service. Instant EtherFast® Series Appendix D: Setting Up the LPR Port in Windows NT 4.0, 2000, and XP LPR Port Setup in Windows NT 4.0 To use the Windows NT 4.0 LPR port as an alternative to the EtherFast PrintServer port...
... the Add Port... When the Printer Ports window appears, select Standard TCP/IP Port. 6. Another window will be prompted to enter the PrintServer's IP address and the name of the NT server's print queue. The Additional Port Information Required window will appear, click the Next button. 8.... print queue name, e.g., 10.0.0.1:L1. 9. Click the Finish button to add a service. Instant EtherFast® Series Appendix D: Setting Up the LPR Port in Windows NT 4.0, 2000, and XP LPR Port Setup in Windows NT 4.0 To use the Windows NT 4.0 LPR port as an alternative to the EtherFast PrintServer port...

