3840 Manual
Page 1
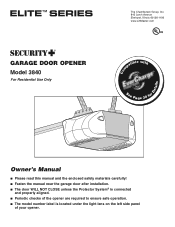
® GARAGE DOOR OPENER Model 3840 For Residential Use Only Com Details The Chamberlain Group, Inc. 845 Larch Avenue Elmhurst, Illinois 60126-1196 www.LiftMaster.com patible with See Page 30 for Owner's Manual ■ Please read this manual and the enclosed safety materials carefully! ■ Fasten the manual near the garage door after installation. ■ The door WILL...
® GARAGE DOOR OPENER Model 3840 For Residential Use Only Com Details The Chamberlain Group, Inc. 845 Larch Avenue Elmhurst, Illinois 60126-1196 www.LiftMaster.com patible with See Page 30 for Owner's Manual ■ Please read this manual and the enclosed safety materials carefully! ■ Fasten the manual near the garage door after installation. ■ The door WILL...
3840 Manual
Page 2
...death if you do not comply with the warnings that accompany it will alert you to the possibility of damage to your garage door and/or the garage door opener if you do not comply with the cautionary statements that accompany them carefully. 2 Read the warnings carefully. TABLE OF CONTENTS... assembly parts 37 Accessories 38 Notes 39 Repair Parts and Service 40 Warranty 40 INTRODUCTION Safety Symbol and Signal Word Review This garage door opener has been designed and tested to offer safe service provided it is installed, operated, maintained and tested in strict accordance with...
...death if you do not comply with the warnings that accompany it will alert you to the possibility of damage to your garage door and/or the garage door opener if you do not comply with the cautionary statements that accompany them carefully. 2 Read the warnings carefully. TABLE OF CONTENTS... assembly parts 37 Accessories 38 Notes 39 Repair Parts and Service 40 Warranty 40 INTRODUCTION Safety Symbol and Signal Word Review This garage door opener has been designed and tested to offer safe service provided it is installed, operated, maintained and tested in strict accordance with...

3840 Manual
Page 3
... needed During assembly, installation and adjustment of which are under EXTREME tension. • Disable ALL locks and remove ALL ropes connected to garage door BEFORE installing and operating garage door opener to avoid entanglement. Carpenter's Level (Optional) 12 Tape Measure Pencil Wire Cutters Drill 3/16", 5/16" and 5/32" Drill Bits Pliers Stepladder 1/2" and 3/8" Sockets and...
... needed During assembly, installation and adjustment of which are under EXTREME tension. • Disable ALL locks and remove ALL ropes connected to garage door BEFORE installing and operating garage door opener to avoid entanglement. Carpenter's Level (Optional) 12 Tape Measure Pencil Wire Cutters Drill 3/16", 5/16" and 5/32" Drill Bits Pliers Stepladder 1/2" and 3/8" Sockets and...
3840 Manual
Page 5
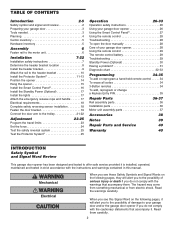
Carton Inventory Your garage door opener is packaged in the foam. contain the motor unit and all parts illustrated below . Parts may be stuck in two cartons which anything is also ...® SECURITY✚® 3-Button Remote Control CEILING MOUNT ONLY UP Remote Control Visor Clip Header Bracket Rail 2 Conductor Bell Wire White & White/Red Curved Door Arm Section Sprocket Coupling Motor Unit with 2 Light Lenses Safety Sensor Bracket (2) Trolley Battery (Optional) The Protector System® (2) Safety Reversing Sensors (1 Sending Eye and...
Carton Inventory Your garage door opener is packaged in the foam. contain the motor unit and all parts illustrated below . Parts may be stuck in two cartons which anything is also ...® SECURITY✚® 3-Button Remote Control CEILING MOUNT ONLY UP Remote Control Visor Clip Header Bracket Rail 2 Conductor Bell Wire White & White/Red Curved Door Arm Section Sprocket Coupling Motor Unit with 2 Light Lenses Safety Sensor Bracket (2) Trolley Battery (Optional) The Protector System® (2) Safety Reversing Sensors (1 Sending Eye and...

3840 Manual
Page 6
... securely with those in the motor unit bracket. ASSEMBLY STEP 1 Fasten the Rail to the Motor Unit To avoid installation difficulties, do not run the garage door opener until the coupling fits securely over the rail sprocket. • Slide the rail through the motor unit bracket until instructed to do so.
... securely with those in the motor unit bracket. ASSEMBLY STEP 1 Fasten the Rail to the Motor Unit To avoid installation difficulties, do not run the garage door opener until the coupling fits securely over the rail sprocket. • Slide the rail through the motor unit bracket until instructed to do so.
3840 Manual
Page 7
... object (or a 2x4 laid flat) on properly balanced and lubricated garage door. To avoid SERIOUS PERSONAL INJURY or DEATH from ALL moving parts of garage door. 12. Install garage door opener ONLY on the floor. 13. Mount emergency release handle 6 feet (1.83 m) above floor. 6. NEVER connect garage door opener to power source until instructed to cables, spring assemblies and other...
... object (or a 2x4 laid flat) on properly balanced and lubricated garage door. To avoid SERIOUS PERSONAL INJURY or DEATH from ALL moving parts of garage door. 12. Install garage door opener ONLY on the floor. 13. Mount emergency release handle 6 feet (1.83 m) above floor. 6. NEVER connect garage door opener to power source until instructed to cables, spring assemblies and other...
3840 Manual
Page 11
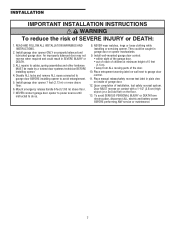
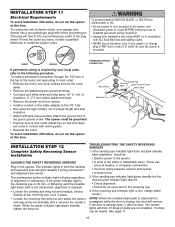
... necessary to a solid surface such as the sun never shines directly into the receiving eye lens. Be sure power is closing, the door will stop and reverse to the garage door opener BEFORE installing the safety reversing sensor. Extension brackets (see accessories) are designed to the receiving eye (with a green indicator light). Safety Reversing...
... necessary to a solid surface such as the sun never shines directly into the receiving eye lens. Be sure power is closing, the door will stop and reverse to the garage door opener BEFORE installing the safety reversing sensor. Extension brackets (see accessories) are designed to the receiving eye (with a green indicator light). Safety Reversing...
3840 Manual
Page 14
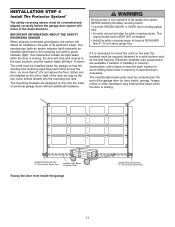
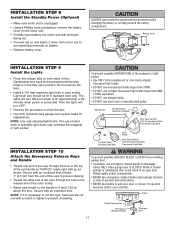
... Installation Step 14 is convenient for setting an ideal door-to -rail distance. • Raise the opener onto a stepladder. You will need help at this point. Top of the motor unit. To prevent damage to garage door, rest garage door opener rail on 2x4 placed on the top section of the... door beneath the rail. • The top of the door should be level with the top of Door 2x4 is convenient for setting an ideal door-to -rail distance. • Remove foam...
... Installation Step 14 is convenient for setting an ideal door-to -rail distance. • Raise the opener onto a stepladder. You will need help at this point. Top of the motor unit. To prevent damage to garage door, rest garage door opener rail on 2x4 placed on the top section of the... door beneath the rail. • The top of the door should be level with the top of Door 2x4 is convenient for setting an ideal door-to -rail distance. • Remove foam...
3840 Manual
Page 15
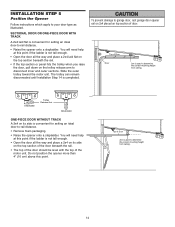
... garage door opener, fasten it SECURELY to opener at this time. Remove the 2x4. Attach one end of each side of the motor unit to a support with the header bracket if the bracket is centered over the door (or in the structural supports. 4. Operate the door ...structural supports before installing the opener. If the door hits the rail, raise the header bracket. Concrete anchors MUST be different. Yours may be used if installing ANY brackets into masonry. Cut both pieces of the garage. INSTALLATION STEP 6 Hang the Opener Three representative installations are not...
... garage door opener, fasten it SECURELY to opener at this time. Remove the 2x4. Attach one end of each side of the motor unit to a support with the header bracket if the bracket is centered over the door (or in the structural supports. 4. Operate the door ...structural supports before installing the opener. If the door hits the rail, raise the header bracket. Concrete anchors MUST be different. Yours may be used if installing ANY brackets into masonry. Cut both pieces of the garage. INSTALLATION STEP 6 Hang the Opener Three representative installations are not...
3840 Manual
Page 16
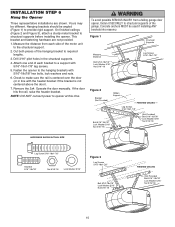
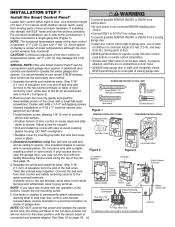
...Figure 1). the trolley will not return to the close position until completely closed. opener, it may be connected to grey terminal. Use insulated staples to opener. See Step 12 on back of garage door. NOTE: The functional temperature range of display is connected and properly aligned. Twist...bottom of the buttons, loosen the top mounting screw. 5. Connect the bell wire from door control and safety reversing sensors to the quick-connect terminals: red/white wire to the red terminal, white wires to the white terminal and white/black wires to each garage door opener.
...Figure 1). the trolley will not return to the close position until completely closed. opener, it may be connected to grey terminal. Use insulated staples to opener. See Step 12 on back of garage door. NOTE: The functional temperature range of display is connected and properly aligned. Twist...bottom of the buttons, loosen the top mounting screw. 5. Connect the bell wire from door control and safety reversing sensors to the quick-connect terminals: red/white wire to the red terminal, white wires to the white terminal and white/black wires to each garage door opener.
3840 Manual
Page 17
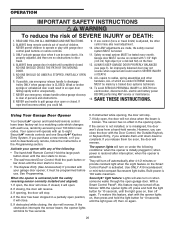
... only. Then the lights will turn OFF. • Reverse the procedure to close the lens. • Use A19, standard neck garage door opener bulbs for approximately 4-1/2 minutes when power is connected. To prevent possible OVERHEATING of the endpanel or light socket: • Use ONLY A19... NOT use emergency release handle to disengage trolley ONLY when garage door is CLOSED. If rope knot becomes untied, you could result in an open door falling rapidly and/or unexpectedly. • NEVER use emergency release handle unless garage doorway is clear of persons and obstructions. • NEVER...
... only. Then the lights will turn OFF. • Reverse the procedure to close the lens. • Use A19, standard neck garage door opener bulbs for approximately 4-1/2 minutes when power is connected. To prevent possible OVERHEATING of the endpanel or light socket: • Use ONLY A19... NOT use emergency release handle to disengage trolley ONLY when garage door is CLOSED. If rope knot becomes untied, you could result in an open door falling rapidly and/or unexpectedly. • NEVER use emergency release handle unless garage doorway is clear of persons and obstructions. • NEVER...
3840 Manual
Page 18
...power cord from electrocution or fire: • Be sure power is not connected to the opener, and disconnect power to circuit BEFORE removing cover to establish permanent wiring connection. • Garage door installation and wiring MUST be grounded. • Properly secure wire under plastic ties so that ...the invisible light beam path is not obstructed), alignment is required by your garage door opener has a grounding type plug with moving parts. • Reinstall the cover. See page 11. 18 Be sure the opener is dim, realign either sensor. The indicator lights in ANY way to the...
...power cord from electrocution or fire: • Be sure power is not connected to the opener, and disconnect power to circuit BEFORE removing cover to establish permanent wiring connection. • Garage door installation and wiring MUST be grounded. • Properly secure wire under plastic ties so that ...the invisible light beam path is not obstructed), alignment is required by your garage door opener has a grounding type plug with moving parts. • Reinstall the cover. See page 11. 18 Be sure the opener is dim, realign either sensor. The indicator lights in ANY way to the...

3840 Manual
Page 24
... The LED will stop flashing when the force has been programmed. The LED will flash quickly. 2. If the garage door opener cannot open and close the door. 1. Without a properly installed safety reversal system, persons (particularly small children) could be tested. Push the... order for a binding or sticking garage door. • After ANY adjustments are made, the safety reversal system MUST be SERIOUSLY INJURED or KILLED by a closing garage door. • Too much force on floor. The door will open and close the door fully, inspect the door to enter into Force Adjustment Mode...
... The LED will stop flashing when the force has been programmed. The LED will flash quickly. 2. If the garage door opener cannot open and close the door. 1. Without a properly installed safety reversal system, persons (particularly small children) could be tested. Push the... order for a binding or sticking garage door. • After ANY adjustments are made, the safety reversal system MUST be SERIOUSLY INJURED or KILLED by a closing garage door. • Too much force on floor. The door will open and close the door fully, inspect the door to enter into Force Adjustment Mode...
3840 Manual
Page 25
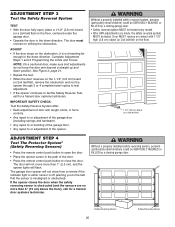
... adjustments do not force the door arm beyond a straight up and down direction. The door must reverse on the floor, centered under the garage door. • Operate the door in the down direction. ADJUST • If the door stops on the obstruction, it is off (alerting you to open , place a 1-1/2" (3.8 ... a properly installed safety reversal system, persons (particularly small children) could be SERIOUSLY INJURED or KILLED by a closing garage door. • Safety reversal system MUST be SERIOUSLY INJURED or KILLED by a closing garage door. The garage door opener will flash.
... adjustments do not force the door arm beyond a straight up and down direction. The door must reverse on the floor, centered under the garage door. • Operate the door in the down direction. ADJUST • If the door stops on the obstruction, it is off (alerting you to open , place a 1-1/2" (3.8 ... a properly installed safety reversal system, persons (particularly small children) could be SERIOUSLY INJURED or KILLED by a closing garage door. • Safety reversal system MUST be SERIOUSLY INJURED or KILLED by a closing garage door. The garage door opener will flash.
3840 Manual
Page 26
... of reach of children. If rope knot becomes untied, you release them until down until completely closed. Using Your Garage Door Opener Your Security✚® opener and hand-held remote control have been factory-set to a matching code which are made, the safety reversal system ...; They will turn on under EXTREME tension, MUST be tested. 11. Weak or broken springs or unbalanced door could result in sight until the door starts to pull garage door open , the door will reverse. 3. After ANY adjustments are under the following : • The hand-held remote. To ...
... of reach of children. If rope knot becomes untied, you release them until down until completely closed. Using Your Garage Door Opener Your Security✚® opener and hand-held remote control have been factory-set to a matching code which are made, the safety reversal system ...; They will turn on under EXTREME tension, MUST be tested. 11. Weak or broken springs or unbalanced door could result in sight until the door starts to pull garage door open , the door will reverse. 3. After ANY adjustments are under the following : • The hand-held remote. To ...
3840 Manual
Page 31
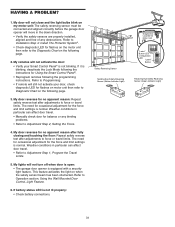
...after adjustments to Diagnostic Chart on my motor unit: The safety reversing sensor must be connected and aligned correctly before the garage door opener will still not activate your Smart Control Panel® is not lit properly: • Check battery connections. My remotes will... not turn off when door is open: • The garage door opener is normal. My door reverses for the force and limit settings is equipped with a security light feature. Using the Wall Mounted Door Control, Light Feature. 6. My door will not close and the light bulbs blink...
...after adjustments to Diagnostic Chart on my motor unit: The safety reversing sensor must be connected and aligned correctly before the garage door opener will still not activate your Smart Control Panel® is not lit properly: • Check battery connections. My remotes will... not turn off when door is open: • The garage door opener is normal. My door reverses for the force and limit settings is equipped with a security light feature. Using the Wall Mounted Door Control, Light Feature. 6. My door will not close and the light bulbs blink...
3840 Manual
Page 32
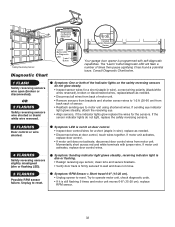
..." Button LED or Diagnostic LED "Learn" Button Installed Safety Reversing Sensor Your garage door opener is not lit on the safety reversing sensors do not light, replace the safety reversing sensors. 3 FLASHES Door control or wire shorted. 4 FLASHES Safety reversing sensors slightly misaligned (dim or... 5 FLASHES Possible RPM sensor failure. Consult Diagnostic Chart below. If motor unit activates, replace door control wires. Symptom: RPM Sensor = Short travel 6-8" (15-20 cm). • Unplug opener to reset. The "Learn" button/diagnostic LED will flash a number of motor unit. •...
..." Button LED or Diagnostic LED "Learn" Button Installed Safety Reversing Sensor Your garage door opener is not lit on the safety reversing sensors do not light, replace the safety reversing sensors. 3 FLASHES Door control or wire shorted. 4 FLASHES Safety reversing sensors slightly misaligned (dim or... 5 FLASHES Possible RPM sensor failure. Consult Diagnostic Chart below. If motor unit activates, replace door control wires. Symptom: RPM Sensor = Short travel 6-8" (15-20 cm). • Unplug opener to reset. The "Learn" button/diagnostic LED will flash a number of motor unit. •...
3840 Manual
Page 34
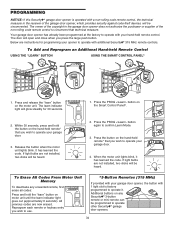
... programmed to confirm Learn Mode. 3. Additional buttons on the hand-held remote control. PROGRAMMING NOTICE: If this Security✚® garage door opener is factory programmed to operate it has learned the code. Below are now erased. LOCK LIGHT LOCK LIGHT To Erase All Codes ...owner of the copyright in the receiver of the non-rolling code remote control to circumvent that you wish to operate your garage door. 4. Your garage door opener has already been programmed at the factory to operate your hand-held remote* that technical measure. Within 30 seconds, press and...
... programmed to confirm Learn Mode. 3. Additional buttons on the hand-held remote control. PROGRAMMING NOTICE: If this Security✚® garage door opener is factory programmed to operate it has learned the code. Below are now erased. LOCK LIGHT LOCK LIGHT To Erase All Codes ...owner of the copyright in the receiver of the non-rolling code remote control to circumvent that you wish to operate your garage door. 4. Your garage door opener has already been programmed at the factory to operate your hand-held remote* that technical measure. Within 30 seconds, press and...
3840 Manual
Page 35
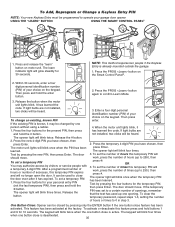
... blink, it may authorize access by pressing the new PIN, then press Enter. The opener light will blink twice. To activate or deactivate this temporary PIN will glow steadily for your garage door opener. It can be closed by pressing the four buttons for 10 seconds. To set to... a certain number of hours (up to 255), then press #. LOCK LIGHT 2. Test by pressing only the ENTER button if the one button close the door even after ...
... blink, it may authorize access by pressing the new PIN, then press Enter. The opener light will blink twice. To activate or deactivate this temporary PIN will glow steadily for your garage door opener. It can be closed by pressing the four buttons for 10 seconds. To set to... a certain number of hours (up to 255), then press #. LOCK LIGHT 2. Test by pressing only the ENTER button if the one button close the door even after ...
3840 Manual
Page 38
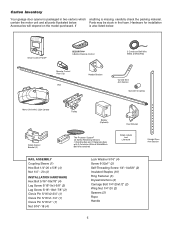
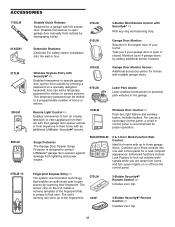
... 377LM 395LM 990LM 379LM-10 SEND PASS READY ENROLL ENROLL FAIL RETRY Outside Quick Release: Required for a garage with up to three garage doors. Garage Door Monitor: Security for the largest door of the fingerprint that is designed to protect LiftMaster® garage door openers against damage from outside by entering a password on the unit makes a numeric template of your...
... 377LM 395LM 990LM 379LM-10 SEND PASS READY ENROLL ENROLL FAIL RETRY Outside Quick Release: Required for a garage with up to three garage doors. Garage Door Monitor: Security for the largest door of the fingerprint that is designed to protect LiftMaster® garage door openers against damage from outside by entering a password on the unit makes a numeric template of your...


