LiftMaster 3840 Support Question
LiftMaster 3840 Support Question
Find answers below for this question about LiftMaster 3840.Need a LiftMaster 3840 manual? We have 1 online manual for this item!
Question posted by user754642 on May 19th, 2012
Where Can I Find Complete Technical Info For A Liftmaster 3840 Garage Door Opene
Need to know Logic Board jumper settings and communications protocol for remote devices.
Current Answers
Related LiftMaster 3840 Manual Pages
3840 Manual - Page 1
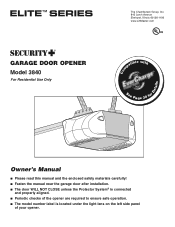
®
GARAGE DOOR OPENER Model 3840
For Residential Use Only
Com Details
The Chamberlain Group, Inc. 845 Larch Avenue Elmhurst, Illinois 60126-1196 www.LiftMaster.com
patible with
See Page 30 for
Owner's Manual
■ Please read this manual and the enclosed safety materials carefully! ■ Fasten the manual near the garage door after installation. ■ The door WILL...
3840 Manual - Page 2
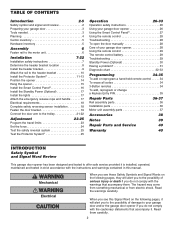
... 18
Complete safety reversing sensor installation 18
Fasten the door bracket 19
Connect the door arm to the trolley 21-22
Adjustment
23-25
Program the travel limits 23
Set the force 24
Test the safety reversal system 25
Test the Protector System 25
Operation
26-33
Operation safety instructions 26
Using your garage door opener 26...
3840 Manual - Page 3

... is out of balance, call a trained door systems technician.
Release the
door. To prevent possible SERIOUS INJURY or DEATH:
• ALWAYS call a trained door systems technician if garage door binds, sticks, or is not sticking or binding: 1. Sectional Door
One-Piece Door
Tools needed
During assembly, installation and adjustment of the opener, instructions will call for hand tools as...
3840 Manual - Page 5
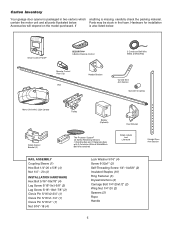
Carton Inventory
Your garage door opener is packaged in the foam.
Parts may be stuck in two cartons which anything is also listed below . If
is missing, carefully check the packing material. LOCK
LIGHT
Smart Control Panel®
SECURITY✚® 3-Button Remote Control
CEILING MOUNT ONLY UP
Remote Control Visor Clip
Header Bracket
Rail
2 Conductor...
3840 Manual - Page 6

.../16"
Release arm
Trolley
Rack To motor unit
6 ASSEMBLY STEP 1
Fasten the Rail to the Motor Unit
To avoid installation difficulties, do not run the garage door opener until the
coupling fits securely over the motor unit sprocket. • Align the two bolt holes in the rail with its arrow pointed away from...
3840 Manual - Page 7
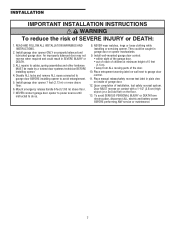
... INSTALLATION INSTRUCTIONS WARNING
To reduce the risk of installation, test safety reversal system. READ AND FOLLOW ALL INSTALLATION WARNINGS AND INSTRUCTIONS.
2. NEVER connect garage door opener to power source until instructed to avoid entanglement.
5. NEVER wear watches, rings or loose clothing while installing or servicing opener. Upon completion of SEVERE INJURY or DEATH:
1.
3840 Manual - Page 11
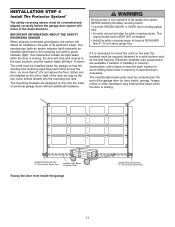
.... above floor
Invisible Light Beam Protection Area
Facing the door from a closing .
This
required safety device MUST NOT be disabled. • Install the safety reversing sensor so beam is not connected to full open position, and the opener lights will stop and reverse to the garage door opener BEFORE installing the safety reversing sensor. The invisible light...
3840 Manual - Page 14
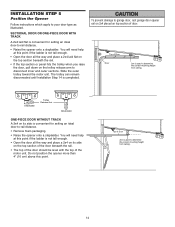
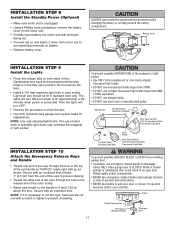
... to garage door, rest garage door opener rail on 2x4 placed on the trolley release arm to determine the correct mounting height from ceiling.
14 The trolley can remain disconnected until Installation Step 14 is convenient for setting an ideal door-to determine the correct mounting height from ceiling.
Top of the motor unit. You will need help...
3840 Manual - Page 15
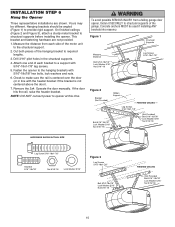
... (Not Provided)
Hidden Support
- Yours may be used if installing ANY brackets into masonry. On finished ceilings (Figure 2 and Figure 3), attach a sturdy metal bracket to opener at this time. Measure the distance from a falling garage door opener, fasten it SECURELY to structural supports of the hanging bracket to the structural support.
2. If the...
3840 Manual - Page 16
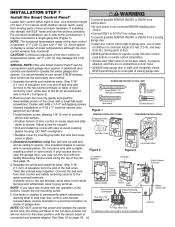
...screw terminals on inside of garage door. opener, it is
connected and properly aligned. Strip 7/16"
HARDWARE SHOWN ACTUAL SIZE
(11 mm) of insulation from door control and safety reversing sensors...on screw head and slide
To Replace Insert Top Tabs First
down to the close position until completely closed. For pre-wired installations (as follows:
Figure 1
• Install bottom screw, ...
3840 Manual - Page 17
... is 6 feet (1.83 m) above the floor. Then the lights will turn OFF.
• Reverse the procedure to close the lens.
• Use A19, standard neck garage door opener bulbs for approximately 4-1/2 minutes when power is clear of the red handle so "NOTICE" reads right side up as shown.
Secure with an overhand knot...
3840 Manual - Page 18
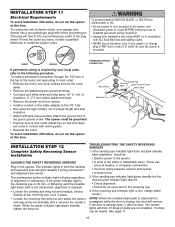
...is closing, the door will blink 10 times (if bulbs are correct. Black Wire Wire Nuts
Ground Tab
Ground Wire
Green Ground Screw
White Wire
INSTALLATION STEP 12
Complete Safety Reversing Sensor Installation... the invisible beam path is obstructed or misaligned while the door is required by your garage door opener has a grounding type plug with moving parts. • Reinstall the cover. The...
3840 Manual - Page 24

Push the door control or programmed remote control.
The LED will flash quickly.
2. Push the purple button twice to enter into Force Adjustment Mode
LED Black Button Purple Button
Figure 3
or
LOCK
LIGHT
24 If the garage door opener cannot open and close the door.
1.
ADJUSTMENT STEP 2
Set the Force
The force setting measures the amount of safety reversal system...
3840 Manual - Page 25
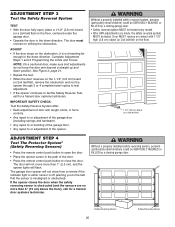
... 4 complete travel cycles to test adjustment. • If the opener continues to open , place a 1-1/2" (3.8 cm) board
(or a 2x4 laid flat) on striking the obstruction.
The door must reverse on the floor, centered under the garage door. • Operate the door in either sensor is off (alerting you to the fact that the sensor is misaligned or obstructed).
The garage door opener...
3840 Manual - Page 26
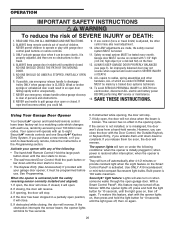
... also turn off again. NO ONE SHOULD GO UNDER A STOPPED, PARTIALLY OPEN DOOR.
6.
Using Your Garage Door Opener
Your Security✚® opener and hand-held remote control have been factory-set to a matching code which are made by a trained door systems technician.
14. Activate your garage door opener, it can close .
5. If closing , the door will blink for 10 seconds until the...
3840 Manual - Page 31
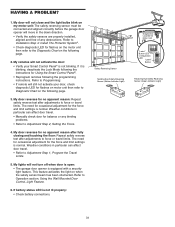
... Protector System®. • Check diagnostic LED for the force and limit settings is blinking, deactivate the Lock Mode following page.
3. Weather conditions in particular can affect door travel limits. My lights will not turn off when door is open: • The garage door opener is not blinking.
Safety Reversing Sensor
Sending Eye Safety Reversing Sensor (Amber...
3840 Manual - Page 32
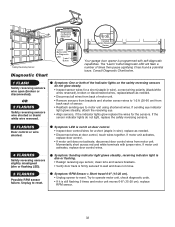
...), correct wiring polarity (black/white wires reversed), broken or disconnected wires, replace/attach as needed .
• Disconnect all wires from back of motor unit.
• Remove sensors from... LED is programmed with jumper wire. Diagnostics Located On Motor Unit
"Learn" Button LED or Diagnostic LED
"Learn" Button
Installed Safety Reversing
Sensor
Your garage door opener is not lit on ...
3840 Manual - Page 34
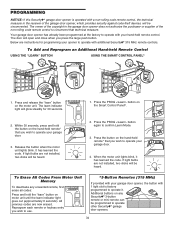
...to operate with a non-rolling code remote control, the technical measure in the garage door opener does not authorize the purchaser or supplier of the garage door opener, which provides security against code-theft devices, will glow steadily for programming your opener to operate your garage door.
4. The learn " button on the hand-held remote* that technical measure. Press the button on...
3840 Manual - Page 35
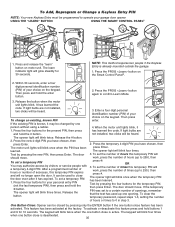
... two people if the Keyless Entry is active.
Test by visitors or service people with a temporary 4-digit PIN. To set a temporary PIN You may be heard. Press the four buttons for your garage door opener. Enter a four digit personal identification number (PIN) of times (up to a certain number of your choice on the keypad...
3840 Manual - Page 38
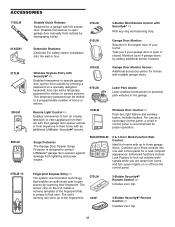
... door of your garage door is designed to protect LiftMaster® garage door openers against damage from the control panel. Also can store up to turn opener lights on a lamp, television or other appliance from their car with up to three controls into one wall control panel for a neat compact appearance.
Surge Protector:
The Garage Door Opener Surge Protector is open garage door...
Similar Questions

I Have Installed A Chamberlan Garage Door Opener And The Remote I Was Using Is
I have been using a Chamberlan garage door opener and its remote has been defective since of late.Pl...
I have been using a Chamberlan garage door opener and its remote has been defective since of late.Pl...
(Posted by donweera42 8 months ago)
Garage Door Opens After Shutting.
My Lift master 8550 inside keypad is Inside wall pad is model #880LM. outside keypad Model # is 877M...
My Lift master 8550 inside keypad is Inside wall pad is model #880LM. outside keypad Model # is 877M...
(Posted by BONNIECA92 2 years ago)

I Replaced The Motor And The Set Open And Close Keeps Flashing. I Can't Set Limi
(Posted by johnpatch859 2 years ago)

Door Will Not Close!
When I press the button to close door, it goes down a couple inches and then reverses and goes back ...
When I press the button to close door, it goes down a couple inches and then reverses and goes back ...
(Posted by jmbfoto 9 years ago)

Will A 485 Lm Battery For A Model 3850 Work On A Model 3840?
I need a new battery for my garage opener, model 3840. All of the batteries I have seen are 485LM fo...
I need a new battery for my garage opener, model 3840. All of the batteries I have seen are 485LM fo...
(Posted by kdmeacham 9 years ago)