LiftMaster 3840 Support Question
LiftMaster 3840 Support Question
Find answers below for this question about LiftMaster 3840.Need a LiftMaster 3840 manual? We have 1 online manual for this item!
Question posted by kdmeacham on June 7th, 2014
Will A 485 Lm Battery For A Model 3850 Work On A Model 3840?
I need a new battery for my garage opener, model 3840. All of the batteries I have seen are 485LM for model 3850. Will the battery for 3850 work on my model 3840?
Current Answers
Related LiftMaster 3840 Manual Pages
3840 Manual - Page 1
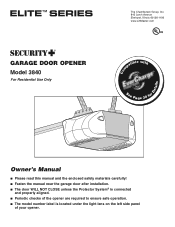
®
GARAGE DOOR OPENER Model 3840
For Residential Use Only
Com Details
The Chamberlain Group, Inc. 845 Larch Avenue Elmhurst, Illinois 60126-1196 www.LiftMaster.com
patible with
See Page 30 for
Owner's Manual
■ Please read this manual and the enclosed safety materials carefully! ■ Fasten the manual near the garage door after installation. ■ The door WILL...
3840 Manual - Page 2
... you to the possibility of damage to your garage door opener 28
Using the remote control 29
The remote control battery 29
Troubleshooting 29
Standby Power (Optional 30
Having...
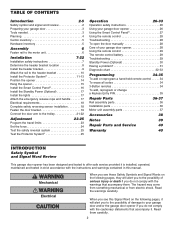
TABLE OF CONTENTS
Introduction
2-5
Safety symbol and signal word review 2
Preparing your garage door 3
Tools needed 3
Planning 4
Carton inventory 5
Hardware inventory 5
Assembly
6
Fasten rail to ...
3840 Manual - Page 3

... to garage door BEFORE installing and operating garage door opener to see if there is not sticking or binding: 1. An unbalanced garage door may not reverse when required.
• NEVER try to loosen, move or adjust garage door, door springs, cables, pulleys, brackets or their hardware, ALL of balance, call for hand tools as shown. Sectional Door
One-Piece Door
Tools needed
During...
3840 Manual - Page 4
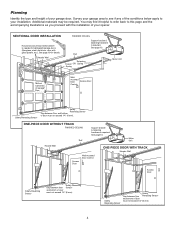
... the type and height of door must not exceed 1/4" (6 mm).
4 SECTIONAL DOOR INSTALLATION
Horizontal and vertical reinforcement is needed for details. See page 15.
ONE-PIECE DOOR WITHOUT TRACK
FINISHED CEILING
Rail
Support bracket & fastening hardware is required. Safety Reversing Sensor
Safety Gap between floor Reversing Sensor and bottom of your opener.
Header Wall
FINISHED...
3840 Manual - Page 5
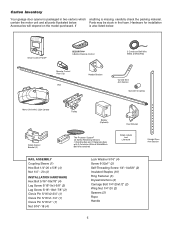
...material.
Hardware for installation
Accessories will depend on the model purchased.
Carton Inventory
Your garage door opener is packaged in the foam. contain the motor ...
2 Conductor Bell Wire White & White/Red
Curved Door Arm Section
Sprocket Coupling
Motor Unit with 2 Light Lenses
Safety Sensor Bracket (2)
Trolley
Battery (Optional)
The Protector System® (2) Safety Reversing...
3840 Manual - Page 6

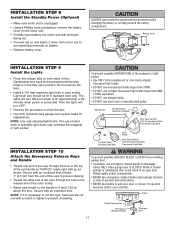
...STEP 1
Fasten the Rail to the Motor Unit
To avoid installation difficulties, do not run the garage door opener until the
coupling fits securely over the motor unit sprocket. • Align the two bolt .... Align trolley with rack and turn release arm up to install it after Installation Step 5. • Working on a level surface, align the rail assembly with
the motor unit, as shown. • Slip...
3840 Manual - Page 7
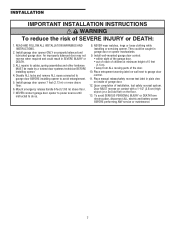
...rings or loose clothing while installing or servicing opener. Door MUST reverse on contact with a 1-1/2" (3.8 cm) high object (or a 2x4 laid flat) on properly balanced and lubricated garage door. Place entrapment warning label on inside of 5 feet (1.5 m). • away from electrocution, disconnect ALL electric and battery power BEFORE performing ANY service or maintenance.
7 An...
3840 Manual - Page 9
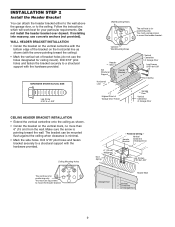
... which will work best for positioning only. You must use lag screws to mount the header bracket.
6" (15 cm) Maximum
Door Spring
-
Do not install the header bracket over drywall. Optional Wall Mounting Holes
Header Wall
2x4 Structural Support
Header Bracket
CEILING MOUNT ONLY UP
Horizontal Line
Vertical Centerline of Garage Door
Lag Screws...
3840 Manual - Page 16
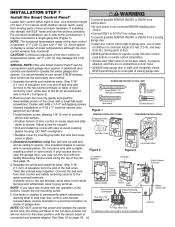
...into drywall, drill 5/32" holes and use model 378LM wireless
door control as follows:
Figure 1
• Install ...Battery Status LED
Antenna
NOTE: DO NOT connect the power and operate the opener
Red White Grey
at a minimum height of 5 feet (1.5 m), and away from one Smart Control Panel® can be seen clearly, is properly adjusted, and there are desired to operate the same garage door...
3840 Manual - Page 17
... the procedure to close the lens.
• Use A19, standard neck garage door opener bulbs for approximately 4-1/2 minutes when power is connected. Secure with terminals
facing out. • Connect red (+) and black (-) wires from motor unit to
corresponding terminals on battery. • Replace battery cover. Gentlyrotate lens back and downward until the lens hinge is...
3840 Manual - Page 26
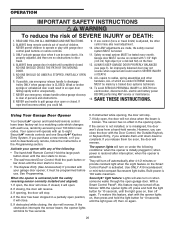
... ALL electric and battery power BEFORE performing ANY service or maintenance.
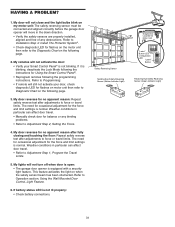
15. The opener lights will turn on under EXTREME tension, MUST be made , the safety reversal system MUST be seen clearly, it can close the door with the opener lights on again.
26 NO ONE SHOULD GO UNDER A STOPPED, PARTIALLY OPEN DOOR.
6. ALWAYS KEEP GARAGE DOOR PROPERLY BALANCED...
3840 Manual - Page 27
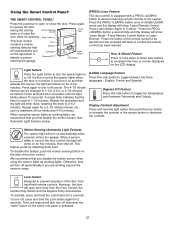
...Fahrenheit and Celsius. Motion Sensing (Automatic Light Feature):
The opener light will turn it detects a person entering the garage.
We recommend that you turn off whenever the "learn"...door while it off . Press the button of the door control.
Using the Smart Control Panel®
THE SMART CONTROL PANEL®
Press the push bar to open and close the door. This feature works...
3840 Manual - Page 29

... control will turn off but the door should turn on a non-metallic surface. To re-enable the proximity lighting, simply press a button. After the opener lights flash, release all buttons.
The 3V2450 lithium battery for the opener and LED lights (marked "LED and Opener Battery") should last 1-2 years. Insert replacement batteries positive side up. If bent the...
3840 Manual - Page 30
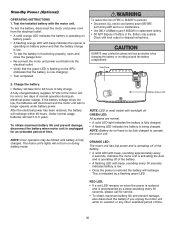
... the electrical outlet. • A solid orange LED indicates the battery is operating on
battery power. • A flashing orange LED with beep indicates the opener is
operating on battery power and that the battery charge is low. • To test the battery is functioning properly, open and close the garage door. • Re-connect the motor unit power cord back...
3840 Manual - Page 31
... be connected and aligned correctly before the garage door opener will move in the down direction. • Verify the safety sensors are properly installed, aligned and free of any binding problems. • Refer to Diagnostic Chart on when the safety sensor beam has been obstructed. If battery status LED is blinking, deactivate the Lock...
3840 Manual - Page 35
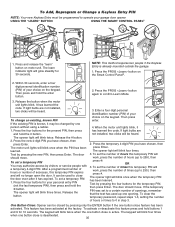
...garage door opener. The door should move . To set a temporary PIN You may be heard. Then press enter.
4.
The opener light will be changed by one person without using a ladder. 1.
One Button Close: Opener... by pressing the new PIN, then press Enter. The keypad will blink once when the PIN has been learned. To set the number of hours this temporary PIN will work , press the ...
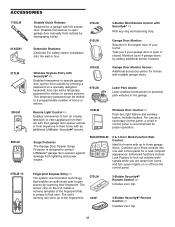
3840 Manual - Page 36
...;
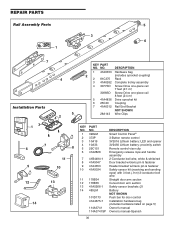
2 373P
3-Button remote control
3 10A19
3V2016 Lithium battery: LED and opener
7 6
4 10A33
8
5 29C151
3V2450 Lithium battery: proximity switch Remote control visor clip
6 41A2828
Emergency release...178B34 12 178B35
Straight door arm section Curved door arm section
13 41A5266-1 Safety sensor brackets (2)
14 485LM
Battery
NOT SHOWN
101D173
Push bar for door control
14
41A4675-7
...
3840 Manual - Page 37
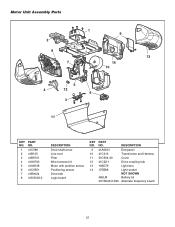
... with position sensor Positioning sensor Drive belt Logic board
KEY NO.
9 10 11 12 13 14
PART NO. 41A6231 41C213 31D504-20 41C22-1 108D79 175B88
485LM 41DS002-2-390
DESCRIPTION
End panel Transformer and Harness Cover Drive coupling hub Light lens Light socket NOT SHOWN...
3840 Manual - Page 38
... : Includes visor clip.
38 Wireless Door Control : Push bar, light feature and auxiliary button.
Garage Door Monitor: Security for homes with NO access door. Also can add a temporary password for a garage with up to operate garage door opener from outside radio signals while you if your home! Includes battery. Combine up to three garage doors. The unit's memory can be...
3840 Manual - Page 40
...8226; PART NUMBER • PART NAME • MODEL NUMBER
ADDRESS ORDERS TO: THE CHAMBERLAIN GROUP, INC..., parts and service, contact your compliance with new or factory-rebuilt parts at no cost to you...TO, THE GARAGE DOOR OR GARAGE DOOR HARDWARE, INCLUDING BUT NOT LIMITED TO THE DOOR SPRINGS, DOOR ROLLERS, DOOR ALIGNMENT OR ...BATTERIES AND LIGHT BULBS OR UNITS INSTALLED FOR NON-RESIDENTIAL USE.
Similar Questions


Where Can I Find Complete Technical Info For A Liftmaster 3840 Garage Door Opene
Need to know Logic Board jumper settings and communications protocol for remote devices.
Need to know Logic Board jumper settings and communications protocol for remote devices.
(Posted by user754642 11 years ago)