LiftMaster 3275 Support and Manuals
Get Help and Manuals for this LiftMaster item
View All Support Options Below
Free LiftMaster 3275 manuals!
Problems with LiftMaster 3275?
Ask a Question
Free LiftMaster 3275 manuals!
Problems with LiftMaster 3275?
Ask a Question
Most Recent LiftMaster 3275 Questions

Liftmaster 3275c Keypad
Hi we have a liftmaster 3275c how do we program the keypad it does not have an enter button on the k...
Hi we have a liftmaster 3275c how do we program the keypad it does not have an enter button on the k...
(Posted by gonefishing247 8 years ago)

Why Does My Liftmaster 3275 Chirp?
(Posted by mattkoerner 11 years ago)
Popular LiftMaster 3275 Manual Pages
3275 Manual - Page 1
The Chamberlain Group, Inc. 845 Larch Avenue
Elmhurst, Illinois 60126-1196 www.liftmaster.com
®
GARAGE DOOR OPENER Models 3275
3275-267
For Residential Use Only
Owner's Manual
■ Please read this manual and the enclosed safety materials carefully! ■ Fasten the manual near the garage door after installation. ■ The door WILL NOT CLOSE unless the Protector System® is ...
3275 Manual - Page 2
...-held remote control 31 To erase all codes 31 3-Button remotes 31 To add, reprogram or change a Keyless Entry PIN 32
Repair Parts
33-34
Rail assembly parts 33 Installation parts 33 Motor unit assembly parts 34
Accessories
35
Repair Parts and Service
36
Warranty
36
INTRODUCTION
Safety Symbol and Signal Word Review
This garage door opener has been designed and tested to offer safe...
3275 Manual - Page 5
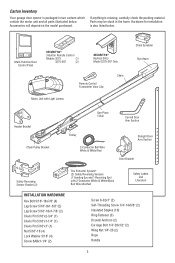
... the motor unit and all parts illustrated below . If anything is missing, carefully check the packing material. Hardware for installation is also listed below . Carton Inventory
Your garage door opener is packaged in the foam. Accessories will depend on the model purchased.
Multi-Function Door Control Panel
SECURITY✚®
3-Button Remote Control
Models 3275
(1)
3275-267...
3275 Manual - Page 6
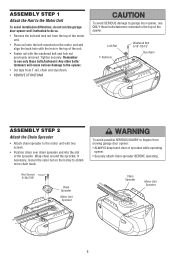
... previously removed. If necessary, loosen the outer nut on the motor unit and align the back hole with the hole in the top of the opener. ASSEMBLY STEP 1
Attach the Rail to the Motor Unit
To avoid installation difficulties, do not run the garage door opener until instructed to do so.
• Remove the bolt and lock...
3275 Manual - Page 7
....
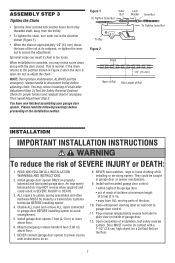
Disable ALL locks and remove ALL ropes connected to garage door BEFORE installing opener to cables, spring assemblies and other hardware MUST be caught in SEVERE INJURY or DEATH.
3. NEVER connect garage door opener to power source until instructed to the position shown in the direction shown (Figure 1). Place manual release/safety reverse test label in plain view on...
3275 Manual - Page 10
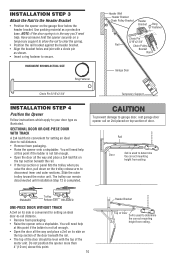
...the Rail to garage door, rest garage door opener rail on 2x4 placed on top section of door. HARDWARE SHOWN ACTUAL SIZE
Ring Fastener
Header Wall Header Bracket Chain Pulley Bracket
Header Bracket
Ring Fastener
Clevis Pin
5/16"x2-3/4"
Rail
Chain Pulley
Bracket
Rail
Garage Door
Clevis Pin 5/16"x2-3/4"
Temporary Support
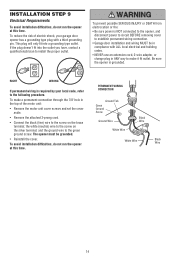
INSTALLATION STEP 4
Position the Opener
Follow instructions which...
3275 Manual - Page 11
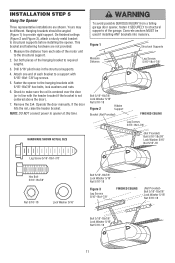
... If the door hits the rail, raise the header bracket. To avoid possible SERIOUS INJURY from each bracket to structural supports of the garage. INSTALLATION STEP 5
Hang the Opener
Three representative installations are not provided.
1. This bracket and fastening hardware are shown. Measure the distance from a falling garage door opener, fasten it SECURELY to a support with 5/16...
3275 Manual - Page 14
... permanent wiring is NOT connected to the opener, and disconnect power to circuit BEFORE removing cover to establish permanent wiring connection.
• Garage door installation and wiring MUST be grounded.
• Reinstall the cover.
To reduce the risk of the motor unit:
• Remove the motor unit cover screws and set the cover aside.
• Remove the...
3275 Manual - Page 28
...device may not cause harmful interference, and (2) this receiver and/or transmitter are prohibited, except for up (+).
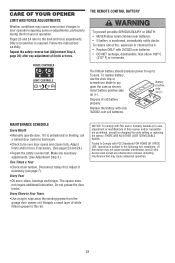
THERE ARE NO OTHER USER SERVICEABLE PARTS.
MAINTENANCE SCHEDULE
Every Month
• Manually operate door. Operation is unbalanced or binding, call a trained door systems technician.
• Check to wipe away the existing grease from the garage door opener rail.
3275 Manual - Page 29
... reversing sensor must be connected and aligned correctly before the garage door opener will sag. This feature activates the light on the following page. My motor unit hums briefly:
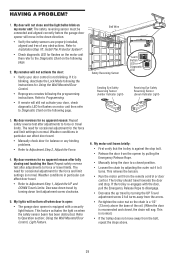
• First verify that the trolley is not blinking. HAVING A PROBLEM?
1. Refer to Installation Step 10: Install The Protector System®.
• Check diagnostic LED for no...
3275 Manual - Page 30
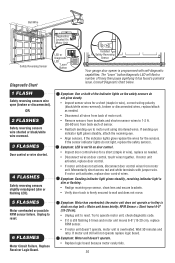
...). Symptom: Motor unit doesn't operate. • Replace logic board because motor rarely fails.
30 If the sensor indicator lights do not glow steady.
• Inspect sensor wires for the sensors. Bell Wire
Diagnostics Located On Motor Unit
Safety Reversing Sensor
LED or Diagnostic LED
"Learn" Button
Diagnostic Chart
Installed Safety Reversing
Sensor
Your garage door opener is programmed...
3275 Manual - Page 31
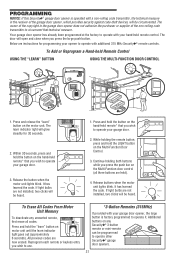
... remote* that you wish to operate your garage door.
3. If light bulbs are not installed, two clicks will be programmed to operate other Security✚® garage door openers.
31 Press and hold the button on the Multi-Function Door Control.
3. It has learned the code. To Erase All Codes From Motor Unit Memory
To deactivate any Security✚®...
3275 Manual - Page 32
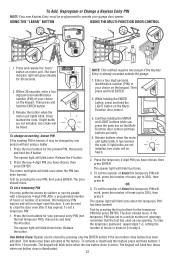
... the code. The opener light will blink twice when the one opening. To set the number of times this feature press and hold the ENTER button.
3.
Press and release the "learn indicator light will blink four times when one button close is already mounted outside the garage.
1. Then press and hold buttons 1 and 9 for your garage door opener...
3275 Manual - Page 35
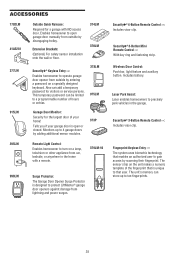
...to operate garage door opener from outside by scanning their fingerprint. ACCESSORIES
1702LM 41A5281 377LM
915LM
Outside Quick Release: Required for visitors or service persons. Extension Brackets: (Optional) For safety sensor installation onto the wall or floor.
374LM 370LM
Security✚® Keyless Entry :
Enables homeowner to 4 garage doors by entering a password on...
3275 Manual - Page 36
... furnished on request, or parts will be shipped at prevailing prices and you will be advised of shipping instructions when you call.
If, during the limited warranty period, this product appears to you . You will be repaired or replaced with the instructions regarding installation, operation, maintenance and testing. ANY SERVICE CALL THAT DETERMINES THE PROBLEM HAS BEEN CAUSED BY...
LiftMaster 3275 Reviews
We have not received any reviews for LiftMaster yet.