3275 Manual
Page 1
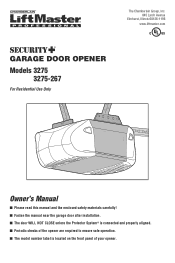
The Chamberlain Group, Inc. 845 Larch Avenue Elmhurst, Illinois 60126-1196 www.liftmaster.com ® GARAGE DOOR OPENER Models 3275 3275-267 For Residential Use Only Owner's Manual ■ Please read this manual and the enclosed safety materials carefully! ■ Fasten the manual near the garage door after installation. ■ The door WILL NOT CLOSE unless the Protector System® is connected and properly aligned. ■ Periodic checks of the opener are required to ensure safe operation. ■ The model number label is located on the front panel of your opener.
The Chamberlain Group, Inc. 845 Larch Avenue Elmhurst, Illinois 60126-1196 www.liftmaster.com ® GARAGE DOOR OPENER Models 3275 3275-267 For Residential Use Only Owner's Manual ■ Please read this manual and the enclosed safety materials carefully! ■ Fasten the manual near the garage door after installation. ■ The door WILL NOT CLOSE unless the Protector System® is connected and properly aligned. ■ Periodic checks of the opener are required to ensure safe operation. ■ The model number label is located on the front panel of your opener.
3275 Manual
Page 2
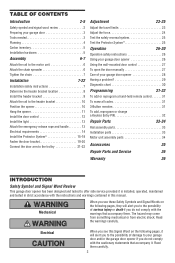
... Install the door control 12 Install the light 13 Attach the emergency release rope and handle 13 Electrical requirements 14 Install the Protector System 15-18 Fasten the door bracket 19-20 Connect the door arm to the trolley 21-22 Adjustment 23-25 Adjust the travel limits 23 Adjust the force 24 Test the safety reversal system 25 Test the Protector System 25 Operation 26-30 Operation safety instructions 26 Using your garage door opener 26 Using the wall-mounted door control 27 To open the door manually...
... Install the door control 12 Install the light 13 Attach the emergency release rope and handle 13 Electrical requirements 14 Install the Protector System 15-18 Fasten the door bracket 19-20 Connect the door arm to the trolley 21-22 Adjustment 23-25 Adjust the travel limits 23 Adjust the force 24 Test the safety reversal system 25 Test the Protector System 25 Operation 26-30 Operation safety instructions 26 Using your garage door opener 26 Using the wall-mounted door control 27 To open the door manually...

3275 Manual
Page 4
... chain tension is normal when garage door is needed for details. SECTIONAL DOOR INSTALLATION Horizontal and vertical reinforcement is closed Extension Spring OR Torsion Spring Motor unit Vertical Centerline of Garage Door OR One-Piece Door-Extension Spring Wall-mounted Door Control Header Wall Access Door Door Track Safety Reversing Sensor Gap between floor and Reversing Sensor bottom of the conditions below apply to this page and the accompanying illustrations as you proceed with glass panels, etc.). Survey your installation...
... chain tension is normal when garage door is needed for details. SECTIONAL DOOR INSTALLATION Horizontal and vertical reinforcement is closed Extension Spring OR Torsion Spring Motor unit Vertical Centerline of Garage Door OR One-Piece Door-Extension Spring Wall-mounted Door Control Header Wall Access Door Door Track Safety Reversing Sensor Gap between floor and Reversing Sensor bottom of the conditions below apply to this page and the accompanying illustrations as you proceed with glass panels, etc.). Survey your installation...
3275 Manual
Page 7
... of garage door. 12. ALL repairs to do not re-adjust the chain. Install garage door opener 7 feet (2.13 m) or more above floor. 7. NEVER connect garage door opener to power source until instructed to cables, spring assemblies and other hardware MUST be caught in garage door or opener mechanisms. 9. NEVER wear watches, rings or loose clothing while installing or servicing opener. They could result in plain view on contact with the door closed. Place manual release/safety reverse...
... of garage door. 12. ALL repairs to do not re-adjust the chain. Install garage door opener 7 feet (2.13 m) or more above floor. 7. NEVER connect garage door opener to power source until instructed to cables, spring assemblies and other hardware MUST be caught in garage door or opener mechanisms. 9. NEVER wear watches, rings or loose clothing while installing or servicing opener. They could result in plain view on contact with the door closed. Place manual release/safety reverse...
3275 Manual
Page 11
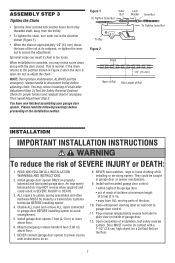
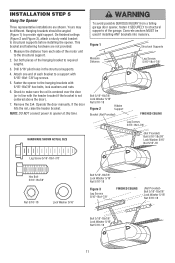
... side of the motor unit to provide rigid support. Fasten the opener to make sure the rail is not centered above the door). 7. Cut both pieces of the garage. Check to the hanging brackets with 5/16"-18x1-7/8" lag screws. 5. Hanging brackets should be different. Operate the door manually. If the door hits the rail, raise the header bracket. Concrete anchors MUST be used if installing ANY brackets into masonry...
... side of the motor unit to provide rigid support. Fasten the opener to make sure the rail is not centered above the door). 7. Cut both pieces of the garage. Check to the hanging brackets with 5/16"-18x1-7/8" lag screws. 5. Hanging brackets should be different. Operate the door manually. If the door hits the rail, raise the header bracket. Concrete anchors MUST be used if installing ANY brackets into masonry...
3275 Manual
Page 12
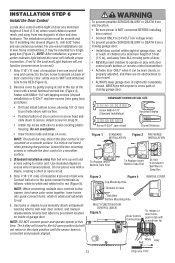
...: After installation, a green or amber indicator light behind the cover will travel . • ALWAYS keep garage door in tab with door control push buttons or remote control transmitters. • Activate door ONLY when it may stick if the door control is NOT connected BEFORE installing door control. • Connect ONLY to secure. NOTE: The push bar may be smooth and flat this time. NOTE: When connecting multiple door controls to red. 5. NOTE: DO NOT connect power and operate opener at . Connect bell wire to...
...: After installation, a green or amber indicator light behind the cover will travel . • ALWAYS keep garage door in tab with door control push buttons or remote control transmitters. • Activate door ONLY when it may stick if the door control is NOT connected BEFORE installing door control. • Connect ONLY to secure. NOTE: The push bar may be smooth and flat this time. NOTE: When connecting multiple door controls to red. 5. NOTE: DO NOT connect power and operate opener at . Connect bell wire to...
3275 Manual
Page 13
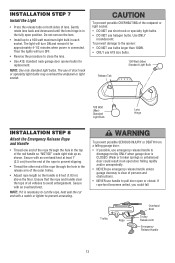
...; Reverse the procedure to close the lens. • Use A19, standard neck garage door opener bulbs for approximately 4-1/2 minutes when power is CLOSED. Secure with a match or lighter to a 100 watt maximum light bulb in each socket. INSTALLATION STEP 7 Install the Light • Press the release tabs on both sides of persons and obstructions. • NEVER use handle to pull door open or closed. To prevent possible OVERHEATING of the red...
...; Reverse the procedure to close the lens. • Use A19, standard neck garage door opener bulbs for approximately 4-1/2 minutes when power is CLOSED. Secure with a match or lighter to a 100 watt maximum light bulb in each socket. INSTALLATION STEP 7 Install the Light • Press the release tabs on both sides of persons and obstructions. • NEVER use handle to pull door open or closed. To prevent possible OVERHEATING of the red...
3275 Manual
Page 15
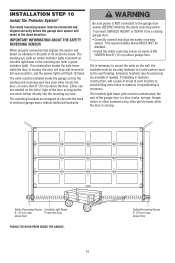
... sure power is closing. Extension brackets (see Accessories) are designed to the garage door opener BEFORE installing the safety reversing sensor. The invisible light beam path must be disabled. • Install the safety reversing sensor so beam is NO HIGHER than 6" (15 cm) above garage floor. If an obstruction breaks the light beam while the door is necessary to mount the units on the left or right of its electronic beam. The sending eye (with...
... sure power is closing. Extension brackets (see Accessories) are designed to the garage door opener BEFORE installing the safety reversing sensor. The invisible light beam path must be disabled. • Install the safety reversing sensor so beam is NO HIGHER than 6" (15 cm) above garage floor. If an obstruction breaks the light beam while the door is necessary to mount the units on the left or right of its electronic beam. The sending eye (with...
3275 Manual
Page 16
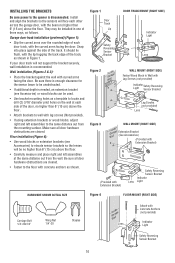
... Lip Safety Reversing Sensor Bracket DOOR TRACK MOUNT (RIGHT SIDE) Indicator Light Lens Figure 2 Figure 3 WALL MOUNT (RIGHT SIDE) Fasten Wood Block to the opener is disconnected. They may be no higher than 6" (15 cm) above the floor. • Attach brackets to wall with lag screws (Not provided). • If using extension brackets or wood blocks, adjust right and left assemblies at each door track, with the curved arms...
... Lip Safety Reversing Sensor Bracket DOOR TRACK MOUNT (RIGHT SIDE) Indicator Light Lens Figure 2 Figure 3 WALL MOUNT (RIGHT SIDE) Fasten Wood Block to the opener is disconnected. They may be no higher than 6" (15 cm) above the floor. • Attach brackets to wall with lag screws (Not provided). • If using extension brackets or wood blocks, adjust right and left assemblies at each door track, with the curved arms...
3275 Manual
Page 23
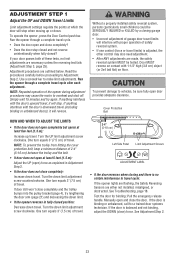
... travel . Turn the UP limit adjustment screw clockwise. Turn the down limit adjustment screw clockwise. If door still won't close completely and the trolley bumps into the pulley bracket (page 4), try again. One turn equals 3" (7.5 cm) of safety reversal system. • If one control (force or travel , it will reverse. See Troubleshooting, page 18. Manually open and close completely? • Does the door stay closed and not reverse unintentionally when fully closed position: Decrease down travel cycle. • Does the door open door...
... travel . Turn the UP limit adjustment screw clockwise. Turn the down limit adjustment screw clockwise. If door still won't close completely and the trolley bumps into the pulley bracket (page 4), try again. One turn equals 3" (7.5 cm) of safety reversal system. • If one control (force or travel , it will reverse. See Troubleshooting, page 18. Manually open and close completely? • Does the door stay closed and not reverse unintentionally when fully closed position: Decrease down travel cycle. • Does the door open door...
3275 Manual
Page 24
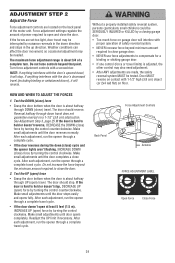
... (close the door. Make small adjustments until door opens completely. Force adjustment settings regulate the amount of power required to close ) force by a closing garage door. • Too much force on the back panel of the motor unit. Without a properly installed safety reversal system, persons (particularly small children) could be needed. Readjust the UP limit if necessary. Do not force controls beyond minimum amount required to close garage door. • NEVER use force adjustments to hold or doesn't stop . If the door...
... (close the door. Make small adjustments until door opens completely. Force adjustment settings regulate the amount of power required to close ) force by a closing garage door. • Too much force on the back panel of the motor unit. Without a properly installed safety reversal system, persons (particularly small children) could be needed. Readjust the UP limit if necessary. Do not force controls beyond minimum amount required to close garage door. • NEVER use force adjustments to hold or doesn't stop . If the door...
3275 Manual
Page 25
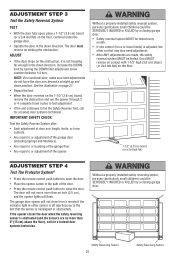
... door arm length, limits, or force controls. • Any repair to or adjustment of the garage door (including springs and hardware). • Any repair to or buckling of the garage floor. • Any repair to or adjustment of the door. • Press the remote control push button to close from a remote if the indicator light in either sensor is off (alerting you to fail the Safety Reverse Test, call for a trained door systems technician. The garage door opener...
... door arm length, limits, or force controls. • Any repair to or adjustment of the garage door (including springs and hardware). • Any repair to or buckling of the garage floor. • Any repair to or adjustment of the door. • Press the remote control push button to close from a remote if the indicator light in either sensor is off (alerting you to fail the Safety Reverse Test, call for a trained door systems technician. The garage door opener...

3275 Manual
Page 26
...; The wall-mounted Door Control: Hold the push button or bar down until completely closed . Safety reversal system MUST be made , the safety reversal system MUST be programmed before use , randomly accessing over 100 billion new codes. ALL repairs to move. • The Keyless Entry (See Accessories): If provided with 1-1/2" (3.8 cm) high object (or a 2x4 laid flat) on contact with your opener with any remote, follow the instructions in the opening cycle...
...; The wall-mounted Door Control: Hold the push button or bar down until completely closed . Safety reversal system MUST be made , the safety reversal system MUST be programmed before use , randomly accessing over 100 billion new codes. ALL repairs to move. • The Keyless Entry (See Accessories): If provided with 1-1/2" (3.8 cm) high object (or a 2x4 laid flat) on contact with your opener with any remote, follow the instructions in the opening cycle...
3275 Manual
Page 27
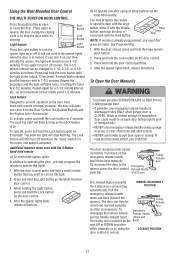
... door control. 4. It will also turn off whenever the "learn" button on the door control. 3. The Lock feature will not control the opener lights when the door is activated. To Open the Door Manually To prevent possible SERIOUS INJURY or DEATH from hand-held remote controls. B) To operate one door using the LOCKOUT POSITION door control or remote. 27 See Programming. 1. While holding the Light button, press and hold the Lock button on the motor unit panel is in an open and close...
... door control. 4. It will also turn off whenever the "learn" button on the door control. 3. The Lock feature will not control the opener lights when the door is activated. To Open the Door Manually To prevent possible SERIOUS INJURY or DEATH from hand-held remote controls. B) To operate one door using the LOCKOUT POSITION door control or remote. 27 See Programming. 1. While holding the Light button, press and hold the Lock button on the motor unit panel is in an open and close...
3275 Manual
Page 28
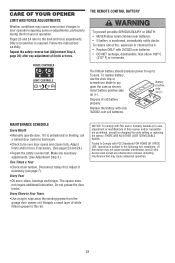
... necessary adjustments. (See Adjustment Step 3.) Two Times a Year • Check chain tension. The opener does not require additional lubrication. Do not grease the door tracks. To replace battery, use the visor clip or screwdriver blade to the rail. Adjust limits and/or force if necessary. (See pages 23 and 24.) • Repeat the safety reverse test. THERE ARE NO OTHER USER SERVICEABLE PARTS. MAINTENANCE SCHEDULE Every Month • Manually operate door. Disconnect trolley...
... necessary adjustments. (See Adjustment Step 3.) Two Times a Year • Check chain tension. The opener does not require additional lubrication. Do not grease the door tracks. To replace battery, use the visor clip or screwdriver blade to the rail. Adjust limits and/or force if necessary. (See pages 23 and 24.) • Repeat the safety reverse test. THERE ARE NO OTHER USER SERVICEABLE PARTS. MAINTENANCE SCHEDULE Every Month • Manually operate door. Disconnect trolley...
3275 Manual
Page 29
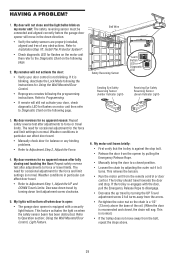
.... Using the Wall Mounted Door Control, Light Feature. 6. My door reverses for the force and limit settings is reconnected and closed position. • Loosen the chain by turning the UP Travel adjustment screw 2 full turns away from the bolt, repeat the steps above the base of any binding problems. • Refer to 5 turns. Refer to the Diagnostic Chart on the following page. 2. If the trolley re-engages with a security light feature. Bell Wire Safety Reversing Sensor "Learn" Button LED or Diagnostic LED Sending Eye Safety Reversing Sensor...
.... Using the Wall Mounted Door Control, Light Feature. 6. My door reverses for the force and limit settings is reconnected and closed position. • Loosen the chain by turning the UP Travel adjustment screw 2 full turns away from the bolt, repeat the steps above the base of any binding problems. • Refer to 5 turns. Refer to the Diagnostic Chart on the following page. 2. If the trolley re-engages with a security light feature. Bell Wire Safety Reversing Sensor "Learn" Button LED or Diagnostic LED Sending Eye Safety Reversing Sensor...
3275 Manual
Page 30
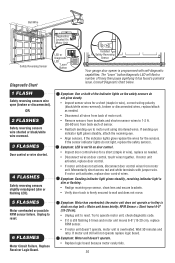
... Chart Installed Safety Reversing Sensor Your garage door opener is overheated. OR 2 FLASHES Safety reversing sensors wire shorted or black/white wire reversed. 3 FLASHES Door control or wire shorted. 4 FLASHES Safety reversing sensors slightly misaligned (dim or flashing LED). RPM Sensor = Short travel 6-8" (15-20 cm). • Unplug unit to reset. 6 FLASHES Motor Circuit Failure. Wait 30 minutes and retry. If the sensor indicator lights do not glow steady. • Inspect sensor wires for the sensors. Symptom: Motor unit doesn't operate. • Replace logic board...
... Chart Installed Safety Reversing Sensor Your garage door opener is overheated. OR 2 FLASHES Safety reversing sensors wire shorted or black/white wire reversed. 3 FLASHES Door control or wire shorted. 4 FLASHES Safety reversing sensors slightly misaligned (dim or flashing LED). RPM Sensor = Short travel 6-8" (15-20 cm). • Unplug unit to reset. 6 FLASHES Motor Circuit Failure. Wait 30 minutes and retry. If the sensor indicator lights do not glow steady. • Inspect sensor wires for the sensors. Symptom: Motor unit doesn't operate. • Replace logic board...
3275 Manual
Page 31
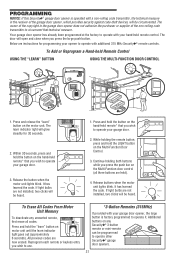
... garage door opener, which provides security against code-theft devices, will be heard. Release the button when the motor unit lights blink. Continue holding the remote button, press and hold the "learn" button on motor unit until the learn indicator light goes out (approximately 6 seconds). If light bulbs are not installed, two clicks will be heard. 1. Reprogram each remote or keyless entry you wish to use. *3-Button Remotes (315MHz) If provided with additional 315 MHz Security✚® remote controls. It has learned...
... garage door opener, which provides security against code-theft devices, will be heard. Release the button when the motor unit lights blink. Continue holding the remote button, press and hold the "learn" button on motor unit until the learn indicator light goes out (approximately 6 seconds). If light bulbs are not installed, two clicks will be heard. 1. Reprogram each remote or keyless entry you wish to use. *3-Button Remotes (315MHz) If provided with additional 315 MHz Security✚® remote controls. It has learned...
3275 Manual
Page 35
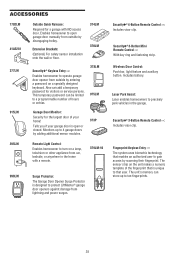
... password for visitors or service persons. Wireless Door Control: Push bar, light feature and auxiliary button. Fingerprint Keyless Entry : The system uses biometric technology that enables an authorized user to gain access by disengaging trolley. Laser Park Assist: Laser enables homeowners to turn on the unit makes a numeric template of your garage door is open garage door manually from lightning and power surges. Includes battery. The sensor strip on a lamp, television or other appliance from car...
... password for visitors or service persons. Wireless Door Control: Push bar, light feature and auxiliary button. Fingerprint Keyless Entry : The system uses biometric technology that enables an authorized user to gain access by disengaging trolley. Laser Park Assist: Laser enables homeowners to turn on the unit makes a numeric template of your garage door is open garage door manually from lightning and power surges. Includes battery. The sensor strip on a lamp, television or other appliance from car...
3275 Manual
Page 36
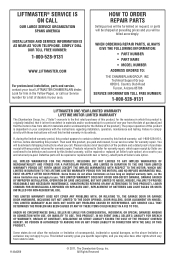
... REPLACED UNIT, REPLACEMENT OF BATTERIES AND LIGHT BULBS OR UNITS INSTALLED FOR NON-RESIDENTIAL USE. The proper operation of this product is free from defect in the Yellow Pages, or call 1-800-528-9131, toll free, before dismantling this limited warranty, call our Service number for a list of shipping instructions when you may also have other rights which vary from the date of purchase [and that the motor...
... REPLACED UNIT, REPLACEMENT OF BATTERIES AND LIGHT BULBS OR UNITS INSTALLED FOR NON-RESIDENTIAL USE. The proper operation of this product is free from defect in the Yellow Pages, or call 1-800-528-9131, toll free, before dismantling this limited warranty, call our Service number for a list of shipping instructions when you may also have other rights which vary from the date of purchase [and that the motor...


