3840 Manual
Page 1
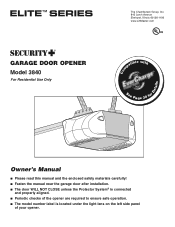
® GARAGE DOOR OPENER Model 3840 For Residential Use Only Com Details The Chamberlain Group, Inc. 845 Larch Avenue Elmhurst, Illinois 60126-1196 www.LiftMaster.com patible with See Page 30 for Owner's Manual ■ Please read this manual and the enclosed safety materials carefully! ■ Fasten the manual near the garage door after installation. ■ The door WILL...
® GARAGE DOOR OPENER Model 3840 For Residential Use Only Com Details The Chamberlain Group, Inc. 845 Larch Avenue Elmhurst, Illinois 60126-1196 www.LiftMaster.com patible with See Page 30 for Owner's Manual ■ Please read this manual and the enclosed safety materials carefully! ■ Fasten the manual near the garage door after installation. ■ The door WILL...
3840 Manual
Page 2
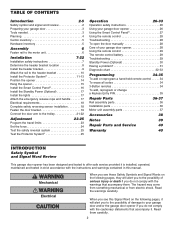
... alert you to the possibility of damage to the possibility of your garage door and/or the garage door opener if you do not comply with the warnings that accompany it will alert you to your garage door opener 28 Using the remote control 29 The remote control battery 29 Troubleshooting...assembly parts 37 Accessories 38 Notes 39 Repair Parts and Service 40 Warranty 40 INTRODUCTION Safety Symbol and Signal Word Review This garage door opener has been designed and tested to offer safe service provided it is installed, operated, maintained and tested in strict accordance ...
... alert you to the possibility of damage to the possibility of your garage door and/or the garage door opener if you do not comply with the warnings that accompany it will alert you to your garage door opener 28 Using the remote control 29 The remote control battery 29 Troubleshooting...assembly parts 37 Accessories 38 Notes 39 Repair Parts and Service 40 Warranty 40 INTRODUCTION Safety Symbol and Signal Word Review This garage door opener has been designed and tested to offer safe service provided it is installed, operated, maintained and tested in strict accordance ...

3840 Manual
Page 3
... Adjustable End Wrench 3 To prevent damage to garage door and opener: • ALWAYS disable locks BEFORE installing and operating the opener. • ONLY operate garage door opener at 120V, 60 Hz to loosen, move or adjust garage door, door springs, cables, pulleys, brackets or their hardware, ALL of balance. Sectional Door One-Piece Door Tools needed During assembly, installation and adjustment of...
... Adjustable End Wrench 3 To prevent damage to garage door and opener: • ALWAYS disable locks BEFORE installing and operating the opener. • ONLY operate garage door opener at 120V, 60 Hz to loosen, move or adjust garage door, door springs, cables, pulleys, brackets or their hardware, ALL of balance. Sectional Door One-Piece Door Tools needed During assembly, installation and adjustment of...
3840 Manual
Page 5
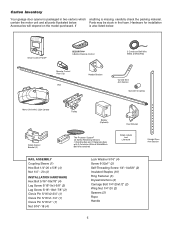
Carton Inventory Your garage door opener is packaged in the foam. Parts may be stuck in two cartons which anything is also listed below . Hardware for installation Accessories will depend on ...® SECURITY✚® 3-Button Remote Control CEILING MOUNT ONLY UP Remote Control Visor Clip Header Bracket Rail 2 Conductor Bell Wire White & White/Red Curved Door Arm Section Sprocket Coupling Motor Unit with 2 Light Lenses Safety Sensor Bracket (2) Trolley Battery (Optional) The Protector System® (2) Safety Reversing Sensors (1 Sending Eye and...
Carton Inventory Your garage door opener is packaged in the foam. Parts may be stuck in two cartons which anything is also listed below . Hardware for installation Accessories will depend on ...® SECURITY✚® 3-Button Remote Control CEILING MOUNT ONLY UP Remote Control Visor Clip Header Bracket Rail 2 Conductor Bell Wire White & White/Red Curved Door Arm Section Sprocket Coupling Motor Unit with 2 Light Lenses Safety Sensor Bracket (2) Trolley Battery (Optional) The Protector System® (2) Safety Reversing Sensors (1 Sending Eye and...

3840 Manual
Page 6
... and installation, replace the foam packing around the motor unit. Tighten securely with a 3/8" socket wrench. • Turn release arm down to do not run the garage door opener until the coupling fits securely over the rail sprocket. • Slide the rail through the motor unit bracket until instructed to disengage trolley. • Slide...
... and installation, replace the foam packing around the motor unit. Tighten securely with a 3/8" socket wrench. • Turn release arm down to do not run the garage door opener until the coupling fits securely over the rail sprocket. • Slide the rail through the motor unit bracket until instructed to disengage trolley. • Slide...
3840 Manual
Page 7
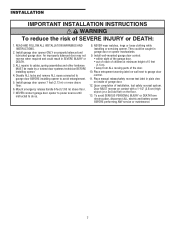
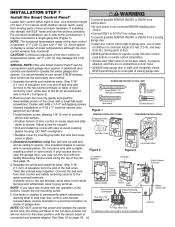
... or maintenance. 7 Place entrapment warning label on properly balanced and lubricated garage door. They could result in SEVERE INJURY or DEATH. 3. Install garage door opener ONLY on wall next to cables, spring assemblies and other hardware MUST be...READ AND FOLLOW ALL INSTALLATION WARNINGS AND INSTRUCTIONS. 2. ALL repairs to garage door control. 11. Install garage door opener 7 feet (2.13 m) or more above floor. 7. Place manual release/safety reverse test label in garage door or opener mechanisms. 9. Door MUST reverse on contact with a 1-1/2" (3.8 cm) high object (or...
... or maintenance. 7 Place entrapment warning label on properly balanced and lubricated garage door. They could result in SEVERE INJURY or DEATH. 3. Install garage door opener ONLY on wall next to cables, spring assemblies and other hardware MUST be...READ AND FOLLOW ALL INSTALLATION WARNINGS AND INSTRUCTIONS. 2. ALL repairs to garage door control. 11. Install garage door opener 7 feet (2.13 m) or more above floor. 7. Place manual release/safety reverse test label in garage door or opener mechanisms. 9. Door MUST reverse on contact with a 1-1/2" (3.8 cm) high object (or...
3840 Manual
Page 11
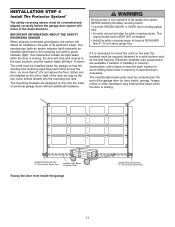
INSTALLATION STEP 4 Install The Protector System® The safety reversing sensor must be connected and aligned correctly before the garage door opener will move in masonry construction, add a piece of its electronic beam. above the floor. IMPORTANT INFORMATION ABOUT THE SAFETY... be disabled. • Install the safety reversing sensor so beam is necessary to the garage door opener BEFORE installing the safety reversing sensor. The invisible light beam path must be installed inside the garage Safety Reversing Sensor 6" (15 cm) max. If an obstruction breaks the light beam ...
INSTALLATION STEP 4 Install The Protector System® The safety reversing sensor must be connected and aligned correctly before the garage door opener will move in masonry construction, add a piece of its electronic beam. above the floor. IMPORTANT INFORMATION ABOUT THE SAFETY... be disabled. • Install the safety reversing sensor so beam is necessary to the garage door opener BEFORE installing the safety reversing sensor. The invisible light beam path must be installed inside the garage Safety Reversing Sensor 6" (15 cm) max. If an obstruction breaks the light beam ...
3840 Manual
Page 14
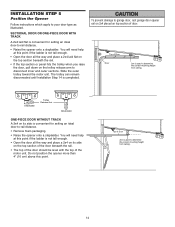
...is completed. ENGAGED Trolley Release Arm RELEASED ONE-PIECE DOOR WITHOUT TRACK A 2x4 on top section of Door 2x4 is used to determine the correct mounting height from ceiling. 14 To prevent damage to garage door, rest garage door opener rail on 2x4 placed on its side on the ...trolley release arm to -rail distance. • Remove foam packaging. • Raise the opener onto a stepladder. Slide the outer trolley toward the motor ...
...is completed. ENGAGED Trolley Release Arm RELEASED ONE-PIECE DOOR WITHOUT TRACK A 2x4 on top section of Door 2x4 is used to determine the correct mounting height from ceiling. 14 To prevent damage to garage door, rest garage door opener rail on 2x4 placed on its side on the ...trolley release arm to -rail distance. • Remove foam packaging. • Raise the opener onto a stepladder. Slide the outer trolley toward the motor ...
3840 Manual
Page 15
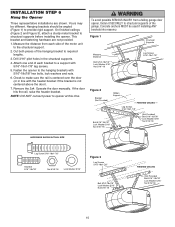
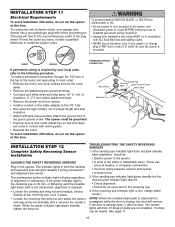
... NOT connect power to structural supports before installing the opener. Yours may be angled (Figure 1) to make sure the rail is centered over the door (or in the structural supports. 4. Cut both pieces of the garage. Drill 3/16" pilot holes in line with the...anchors MUST be used if installing ANY brackets into masonry. Fasten the opener to required lengths. 3. INSTALLATION STEP 6 Hang the Opener Three representative installations are not provided. 1. Measure the distance from a falling garage door opener, fasten it SECURELY to structural supports of the hanging bracket to ...
... NOT connect power to structural supports before installing the opener. Yours may be angled (Figure 1) to make sure the rail is centered over the door (or in the structural supports. 4. Cut both pieces of the garage. Drill 3/16" pilot holes in line with the...anchors MUST be used if installing ANY brackets into masonry. Fasten the opener to required lengths. 3. INSTALLATION STEP 6 Hang the Opener Three representative installations are not provided. 1. Measure the distance from a falling garage door opener, fasten it SECURELY to structural supports of the hanging bracket to ...
3840 Manual
Page 16
...: If you may run this time; Use tacks or staples to permanently attach entrapment warning label to each garage door opener. NOTE: The functional temperature range of the door control is slower at lower temperatures although the door control remains fully functional. SPECIAL NOTE: Only one end of bell wire and connect to the two...
...: If you may run this time; Use tacks or staples to permanently attach entrapment warning label to each garage door opener. NOTE: The functional temperature range of the door control is slower at lower temperatures although the door control remains fully functional. SPECIAL NOTE: Only one end of bell wire and connect to the two...
3840 Manual
Page 17
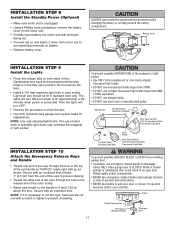
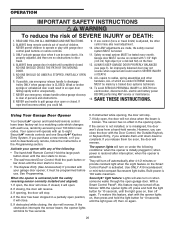
... INJURY or DEATH from motor unit to close the lens. • Use A19, standard neck garage door opener bulbs for approximately 4-1/2 minutes when power is in an open door falling rapidly and/or unexpectedly. • NEVER use emergency release handle unless garage doorway is 6 feet (1.83 m) above the floor. INSTALLATION STEP 8 Install the Standby Power (Optional...
... INJURY or DEATH from motor unit to close the lens. • Use A19, standard neck garage door opener bulbs for approximately 4-1/2 minutes when power is in an open door falling rapidly and/or unexpectedly. • NEVER use emergency release handle unless garage doorway is 6 feet (1.83 m) above the floor. INSTALLATION STEP 8 Install the Standby Power (Optional...
3840 Manual
Page 18
... the wing nut. NOTE: When the invisible beam path is obstructed or misaligned while the door is required by your garage door opener has a grounding type plug with a third grounding pin. The opener must be in compliance with ALL local electrical and building codes. • NEVER use an...before spade terminals. • Remove the power cord from electrocution or fire: • Be sure power is already open wire to establish permanent wiring connection. • Garage door installation and wiring MUST be grounded. • Properly secure wire under plastic ties so that wire does not come in...
... the wing nut. NOTE: When the invisible beam path is obstructed or misaligned while the door is required by your garage door opener has a grounding type plug with a third grounding pin. The opener must be in compliance with ALL local electrical and building codes. • NEVER use an...before spade terminals. • Remove the power cord from electrocution or fire: • Be sure power is already open wire to establish permanent wiring connection. • Garage door installation and wiring MUST be grounded. • Properly secure wire under plastic ties so that wire does not come in...

3840 Manual
Page 24
... it is balanced properly and is not sticking or binding. The LED will stop flashing when the force has been programmed. If the garage door opener cannot open and close the door. 1. Figure 1 Side Panel LED Black Button Purple Button Figure 2 Push Purple button twice to enter into Force Adjustment Mode LED Black Button Purple...
... it is balanced properly and is not sticking or binding. The LED will stop flashing when the force has been programmed. If the garage door opener cannot open and close the door. 1. Figure 1 Side Panel LED Black Button Purple Button Figure 2 Push Purple button twice to enter into Force Adjustment Mode LED Black Button Purple...
3840 Manual
Page 25
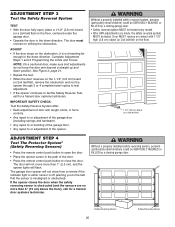
... not traveling far enough in the path of the opener. Door MUST reverse on contact with 1-1/2" high (3.8 cm) object (or 2x4 laid flat) on the obstruction, it is misaligned or obstructed). The garage door opener will flash. ADJUSTMENT STEP 3 Test the Safety Reversal... System TEST • With the door fully open the door. • Place the opener carton in the down direction. The door must reverse on the floor, centered under the garage door. • Operate the door in either...
... not traveling far enough in the path of the opener. Door MUST reverse on contact with 1-1/2" high (3.8 cm) object (or 2x4 laid flat) on the obstruction, it is misaligned or obstructed). The garage door opener will flash. ADJUSTMENT STEP 3 Test the Safety Reversal... System TEST • With the door fully open the door. • Place the opener carton in the down direction. The door must reverse on the floor, centered under the garage door. • Operate the door in either...
3840 Manual
Page 26
... (force or travel is CLOSED. If closing , the door will open garage door. Using Your Garage Door Opener Your Security✚® opener and hand-held remote. If the door has been stopped in the opening , the door will also turn on contact with up to disengage trolley ONLY when garage door is complete. Your opener will close from electrocution, disconnect ALL electric and...
... (force or travel is CLOSED. If closing , the door will open garage door. Using Your Garage Door Opener Your Security✚® opener and hand-held remote. If the door has been stopped in the opening , the door will also turn on contact with up to disengage trolley ONLY when garage door is complete. Your opener will close from electrocution, disconnect ALL electric and...
3840 Manual
Page 31
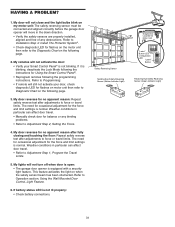
...on the following the programming instructions. If battery status LED is normal. My remotes will not turn off when door is open: • The garage door opener is not blinking. My door reverses for the force and limit settings is not lit properly: • Check battery connections. Using the ... my motor unit: The safety reversing sensor must be connected and aligned correctly before the garage door opener will not close and the light bulbs blink on the following page. 2. My door reverses for flashes on when the safety sensor beam has been obstructed. Weather conditions in...
...on the following the programming instructions. If battery status LED is normal. My remotes will not turn off when door is open: • The garage door opener is not blinking. My door reverses for the force and limit settings is not lit properly: • Check battery connections. Using the ... my motor unit: The safety reversing sensor must be connected and aligned correctly before the garage door opener will not close and the light bulbs blink on the following page. 2. My door reverses for flashes on when the safety sensor beam has been obstructed. Weather conditions in...
3840 Manual
Page 32
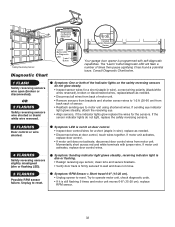
.... Diagnostics Located On Motor Unit "Learn" Button LED or Diagnostic LED "Learn" Button Installed Safety Reversing Sensor Your garage door opener is firmly secured to motor unit using shortened wires. Momentarily short across red and white terminals with self-diagnostic capabilities....reversed), broken or disconnected wires, replace/attach as needed . • Disconnect all wires from back of the Indicator lights on door control. • Inspect door control/wires for the sensors. Symptom: One or both of motor unit. • Remove sensors from brackets and shorten sensor ...
.... Diagnostics Located On Motor Unit "Learn" Button LED or Diagnostic LED "Learn" Button Installed Safety Reversing Sensor Your garage door opener is firmly secured to motor unit using shortened wires. Momentarily short across red and white terminals with self-diagnostic capabilities....reversed), broken or disconnected wires, replace/attach as needed . • Disconnect all wires from back of the Indicator lights on door control. • Inspect door control/wires for the sensors. Symptom: One or both of motor unit. • Remove sensors from brackets and shorten sensor ...
3840 Manual
Page 34
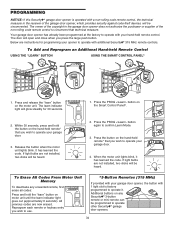
... your hand-held remote* that you wish to use. *3-Button Remotes (315 MHz) If provided with your garage door opener, the button with your garage door. 3. Additional buttons on the hand-held remote control. Within 30 seconds, press and hold the button on any...remote control, the technical measure in the garage door opener does not authorize the purchaser or supplier of the garage door opener, which provides security against code-theft devices, will be heard. 1. PROGRAMMING NOTICE: If this Security✚® garage door opener is factory programmed to operate it has ...
... your hand-held remote* that you wish to use. *3-Button Remotes (315 MHz) If provided with your garage door opener, the button with your garage door. 3. Additional buttons on the hand-held remote control. Within 30 seconds, press and hold the button on any...remote control, the technical measure in the garage door opener does not authorize the purchaser or supplier of the garage door opener, which provides security against code-theft devices, will be heard. 1. PROGRAMMING NOTICE: If this Security✚® garage door opener is factory programmed to operate it has ...
3840 Manual
Page 35
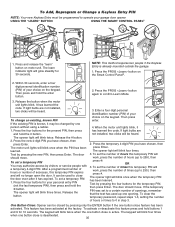
...PIN) of your choice on the keypad. The door should move . Press the new 4-digit PIN you have chosen, then press Enter. Then press enter. 4. LOCK LIGHT 3. Press the four buttons for your garage door opener. Release the button when the motor unit lights ...blink. It has learned the code. Release the # button. 2. The keypad will blink twice when the one opening. Within 30 seconds, enter a four digit personal ...
...PIN) of your choice on the keypad. The door should move . Press the new 4-digit PIN you have chosen, then press Enter. Then press enter. 4. LOCK LIGHT 3. Press the four buttons for your garage door opener. Release the button when the motor unit lights ...blink. It has learned the code. Release the # button. 2. The keypad will blink twice when the one opening. Within 30 seconds, enter a four digit personal ...
3840 Manual
Page 38
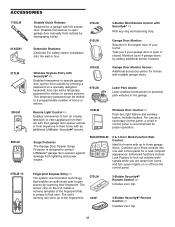
... homeowners to precisely park vehicles in their fingerprint. This temporary password can be limited to a programmable number of the fingerprint that is designed to protect LiftMaster® garage door openers against damage from outside radio signals while you if your home! The sensor strip on the unit makes a numeric template of hours or entries...
... homeowners to precisely park vehicles in their fingerprint. This temporary password can be limited to a programmable number of the fingerprint that is designed to protect LiftMaster® garage door openers against damage from outside radio signals while you if your home! The sensor strip on the unit makes a numeric template of hours or entries...


