
User's Guide
Page 3
... tray 2 7 Printing for fun 9 Printing a digital photo on a photo card (Windows 10 Troubleshooting checklist 13 Setup troubleshooting 15 Index 26 Thank you for buying a Lexmark Z65 printer! • To set up your printer for Windows operating systems, Mac OS 8.6 to 9.2, or Mac OS X version 10.0.3 to 10.1, follow the steps on the setup sheet that came with...
... tray 2 7 Printing for fun 9 Printing a digital photo on a photo card (Windows 10 Troubleshooting checklist 13 Setup troubleshooting 15 Index 26 Thank you for buying a Lexmark Z65 printer! • To set up your printer for Windows operating systems, Mac OS 8.6 to 9.2, or Mac OS X version 10.0.3 to 10.1, follow the steps on the setup sheet that came with...
User's Guide
Page 7
.... Click the ? Click the ? or Click Start Programs or All Programs Lexmark Z65 Lexmark Z65 Solution Center. to view the printer software Help. • From the Lexmark Z65 printer folder on any tab to 10.1 From your operating system. Windows Mac OS 8.6 to 9.2 Mac OS X version 10.0.3 to view the printer software Help. • From the Apple menu, choose...
.... Click the ? Click the ? or Click Start Programs or All Programs Lexmark Z65 Lexmark Z65 Solution Center. to view the printer software Help. • From the Lexmark Z65 printer folder on any tab to 10.1 From your operating system. Windows Mac OS 8.6 to 9.2 Mac OS X version 10.0.3 to view the printer software Help. • From the Apple menu, choose...

User's Guide
Page 9
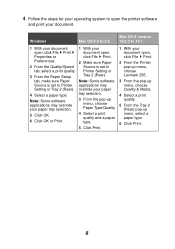
...) or to the paper type for your document. 6 Click Print. 1 With your document open, click File Print. 2 From the Printer pop-up menu, choose Lexmark Z65. 3 From the pop-up menu, choose Quality & Media. 4 Select a print quality. 5 From the Tray 1 (Front) pop-up menu, select Automatic (... 1 (Front). Paper tray 1 button 4 Follow the steps for your document open the printer software and print your document. - Windows Mac OS 8.6 to 9.2 Mac OS X version 10.0.3 to 10.1 1 With your document. Make sure you want the paper type to Printer Setting or Tray 1 (Front). For example, A4 ...
...) or to the paper type for your document. 6 Click Print. 1 With your document open, click File Print. 2 From the Printer pop-up menu, choose Lexmark Z65. 3 From the pop-up menu, choose Quality & Media. 4 Select a print quality. 5 From the Tray 1 (Front) pop-up menu, select Automatic (... 1 (Front). Paper tray 1 button 4 Follow the steps for your document open the printer software and print your document. - Windows Mac OS 8.6 to 9.2 Mac OS X version 10.0.3 to 10.1 1 With your document. Make sure you want the paper type to Printer Setting or Tray 1 (Front). For example, A4 ...
User's Guide
Page 11
.... 6 Click Print. 8 4 Follow the steps for your operating system to Printer Setting or Tray 2 (Rear). Windows Mac OS 8.6 to 9.2 Mac OS X version 10.0.3 to 10.1 1 With your document open , click File Print. 2 From the Printer pop-up menu, choose Lexmark Z65. 3 From the pop-up menu, choose Quality & Media. 4 Select a print quality. 5 From the Tray...
.... 6 Click Print. 8 4 Follow the steps for your operating system to Printer Setting or Tray 2 (Rear). Windows Mac OS 8.6 to 9.2 Mac OS X version 10.0.3 to 10.1 1 With your document open , click File Print. 2 From the Printer pop-up menu, choose Lexmark Z65. 3 From the pop-up menu, choose Quality & Media. 4 Select a print quality. 5 From the Tray...
User's Guide
Page 12
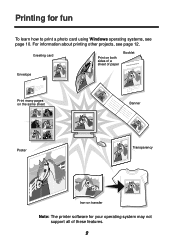
Printing for your operating system may not support all of these features. 9 Greeting card Print on both sides of a sheet of paper Booklet Envelope Print many pages on the same sheet Banner Poster Transparency Iron-on transfer Note: The printer software for fun To learn how to print a photo card using Windows operating systems, see page 12. For information about printing other projects, see page 10.
Printing for your operating system may not support all of these features. 9 Greeting card Print on both sides of a sheet of paper Booklet Envelope Print many pages on the same sheet Banner Poster Transparency Iron-on transfer Note: The printer software for fun To learn how to print a photo card using Windows operating systems, see page 12. For information about printing other projects, see page 10.

User's Guide
Page 13
Paper tray 1 button 10 The print side is selected. Printing a digital photo on a photo card (Windows) 1 Load up to the left edge of paper tray 1. You carefully read the instructions that came with your cards. - You do not push the cards too far into the printer. - When you . - All the cards have the same dimensions. 2 Squeeze and slide the paper guide to 10 photo cards vertically against the right side of the cards. 3 Make sure the paper tray 1 button is facing you load photo cards, make sure: -
Paper tray 1 button 10 The print side is selected. Printing a digital photo on a photo card (Windows) 1 Load up to the left edge of paper tray 1. You carefully read the instructions that came with your cards. - You do not push the cards too far into the printer. - When you . - All the cards have the same dimensions. 2 Squeeze and slide the paper guide to 10 photo cards vertically against the right side of the cards. 3 Make sure the paper tray 1 button is facing you load photo cards, make sure: -

User's Guide
Page 15
...). 10 From Print Properties, click OK. 11 From the Print screen, click OK or Print. 12 To prevent smudging, remove each photo as it exits the printer and let it dry completely before stacking. Windows 1 Refer to the Online User's Guide (see page 4). 2 Click the Printing Ideas tab. Macintosh 1 Refer to the Lexmark Z65...
...). 10 From Print Properties, click OK. 11 From the Print screen, click OK or Print. 12 To prevent smudging, remove each photo as it exits the printer and let it dry completely before stacking. Windows 1 Refer to the Online User's Guide (see page 4). 2 Click the Printing Ideas tab. Macintosh 1 Refer to the Lexmark Z65...
User's Guide
Page 16
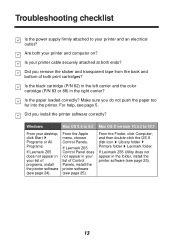
... install the printer software (see page 25). Is your printer cable securely attached at both your desktop, click Start Programs or All Programs. If Lexmark Z65 does not appear in the right carrier? From the Finder, click Computer, and then double-click the OS X disk icon Library folder Printers folder... your printer and computer on? Did you do not push the paper too far into the printer. Windows Mac OS 8.6 to 9.2 Mac OS X version 10.0.3 to your list of programs, install the printer software (see page 24). Did you install the printer software correctly? From the Apple menu, choose...
... install the printer software (see page 25). Is your printer cable securely attached at both your desktop, click Start Programs or All Programs. If Lexmark Z65 does not appear in the right carrier? From the Finder, click Computer, and then double-click the OS X disk icon Library folder Printers folder... your printer and computer on? Did you do not push the paper too far into the printer. Windows Mac OS 8.6 to 9.2 Mac OS X version 10.0.3 to your list of programs, install the printer software (see page 24). Did you install the printer software correctly? From the Apple menu, choose...
User's Guide
Page 25
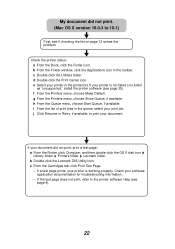
...a test page: a From the Finder, click Computer, and then double-click the OS X disk icon Library folder Printers folder Lexmark folder. b From the Finder window, click the Applications icon in the printer list. e Select your printer in the toolbar. h From the Queue menu, choose ... Finder icon. c Double-click the Utilities folder. If your document did not print. (Mac OS X version 10.0.3 to 10.1) First, see page 25). i From the list of print jobs in the queue, select your software application documentation for troubleshooting information. - b Double-click the Lexmark Z65 Utility icon.
...a test page: a From the Finder, click Computer, and then double-click the OS X disk icon Library folder Printers folder Lexmark folder. b From the Finder window, click the Applications icon in the printer list. e Select your printer in the toolbar. h From the Queue menu, choose ... Finder icon. c Double-click the Utilities folder. If your document did not print. (Mac OS X version 10.0.3 to 10.1) First, see page 25). i From the list of print jobs in the queue, select your software application documentation for troubleshooting information. - b Double-click the Lexmark Z65 Utility icon.
User's Guide
Page 29
... tray 1 5 paper tray 2 7 paper tray light, troubleshooting . . . 23 paper type sensor 1, 5 paper type settings, accessing . . . . . 3 paper, loading 5, 7 photo cards, loading 10 power light, troubleshooting 16 Print dialog box (Macintosh 3 Print Properties (Windows 2 print quality settings, accessing . . . . . 3 printer cable, troubleshooting . . . . . 13 printer parts front cover 1 paper exit tray 1 paper guides 1 paper release levers...
... tray 1 5 paper tray 2 7 paper tray light, troubleshooting . . . 23 paper type sensor 1, 5 paper type settings, accessing . . . . . 3 paper, loading 5, 7 photo cards, loading 10 power light, troubleshooting 16 Print dialog box (Macintosh 3 Print Properties (Windows 2 print quality settings, accessing . . . . . 3 printer cable, troubleshooting . . . . . 13 printer parts front cover 1 paper exit tray 1 paper guides 1 paper release levers...

User's Guide
Page 30
... printer cable 13 printer not printing Mac OS 8.6 to 9.2 21 Mac OS X 10.0.3 to 10.1 . . . . 22 Windows 20 printer software CD Macintosh 19 Windows 18 test page 14 Macintosh 25 Windows 24 uninstalling software Macintosh 25 Windows 24 U uninstalling printer software Macintosh 25 Windows 24 W Windows I Want To menu 2 Print Properties 2 Search Results screen 16 Solution Center 4 27
... printer cable 13 printer not printing Mac OS 8.6 to 9.2 21 Mac OS X 10.0.3 to 10.1 . . . . 22 Windows 20 printer software CD Macintosh 19 Windows 18 test page 14 Macintosh 25 Windows 24 uninstalling software Macintosh 25 Windows 24 U uninstalling printer software Macintosh 25 Windows 24 W Windows I Want To menu 2 Print Properties 2 Search Results screen 16 Solution Center 4 27
Setup Sheet
Page 2
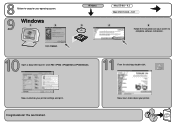
Open a document to complete software installation. Congratulations! Click File Print Properties or Preferences. From the desktop, double-click: Now, customize your printer. Now, learn more about your printer settings and print. You are finished. Windows 1 2 Click Cancel. Windows Mac OS 8.6 - 9.2 Mac OS X 10.0.3 - 10.1 3 4 5 Follow the instructions on your operating system. Follow the steps for your screen to print.
Open a document to complete software installation. Congratulations! Click File Print Properties or Preferences. From the desktop, double-click: Now, customize your printer. Now, learn more about your printer settings and print. You are finished. Windows 1 2 Click Cancel. Windows Mac OS 8.6 - 9.2 Mac OS X 10.0.3 - 10.1 3 4 5 Follow the instructions on your operating system. Follow the steps for your screen to print.
Online User’s Guide for Mac OS 8.6 to 9.2
Page 40
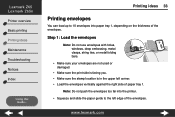
Printing ideas 33 Printing envelopes You can load up to 10 envelopes into the printer. • Squeeze and slide the paper guide to the left corner. • Load the envelopes vertically against the right side of ... envelopes with holes, windows, deep embossing, metal clasps, string ties, or metal folding bars. • Make sure your envelopes are not used or damaged. • Make sure the print side is facing you. • Make sure the stamp location is in the upper left edge of the envelopes. Lexmark Z65 Lexmark Z65n Printer overview...
Printing ideas 33 Printing envelopes You can load up to 10 envelopes into the printer. • Squeeze and slide the paper guide to the left corner. • Load the envelopes vertically against the right side of ... envelopes with holes, windows, deep embossing, metal clasps, string ties, or metal folding bars. • Make sure your envelopes are not used or damaged. • Make sure the print side is facing you. • Make sure the stamp location is in the upper left edge of the envelopes. Lexmark Z65 Lexmark Z65n Printer overview...

Online User’s Guide for Mac OS X 10.0.3 to 10.1
Page 36
...envelopes You can load up to 10 envelopes into the printer. • Squeeze and slide the paper guide to the left corner. • Load the envelopes vertically against the right side of paper tray 1. Step 1: Load the envelopes Note: Do not use envelopes with holes, windows, deep embossing, metal clasps, string... upper left edge of the envelopes. Note: Do not push the envelopes too far into paper tray 1, depending on the thickness of the envelopes. Lexmark Z65 Lexmark Z65n Printer overview Basic printing Printing ideas Maintenance Troubleshooting Notices Index Using this Guide... www...
...envelopes You can load up to 10 envelopes into the printer. • Squeeze and slide the paper guide to the left corner. • Load the envelopes vertically against the right side of paper tray 1. Step 1: Load the envelopes Note: Do not use envelopes with holes, windows, deep embossing, metal clasps, string... upper left edge of the envelopes. Note: Do not push the envelopes too far into paper tray 1, depending on the thickness of the envelopes. Lexmark Z65 Lexmark Z65n Printer overview Basic printing Printing ideas Maintenance Troubleshooting Notices Index Using this Guide... www...


