Getting Started
Page 3
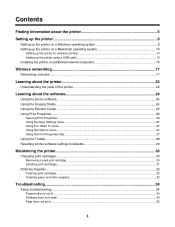
...26 Opening Print Properties ...26 Using the Save Settings menu ...27 Using the I Want To menu...27 Using the Options menu ...27 Using the Print Properties tabs...27 Using the Toolbar...28 Resetting printer software settings to defaults 29 Maintaining the printer 30 Changing print cartridges...30 Removing a used print cartridge...30 Installing print cartridges...31 Ordering Supplies...32 Ordering print cartridges...32 Ordering paper and other supplies ...32 Troubleshooting...34 Setup troubleshooting...34 Power button is not lit ...34 Software does not install ...34 Page does not print ...35...
...26 Opening Print Properties ...26 Using the Save Settings menu ...27 Using the I Want To menu...27 Using the Options menu ...27 Using the Print Properties tabs...27 Using the Toolbar...28 Resetting printer software settings to defaults 29 Maintaining the printer 30 Changing print cartridges...30 Removing a used print cartridge...30 Installing print cartridges...31 Ordering Supplies...32 Ordering print cartridges...32 Ordering paper and other supplies ...32 Troubleshooting...34 Setup troubleshooting...34 Power button is not lit ...34 Software does not install ...34 Page does not print ...35...
Getting Started
Page 5
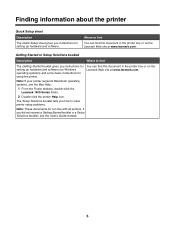
You can find The Getting Started booklet gives you instructions for using the printer. Note: If your printer supports Macintosh operating systems, see the User's Guide instead. 5 The Setup Solutions booklet tells you did not receive a Getting Started booklet or a Setup Solutions booklet, see the Mac Help: 1 From the Finder desktop, double-click the Lexmark 1400 Series folder. 2 Double-click the printer Help icon. Where to find You can find...
You can find The Getting Started booklet gives you instructions for using the printer. Note: If your printer supports Macintosh operating systems, see the User's Guide instead. 5 The Setup Solutions booklet tells you did not receive a Getting Started booklet or a Setup Solutions booklet, see the Mac Help: 1 From the Finder desktop, double-click the Lexmark 1400 Series folder. 2 Double-click the printer Help icon. Where to find You can find...
Getting Started
Page 6
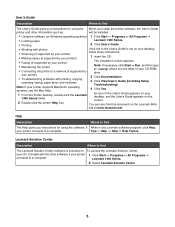
... Œ • Loading paper Lexmark 1400 Series. • Printing 2 Click User's Guide. • Working with printing, copying, scanning, faxing, paper jams, and misfeeds 3 Click View User's Guide (including Setup Troubleshooting). User's Guide Description Where to find The User's Guide gives you install the printer software, the User's Guide printer and other software, if your printer 1 Click Start Œ Programs or All Programs Œ connects to a computer. Lexmark Solution Center Description Where to find this document on To access the Lexmark Solution Center: your...
... Œ • Loading paper Lexmark 1400 Series. • Printing 2 Click User's Guide. • Working with printing, copying, scanning, faxing, paper jams, and misfeeds 3 Click View User's Guide (including Setup Troubleshooting). User's Guide Description Where to find The User's Guide gives you install the printer software, the User's Guide printer and other software, if your printer 1 Click Start Œ Programs or All Programs Œ connects to a computer. Lexmark Solution Center Description Where to find this document on To access the Lexmark Solution Center: your...

Getting Started
Page 20
... respond: a Print a setup page. c Under Network Card, check that start with your configuration settings. This is listed as Connected. e For additional information, refer to the "Wireless troubleshooting" section of the printer in his router and wants to add a printer to the network, the printer MAC address must be allowed to operate on the network or is not responding, after several lines appear that the Status is called MAC filtering. If a customer has a MAC filter...
... respond: a Print a setup page. c Under Network Card, check that start with your configuration settings. This is listed as Connected. e For additional information, refer to the "Wireless troubleshooting" section of the printer in his router and wants to add a printer to the network, the printer MAC address must be allowed to operate on the network or is not responding, after several lines appear that the Status is called MAC filtering. If a customer has a MAC filter...
Getting Started
Page 22
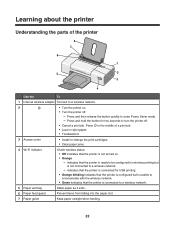
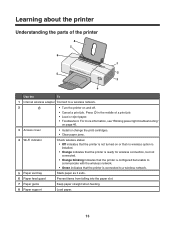
...Power Saver mode. - Learning about the printer Understanding the parts of a print job. • Load or eject paper. • Troubleshoot. 3 Access cover • Install or change the print cartridges. • Clear paper jams. 4 Wi-Fi indicator Check wireless status: • Off indicates that the printer is ready to be configured for USB printing • Orange blinking indicates that the printer is configured but is not connected to a wireless network - Press in the middle of the printer 8 7 6 1 5 2 3 4 Use the To 1 Internal wireless adapter Connect to a wireless network...
...Power Saver mode. - Learning about the printer Understanding the parts of a print job. • Load or eject paper. • Troubleshoot. 3 Access cover • Install or change the print cartridges. • Clear paper jams. 4 Wi-Fi indicator Check wireless status: • Off indicates that the printer is ready to be configured for USB printing • Orange blinking indicates that the printer is configured but is not connected to a wireless network - Press in the middle of the printer 8 7 6 1 5 2 3 4 Use the To 1 Internal wireless adapter Connect to a wireless network...
Getting Started
Page 25
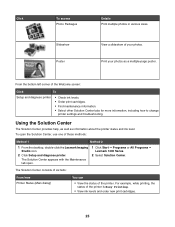
... various sizes. To open . 1 Click Start Œ Programs or All Programs Œ Lexmark 1400 Series. 2 Select Solution Center. The Solution Center appears with the Maintenance tab open the Solution Center, use one of these methods: Method 1 Method 2 1 From the desktop, double-click the Lexmark Imaging Studio icon. 2 Click Setup and diagnose printer. Print your photos. View a slideshow of the printer is Busy Printing. • View ink levels and order new print cartridges...
... various sizes. To open . 1 Click Start Œ Programs or All Programs Œ Lexmark 1400 Series. 2 Select Solution Center. The Solution Center appears with the Maintenance tab open the Solution Center, use one of these methods: Method 1 Method 2 1 From the desktop, double-click the Lexmark Imaging Studio icon. 2 Click Setup and diagnose printer. Print your photos. View a slideshow of the printer is Busy Printing. • View ink levels and order new print cartridges...
Getting Started
Page 26
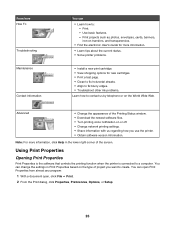
... Troubleshooting Maintenance Contact Information You can open Print Properties from almost any program: 1 With a document open, click File Œ Print. 2 From the Print dialog, click Properties, Preferences, Options, or Setup. 26 Note: For more information. • Learn tips about the current status. • Solve printer problems. • Install a new print cartridge. • View shopping options for new cartridges. • Print a test page. • Clean to fix horizontal streaks. • Align to fix blurry edges. • Troubleshoot other ink problems...
... Troubleshooting Maintenance Contact Information You can open Print Properties from almost any program: 1 With a document open, click File Œ Print. 2 From the Print dialog, click Properties, Preferences, Options, or Setup. 26 Note: For more information. • Learn tips about the current status. • Solve printer problems. • Install a new print cartridge. • View shopping options for new cartridges. • Print a test page. • Clean to fix horizontal streaks. • Align to fix blurry edges. • Troubleshoot other ink problems...
Getting Started
Page 27
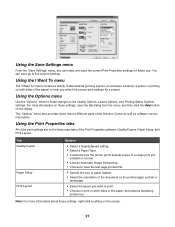
...; Customize how the printer prints several copies of a single print job: collated or normal. • Choose Automatic Image Sharpening. • Choose to have the last page printed first. • Specify the size of paper loaded. • Select the orientation of the document on the printed page: portrait or landscape. • Select the layout you want to print. • Choose to help you select the correct print settings for future use. The "Options" menu...
...; Customize how the printer prints several copies of a single print job: collated or normal. • Choose Automatic Image Sharpening. • Choose to have the last page printed first. • Specify the size of paper loaded. • Select the orientation of the document on the printed page: portrait or landscape. • Select the layout you want to print. • Choose to help you select the correct print settings for future use. The "Options" menu...
Getting Started
Page 43
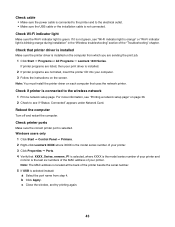
...or "Wi-Fi indicator light is blinking orange during installation" in the "Wireless troubleshooting" section of the "Troubleshooting" chapter. Windows users only 1 Click Start Œ Control Panel Œ Printers. 2 Right-click Lexmark XXXX where XXXX is the model series number of your printer. 3 Click Properties Œ Ports. 4 Verify that uses the network printer. Check printer ports Make sure the correct printer port is green. Check cable • Make sure the power cable is connected to the printer and to the wireless network 1 Print a network setup page. If printer programs are listed...
...or "Wi-Fi indicator light is blinking orange during installation" in the "Wireless troubleshooting" section of the "Troubleshooting" chapter. Windows users only 1 Click Start Œ Control Panel Œ Printers. 2 Right-click Lexmark XXXX where XXXX is the model series number of your printer. 3 Click Properties Œ Ports. 4 Verify that uses the network printer. Check printer ports Make sure the correct printer port is green. Check cable • Make sure the power cable is connected to the printer and to the wireless network 1 Print a network setup page. If printer programs are listed...

Getting Started
Page 49
... the IP address of the printer, print the network setup page to reinstall the software, and make the changes you want. c Select the type of your wireless network. 8 Click Submit. 49 for example: http://10.168.0.101 Note: If you use to the computer again using a wireless router. Note: You may be prompted to connect the printer to protect your password, network name, or other wireless setting: Windows users only 1 Click Start ΠPrograms...
... the IP address of the printer, print the network setup page to reinstall the software, and make the changes you want. c Select the type of your wireless network. 8 Click Submit. 49 for example: http://10.168.0.101 Note: If you use to the computer again using a wireless router. Note: You may be prompted to connect the printer to protect your password, network name, or other wireless setting: Windows users only 1 Click Start ΠPrograms...
Getting Started
Page 50
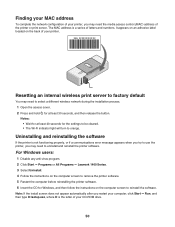
... a different wireless network during the installation process. 1 Open the access cover. 2 Press and hold for at least 40 seconds for the settings to be cleared. • The Wi-Fi indicator light will turn to factory default You may need the media access control (MAC) address of the printer or print server. UAA: XX XX XX XX XX XX Resetting an internal wireless print server to orange. Notes: • Wait for Windows, and then follow the instructions on...
... a different wireless network during the installation process. 1 Open the access cover. 2 Press and hold for at least 40 seconds for the settings to be cleared. • The Wi-Fi indicator light will turn to factory default You may need the media access control (MAC) address of the printer or print server. UAA: XX XX XX XX XX XX Resetting an internal wireless print server to orange. Notes: • Wait for Windows, and then follow the instructions on...
Getting Started
Page 52
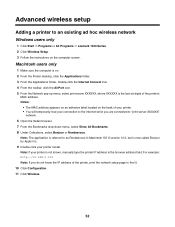
...; Lexmark 1400 Series. 2 Click Wireless Setup. 3 Follow the instructions on . 2 From the Finder desktop, click the Applications folder. 3 From the Applications folder, double-click the Internet Connect icon. 4 From the toolbar, click the AirPort icon. 5 From the Network pop-up menu, select print server XXXXXX, where XXXXXX is the last six digits of the printer's MAC address. Note: If your printer is not shown, manually type the printer...
...; Lexmark 1400 Series. 2 Click Wireless Setup. 3 Follow the instructions on . 2 From the Finder desktop, click the Applications folder. 3 From the Applications folder, double-click the Internet Connect icon. 4 From the toolbar, click the AirPort icon. 5 From the Network pop-up menu, select print server XXXXXX, where XXXXXX is the last six digits of the printer's MAC address. Note: If your printer is not shown, manually type the printer...
Getting Started
Page 58
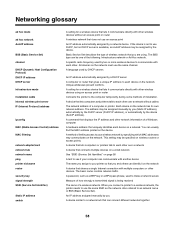
...) DHCP IP address DHCP server infrastructure mode installation cable internal wireless print server IP (Internet Protocol) address ipconfig MAC (Media Access Control) address MAC filtering network adapter/card network hub network name ping printer nickname router security key signal strength SSID (Service Set Identifier) Static IP address switch A setting for a wireless device that lets it communicate directly with other wireless devices without cables The network address of wireless network that you are using an access point or router Connects the printer to a network hub that can...
...) DHCP IP address DHCP server infrastructure mode installation cable internal wireless print server IP (Internet Protocol) address ipconfig MAC (Media Access Control) address MAC filtering network adapter/card network hub network name ping printer nickname router security key signal strength SSID (Service Set Identifier) Static IP address switch A setting for a wireless device that lets it communicate directly with other wireless devices without cables The network address of wireless network that you are using an access point or router Connects the printer to a network hub that can...
User's Guide
Page 4
... the printer 32 Changing print cartridges...32 Removing a used print cartridge...32 Installing print cartridges...33 Achieving better print quality...34 Improving print quality ...34 Aligning the print cartridges ...34 Cleaning the print cartridge nozzles ...34 Wiping the print cartridge nozzles and contacts 35 Preserving the print cartridges...36 Ordering supplies...36 Using genuine Lexmark print cartridges 37 Refilling a print cartridge...37 Recycling Lexmark products...37 Troubleshooting...38 Setup troubleshooting...38 Power light is not lit...38 Software does not install ...38 Page does...
... the printer 32 Changing print cartridges...32 Removing a used print cartridge...32 Installing print cartridges...33 Achieving better print quality...34 Improving print quality ...34 Aligning the print cartridges ...34 Cleaning the print cartridge nozzles ...34 Wiping the print cartridge nozzles and contacts 35 Preserving the print cartridges...36 Ordering supplies...36 Using genuine Lexmark print cartridges 37 Refilling a print cartridge...37 Recycling Lexmark products...37 Troubleshooting...38 Setup troubleshooting...38 Power light is not lit...38 Software does not install ...38 Page does...
User's Guide
Page 13
... "Blinking power light troubleshooting" on page 46. 3 Access cover • Install or change the print cartridges. • Clear paper jams. 4 Wi-Fi indicator Check wireless status: • Off indicates that the printer is connected to communicate with the wireless network. • Green indicates that the printer is configured but not connected. • Orange blinking indicates that the printer is not turned on and off. • Cancel a print job. Learning about the printer Understanding the parts of a print job. • Load or eject paper. • Troubleshoot. Press...
... "Blinking power light troubleshooting" on page 46. 3 Access cover • Install or change the print cartridges. • Clear paper jams. 4 Wi-Fi indicator Check wireless status: • Off indicates that the printer is connected to communicate with the wireless network. • Green indicates that the printer is configured but not connected. • Orange blinking indicates that the printer is not turned on and off. • Cancel a print job. Learning about the printer Understanding the parts of a print job. • Load or eject paper. • Troubleshoot. Press...

User's Guide
Page 17
.... Using Print Properties Opening Print Properties Print Properties is the software that controls the printing function when the printer is connected to : - You can change the settings in Print Properties based on or off. • Change network printing settings. • Share information with us by telephone or on transfers, and transparencies. • Find the electronic User's Guide for new cartridges. • Print a test page. • Clean to fix horizontal streaks. • Align to fix blurry edges. • Troubleshoot other ink problems. Learn...
.... Using Print Properties Opening Print Properties Print Properties is the software that controls the printing function when the printer is connected to : - You can change the settings in Print Properties based on or off. • Change network printing settings. • Share information with us by telephone or on transfers, and transparencies. • Find the electronic User's Guide for new cartridges. • Print a test page. • Clean to fix horizontal streaks. • Align to fix blurry edges. • Troubleshoot other ink problems. Learn...

User's Guide
Page 18
... menu, and then click the Help button on the dialog. Using the Options menu Use the "Options" menu to make changes to help you select the correct print settings for future use. Tab Quality/Copies Paper Setup Print Layout Options • Select a Quality/Speed setting. • Select a Paper Type. • Customize how the printer prints several copies of a single print job: collated or normal. • Choose Automatic Image Sharpening. • Choose to have the last page printed first. • Specify the size of paper loaded...
... menu, and then click the Help button on the dialog. Using the Options menu Use the "Options" menu to make changes to help you select the correct print settings for future use. Tab Quality/Copies Paper Setup Print Layout Options • Select a Quality/Speed setting. • Select a Paper Type. • Customize how the printer prints several copies of a single print job: collated or normal. • Choose Automatic Image Sharpening. • Choose to have the last page printed first. • Specify the size of paper loaded...

User's Guide
Page 26
... the number of pages to print on each page. 6 If you want the printer software to let the printer select the paper type for you have a program that automatically flips the image. 5 Click OK to close any printer software dialogs that are open , click File ΠPrint. 3 Click Properties, Preferences, Options, or Setup. 4 Click the Quality/Copies tab. 5 From the Quality/Speed section, select Photo. 6 From the Paper Type section, select Use printer sensor to...
... the number of pages to print on each page. 6 If you want the printer software to let the printer select the paper type for you have a program that automatically flips the image. 5 Click OK to close any printer software dialogs that are open , click File ΠPrint. 3 Click Properties, Preferences, Options, or Setup. 4 Click the Quality/Copies tab. 5 From the Quality/Speed section, select Photo. 6 From the Paper Type section, select Use printer sensor to...

User's Guide
Page 27
... force the transparencies into the printer. b Adjust the print settings. Note: For additional print setting options, see "Using Print Properties" on page 17. 4 If you want to check or change your document open, click File ΠPrint. 3 Click Properties, Preferences, Options, or Setup. 4 From the Quality/Copies tab, select Normal or Photo. 5 From the Paper Type section, select Transparency. 6 Click OK to close any Web page. 1 Load paper. 2 Open a Web page using Microsoft Internet Explorer 5.5 or...
... force the transparencies into the printer. b Adjust the print settings. Note: For additional print setting options, see "Using Print Properties" on page 17. 4 If you want to check or change your document open, click File ΠPrint. 3 Click Properties, Preferences, Options, or Setup. 4 From the Quality/Copies tab, select Normal or Photo. 5 From the Paper Type section, select Transparency. 6 Click OK to close any Web page. 1 Load paper. 2 Open a Web page using Microsoft Internet Explorer 5.5 or...
User's Guide
Page 52
... install 38 software settings, printer resetting to defaults 20 Solution Center Advanced tab 17 Contact Information tab 17 How To tab 17 Maintenance tab 17 opening 16 Printer Status dialog 16 Troubleshooting tab 17 using 16 supplies, ordering 36 T Toolbar printing a Web page 27 printing only the photos from a Web page 28 using 19 transparencies loading 22 printing 27 Troubleshooting tab 17 troubleshooting, blinking power light power light blinks rapidly 46 power light blinks slowly 46 troubleshooting, error messages Black and Color cartridge replacement required 47 Black cartridge replacement...
... install 38 software settings, printer resetting to defaults 20 Solution Center Advanced tab 17 Contact Information tab 17 How To tab 17 Maintenance tab 17 opening 16 Printer Status dialog 16 Troubleshooting tab 17 using 16 supplies, ordering 36 T Toolbar printing a Web page 27 printing only the photos from a Web page 28 using 19 transparencies loading 22 printing 27 Troubleshooting tab 17 troubleshooting, blinking power light power light blinks rapidly 46 power light blinks slowly 46 troubleshooting, error messages Black and Color cartridge replacement required 47 Black cartridge replacement...


