
User Guide
Page 22
...configuring and using the home screen applications 22 Activating the home screen applications Finding information about the other applications. 3 Click the Manuals tab, and then select the document for the home screen application. Note: The printer must first activate and set up Forms and...: A later version of this User's Guide may contain a direct link to the Administrator's Guide of this User's Guide, go to http://support.lexmark.com. For more information on accessing the Embedded Web Server, see "Accessing the Embedded Web Server" on page 20. • Make sure the ...
...configuring and using the home screen applications 22 Activating the home screen applications Finding information about the other applications. 3 Click the Manuals tab, and then select the document for the home screen application. Note: The printer must first activate and set up Forms and...: A later version of this User's Guide may contain a direct link to the Administrator's Guide of this User's Guide, go to http://support.lexmark.com. For more information on accessing the Embedded Web Server, see "Accessing the Embedded Web Server" on page 20. • Make sure the ...

User Guide
Page 34
... setting up the printer, then turn them available for print jobs. Installing an Internal Solutions Port The controller board supports one optional Lexmark Internal Solutions Port (ISP). Additional printer setup 34 Warning-Potential Damage: Improper installation of the connector on the card must touch and... be necessary to manually add the options in the print driver" on page 51. Note: The entire length of the card may be flushed against ...
... setting up the printer, then turn them available for print jobs. Installing an Internal Solutions Port The controller board supports one optional Lexmark Internal Solutions Port (ISP). Additional printer setup 34 Warning-Potential Damage: Improper installation of the connector on the card must touch and... be necessary to manually add the options in the print driver" on page 51. Note: The entire length of the card may be flushed against ...

User Guide
Page 49
... make them available for print jobs. Additional printer setup 49 2 1 Note: When the printer software and any optional trays are installed, you may need to manually add the options in the printer driver to the bottom.
... make them available for print jobs. Additional printer setup 49 2 1 Note: When the printer software and any optional trays are installed, you may need to manually add the options in the printer driver to the bottom.
User Guide
Page 54
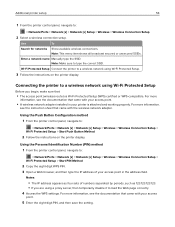
... [x] > Network [x] Setup > Wireless > Wireless Connection Setup > Wi‑Fi Protected Setup > Start Push Button Method 2 Follow the instructions on the printer display. Enter a network name Manually type the SSID. Notes: • The IP address appears as four sets of your printer is Wi‑Fi Protected Setup (WPS) certified...
... [x] > Network [x] Setup > Wireless > Wireless Connection Setup > Wi‑Fi Protected Setup > Start Push Button Method 2 Follow the instructions on the printer display. Enter a network name Manually type the SSID. Notes: • The IP address appears as four sets of your printer is Wi‑Fi Protected Setup (WPS) certified...

User Guide
Page 102
... Navigate to: Copy to > select the tray containing the letterhead > Copy It 5 If there are no trays that contain transparencies, then navigate to : Manual Feeder > select the size of the transparencies > > Transparency > 4 Load transparencies into the multipurpose feeder, and then touch Copy It. Notes: •... to: Copy to > select the tray that contains transparencies > Copy It If there are no trays that support letterhead, then navigate to : Manual Feeder > > select the size of the letterhead > Letterhead 6 Load the letterhead faceup, top edge first into the multipurpose feeder, and...
... Navigate to: Copy to > select the tray containing the letterhead > Copy It 5 If there are no trays that contain transparencies, then navigate to : Manual Feeder > select the size of the transparencies > > Transparency > 4 Load transparencies into the multipurpose feeder, and then touch Copy It. Notes: •... to: Copy to > select the tray that contains transparencies > Copy It If there are no trays that support letterhead, then navigate to : Manual Feeder > > select the size of the letterhead > Letterhead 6 Load the letterhead faceup, top edge first into the multipurpose feeder, and...

User Guide
Page 105
Reducing or enlarging copies Copies can be scaled from " after setting Scale manually changes the scale value back to 2 sided" if you have two-sided original documents and you want two‑sided copies. 4 Touch > Copy It. Touching "...
Reducing or enlarging copies Copies can be scaled from " after setting Scale manually changes the scale value back to 2 sided" if you have two-sided original documents and you want two‑sided copies. 4 Touch > Copy It. Touching "...

User Guide
Page 110
... the original document is mostly text or line art. • Text/Photo-The original document is not in one of the trays, then touch Manual Feeder, and manually load the paper in one of text, graphics, and photos. Darkness This option lets you want to copy onto is not loaded in the...
... the original document is mostly text or line art. • Text/Photo-The original document is not in one of the trays, then touch Manual Feeder, and manually load the paper in one of text, graphics, and photos. Darkness This option lets you want to copy onto is not loaded in the...

User Guide
Page 121
Faxing 121 Setup 1: Printer is connected to a dedicated fax line 1 Connect one end of the telephone cable to an active analog wall jack. Notes: • You can set the printer to receive faxes automatically (Auto Answer On) or manually (Auto Answer Off). • If you want to receive faxes automatically, then set the printer to pick up on any number of the telephone cable to the line port of the printer. 2 Connect the other end of rings that you want.
Faxing 121 Setup 1: Printer is connected to a dedicated fax line 1 Connect one end of the telephone cable to an active analog wall jack. Notes: • You can set the printer to receive faxes automatically (Auto Answer On) or manually (Auto Answer Off). • If you want to receive faxes automatically, then set the printer to pick up on any number of the telephone cable to the line port of the printer. 2 Connect the other end of rings that you want.

User Guide
Page 124
... analog wall jack. 3 Connect the telephone to receive faxes automatically, but turn off the voice mail service when you hear fax tones, press *9* or the manual answer code on the telephone to receive the fax. • You can also set the printer to the telephone port of the printer.
... analog wall jack. 3 Connect the telephone to receive faxes automatically, but turn off the voice mail service when you hear fax tones, press *9* or the manual answer code on the telephone to receive the fax. • You can also set the printer to the telephone port of the printer.

User Guide
Page 133
... the printer to observe daylight saving time The printer can set to load the Web page correctly. 2 Click Security > Set Date and Time. 3 In the Manually Set Date & Time field, enter the current date and time. 4 Click Submit. Sending a fax You can use the address book.
... the printer to observe daylight saving time The printer can set to load the Web page correctly. 2 Click Security > Set Date and Time. 3 In the Manually Set Date & Time field, enter the current date and time. 4 Click Submit. Sending a fax You can use the address book.

User Guide
Page 138
... you are using a proxy server, then temporarily disable it to block. Only three jobs appear on the printer home screen. Held faxes can be released manually or at a scheduled day or time. 1 Open a Web browser, and then type the printer IP address in the address field. Notes: • View the...
... you are using a proxy server, then temporarily disable it to block. Only three jobs appear on the printer home screen. Held faxes can be released manually or at a scheduled day or time. 1 Open a Web browser, and then type the printer IP address in the address field. Notes: • View the...

User Guide
Page 139
... image resolution reduces the file size. b From the Action menu, select Hold faxes. Select one of the following: • Off • Always On • Manual • Scheduled 4 If you want the held faxes released. Faxing 139 3 From the Held Fax Mode menu, select one of the following steps: a Click Fax...
... image resolution reduces the file size. b From the Action menu, select Hold faxes. Select one of the following: • Off • Always On • Manual • Scheduled 4 If you want the held faxes released. Faxing 139 3 From the Held Fax Mode menu, select one of the following steps: a Click Fax...

User Guide
Page 150
... menus 150 Paper menu Default Source menu Use Default Source Tray [x] Multipurpose Feeder Manual Paper Manual Envelope Configure MP menu Use Configure MP Cassette Manual First To Set a default paper source for manual‑feed print jobs. • First configures the multipurpose feeder as...When one tray is the factory default setting. Cassette configures the multipurpose feeder as the automatic paper source. • Manual sets the multipurpose feeder only for all print jobs. Notes: • Cassette is empty, the print job continues using the linked tray.
... menus 150 Paper menu Default Source menu Use Default Source Tray [x] Multipurpose Feeder Manual Paper Manual Envelope Configure MP menu Use Configure MP Cassette Manual First To Set a default paper source for manual‑feed print jobs. • First configures the multipurpose feeder as...When one tray is the factory default setting. Cassette configures the multipurpose feeder as the automatic paper source. • Manual sets the multipurpose feeder only for all print jobs. Notes: • Cassette is empty, the print job continues using the linked tray.

User Guide
Page 153
...Notes: • Plain Paper is the international factory default setting. factory default setting. Manual Envelope Type Envelope Rough Envelope Custom Type [x] Specify the envelope type being manually loaded. Manual Paper Type Plain Paper Card Stock Transparency Recycled Labels Bond Letterhead Preprinted Colored Paper Light ...: 10 Envelope is the factory default setting. DL Envelope is the U.S. Understanding the printer menus 153 Use To Manual Paper Size A4 A5 A6 JIS B5 Letter Legal Executive Oficio (Mexico) Folio Statement Universal Specify the size of the ...
...Notes: • Plain Paper is the international factory default setting. factory default setting. Manual Envelope Type Envelope Rough Envelope Custom Type [x] Specify the envelope type being manually loaded. Manual Paper Type Plain Paper Card Stock Transparency Recycled Labels Bond Letterhead Preprinted Colored Paper Light ...: 10 Envelope is the factory default setting. DL Envelope is the U.S. Understanding the printer menus 153 Use To Manual Paper Size A4 A5 A6 JIS B5 Letter Legal Executive Oficio (Mexico) Folio Statement Universal Specify the size of the ...

User Guide
Page 167
... setting. Backup DNS Server Address View or change the current TCP/IP address. Enable DHCP On Off Specify the DHCP address and parameter assignment. Note: Manually setting the IP address sets the Enable DHCP and Enable Auto IP settings to Off. Note: On is the factory default setting. Note: Yes is...
... setting. Backup DNS Server Address View or change the current TCP/IP address. Enable DHCP On Off Specify the DHCP address and parameter assignment. Note: Manually setting the IP address sets the Enable DHCP and Enable Auto IP settings to Off. Note: On is the factory default setting. Note: Yes is...

User Guide
Page 182
...;lls a certain amount of events to the administrator every time a log is the factory default setting. Set Date/Time menu Use Current Date and Time Manually Set Date and Time Time Zone To Set the current printer date and time. Note: Date/Time is toggled.
...;lls a certain amount of events to the administrator every time a log is the factory default setting. Set Date/Time menu Use Current Date and Time Manually Set Date and Time Time Zone To Set the current printer date and time. Note: Date/Time is toggled.

User Guide
Page 196
...job through a telephone line. General Fax Settings Use Restore Factory Defaults Optimize Fax Compatibility Fax Name Fax Number Fax ID Fax Name Fax Number Enable Manual Fax On Off Memory Use All receive Mostly receive Equal Mostly send All send To Restore the factory defaults of a copy. Specify the number ... printer menus 196 Use Scan edge to edge Off On Sharpness 1-5 Sample Copy Off On Fax Settings menu To Allow edge‑to fax manually, which requires a line splitter and a telephone handset. Specify how the fax is the factory default setting. Note: Fax Number is identified...
...job through a telephone line. General Fax Settings Use Restore Factory Defaults Optimize Fax Compatibility Fax Name Fax Number Fax ID Fax Name Fax Number Enable Manual Fax On Off Memory Use All receive Mostly receive Equal Mostly send All send To Restore the factory defaults of a copy. Specify the number ... printer menus 196 Use Scan edge to edge Off On Sharpness 1-5 Sample Copy Off On Fax Settings menu To Allow edge‑to fax manually, which requires a line splitter and a telephone handset. Specify how the fax is the factory default setting. Note: Fax Number is identified...

User Guide
Page 201
... Receive On Off Enable Caller ID On Off Fax Job Waiting None Toner Toner and Supplies Rings to Answer 1-25 Auto Answer Yes No Manual Answer Code 0-9 Auto Reduction On Off To Adjust the sharpness of the paper loaded in the designated fax source. Display the caller ID ...fax. Cool values generate a bluer output than the default while warm values generate a redder output than the default. Note: On is the factory default setting. Manually enter a code on the telephone number pad to black and white. Note: 3 is the factory default setting. Note: On is the factory default setting....
... Receive On Off Enable Caller ID On Off Fax Job Waiting None Toner Toner and Supplies Rings to Answer 1-25 Auto Answer Yes No Manual Answer Code 0-9 Auto Reduction On Off To Adjust the sharpness of the paper loaded in the designated fax source. Display the caller ID ...fax. Cool values generate a bluer output than the default while warm values generate a redder output than the default. Note: On is the factory default setting. Manually enter a code on the telephone number pad to black and white. Note: 3 is the factory default setting. Note: On is the factory default setting....

User Guide
Page 203
.... Enable automatic printing of a received error log. Specify the source of a transmission log after every 200 fax jobs. Held faxes can be released manually or at a scheduled day or time. Note: Print log is the factory default setting. Notes: • On is the factory default setting.... Understanding the printer menus 203 Use Holding Faxes Held Fax Mode Off Always On Manual Scheduled Fax Holding Schedule Punch Off On Staple Off 1 staple Enable Color Fax Receive On Off Fax Log Settings Use Transmission Log Print ...
.... Enable automatic printing of a received error log. Specify the source of a transmission log after every 200 fax jobs. Held faxes can be released manually or at a scheduled day or time. Note: Print log is the factory default setting. Notes: • On is the factory default setting.... Understanding the printer menus 203 Use Holding Faxes Held Fax Mode Off Always On Manual Scheduled Fax Holding Schedule Punch Off On Staple Off 1 staple Enable Color Fax Receive On Off Fax Log Settings Use Transmission Log Print ...

User Guide
Page 220
Paper Source Tray [x] Multipurpose Feeder Manual Paper Manual Envelope Set a default paper source for incoming print jobs. Collate (1,1,1) (2,2,2) (1,2,3) (1,2,3) Stack the pages of copies for each print job. Note: 1 sided is installed. factory default ...
Paper Source Tray [x] Multipurpose Feeder Manual Paper Manual Envelope Set a default paper source for incoming print jobs. Collate (1,1,1) (2,2,2) (1,2,3) (1,2,3) Stack the pages of copies for each print job. Note: 1 sided is installed. factory default ...


