
User Guide
Page 10
support: http://support.lexmark.com • Documentation • Driver downloads Note: Select your country or region, and then select your product to view the appropriate support site. • Live chat support • E‑mail ... recommended temperatures and avoid fluctuations: Ambient temperature 15.6 to 32.2°C (60 to 90°F) Storage temperature 1 to 35°C (34 to http://support.lexmark.com. • In other countries and regions-See the printed warranty that they may serve you faster: • Machine Type number • Serial number •...
support: http://support.lexmark.com • Documentation • Driver downloads Note: Select your country or region, and then select your product to view the appropriate support site. • Live chat support • E‑mail ... recommended temperatures and avoid fluctuations: Ambient temperature 15.6 to 32.2°C (60 to 90°F) Storage temperature 1 to 35°C (34 to http://support.lexmark.com. • In other countries and regions-See the printed warranty that they may serve you faster: • Machine Type number • Serial number •...

User Guide
Page 34
... on the card must touch and be necessary to manually add the options in the print driver" on page 51. Installing an Internal Solutions Port The controller board supports one optional Lexmark Internal Solutions Port (ISP). For more information, see "Removing a printer hard disk" on...see "Accessing the controller board" on the printer first before continuing. For more information, see "Adding available options in the printer driver to the printer, then turn the printer off as well, and unplug any controller board electronic components or connectors. 1 Access the controller...
... on the card must touch and be necessary to manually add the options in the print driver" on page 51. Installing an Internal Solutions Port The controller board supports one optional Lexmark Internal Solutions Port (ISP). For more information, see "Removing a printer hard disk" on...see "Accessing the controller board" on the printer first before continuing. For more information, see "Adding available options in the printer driver to the printer, then turn the printer off as well, and unplug any controller board electronic components or connectors. 1 Access the controller...

User Guide
Page 49
... shock, do not set up this product or make any optional trays are installed, you may need to manually add the options in the printer driver to the bottom. Additional printer setup 49 2 1 Note: When the printer software and any electrical or cabling connections, such as the power cord, ..., or telephone, during a lightning storm. Warning-Potential Damage: Do not touch the USB cable, any wireless network adapter, or the printer in the print driver" on the right side of the printer toward the front of data or a malfunction can occur. To uninstall the optional trays, slide the latch on...
... shock, do not set up this product or make any optional trays are installed, you may need to manually add the options in the printer driver to the bottom. Additional printer setup 49 2 1 Note: When the printer software and any electrical or cabling connections, such as the power cord, ..., or telephone, during a lightning storm. Warning-Potential Damage: Do not touch the USB cable, any wireless network adapter, or the printer in the print driver" on the right side of the printer toward the front of data or a malfunction can occur. To uninstall the optional trays, slide the latch on...

User Guide
Page 51
Note: Obtain the printer IP address from the TCP/IP section in the print driver For Windows users 1 Open the printers folder. 2 Select the printer you want to update, and then do the following: • For Windows 7 or later, select ...
Note: Obtain the printer IP address from the TCP/IP section in the print driver For Windows users 1 Open the printers folder. 2 Select the printer you want to update, and then do the following: • For Windows 7 or later, select ...

User Guide
Page 134
... an original document faceup, short edge first into the ADF tray. Notes: • The fax option is available only with the PostScript driver, configure and enable it in the Configuration tab. Sending a fax using the computer For Windows users 1 From the document ...that you are trying to http://support.lexmark.com. • To use the fax option with the PostScript® driver or the Universal Fax Driver. Sending a fax using a shortcut number Fax shortcuts are like the speed dial numbers on a telephone...
... an original document faceup, short edge first into the ADF tray. Notes: • The fax option is available only with the PostScript driver, configure and enable it in the Configuration tab. Sending a fax using the computer For Windows users 1 From the document ...that you are trying to http://support.lexmark.com. • To use the fax option with the PostScript® driver or the Universal Fax Driver. Sending a fax using a shortcut number Fax shortcuts are like the speed dial numbers on a telephone...

User Guide
Page 199
... default setting. • This menu item appears only when a formatted, working printer hard disk is the factory default setting. Allow the print driver to a specified number. Specify the dialing sound. Understanding the printer menus 199 Use Darkness 1-9 Dial Prefix Dialing Prefix... Rules Prefix Rule [x] Automatic Redial 0-9 Redial frequency 1-200 Behind a PABX Yes No Enable ECM Yes No Enable Fax Scans On Off Driver to fax Yes No Allow Save as 99. Note: 5 is installed. Establish a dialing prefix rule. Note: Yes is the factory default setting...
... default setting. • This menu item appears only when a formatted, working printer hard disk is the factory default setting. Allow the print driver to a specified number. Specify the dialing sound. Understanding the printer menus 199 Use Darkness 1-9 Dial Prefix Dialing Prefix... Rules Prefix Rule [x] Automatic Redial 0-9 Redial frequency 1-200 Behind a PABX Yes No Enable ECM Yes No Enable Fax Scans On Off Driver to fax Yes No Allow Save as 99. Note: 5 is installed. Establish a dialing prefix rule. Note: Yes is the factory default setting...

User Guide
Page 236
... of the carbon footprint of a printer is related to paper usage. Notes: • Two-sided printing is the default setting in the print driver. • For a complete list of paper by using one printer setting, see "Using Eco‑Mode" on page 86. We design with... your printer, see : • The Notices chapter • The Environmental Sustainability section of the Lexmark Web site at www.lexmark.com/environment • The Lexmark recycling program at www.lexmark.com/recycle By selecting certain printer settings or tasks, you can significantly reduce your printer's impact...
... of the carbon footprint of a printer is related to paper usage. Notes: • Two-sided printing is the default setting in the print driver. • For a complete list of paper by using one printer setting, see "Using Eco‑Mode" on page 86. We design with... your printer, see : • The Notices chapter • The Environmental Sustainability section of the Lexmark Web site at www.lexmark.com/environment • The Lexmark recycling program at www.lexmark.com/recycle By selecting certain printer settings or tasks, you can significantly reduce your printer's impact...

User Guide
Page 312
...all packing materials, then reinstall the hardware options, and then turn solved. Check if you have selected the correct port settings in the printer driver. Are the port settings correct? Go to step 11. Turn off the printer, then wait for about 10 seconds, and then turn ...solved. Step 10 Go to step 12. Is the correct printer driver installed? Troubleshooting 312 Action Yes Step 9 Go to step 2. Make sure to install all packing material removed? Printer display is Turn off ...
...all packing materials, then reinstall the hardware options, and then turn solved. Check if you have selected the correct port settings in the printer driver. Are the port settings correct? Go to step 11. Turn off the printer, then wait for about 10 seconds, and then turn ...solved. Step 10 Go to step 12. Is the correct printer driver installed? Troubleshooting 312 Action Yes Step 9 Go to step 2. Make sure to install all packing material removed? Printer display is Turn off ...

User Guide
Page 313
Step 2 Go to step 4. Step 3 Go to step 3. It may be necessary to manually add the internal option in the printer driver to make it available for about 10 seconds, and then turn on the printer. b Resend the print job. Connect the internal option to step 2.... 4 a Check if the internal option is solved. The problem is selected. For more information, see if the internal option is listed in the print driver" on the printer. b Make sure the internal option is installed in the appropriate connector in the controller board. Is the internal option listed in the...
Step 2 Go to step 4. Step 3 Go to step 3. It may be necessary to manually add the internal option in the printer driver to make it available for about 10 seconds, and then turn on the printer. b Resend the print job. Connect the internal option to step 2.... 4 a Check if the internal option is solved. The problem is selected. For more information, see if the internal option is listed in the print driver" on the printer. b Make sure the internal option is installed in the appropriate connector in the controller board. Is the internal option listed in the...
User Guide
Page 315
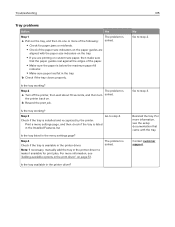
... fill indicator. • Make sure paper lies flat in the tray. Contact customer support. Step 2 The problem is available in the printer driver. Step 4 Check if the tray is a Turn off the printer, then wait about 10 seconds, and then turn solved. Reinstall the tray. b Resend ... Action Yes Step 1 The problem is a Pull out the tray, and then do one or more information, see "Adding available options in the print driver" on . Is the tray working ? Note: If necessary, manually add the tray in the Installed Features list. For more information, see the setup ...
... fill indicator. • Make sure paper lies flat in the tray. Contact customer support. Step 2 The problem is available in the printer driver. Step 4 Check if the tray is a Turn off the printer, then wait about 10 seconds, and then turn solved. Reinstall the tray. b Resend ... Action Yes Step 1 The problem is a Pull out the tray, and then do one or more information, see "Adding available options in the print driver" on . Is the tray working ? Note: If necessary, manually add the tray in the Installed Features list. For more information, see the setup ...

User Guide
Page 361
Technical support via telephone is also available. Troubleshooting 361 Contacting customer support Before contacting customer support, make sure to have the following information: • Printer problem • Error message • Printer model type and serial number Go to http://support.lexmark.com to http://support.lexmark.com. or Canada, call 1-800-539-6275. For other countries or regions, go to receive e‑mail or chat support, or browse through the library of manuals, support documentation, drivers, and other downloads. In the U.S.
Technical support via telephone is also available. Troubleshooting 361 Contacting customer support Before contacting customer support, make sure to have the following information: • Printer problem • Error message • Printer model type and serial number Go to http://support.lexmark.com to http://support.lexmark.com. or Canada, call 1-800-539-6275. For other countries or regions, go to receive e‑mail or chat support, or browse through the library of manuals, support documentation, drivers, and other downloads. In the U.S.
User Guide
Page 376
...‑sheet tray installing 46 A accessing the Embedded Web Server 20 Active NIC menu 164 adapter plug 129 adding hardware options print driver 51 adding internal options print driver 51 ADF copying using 100 adjusting copy quality 105 adjusting printer display brightness 239 adjusting Sleep mode 238 adjusting toner darkness 93 administrator...
...‑sheet tray installing 46 A accessing the Embedded Web Server 20 Active NIC menu 164 adapter plug 129 adding hardware options print driver 51 adding internal options print driver 51 ADF copying using 100 adjusting copy quality 105 adjusting printer display brightness 239 adjusting Sleep mode 238 adjusting toner darkness 93 administrator...
User Guide
Page 379
... G General Settings menu 184 Google Cloud Print using 94 green settings Eco‑Mode 237 Hibernate mode 238 Quiet Mode 237 H hardware options, adding print driver 51 held jobs 97 printing from a Macintosh computer 98 printing from Windows 98 held print jobs printing from a Macintosh computer 98 printing from Windows 98...
... G General Settings menu 184 Google Cloud Print using 94 green settings Eco‑Mode 237 Hibernate mode 238 Quiet Mode 237 H hardware options, adding print driver 51 held jobs 97 printing from a Macintosh computer 98 printing from Windows 98 held print jobs printing from a Macintosh computer 98 printing from Windows 98...
User Guide
Page 380
... were deleted [37] 296 Insufficient memory, some held jobs will not be restored [37] 297 internal options 27 internal options, adding print driver 51 internal print server troubleshooting 314 Internal Solutions Port installing 34 troubleshooting 314 IP address of computer finding 20 IP address, printer fi...L labels, paper tips 84 letterhead copying on 102 loading, 2100‑sheet tray 68 loading, multipurpose feeder 75, 84 loading, trays 58, 84 Lexmark Print using 94 light, indicator 15 line filter 125 LINE port 49 linking trays 81, 82 Load [paper source] with [custom string] ...
... were deleted [37] 296 Insufficient memory, some held jobs will not be restored [37] 297 internal options 27 internal options, adding print driver 51 internal print server troubleshooting 314 Internal Solutions Port installing 34 troubleshooting 314 IP address of computer finding 20 IP address, printer fi...L labels, paper tips 84 letterhead copying on 102 loading, 2100‑sheet tray 68 loading, multipurpose feeder 75, 84 loading, trays 58, 84 Lexmark Print using 94 light, indicator 15 line filter 125 LINE port 49 linking trays 81, 82 Load [paper source] with [custom string] ...

User Guide
Page 382
... [x] disabled [56] 300 parts checking status 249 checking, from printer control panel 249 checking, using the Embedded Web Server 249 using genuine Lexmark 250 PCL Emul menu 231 PDF menu 230 Personal Identification Number method using 54 phone splitter 126 photos copying 101 placing separator sheets...settings configuring 55 PostScript menu 230 power cord socket 49 preparing to set up the printer on an Ethernet network 52 print driver hardware options, adding 51 print irregularities 333 print job canceling from wrong tray 320 job prints on prints 343 transparency print quality is ...
... [x] disabled [56] 300 parts checking status 249 checking, from printer control panel 249 checking, using the Embedded Web Server 249 using genuine Lexmark 250 PCL Emul menu 231 PDF menu 230 Personal Identification Number method using 54 phone splitter 126 photos copying 101 placing separator sheets...settings configuring 55 PostScript menu 230 power cord socket 49 preparing to set up the printer on an Ethernet network 52 print driver hardware options, adding 51 print irregularities 333 print job canceling from wrong tray 320 job prints on prints 343 transparency print quality is ...


