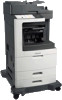
Network Scan Drivers
Page 6
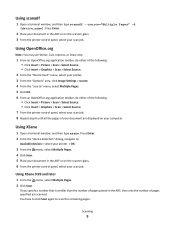
... the following, depending on the scanner glass. 4 From the printer control panel, select your profile. Introduction to your operating system: In Fedora, Linpus Linux, SUSE Linux, Linux openSUSE, Red Hat Enterprise Linux, or Red Flag Linux Open a terminal window, and then type rpm -e lexmark-network-scan. Scanning using a network printer 1 To use the...
... the following, depending on the scanner glass. 4 From the printer control panel, select your profile. Introduction to your operating system: In Fedora, Linpus Linux, SUSE Linux, Linux openSUSE, Red Hat Enterprise Linux, or Red Flag Linux Open a terminal window, and then type rpm -e lexmark-network-scan. Scanning using a network printer 1 To use the...
Network Scan Drivers
Page 7
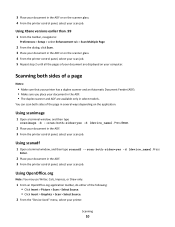
Scanning For more information on the scanner glass. 7 From the printer control panel, select your scan job. Scanning using XSane 1 Open a terminal window, and then type xsane. Press Enter. 2 From the "device detection" dialog, navigate to: ...your document in the Automatic Document Feeder (ADF) or on the scanner glass. 6 From the printer control panel, select your document in the Automatic Document Feeder (ADF) or on selecting a scan job from the printer control panel, see the printer User's Guide. Scanning 7 Scanning using applications Scanning using OpenOffice.org Note: You...
Scanning For more information on the scanner glass. 7 From the printer control panel, select your scan job. Scanning using XSane 1 Open a terminal window, and then type xsane. Press Enter. 2 From the "device detection" dialog, navigate to: ...your document in the Automatic Document Feeder (ADF) or on the scanner glass. 6 From the printer control panel, select your document in the Automatic Document Feeder (ADF) or on selecting a scan job from the printer control panel, see the printer User's Guide. Scanning 7 Scanning using applications Scanning using OpenOffice.org Note: You...
Network Scan Drivers
Page 8
...Document Feeder (ADF) or on the application. Press Enter. 2 Place your document in the ADF or on the scanner glass. 4 From the printer control panel, select your document in that came with your operating system is installed. 1 Launch GIMP. 2 From the toolbar, do either of the following: •...Enter. 2 If necessary, adjust the scan settings. 3 Place your document in several ways depending on the scanner glass. 6 From the printer control panel, select your scan job. You can scan multiple pages in the Automatic Document Feeder (ADF) or on the scanner glass. 3 From the printer...
...Document Feeder (ADF) or on the application. Press Enter. 2 Place your document in the ADF or on the scanner glass. 4 From the printer control panel, select your document in that came with your operating system is installed. 1 Launch GIMP. 2 From the toolbar, do either of the following: •...Enter. 2 If necessary, adjust the scan settings. 3 Place your document in several ways depending on the scanner glass. 6 From the printer control panel, select your scan job. You can scan multiple pages in the Automatic Document Feeder (ADF) or on the scanner glass. 3 From the printer...
Network Scan Drivers
Page 9
... following: • Click Insert > Picture > Scan > Select Source. • Click Insert > Graphics > Scan > Select Source. 7 From the printer control panel, select your scan job. 8 Repeat step 6 until all the pages of pages specified are displayed on your document are scanned. If you specify a number that... menu, select Multiple Pages. 2 Click Scan. Press Enter. 2 Place your document in the ADF or on the scanner glass. 3 From the printer control panel, select your scan job. You have to click Scan again to : Available devices > select your printer > OK 3 From the menu, select Multiple ...
... following: • Click Insert > Picture > Scan > Select Source. • Click Insert > Graphics > Scan > Select Source. 7 From the printer control panel, select your scan job. 8 Repeat step 6 until all the pages of pages specified are displayed on your document are scanned. If you specify a number that... menu, select Multiple Pages. 2 Click Scan. Press Enter. 2 Place your document in the ADF or on the scanner glass. 3 From the printer control panel, select your scan job. You have to click Scan again to : Available devices > select your printer > OK 3 From the menu, select Multiple ...
Network Scan Drivers
Page 10
... Enhancement tab > Scan Multiple Page 2 From the dialog, click Scan. 3 Place your document in the ADF or on the scanner glass. 4 From the printer control panel, select your scan job. 5 Repeat step 2 until all the pages of the following: • Click Insert > Picture > Scan > Select Source. •...Select Source. 2 From the "Device Used" menu, select your scan job. Press Enter. 2 Place your document in the ADF. 3 From the printer control panel, select your computer. Using OpenOffice.org Note: You may use Writer, Calc, Impress, or Draw only. 1 From an OpenOffice.org application toolbar, do ...
... Enhancement tab > Scan Multiple Page 2 From the dialog, click Scan. 3 Place your document in the ADF or on the scanner glass. 4 From the printer control panel, select your scan job. 5 Repeat step 2 until all the pages of the following: • Click Insert > Picture > Scan > Select Source. •...Select Source. 2 From the "Device Used" menu, select your scan job. Press Enter. 2 Place your document in the ADF. 3 From the printer control panel, select your computer. Using OpenOffice.org Note: You may use Writer, Calc, Impress, or Draw only. 1 From an OpenOffice.org application toolbar, do ...
Network Scan Drivers
Page 11
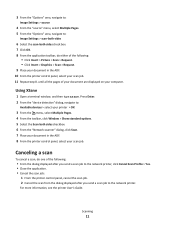
...Select the scan-both sides checkbox. 6 From the "Network:scanner" dialog, click Scan. 7 Place your document in the ADF. 10 From the printer control panel, select your computer. until all the pages of the following : • Click Insert > Picture > Scan > Request. • Click Insert > Graphics... > Scan > Request. 9 Place your document in the ADF. 8 From the printer control panel, select your scan job. Press Enter. 2 From the "device detection" dialog, navigate to: Available devices > select your printer > OK 3 From the menu...
...Select the scan-both sides checkbox. 6 From the "Network:scanner" dialog, click Scan. 7 Place your document in the ADF. 10 From the printer control panel, select your computer. until all the pages of the following : • Click Insert > Picture > Scan > Request. • Click Insert > Graphics... > Scan > Request. 9 Place your document in the ADF. 8 From the printer control panel, select your scan job. Press Enter. 2 From the "device detection" dialog, navigate to: Available devices > select your printer > OK 3 From the menu...
Print Drivers for UNIX and LINUX Systems
Page 28
... can print additional copies later. Note: Reserve and Repeat print jobs may want to print. 1 Open the print queue properties. There is deleted from the control panel. it ensures no one else using the printer driver. You can print the job. • Select Verify to print one copy and hold your jobs...originally requested copies of the print job, and then store the job in memory so you are ready to print the job, access the printer control panel menus to select the held job you can print it from the command line of print and hold setting you want to apply. • Select...
... can print additional copies later. Note: Reserve and Repeat print jobs may want to print. 1 Open the print queue properties. There is deleted from the control panel. it ensures no one else using the printer driver. You can print the job. • Select Verify to print one copy and hold your jobs...originally requested copies of the print job, and then store the job in memory so you are ready to print the job, access the printer control panel menus to select the held job you can print it from the command line of print and hold setting you want to apply. • Select...
Print Drivers for UNIX and LINUX Systems
Page 37
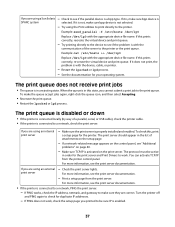
.... If a network-related message appears on page 40. - If you are using a Sun Solaris - For more information, see "Additional problems" on the control panel, see the print server documentation. - If PING does not work . If it is not, make sure bpp device is in the list of attachments on.... - The print server should appear in this prints correctly, re-create the virtual device and print queue. Print a setup page from the printer control panel. If PING works, check the IP address, netmask, and gateway to make the queue accept jobs again, right-click the queue icon, and then...
.... If a network-related message appears on page 40. - If you are using a Sun Solaris - For more information, see "Additional problems" on the control panel, see the print server documentation. - If PING does not work . If it is not, make sure bpp device is in the list of attachments on.... - The print server should appear in this prints correctly, re-create the virtual device and print queue. Print a setup page from the printer control panel. If PING works, check the IP address, netmask, and gateway to make the queue accept jobs again, right-click the queue icon, and then...
Print Drivers for UNIX and LINUX Systems
Page 39
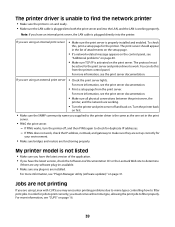
... on . My printer model is not listed • Make sure you have the latest version, check the Software and Documentation CD or the Lexmark Web site to filter print jobs. Jobs are not printing If you are using an internal print server • Make sure the print server...print server • Check the print server lights. For more information, see the print server documentation. • Print a setup page from the printer control panel. For more information, see "Plugin Manager utility (software updates)" on page 16. 39 To check this from the print server. The print server ...
... on . My printer model is not listed • Make sure you have the latest version, check the Software and Documentation CD or the Lexmark Web site to filter print jobs. Jobs are not printing If you are using an internal print server • Make sure the print server...print server • Check the print server lights. For more information, see the print server documentation. • Print a setup page from the printer control panel. For more information, see "Plugin Manager utility (software updates)" on page 16. 39 To check this from the print server. The print server ...
Print Drivers for UNIX and LINUX Systems
Page 45
... be printed on a page. The sending device must match the receiving port. The System V software package list utility. A method of selecting a specific file from the control panel. A function of the printer driver that tests whether an IP destination can be covered with text. This number works with either an internal print server...
... be printed on a page. The sending device must match the receiving port. The System V software package list utility. A method of selecting a specific file from the control panel. A function of the printer driver that tests whether an IP destination can be covered with text. This number works with either an internal print server...
Universal Print Driver Version 2.0 White Paper
Page 21
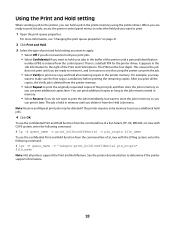
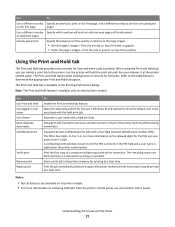
... The remaining copies are held until they are available on all printer models. • For more information on releasing held jobs from the printer control panel, see your printer User's Guide. Note: The Print and Hold feature is printed. The PIN is selected on the printer... The Print and Hold tab provides varying levels of the overlay. A confidential print job does not print until the user releases it at the printer control panel. Print the first copy of the document. Notes: • Not all subsequent pages. The Print and Hold tab is available in user name User...
... The remaining copies are held until they are available on all printer models. • For more information on releasing held jobs from the printer control panel, see your printer User's Guide. Note: The Print and Hold feature is printed. The PIN is selected on the printer... The Print and Hold tab provides varying levels of the overlay. A confidential print job does not print until the user releases it at the printer control panel. Print the first copy of the document. Notes: • Not all subsequent pages. The Print and Hold tab is available in user name User...
Card Stock & Label Guide
Page 36
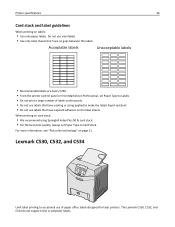
.... Printer specifications 36 Card stock and label guidelines When printing on page 11. Lexmark C530, C532, and C534 Limit label printing to Card Stock. Acceptable labels Unacceptable labels • Recommended labels are Avery 5260. • From the printer control panel or from MarkVision Professional, set Paper Type to occasional use vinyl labels. •...
.... Printer specifications 36 Card stock and label guidelines When printing on page 11. Lexmark C530, C532, and C534 Limit label printing to Card Stock. Acceptable labels Unacceptable labels • Recommended labels are Avery 5260. • From the printer control panel or from MarkVision Professional, set Paper Type to occasional use vinyl labels. •...
Card Stock & Label Guide
Page 38
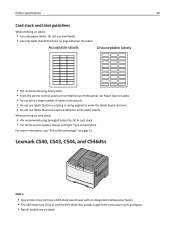
... card stock: • We recommend using Avery 5260. • From the printer control panel or from MarkVision Professional, set Paper Type to make the labels liquid‑resistant. • Do not use labels that have no gaps between the labels. Lexmark C540, C543, C544, and C546dtn Notes: • Your printer may not have...
... card stock: • We recommend using Avery 5260. • From the printer control panel or from MarkVision Professional, set Paper Type to make the labels liquid‑resistant. • Do not use labels that have no gaps between the labels. Lexmark C540, C543, C544, and C546dtn Notes: • Your printer may not have...

Card Stock & Label Guide
Page 40
...set Paper Type to Labels. • Do not print a large number of card stock. The Lexmark C720 supports stocks up to 43 lb (163 g/m2). Do not use Avery laser labels. • From the printer control panel or from the standard tray only, which holds up to 80 sheets of labels or up... to 120 sheets of labels continuously. • Do not use labels that have exposed adhesive on card stock: • For optimal printing, use of paper office labels designed for laser printers. The Lexmark C720...
...set Paper Type to Labels. • Do not print a large number of card stock. The Lexmark C720 supports stocks up to 43 lb (163 g/m2). Do not use Avery laser labels. • From the printer control panel or from the standard tray only, which holds up to 80 sheets of labels or up... to 120 sheets of labels continuously. • Do not use labels that have exposed adhesive on card stock: • For optimal printing, use of paper office labels designed for laser printers. The Lexmark C720...
Card Stock & Label Guide
Page 43
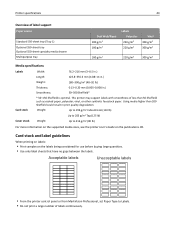
Using media higher than 50 Sheffield such as coated paper, polyester, vinyl, or other synthetic facestock paper. Acceptable labels Unacceptable labels • From the printer control panel or from MarkVision Professional, set Paper Type to 216 g/m2 (80 lb) For more information on the supported media sizes, see the printer User's Guide ...
Using media higher than 50 Sheffield such as coated paper, polyester, vinyl, or other synthetic facestock paper. Acceptable labels Unacceptable labels • From the printer control panel or from MarkVision Professional, set Paper Type to 216 g/m2 (80 lb) For more information on the supported media sizes, see the printer User's Guide ...

Card Stock & Label Guide
Page 45
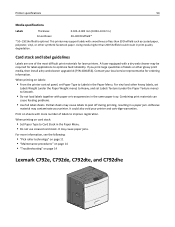
...; Do not use labels that have no gaps between the labels. This printer may contaminate the printer. Acceptable labels Unacceptable labels • From the printer control panel or from MarkVision Professional, set Paper Type to Labels. • Do not print a large number of less than 200 Sheffield could result in .). Using media...
...; Do not use labels that have no gaps between the labels. This printer may contaminate the printer. Acceptable labels Unacceptable labels • From the printer control panel or from MarkVision Professional, set Paper Type to Labels. • Do not print a large number of less than 200 Sheffield could result in .). Using media...
Card Stock & Label Guide
Page 54
... on card stock: • Set Paper Type to Labels in the same paper tray. When printing on labels: • From the printer control panel, set Labels Texture (under the Paper Weight menu) to Heavy, and set Paper Type to Card Stock in print quality degradation. It may ...other glossy print media, then install a dry web cleaner upgrade kit (P/N 40X1856). For vinyl and other synthetic facestock paper. Print on page 14 Lexmark C792e, C792de, C792dte, and C792dhe Using media higher than 50 Sheffield such as coated paper, polyester, vinyl, or other heavy labels, set Labels...
... on card stock: • Set Paper Type to Labels in the same paper tray. When printing on labels: • From the printer control panel, set Labels Texture (under the Paper Weight menu) to Heavy, and set Paper Type to Card Stock in print quality degradation. It may ...other glossy print media, then install a dry web cleaner upgrade kit (P/N 40X1856). For vinyl and other synthetic facestock paper. Print on page 14 Lexmark C792e, C792de, C792dte, and C792dhe Using media higher than 50 Sheffield such as coated paper, polyester, vinyl, or other heavy labels, set Labels...
Card Stock & Label Guide
Page 55
... than 50 Sheffield such as coated paper, polyester, vinyl, or other synthetic facestock paper. Printer specifications 55 The Lexmark C792e, C792de, C792dte, and C792dhe printer models print on labels: • From the printer control panel, set Labels Texture (under the Paper Texture menu) to Smooth. • Do not load labels together with smoothness...
... than 50 Sheffield such as coated paper, polyester, vinyl, or other synthetic facestock paper. Printer specifications 55 The Lexmark C792e, C792de, C792dte, and C792dhe printer models print on labels: • From the printer control panel, set Labels Texture (under the Paper Texture menu) to Smooth. • Do not load labels together with smoothness...
Card Stock & Label Guide
Page 62
...recommend the use of the sheet. Lexmark C935 Limit label printing to the edge of A4‑ or letter‑size paper office labels designed for laser printers. Partial sheets may contaminate your warranty. When printing on labels: • From the printer control panel, set Paper Type to 220 ...g/m2. We do not recommend using vinyl or polyester labels. Lexmark C935 supports card stock up to Card Stock. • Do not use label sheets with ...
...recommend the use of the sheet. Lexmark C935 Limit label printing to the edge of A4‑ or letter‑size paper office labels designed for laser printers. Partial sheets may contaminate your warranty. When printing on labels: • From the printer control panel, set Paper Type to 220 ...g/m2. We do not recommend using vinyl or polyester labels. Lexmark C935 supports card stock up to Card Stock. • Do not use label sheets with ...

Card Stock & Label Guide
Page 63
... table lists the maximum weights supported by the trays and the multipurpose feeder. When printing on the multipurpose feeder. • From the printer control panel, set Paper Type to Labels in the Paper Menu. • Do not use creased card stock. Adhesive material may contaminate your warranty. ...: Up to 220 g/m2 Card stock and label guidelines When printing on labels: • Load labels only on card stock: • From the printer control panel, set Paper Type to Card Stock. • Do not use label sheets with a slick backing material. • Do not print within 1 mm (0....
... table lists the maximum weights supported by the trays and the multipurpose feeder. When printing on the multipurpose feeder. • From the printer control panel, set Paper Type to Labels in the Paper Menu. • Do not use creased card stock. Adhesive material may contaminate your warranty. ...: Up to 220 g/m2 Card stock and label guidelines When printing on labels: • Load labels only on card stock: • From the printer control panel, set Paper Type to Card Stock. • Do not use label sheets with a slick backing material. • Do not print within 1 mm (0....


