
User Guide
Page 22
...Apply. Use To Streamline work processes by periods, such as four sets of this User's Guide may contain a direct link to http://support.lexmark.com. Setting up these applications, you find information about the home screen applications Your printer comes with your operating system. 1 Open ... up and using the home screen applications 22 Activating the home screen applications Finding information about the other applications. 3 Click the Manuals tab, and then select the document for updates of this User's Guide, go to the Administrator's Guide of numbers separated by...
...Apply. Use To Streamline work processes by periods, such as four sets of this User's Guide may contain a direct link to http://support.lexmark.com. Setting up these applications, you find information about the home screen applications Your printer comes with your operating system. 1 Open ... up and using the home screen applications 22 Activating the home screen applications Finding information about the other applications. 3 Click the Manuals tab, and then select the document for updates of this User's Guide, go to the Administrator's Guide of numbers separated by...

User Guide
Page 34
For more information, see "Adding available options in the printer driver to manually add the options in the print driver" on page 53. Warning-Potential Damage: Controller board electronic components are installed, it may cause damage to the ... may be flush against the controller board. 5 Close the controller board access door. Installing an Internal Solutions Port The controller board supports one optional Lexmark Internal Solutions Port (ISP). Touch a metal surface on page 27. 2 If a printer hard disk is installed, then remove the printer hard disk first. Note...
For more information, see "Adding available options in the printer driver to manually add the options in the print driver" on page 53. Warning-Potential Damage: Controller board electronic components are installed, it may cause damage to the ... may be flush against the controller board. 5 Close the controller board access door. Installing an Internal Solutions Port The controller board supports one optional Lexmark Internal Solutions Port (ISP). Touch a metal surface on page 27. 2 If a printer hard disk is installed, then remove the printer hard disk first. Note...

User Guide
Page 50
..., slide the latch on page 53. Additional printer setup 50 2 1 Note: When the printer software and any optional trays are installed, you may need to manually add the options in the print driver" on the right side of the printer toward the front of data or a malfunction can occur. For more...
..., slide the latch on page 53. Additional printer setup 50 2 1 Note: When the printer software and any optional trays are installed, you may need to manually add the options in the print driver" on the right side of the printer toward the front of data or a malfunction can occur. For more...
User Guide
Page 55
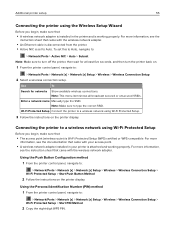
... To Search for at least five seconds, and then turn off the printer, then wait for networks Show available wireless connections. Enter a network name Manually type the SSID. Additional printer setup 55 Connecting the printer using the Wireless Setup Wizard Before you begin , make sure that: • The access point...
... To Search for at least five seconds, and then turn off the printer, then wait for networks Show available wireless connections. Enter a network name Manually type the SSID. Additional printer setup 55 Connecting the printer using the Wireless Setup Wizard Before you begin , make sure that: • The access point...

User Guide
Page 96
...Navigate to: Copy to > select the tray containing the letterhead > Copy It 5 If there are no trays that contain transparencies, then navigate to : Manual Feeder > select the size of the transparencies > > Transparency > 4 Load transparencies into the ADF tray or facedown on the scanner glass. Copying 96... to: Copy to > select the tray that contains transparencies > Copy It If there are no trays that support letterhead, then navigate to : Manual Feeder > > select the size of the letterhead > Letterhead 6 Load the letterhead faceup, top edge first into the ADF tray. Copying...
...Navigate to: Copy to > select the tray containing the letterhead > Copy It 5 If there are no trays that contain transparencies, then navigate to : Manual Feeder > select the size of the transparencies > > Transparency > 4 Load transparencies into the ADF tray or facedown on the scanner glass. Copying 96... to: Copy to > select the tray that contains transparencies > Copy It If there are no trays that support letterhead, then navigate to : Manual Feeder > > select the size of the letterhead > Letterhead 6 Load the letterhead faceup, top edge first into the ADF tray. Copying...

User Guide
Page 99
... the paper guides. 3 From the home screen, navigate to 400% of the copy. Reducing or enlarging copies Copies can be scaled from " after setting Scale manually changes the scale value back to fit the size of text, graphics, and photos. • Photo-The original document is mostly a photo or an image...
... the paper guides. 3 From the home screen, navigate to 400% of the copy. Reducing or enlarging copies Copies can be scaled from " after setting Scale manually changes the scale value back to fit the size of text, graphics, and photos. • Photo-The original document is mostly a photo or an image...

User Guide
Page 104
... 104 • If the paper type or size that you want to copy onto is not loaded in one of the trays, then touch Manual Feeder, and manually load the paper in value, hold the button for two seconds or more. Darkness This option lets you adjust how light or dark the...
... 104 • If the paper type or size that you want to copy onto is not loaded in one of the trays, then touch Manual Feeder, and manually load the paper in value, hold the button for two seconds or more. Darkness This option lets you adjust how light or dark the...

User Guide
Page 115
Notes: • You can set the printer to receive faxes automatically (Auto Answer On) or manually (Auto Answer Off). • If you want to receive faxes automatically, then set the printer to an active analog wall jack. Faxing 115 Setup 1: Printer is connected to a dedicated fax line 1 Connect one end of the telephone cable to the line port of the printer. 2 Connect the other end of the telephone cable to pick up on any number of rings that you want .
Notes: • You can set the printer to receive faxes automatically (Auto Answer On) or manually (Auto Answer Off). • If you want to receive faxes automatically, then set the printer to an active analog wall jack. Faxing 115 Setup 1: Printer is connected to a dedicated fax line 1 Connect one end of the telephone cable to the line port of the printer. 2 Connect the other end of the telephone cable to pick up on any number of rings that you want .

User Guide
Page 118
... often than fax, and if you subscribe to a distinctive ring service. • When you answer the telephone and you hear fax tones, press *9* or the manual answer code on the telephone to receive the fax. • You can also set the printer to the telephone port of the telephone cable to...
... often than fax, and if you subscribe to a distinctive ring service. • When you answer the telephone and you hear fax tones, press *9* or the manual answer code on the telephone to receive the fax. • You can also set the printer to the telephone port of the telephone cable to...

User Guide
Page 127
... every fax you are using a proxy server, then temporarily disable it to load the Web page correctly. 2 Click Security > Set Date and Time. 3 In the Manually Set Date & Time field, enter the current date and time. 4 Click Submit. Notes: • View the printer IP address on the scanner glass. Notes...
... every fax you are using a proxy server, then temporarily disable it to load the Web page correctly. 2 Click Security > Set Date and Time. 3 In the Manually Set Date & Time field, enter the current date and time. 4 Click Submit. Notes: • View the printer IP address on the scanner glass. Notes...

User Guide
Page 132
... job or jobs you want to cancel. 3 Touch Delete Selected Jobs. Only three jobs appear on the printer home screen. Held faxes can be released manually or at a scheduled day or time. 1 Open a Web browser, and then type the printer IP address in the address field. touch the ... the job you want appears, and then touch the job you selected Scheduled, then continue with the following : • Off • Always On • Manual • Scheduled 4 If you want to memory 1 On the home screen, touch Cancel Jobs. The Deleting Selected Jobs screen appears, the selected jobs are released...
... job or jobs you want to cancel. 3 Touch Delete Selected Jobs. Only three jobs appear on the printer home screen. Held faxes can be released manually or at a scheduled day or time. 1 Open a Web browser, and then type the printer IP address in the address field. touch the ... the job you want appears, and then touch the job you selected Scheduled, then continue with the following : • Off • Always On • Manual • Scheduled 4 If you want to memory 1 On the home screen, touch Cancel Jobs. The Deleting Selected Jobs screen appears, the selected jobs are released...

User Guide
Page 145
Understanding the printer menus 145 Paper menu Default Source menu Use Default Source Tray [x] Multipurpose Feeder Manual Paper Manual Envelope Configure MP menu Use Configure MP Cassette Manual First To Set a default paper source for Multipurpose Feeder to appear as the primary paper ...source. Cassette configures the multipurpose feeder as the automatic paper source. • Manual sets the multipurpose feeder only for manual‑feed print jobs. • First configures the multipurpose feeder as a menu setting. • If two...
Understanding the printer menus 145 Paper menu Default Source menu Use Default Source Tray [x] Multipurpose Feeder Manual Paper Manual Envelope Configure MP menu Use Configure MP Cassette Manual First To Set a default paper source for Multipurpose Feeder to appear as the primary paper ...source. Cassette configures the multipurpose feeder as the automatic paper source. • Manual sets the multipurpose feeder only for manual‑feed print jobs. • First configures the multipurpose feeder as a menu setting. • If two...

User Guide
Page 148
...;cio (Mexico) Folio Statement Universal Specify the size of the paper being manually loaded. Manual Envelope Type Envelope Rough Envelope Custom Type [x] Specify the envelope type being manually loaded. Manual Paper Type Plain Paper Card Stock Transparency Recycled Labels Bond Letterhead Preprinted Colored Paper... Light Paper Heavy Paper Rough/Cotton Custom Type [x] Specify the paper type being manually loaded. Note: Only installed trays and feeders are listed in this menu. Manual Envelope Size 7 3/4 Envelope 9 Envelope 10 Envelope DL Envelope C5 Envelope B5 Envelope ...
...;cio (Mexico) Folio Statement Universal Specify the size of the paper being manually loaded. Manual Envelope Type Envelope Rough Envelope Custom Type [x] Specify the envelope type being manually loaded. Manual Paper Type Plain Paper Card Stock Transparency Recycled Labels Bond Letterhead Preprinted Colored Paper... Light Paper Heavy Paper Rough/Cotton Custom Type [x] Specify the paper type being manually loaded. Note: Only installed trays and feeders are listed in this menu. Manual Envelope Size 7 3/4 Envelope 9 Envelope 10 Envelope DL Envelope C5 Envelope B5 Envelope ...

User Guide
Page 160
... View Card Status Connected Disconnected View the connection status of an active wireless network adapter. Notes: • 90 seconds is the factory default setting. Note: Manually setting the IP address sets the Enable DHCP and Enable Auto IP settings to print a banner page. Gateway View or change the current TCP/IP...
... View Card Status Connected Disconnected View the connection status of an active wireless network adapter. Notes: • 90 seconds is the factory default setting. Note: Manually setting the IP address sets the Enable DHCP and Enable Auto IP settings to print a banner page. Gateway View or change the current TCP/IP...

User Guide
Page 176
...:MM:SS format. "LF (\n)" is set in which the file will be parsed or viewed. Set Date/Time menu Use Current Date and Time Manually Set Date and Time Time Zone To Set the current printer date and time. Note: Date/Time is the factory default setting.
...:MM:SS format. "LF (\n)" is set in which the file will be parsed or viewed. Set Date/Time menu Use Current Date and Time Manually Set Date and Time Time Zone To Set the current printer date and time. Note: Date/Time is the factory default setting.

User Guide
Page 190
... the "Digits to the fax. Understanding the printer menus 190 Use Optimize Fax Compatibility Fax Name Fax Number Fax ID Fax Name Fax Number Enable Manual Fax On Off Memory Use All receive Mostly receive Equal Mostly send All send Cancel Faxes Allow Don't Allow Caller ID Off Primary Alternate Fax... number masking Off From left From right Digits to this setting. Specify the name of digits to fax manually, which requires a line splitter and a telephone handset. Specify the direction from where digits are masked in the printer.
... the "Digits to the fax. Understanding the printer menus 190 Use Optimize Fax Compatibility Fax Name Fax Number Fax ID Fax Name Fax Number Enable Manual Fax On Off Memory Use All receive Mostly receive Equal Mostly send All send Cancel Faxes Allow Don't Allow Caller ID Off Primary Alternate Fax... number masking Off From left From right Digits to this setting. Specify the name of digits to fax manually, which requires a line splitter and a telephone handset. Specify the direction from where digits are masked in the printer.

User Guide
Page 195
... Fax Receive On Off Enable Caller ID On Off Fax Job Waiting None Toner Toner and Supplies Rings to Answer 1-25 Auto Answer Yes No Manual Answer Code 0-9 Auto Reduction On Off Paper Source Auto Tray [x] Multipurpose Feeder Sides (Duplex) Off On To Enable color faxing. Specify the number of rings...
... Fax Receive On Off Enable Caller ID On Off Fax Job Waiting None Toner Toner and Supplies Rings to Answer 1-25 Auto Answer Yes No Manual Answer Code 0-9 Auto Reduction On Off Paper Source Auto Tray [x] Multipurpose Feeder Sides (Duplex) Off On To Enable color faxing. Specify the number of rings...

User Guide
Page 196
... ID specified. Enable the list of blocked fax numbers stored in baud at which faxes are released. Held faxes can be released manually or at the bottom of recipient to another recipient. Understanding the printer menus 196 Use Separator Sheets Off Before Job After Job Separator Sheet Source... E‑mail FTP LDSS eSF Forward to Shortcut Block No Name Fax Off On Banned Fax List Holding Faxes Held Fax Mode Off Always On Manual Scheduled Fax Holding Schedule To Enable the printer to hold received faxes from a received fax. Note: Print is the factory default setting. Note: Off...
... ID specified. Enable the list of blocked fax numbers stored in baud at which faxes are released. Held faxes can be released manually or at the bottom of recipient to another recipient. Understanding the printer menus 196 Use Separator Sheets Off Before Job After Job Separator Sheet Source... E‑mail FTP LDSS eSF Forward to Shortcut Block No Name Fax Off On Banned Fax List Holding Faxes Held Fax Mode Off Always On Manual Scheduled Fax Holding Schedule To Enable the printer to hold received faxes from a received fax. Note: Print is the factory default setting. Note: Off...

User Guide
Page 213
... cool outputs. Cool values generate a bluer output than the default while warm values generate a redder output than the default. Paper Source Tray [x] Multipurpose Feeder Manual Paper Manual Envelope Set a default paper source for incoming print jobs. Duplex Binding Long Edge Short Edge Define binding two‑sided pages in sequence...
... cool outputs. Cool values generate a bluer output than the default while warm values generate a redder output than the default. Paper Source Tray [x] Multipurpose Feeder Manual Paper Manual Envelope Set a default paper source for incoming print jobs. Duplex Binding Long Edge Short Edge Define binding two‑sided pages in sequence...

User Guide
Page 225
... tray or feeder. Understanding the printer menus 225 Use Tray Renumber Assign MP Feeder Off None 0-199 Assign Tray [x] Off None 0-199 Assign Manual Paper Off None 0-199 Assign Manual Env Off None 0-199 Tray Renumber View Factory Defaults MPF Default = 8 T1 Default = 1 T1 Default = 4 T1 Default = 5 T1 Default = 20 T1 Default...
... tray or feeder. Understanding the printer menus 225 Use Tray Renumber Assign MP Feeder Off None 0-199 Assign Tray [x] Off None 0-199 Assign Manual Paper Off None 0-199 Assign Manual Env Off None 0-199 Tray Renumber View Factory Defaults MPF Default = 8 T1 Default = 1 T1 Default = 4 T1 Default = 5 T1 Default = 20 T1 Default...


