
User Guide
Page 61
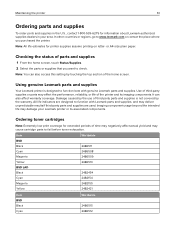
...you purchased the printer. Checking the status of the home screen. Ordering toner cartridges Note: Extremely low print coverage for extended periods of third-party parts and supplies is designed to function best with Lexmark parts and supplies, and may cause cartridge parts to check. Note: ... third-party supplies or parts may damage your area. In other countries or regions, go to www.lexmark.com or contact the place where you want to fail before toner exhaustion. Maintaining the printer 61 Ordering parts and supplies To order parts and supplies in the U.S., contact...
...you purchased the printer. Checking the status of the home screen. Ordering toner cartridges Note: Extremely low print coverage for extended periods of third-party parts and supplies is designed to function best with Lexmark parts and supplies, and may cause cartridge parts to check. Note: ... third-party supplies or parts may damage your area. In other countries or regions, go to www.lexmark.com or contact the place where you want to fail before toner exhaustion. Maintaining the printer 61 Ordering parts and supplies To order parts and supplies in the U.S., contact...
User Guide
Page 63
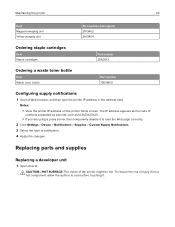
... Item Magenta imaging unit Yellow imaging unit All countries and regions 21K3402 21K3404 Ordering staple cartridges Item Staple cartridges Part number 25A0013 Ordering a waste toner bottle Item Waste toner bottle Part number 72K0W00 Configuring supply notifications 1 Open a Web browser, and then type the printer IP address in the...
... Item Magenta imaging unit Yellow imaging unit All countries and regions 21K3402 21K3404 Ordering staple cartridges Item Staple cartridges Part number 25A0013 Ordering a waste toner bottle Item Waste toner bottle Part number 72K0W00 Configuring supply notifications 1 Open a Web browser, and then type the printer IP address in the...

User Guide
Page 64
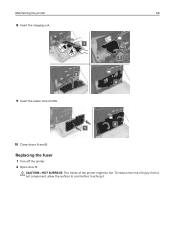
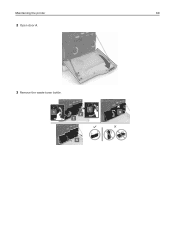
Maintaining the printer 64 2 Open door A. 3 Remove the waste toner bottle.
Maintaining the printer 64 2 Open door A. 3 Remove the waste toner bottle.
User Guide
Page 66
CAUTION-HOT SURFACE: The inside of injury from a hot component, allow the surface to cool before touching it. To reduce the risk of the printer might be hot. Replacing the fuser 1 Turn off the printer. 2 Open door B. Maintaining the printer 66 8 Insert the imaging unit. 9 Insert the waste toner bottle. 10 Close doors A and B.
CAUTION-HOT SURFACE: The inside of injury from a hot component, allow the surface to cool before touching it. To reduce the risk of the printer might be hot. Replacing the fuser 1 Turn off the printer. 2 Open door B. Maintaining the printer 66 8 Insert the imaging unit. 9 Insert the waste toner bottle. 10 Close doors A and B.
User Guide
Page 69
Maintaining the printer 69 2 Open door A. 3 Remove the waste toner bottle.
Maintaining the printer 69 2 Open door A. 3 Remove the waste toner bottle.
User Guide
Page 71
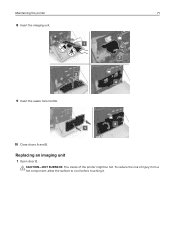
Replacing an imaging unit 1 Open door B. To reduce the risk of the printer might be hot. Maintaining the printer 71 8 Insert the imaging unit. 9 Insert the waste toner bottle. 10 Close doors A and B. CAUTION-HOT SURFACE: The inside of injury from a hot component, allow the surface to cool before touching it.
Replacing an imaging unit 1 Open door B. To reduce the risk of the printer might be hot. Maintaining the printer 71 8 Insert the imaging unit. 9 Insert the waste toner bottle. 10 Close doors A and B. CAUTION-HOT SURFACE: The inside of injury from a hot component, allow the surface to cool before touching it.
User Guide
Page 72
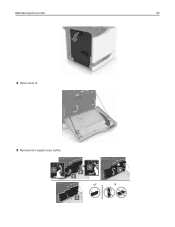
Maintaining the printer 72 2 Open door A. 3 Remove the waste toner bottle.
Maintaining the printer 72 2 Open door A. 3 Remove the waste toner bottle.
User Guide
Page 74
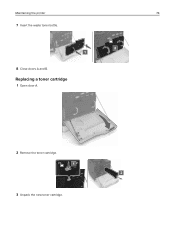
Replacing a toner cartridge 1 Open door A. 2 Remove the toner cartridge. 3 Unpack the new toner cartridge. Maintaining the printer 74 7 Insert the waste toner bottle. 8 Close doors A and B.
Replacing a toner cartridge 1 Open door A. 2 Remove the toner cartridge. 3 Unpack the new toner cartridge. Maintaining the printer 74 7 Insert the waste toner bottle. 8 Close doors A and B.
User Guide
Page 75
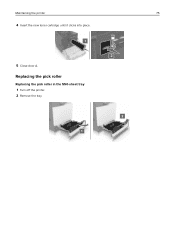
Replacing the pick roller Replacing the pick roller in the 550‑sheet tray 1 Turn off the printer. 2 Remove the tray. Maintaining the printer 75 4 Insert the new toner cartridge until it clicks into place. 5 Close door A.
Replacing the pick roller Replacing the pick roller in the 550‑sheet tray 1 Turn off the printer. 2 Remove the tray. Maintaining the printer 75 4 Insert the new toner cartridge until it clicks into place. 5 Close door A.
User Guide
Page 81
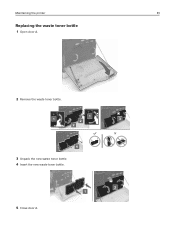
Maintaining the printer 81 Replacing the waste toner bottle 1 Open door A. 2 Remove the waste toner bottle. 3 Unpack the new waste toner bottle. 4 Insert the new waste toner bottle. 5 Close door A.
Maintaining the printer 81 Replacing the waste toner bottle 1 Open door A. 2 Remove the waste toner bottle. 3 Unpack the new waste toner bottle. 4 Insert the new waste toner bottle. 5 Close door A.
User Guide
Page 83
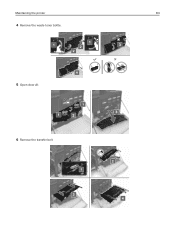
Maintaining the printer 83 4 Remove the waste toner bottle. 5 Open door A1. 6 Remove the transfer belt.
Maintaining the printer 83 4 Remove the waste toner bottle. 5 Open door A1. 6 Remove the transfer belt.
User Guide
Page 85
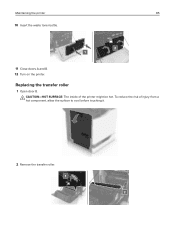
CAUTION-HOT SURFACE: The inside of injury from a hot component, allow the surface to cool before touching it. 2 Remove the transfer roller. Maintaining the printer 85 10 Insert the waste toner bottle. 11 Close doors A and B. 12 Turn on the printer. To reduce the risk of the printer might be hot. Replacing the transfer roller 1 Open door B.
CAUTION-HOT SURFACE: The inside of injury from a hot component, allow the surface to cool before touching it. 2 Remove the transfer roller. Maintaining the printer 85 10 Insert the waste toner bottle. 11 Close doors A and B. 12 Turn on the printer. To reduce the risk of the printer might be hot. Replacing the transfer roller 1 Open door B.
User Guide
Page 141
... control panel. Is the print still too dark? Are you are printing on. b Resend the print job. Step 2 a Depending on your operating system, reduce the toner darkness from a fresh package. The problem is solved. b Resend the print job. settings to use it. Step 5 a Load paper from the Printing Preferences or Print...
... control panel. Is the print still too dark? Are you are printing on. b Resend the print job. Step 2 a Depending on your operating system, reduce the toner darkness from a fresh package. The problem is solved. b Resend the print job. settings to use it. Step 5 a Load paper from the Printing Preferences or Print...

User Guide
Page 143
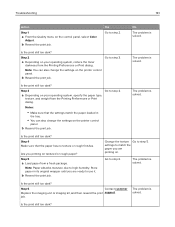
Troubleshooting 143 Action Yes Step 1 a Depending on your operating system, decrease the toner darkness from the Printing Preferences or Print dialog. a Depending on your operating system, specify the tray or feeder from the Printing Preferences or Print dialog. ...
Troubleshooting 143 Action Yes Step 1 a Depending on your operating system, decrease the toner darkness from the Printing Preferences or Print dialog. a Depending on your operating system, specify the tray or feeder from the Printing Preferences or Print dialog. ...
User Guide
Page 147
... print job. The problem is solved. Is the print still too light? Note: You can also change the settings on your operating system, increase the toner darkness from the Printing Preferences or Print dialog. Change the texture Go to step 4. a Depending on the printer control panel. b Resend the print job. Is...
... print job. The problem is solved. Is the print still too light? Note: You can also change the settings on your operating system, increase the toner darkness from the Printing Preferences or Print dialog. Change the texture Go to step 4. a Depending on the printer control panel. b Resend the print job. Is...

User Guide
Page 152
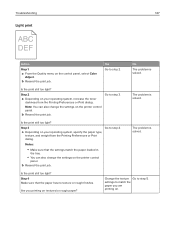
... dialog. Action Yes Replace the imaging unit or imaging kit, and then resend the print Contact customer job. Yes Contact customer support. Troubleshooting Toner easily rubs off ? Does the toner still rub off ABC DEF Leading edge Trailing edge Action 1 Depending on the printer control panel. 2 Resend the print job. Extended exposure...
... dialog. Action Yes Replace the imaging unit or imaging kit, and then resend the print Contact customer job. Yes Contact customer support. Troubleshooting Toner easily rubs off ? Does the toner still rub off ABC DEF Leading edge Trailing edge Action 1 Depending on the printer control panel. 2 Resend the print job. Extended exposure...

User Guide
Page 156
... tray. • You can also change the settings on the correct paper? The problem is solved. Color quality problems Adjusting toner darkness 1 From the home screen, touch Settings > Print > Quality. 2 Adjust the toner darkness. 3 Apply the changes. Is the document printed from the wrong tray or on the wrong paper Action Step...
... tray. • You can also change the settings on the correct paper? The problem is solved. Color quality problems Adjusting toner darkness 1 From the home screen, touch Settings > Print > Quality. 2 Adjust the toner darkness. 3 Apply the changes. Is the document printed from the wrong tray or on the wrong paper Action Step...
User Guide
Page 157
...to create all incoming color formats. • sRGB Display-Produces an output that approximates the colors displayed on a computer monitor. Black toner usage is a method of describing colors by indicating the amount of neutral gray. • sRGB Vivid-Provides an increased color saturation for...‑True Black-Produces an output that approximates the colors displayed on a computer monitor. Cyan, magenta, yellow, and black inks or toners can be added in nature. For more saturated colors and may be printed? Computer screens, scanners, and digital cameras use this manner....
...to create all incoming color formats. • sRGB Display-Produces an output that approximates the colors displayed on a computer monitor. Black toner usage is a method of describing colors by indicating the amount of neutral gray. • sRGB Vivid-Provides an increased color saturation for...‑True Black-Produces an output that approximates the colors displayed on a computer monitor. Cyan, magenta, yellow, and black inks or toners can be added in nature. For more saturated colors and may be printed? Computer screens, scanners, and digital cameras use this manner....
User Guide
Page 158
When printing a document, information describing the type and color of each box is translated into the appropriate amounts of cyan, magenta, yellow, and black toner used to produce the color you can identify the box with RGB or CMYK combinations, then the Color Samples pages are also available from the ...
When printing a document, information describing the type and color of each box is translated into the appropriate amounts of cyan, magenta, yellow, and black toner used to produce the color you can identify the box with RGB or CMYK combinations, then the Color Samples pages are also available from the ...
User Guide
Page 161
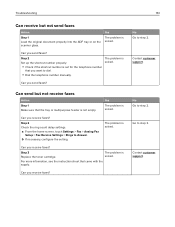
The problem is solved. Step 2 Check the ring count delay settings. No Go to step 3. Contact customer support. Can you receive faxes? Step 3 Replace the toner cartridge. Yes The problem is solved. The problem is solved. Can you receive faxes? Go to step 2. Contact customer support. Can you send faxes? Yes ...
The problem is solved. Step 2 Check the ring count delay settings. No Go to step 3. Contact customer support. Can you receive faxes? Step 3 Replace the toner cartridge. Yes The problem is solved. The problem is solved. Can you receive faxes? Go to step 2. Contact customer support. Can you send faxes? Yes ...

