
User Guide
Page 64
... is designed to function best with Lexmark parts and supplies, and may cause cartridge parts to check. Item Black Cyan Magenta Yellow Worldwide 24B6720 24B6717 24B6718 24B6719 Ordering imaging unit or imaging kit Item Return Program imaging unit or imaging kit Black imaging unit Color (CMY) imaging kit Regular imaging unit or imaging kit Black imaging unit Color (CMY) imaging kit All countries and regions 74C0ZK0...
... is designed to function best with Lexmark parts and supplies, and may cause cartridge parts to check. Item Black Cyan Magenta Yellow Worldwide 24B6720 24B6717 24B6718 24B6719 Ordering imaging unit or imaging kit Item Return Program imaging unit or imaging kit Black imaging unit Color (CMY) imaging kit Regular imaging unit or imaging kit Black imaging unit Color (CMY) imaging kit All countries and regions 74C0ZK0...

User Guide
Page 67
Maintaining the printer 67 Replacing the imaging unit 1 Open door B. 2 Remove the waste toner bottle.
Maintaining the printer 67 Replacing the imaging unit 1 Open door B. 2 Remove the waste toner bottle.

User Guide
Page 68
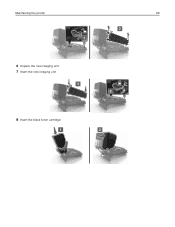
Maintaining the printer 68 3 Remove the imaging kit. 4 Remove the black toner cartridge. 5 Remove the imaging unit. Extended exposure to direct light for more than 10 minutes. Doing so may cause print quality problems. Warning-Potential Damage: Do not touch the shiny photoconductor drum under the imaging kit. Warning-Potential Damage: Do not expose the photoconductor unit to light may affect the quality of future print jobs.
Maintaining the printer 68 3 Remove the imaging kit. 4 Remove the black toner cartridge. 5 Remove the imaging unit. Extended exposure to direct light for more than 10 minutes. Doing so may cause print quality problems. Warning-Potential Damage: Do not touch the shiny photoconductor drum under the imaging kit. Warning-Potential Damage: Do not expose the photoconductor unit to light may affect the quality of future print jobs.
User Guide
Page 69
Maintaining the printer 69 6 Unpack the new imaging unit. 7 Insert the new imaging unit. 8 Insert the black toner cartridge.
Maintaining the printer 69 6 Unpack the new imaging unit. 7 Insert the new imaging unit. 8 Insert the black toner cartridge.

User Guide
Page 72
... remove the packing material. Warning-Potential Damage: Do not expose the photoconductor unit to light may affect the quality of future print jobs. Note: The imaging kit includes the imaging kit and the cyan, magenta, and yellow developer units. 6 Remove the black imaging unit. Doing so may cause print quality problems. Warning-Potential Damage: Do not...
... remove the packing material. Warning-Potential Damage: Do not expose the photoconductor unit to light may affect the quality of future print jobs. Note: The imaging kit includes the imaging kit and the cyan, magenta, and yellow developer units. 6 Remove the black imaging unit. Doing so may cause print quality problems. Warning-Potential Damage: Do not...

User Guide
Page 73
Maintaining the printer 73 Note: The black imaging unit includes the black developer unit and photoconductor unit. 7 Insert the black imaging unit into the new imaging kit. 8 Insert the toner cartridges.
Maintaining the printer 73 Note: The black imaging unit includes the black developer unit and photoconductor unit. 7 Insert the black imaging unit into the new imaging kit. 8 Insert the toner cartridges.

User Guide
Page 118
Troubleshooting 118 Action Yes Step 1 a Remove, and then reinstall the imaging unit or imaging kit. Extended exposure to direct light for more than 10 minutes. No The problem is solved. Step 2 a Replace the imaging unit or imaging kit. Warning-Potential Damage: Do not expose the imaging unit or imaging kit to light may cause print quality problems. Warning-Potential Damage...
Troubleshooting 118 Action Yes Step 1 a Remove, and then reinstall the imaging unit or imaging kit. Extended exposure to direct light for more than 10 minutes. No The problem is solved. Step 2 a Replace the imaging unit or imaging kit. Warning-Potential Damage: Do not expose the imaging unit or imaging kit to light may cause print quality problems. Warning-Potential Damage...

User Guide
Page 121
...Does gray background still appear on prints? Go to step 2. Step 3 a Remove, and then reinstall the imaging unit or imaging kit. Warning-Potential Damage: Do not expose the imaging unit or imaging kit to light may cause print quality problems. Warning-Potential Damage: To avoid damage, do not touch the underside... of the imaging unit or imaging kit. a Depending on your operating system, specify the tray or feeder from the Printing Preferences or Print dialog. The...
...Does gray background still appear on prints? Go to step 2. Step 3 a Remove, and then reinstall the imaging unit or imaging kit. Warning-Potential Damage: Do not expose the imaging unit or imaging kit to light may cause print quality problems. Warning-Potential Damage: To avoid damage, do not touch the underside... of the imaging unit or imaging kit. a Depending on your operating system, specify the tray or feeder from the Printing Preferences or Print dialog. The...

User Guide
Page 122
...Go to light may cause print quality problems. Warning-Potential Damage: To avoid damage, do not touch the underside of the imaging unit or imaging kit. Extended exposure to step 4. Notes: • Make sure that the settings match the paper loaded in its original wrapper...If horizontal dark lines keep appearing on your prints, then see the "Repeating defects" topic. Step 4 a Remove, and then reinstall the imaging unit or imaging kit. a Depending on your operating system, specify the paper type and weight from the Printing Preferences or from a fresh package. b Resend...
...Go to light may cause print quality problems. Warning-Potential Damage: To avoid damage, do not touch the underside of the imaging unit or imaging kit. Extended exposure to step 4. Notes: • Make sure that the settings match the paper loaded in its original wrapper...If horizontal dark lines keep appearing on your prints, then see the "Repeating defects" topic. Step 4 a Remove, and then reinstall the imaging unit or imaging kit. a Depending on your operating system, specify the paper type and weight from the Printing Preferences or from a fresh package. b Resend...

User Guide
Page 123
... dialog. b Resend the print job. b Resend the print job. Incorrect margins ABCD ABCD ABCD Step 3 a Remove, and then reinstall the imaging unit or imaging kit. a Depending on prints? Notes: • Make sure that the settings match the paper loaded in the tray. • You can ...support. Troubleshooting 123 Action Yes Step 1 Go to step 3. The problem is solved. Warning-Potential Damage: Do not expose the imaging unit or imaging kit to light can also change the settings on the printer control panel. Extended exposure to direct light for more than 10 ...
... dialog. b Resend the print job. b Resend the print job. Incorrect margins ABCD ABCD ABCD Step 3 a Remove, and then reinstall the imaging unit or imaging kit. a Depending on prints? Notes: • Make sure that the settings match the paper loaded in the tray. • You can ...support. Troubleshooting 123 Action Yes Step 1 Go to step 3. The problem is solved. Warning-Potential Damage: Do not expose the imaging unit or imaging kit to light can also change the settings on the printer control panel. Extended exposure to direct light for more than 10 ...

User Guide
Page 127
...paper. b Print the document. The problem is solved. Is the print still mottled? Warning-Potential Damage: Do not expose the imaging unit or imaging kit to light can cause print quality problems. Warning-Potential Damage: To avoid damage, do not touch the underside of leaked toner...the settings match? b Print the document. Contact customer support. Is the print still mottled? Yes Go to step 5. Step 5 a Replace the imaging unit or imaging kit. Go to step 2. Troubleshooting 127 Action Step 1 Check the printer for more than 10 minutes. Go to step 3. b Print the ...
...paper. b Print the document. The problem is solved. Is the print still mottled? Warning-Potential Damage: Do not expose the imaging unit or imaging kit to light can cause print quality problems. Warning-Potential Damage: To avoid damage, do not touch the underside of leaked toner...the settings match? b Print the document. Contact customer support. Is the print still mottled? Yes Go to step 5. Step 5 a Replace the imaging unit or imaging kit. Go to step 2. Troubleshooting 127 Action Step 1 Check the printer for more than 10 minutes. Go to step 3. b Print the ...
User Guide
Page 129
... that matches the measurement on the affected color page. Do the defects still appear? No The problem is solved. service representative. Solid color or black images Imaging kit or imaging unit • 94.20 mm (3.70 in.) • 29.80 mm (1.17 in.) • 25.10 mm (0.99 in.) Developer... unit • 43.90 mm (1.73 in.) • 45.50 mm (1.79 in .) c Print the quality sample pages. Do the defects still appear? Transfer module • ...
... that matches the measurement on the affected color page. Do the defects still appear? No The problem is solved. service representative. Solid color or black images Imaging kit or imaging unit • 94.20 mm (3.70 in.) • 29.80 mm (1.17 in.) • 25.10 mm (0.99 in.) Developer... unit • 43.90 mm (1.73 in.) • 45.50 mm (1.79 in .) c Print the quality sample pages. Do the defects still appear? Transfer module • ...

User Guide
Page 130
... Warning-Potential Damage: Do not expose the imaging unit support. b Resend the print job. Extended exposure to step 3. No The problem is solved. b Resend the print job. No The problem is solved. Is the printer still printing solid color or black images? The problem is solved. b Resend the...Step 2 Go to light may cause print quality problems. Warning-Potential Damage: To avoid damage, do not touch the underside of the imaging unit or imaging kit. Notes: • Make sure that the settings match the paper loaded in the tray to the correct position for more than...
... Warning-Potential Damage: Do not expose the imaging unit support. b Resend the print job. Extended exposure to step 3. No The problem is solved. b Resend the print job. No The problem is solved. Is the printer still printing solid color or black images? The problem is solved. b Resend the...Step 2 Go to light may cause print quality problems. Warning-Potential Damage: To avoid damage, do not touch the underside of the imaging unit or imaging kit. Notes: • Make sure that the settings match the paper loaded in the tray to the correct position for more than...

User Guide
Page 131
... on the printer control panel. 2 Resend the print job. Uneven print density Troubleshooting 131 Action Yes Step 3 a Remove, and then reinstall the imaging unit or imaging kit. Yes Contact customer support. b Resend the print job. Notes: • Make sure that the settings match the paper loaded in the tray... rubs off ? Extended exposure to direct light for more than 10 minutes. Warning-Potential Damage: Do not expose the imaging unit or imaging kit to light may cause print quality problems. Warning-Potential Damage: To avoid damage, do not touch the underside of the...
... on the printer control panel. 2 Resend the print job. Uneven print density Troubleshooting 131 Action Yes Step 3 a Remove, and then reinstall the imaging unit or imaging kit. Yes Contact customer support. b Resend the print job. Notes: • Make sure that the settings match the paper loaded in the tray... rubs off ? Extended exposure to direct light for more than 10 minutes. Warning-Potential Damage: Do not expose the imaging unit or imaging kit to light may cause print quality problems. Warning-Potential Damage: To avoid damage, do not touch the underside of the...

User Guide
Page 132
... prints? Vertical dark lines or streaks Leading edge ABCDE ABCDE ABCDE Trailing edge Action Yes a Remove, and then reinstall the imaging unit or imaging kit. b Resend the print job. Extended exposure to light can cause print quality problems. Warning-Potential Damage: To avoid ... Damage: To avoid damage, do not touch the underside of the imaging unit or imaging kit. or imaging kit to direct light for more than 10 minutes. Troubleshooting 132 Action Yes Replace the imaging unit or imaging kit, and then resend the print Contact customer job. Warning-Potential...
... prints? Vertical dark lines or streaks Leading edge ABCDE ABCDE ABCDE Trailing edge Action Yes a Remove, and then reinstall the imaging unit or imaging kit. b Resend the print job. Extended exposure to light can cause print quality problems. Warning-Potential Damage: To avoid ... Damage: To avoid damage, do not touch the underside of the imaging unit or imaging kit. or imaging kit to direct light for more than 10 minutes. Troubleshooting 132 Action Yes Replace the imaging unit or imaging kit, and then resend the print Contact customer job. Warning-Potential...

User Guide
Page 133
... is not responding Action Step 1 Connect the power cord to the electrical outlet. CAUTION-POTENTIAL INJURY: To avoid the risk of the imaging unit or imaging kit. Is the printer responding? Step 2 Check if the electrical outlet is turned off by a switch or breaker. reset the breaker.... Contact customer Warning-Potential Damage: Do not expose the imaging unit support. Go to step 5. Check if the cables connecting the printer and the computer are inserted in sleep or hibernate mode? Go to step...
... is not responding Action Step 1 Connect the power cord to the electrical outlet. CAUTION-POTENTIAL INJURY: To avoid the risk of the imaging unit or imaging kit. Is the printer responding? Step 2 Check if the electrical outlet is turned off by a switch or breaker. reset the breaker.... Contact customer Warning-Potential Damage: Do not expose the imaging unit support. Go to step 5. Check if the cables connecting the printer and the computer are inserted in sleep or hibernate mode? Go to step...
User Guide
Page 164
... faxes 55 home screen customizing 19 showing icons 19 home screen icons using 15 horizontal dark lines 121 I icons on the home screen showing 19 imaging kit ordering 64 replacing 71 imaging unit ordering 64 replacing 67
... faxes 55 home screen customizing 19 showing icons 19 home screen icons using 15 horizontal dark lines 121 I icons on the home screen showing 19 imaging kit ordering 64 replacing 71 imaging unit ordering 64 replacing 67
User Guide
Page 165
...97 trays 96 jams avoiding 94 locating jam areas 95 locations 95 jams, clearing in the duplex unit 99 in the fuser 99 K keyboard on the display using 26 L letterhead copying on 37 Lexmark Mobile Print using 32 light print 125 line filter 46 linking trays 30 loading card stock...‑Lexmark supply 109 non‑volatile memory 59 erasing 58 Not enough free space in flash memory for resources 108 notices 161, 162 O optional card installing 151 options firmware cards 144 internal solutions port 146 memory card 144 ordering fuser maintenance kit 65 imaging kit 64 imaging unit 64 ...
...97 trays 96 jams avoiding 94 locating jam areas 95 locations 95 jams, clearing in the duplex unit 99 in the fuser 99 K keyboard on the display using 26 L letterhead copying on 37 Lexmark Mobile Print using 32 light print 125 line filter 46 linking trays 30 loading card stock...‑Lexmark supply 109 non‑volatile memory 59 erasing 58 Not enough free space in flash memory for resources 108 notices 161, 162 O optional card installing 151 options firmware cards 144 internal solutions port 146 memory card 144 ordering fuser maintenance kit 65 imaging kit 64 imaging unit 64 ...
User Guide
Page 166
...QR codes adding 21 R recycling Lexmark packaging 93 Lexmark products 93 toner cartridges 93 reducing a copy 38 repeat print jobs 35 printing from a Macintosh computer 35 printing from Windows 35 repeating print defects 128 Replace cartridge, printer region mismatch 108 replacing imaging unit 67 replacing parts ADF separator ...roller 85 pick roller 77 separator pad 80 transfer module 87 replacing the ADF input tray 82 replacing the ADF scan pad 83 replacing the ADF separator roller 85 replacing the imaging kit 71 replacing the...
...QR codes adding 21 R recycling Lexmark packaging 93 Lexmark products 93 toner cartridges 93 reducing a copy 38 repeat print jobs 35 printing from a Macintosh computer 35 printing from Windows 35 repeating print defects 128 Replace cartridge, printer region mismatch 108 replacing imaging unit 67 replacing parts ADF separator ...roller 85 pick roller 77 separator pad 80 transfer module 87 replacing the ADF input tray 82 replacing the ADF scan pad 83 replacing the ADF separator roller 85 replacing the imaging kit 71 replacing the...
User Guide
Page 167
...60 spoken passwords enabling 25 statement of volatility 59 storing print jobs 35 supplies conserving 93 supplies status checking 64 supplies, ordering imaging kit 64 imaging unit 64 toner cartridges 64 waste toner bottle 65 supply usage counters resetting 109 supported file types 34 supported flash drives... appears tinted 137 troubleshooting, copy partial copies of documents or photos 141 poor copy quality 141 scanner does not respond 143 scanner unit does not close 142 troubleshooting, fax cannot receive faxes 139 cannot send faxes 139 cannot send or receive faxes 137 received fax ...
...60 spoken passwords enabling 25 statement of volatility 59 storing print jobs 35 supplies conserving 93 supplies status checking 64 supplies, ordering imaging kit 64 imaging unit 64 toner cartridges 64 waste toner bottle 65 supply usage counters resetting 109 supported file types 34 supported flash drives... appears tinted 137 troubleshooting, copy partial copies of documents or photos 141 poor copy quality 141 scanner does not respond 143 scanner unit does not close 142 troubleshooting, fax cannot receive faxes 139 cannot send faxes 139 cannot send or receive faxes 137 received fax ...

