Quick Reference
Page 1
...(If duplexing is on next to the Duplex setting you cancel a fax, the control panel resets to the scan destination. 5 Press Go/Send. ©Copyright Lexmark International, Inc., 2002. Press Menu > again until you see SCAN → FAX in the automatic feeder or on the flatbed. 4 Use one of the... flatbed of paper. Tips • If you see Cancel fax, then press Select. Send a fax 1 Place your scan profile. 2 Locate the network-attached MFP you want to fax: a Press Fax/Scan Mode repeatedly until you see Enter Phone # in the automatic feeder or on the flatbed. 2 Use one sheet...
...(If duplexing is on next to the Duplex setting you cancel a fax, the control panel resets to the scan destination. 5 Press Go/Send. ©Copyright Lexmark International, Inc., 2002. Press Menu > again until you see SCAN → FAX in the automatic feeder or on the flatbed. 4 Use one of the... flatbed of paper. Tips • If you see Cancel fax, then press Select. Send a fax 1 Place your scan profile. 2 Locate the network-attached MFP you want to fax: a Press Fax/Scan Mode repeatedly until you see Enter Phone # in the automatic feeder or on the flatbed. 2 Use one sheet...
Quick Reference
Page 2
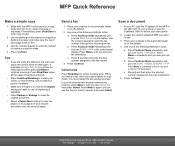
... paper. Return takes you move through copy, fax, and network scan modes. Network scan modes must be configured to redial the last outgoing fax number. MFP Quick Reference Collation/ Finishing Paper saver Duplex Content text mixed Copy media Fax resolution Reduce Enlarge plain paper fine transparency super fine photo other ultra...
... paper. Return takes you move through copy, fax, and network scan modes. Network scan modes must be configured to redial the last outgoing fax number. MFP Quick Reference Collation/ Finishing Paper saver Duplex Content text mixed Copy media Fax resolution Reduce Enlarge plain paper fine transparency super fine photo other ultra...
User's Reference
Page 1
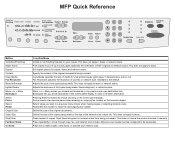
3100, 3200 MFP options User's Guide 3100 3200 October 2002 Click here for Quick Reference www.lexmark.com
3100, 3200 MFP options User's Guide 3100 3200 October 2002 Click here for Quick Reference www.lexmark.com
User's Reference
Page 3
... a scan to e-mail profile 16 Scan to permanent e-mail destinations 17 Chapter 5: Scanning to FTP 18 Scan to an FTP destination 18 Chapter 6: Using the MFP control panel 19 Button and menu key 19 Function modes 22 Contents iii
... a scan to e-mail profile 16 Scan to permanent e-mail destinations 17 Chapter 5: Scanning to FTP 18 Scan to an FTP destination 18 Chapter 6: Using the MFP control panel 19 Button and menu key 19 Function modes 22 Contents iii
User's Reference
Page 4
Chapter 7: Customizing your MFP configuration 23 Customize copy settings 23 Restore factory default settings 23 Manually set basic fax information 24 Create permanent fax destinations 25 Change fax send ...
Chapter 7: Customizing your MFP configuration 23 Customize copy settings 23 Restore factory default settings 23 Manually set basic fax information 24 Create permanent fax destinations 25 Change fax send ...
User's Reference
Page 6
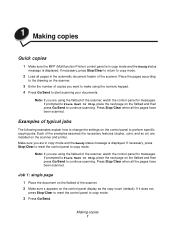
..., press Stop/Clear to reset the control panel to copy mode. 2 Load all the pages have been scanned. 1 Making copies Quick copies 1 Make sure the MFP (Multifunction Printer) control panel is in copy mode and the Ready status message is displayed. Press Stop/Clear when all pages in the automatic document...
..., press Stop/Clear to reset the control panel to copy mode. 2 Load all the pages have been scanned. 1 Making copies Quick copies 1 Make sure the MFP (Multifunction Printer) control panel is in copy mode and the Ready status message is displayed. Press Stop/Clear when all pages in the automatic document...
User's Reference
Page 13
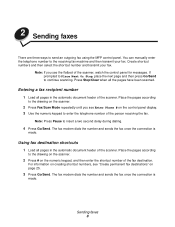
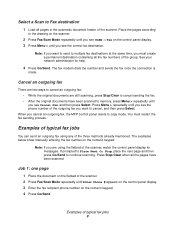
... faxes There are three ways to insert a two second delay during dialing. 4 Press Go/Send. Note: Press Pause to send an outgoing fax using the MFP control panel. Using fax destination shortcuts 1 Load all pages in the automatic document feeder of the fax destination. If prompted to Place Next Or Stop...
... faxes There are three ways to insert a two second delay during dialing. 4 Press Go/Send. Note: Press Pause to send an outgoing fax using the MFP control panel. Using fax destination shortcuts 1 Load all pages in the automatic document feeder of the fax destination. If prompted to Place Next Or Stop...
User's Reference
Page 14
... press Select. Press Stop/Clear when all the fax numbers of the scanner. 2 Press Fax/Scan Mode repeatedly until you cancel an outgoing fax, the MFP control panel resets to copy mode. Job 1: one page 1 Place the document on the numeric keypad. See your network administrator for messages. Select a Scan to...
... press Select. Press Stop/Clear when all the fax numbers of the scanner. 2 Press Fax/Scan Mode repeatedly until you cancel an outgoing fax, the MFP control panel resets to copy mode. Job 1: one page 1 Place the document on the numeric keypad. See your network administrator for messages. Select a Scan to...
User's Reference
Page 17
...If you installed the software using the default directories, click Start, Programs, Lexmark, MFP, and then ScanBack Utility. 2 Select the MFP you want to those settings. Step 2: Scan your original documents 1 Locate the MFP you want to save this group of output you specified in the automatic document...If none are determined by the capabilities of the MFP you want to PC profiles. if you select. 4 Make sure to e-mail profiles. Lexmark™ ScanBack™ Utility is shipped on the scanner. You must select at least one MFP to continue creating a profile. 3 Follow the ...
...If you installed the software using the default directories, click Start, Programs, Lexmark, MFP, and then ScanBack Utility. 2 Select the MFP you want to those settings. Step 2: Scan your original documents 1 Locate the MFP you want to save this group of output you specified in the automatic document...If none are determined by the capabilities of the MFP you want to PC profiles. if you select. 4 Make sure to e-mail profiles. Lexmark™ ScanBack™ Utility is shipped on the scanner. You must select at least one MFP to continue creating a profile. 3 Follow the ...
User's Reference
Page 18
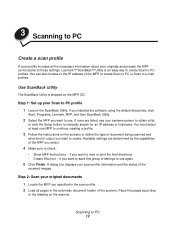
... 1 Specify a path and file name for messages. A Receiving Image window appears on your desktop indicating that appears in the SCAN → PROFILE list on the MFP control panel. 3 Click Submit. Step 3: Scan your computer. Create a scan profile 13 Note: If you specified in the scan profile. 2 Load all the ...pages have been scanned. 6 Return to your original documents 1 Locate the MFP you are stored on your MFP. Step 1: Set up your scan profile 1 Type the IP address of the MFP in the URL field of the scanner, watch the control panel for saving the scan output file...
... 1 Specify a path and file name for messages. A Receiving Image window appears on your desktop indicating that appears in the SCAN → PROFILE list on the MFP control panel. 3 Click Submit. Step 3: Scan your computer. Create a scan profile 13 Note: If you specified in the scan profile. 2 Load all the ...pages have been scanned. 6 Return to your original documents 1 Locate the MFP you are stored on your MFP. Step 1: Set up your scan profile 1 Type the IP address of the MFP in the URL field of the scanner, watch the control panel for saving the scan output file...
User's Reference
Page 20
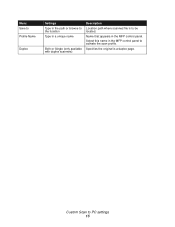
Custom Scan to activate the scan profile. Name that appears in a unique name Both or Single (only available with duplex scanners) Description Location path where scanned file is a duplex page. Specifies the original is to be located. Menu Save to Profile Name Duplex Settings Type in the path or browse to the location Type in the MFP control panel. Select this name in the MFP control panel to PC settings 15
Custom Scan to activate the scan profile. Name that appears in a unique name Both or Single (only available with duplex scanners) Description Location path where scanned file is a duplex page. Specifies the original is to be located. Menu Save to Profile Name Duplex Settings Type in the path or browse to the location Type in the MFP control panel. Select this name in the MFP control panel to PC settings 15
User's Reference
Page 21
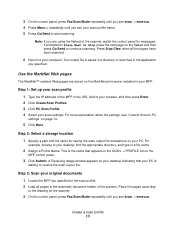
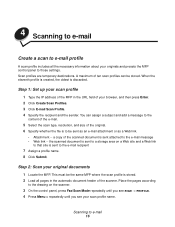
... is sent to the e-mail recipient 7 Assign a profile name. 8 Click Submit. Step 1: Set up your scan profile 1 Type the IP address of the MFP in the automatic document feeder of your scan profile name. the scanned document is sent to a storage area on the scanner. 3 On the control panel...type, resolution, and size of the original. 6 Specify whether the file is stored. 2 Load all the necessary information about your original documents 1 Locate the MFP. Place the pages according to the drawing on a Web site and a Web link to that site is sent attached to the e-mail message • ...
... is sent to the e-mail recipient 7 Assign a profile name. 8 Click Submit. Step 1: Set up your scan profile 1 Type the IP address of the MFP in the automatic document feeder of your scan profile name. the scanned document is sent to a storage area on the scanner. 3 On the control panel...type, resolution, and size of the original. 6 Specify whether the file is stored. 2 Load all the necessary information about your original documents 1 Locate the MFP. Place the pages according to the drawing on a Web site and a Web link to that site is sent attached to the e-mail message • ...
User's Reference
Page 22
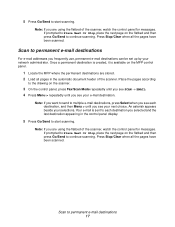
... is sent to each destination, and then Menu > until you see your network administrator. Place the pages according to the drawing on the MFP control panel. 1 Locate the MFP where the permanent destinations are stored. 2 Load all the pages have been scanned. An asterisk appears beside your next choice. Press Stop/Clear...
... is sent to each destination, and then Menu > until you see your network administrator. Place the pages according to the drawing on the MFP control panel. 1 Locate the MFP where the permanent destinations are stored. 2 Load all the pages have been scanned. An asterisk appears beside your next choice. Press Stop/Clear...

User's Reference
Page 23
... FTP server: rome.gre.kidnet.bigcity.com Directory: web/scans Save Scan File (s) pic2000-03-13_131942.pdf Scanning to FTP 18 This must be the MFP configured with your systems person, the name of the destination becomes available as a network scanning choice in the automatic document feeder of the scanner, watch...
... FTP server: rome.gre.kidnet.bigcity.com Directory: web/scans Save Scan File (s) pic2000-03-13_131942.pdf Scanning to FTP 18 This must be the MFP configured with your systems person, the name of the destination becomes available as a network scanning choice in the automatic document feeder of the scanner, watch...
User's Reference
Page 24
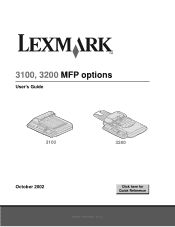
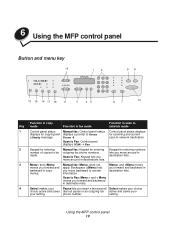
Scan to Fax: Keypad lets you move around in made. 6 Using the MFP control panel Button and menu key 12 1 2 98 13 15 14 17 16 11 3 45 6 7 10 Function in copy Key mode Function in fax mode ...
Scan to Fax: Keypad lets you move around in made. 6 Using the MFP control panel Button and menu key 12 1 2 98 13 15 14 17 16 11 3 45 6 7 10 Function in copy Key mode Function in fax mode ...
User's Reference
Page 27
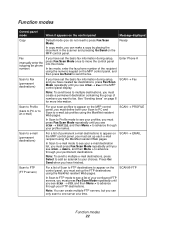
... scan to one server at a time. See "Sending faxes" on page 8 for more information. Note: You can make a copy by placing the document in the MFP control panel display. Enter Phone # Scan to Fax (permanent destinations) If you have set the basic fax information during setup, press Fax/Scan Mode once... panel. SCAN → EMAIL Scan to FTP (FTP servers) For a list of the recipient using the numeric keypad on the MFP control panel, and then press Go/Send to your FTP destinations. SCAN ® FTP Function modes 22 Function modes Control panel mode When it appears ...
... scan to one server at a time. See "Sending faxes" on page 8 for more information. Note: You can make a copy by placing the document in the MFP control panel display. Enter Phone # Scan to Fax (permanent destinations) If you have set the basic fax information during setup, press Fax/Scan Mode once... panel. SCAN → EMAIL Scan to FTP (FTP servers) For a list of the recipient using the numeric keypad on the MFP control panel, and then press Go/Send to your FTP destinations. SCAN ® FTP Function modes 22 Function modes Control panel mode When it appears ...
User's Reference
Page 28
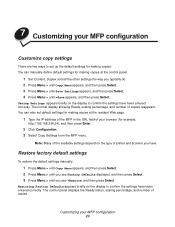
... scaling percentage, and number of copies. The control panel displays the Ready status, scaling percentage, and number of copies reappears. 7 Customizing your MFP configuration Customize copy settings There are two ways to set default settings for making copies at the resident Web page. 1 Type the IP address of... the MFP in the URL field of printer and scanner you see Factory Defaults displayed, and then press Select. 3 Press Menu > until you see =...
... scaling percentage, and number of copies. The control panel displays the Ready status, scaling percentage, and number of copies reappears. 7 Customizing your MFP configuration Customize copy settings There are two ways to set default settings for making copies at the resident Web page. 1 Type the IP address of... the MFP in the URL field of printer and scanner you see Factory Defaults displayed, and then press Select. 3 Press Menu > until you see =...
User's Reference
Page 29
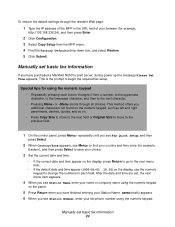
To restore the default settings through the resident Web page: 1 Type the IP address of the MFP in each button changes it from the MFP menu. 4 Find the Factory Defaults drop-down box, and select Restore. 5 Click Submit. Special tips for using the numeric keypad • Repeatedly pressing each field. ...
To restore the default settings through the resident Web page: 1 Type the IP address of the MFP in each button changes it from the MFP menu. 4 Find the Factory Defaults drop-down box, and select Restore. 5 Click Submit. Special tips for using the numeric keypad • Repeatedly pressing each field. ...
User's Reference
Page 30
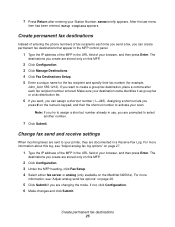
... group fax destination, place a comma after entering your scan. If you are stored only on page 27. 1 Type the IP address of the MFP in the URL field of your printer, they are prompted to your browser, and then press Enter. 7 Press Return after each time you send ...a fax, you are documented in a Receive Fax Log. For more information, see "Adjust analog fax log options" on this MFP. 2 Click Configuration. 3 Click Manage Destinations. 4 Click Fax Destinations Setup. 5 Enter a unique name for the fax recipient and specify their fax number (for...
... group fax destination, place a comma after entering your scan. If you are stored only on page 27. 1 Type the IP address of the MFP in the URL field of your printer, they are prompted to your browser, and then press Enter. 7 Press Return after each time you send ...a fax, you are documented in a Receive Fax Log. For more information, see "Adjust analog fax log options" on this MFP. 2 Click Configuration. 3 Click Manage Destinations. 4 Click Fax Destinations Setup. 5 Enter a unique name for the fax recipient and specify their fax number (for...
User's Reference
Page 32
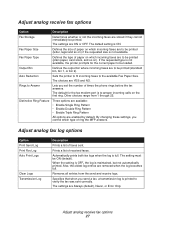
... changing these settings, you control which type of received faxes. Automatically prints both fax logs when the log is ON. Prints a list of ring the MFP answers. Also, the oldest log entries are Always (default), Never, or Error Only. Rings to Answer Lets you send a fax, a transmission log is to be...
... changing these settings, you control which type of received faxes. Automatically prints both fax logs when the log is ON. Prints a list of ring the MFP answers. Also, the oldest log entries are Always (default), Never, or Error Only. Rings to Answer Lets you send a fax, a transmission log is to be...


