
Forms and Bar Code Card User's Guide
Page 13
...string in the toolbar. Generating bar code data Visual Bar Code Designer generates the PCL escape sequences, PCL HEX, or PostScript command sequences for scanning. • For additional information, click the Visual Bar Code Designer Help menu, or see the Forms and Bar Code Card Technical Reference Manual... Designer. 3 Double-click the bar code symbology you want from the Designer subdirectory. 3 Review and accept the license agreement. 4 Select the folder where you want to generate the bar code. Using the Visual Bar Code Designer 13 These data can be printed by clicking the Print icon...
...string in the toolbar. Generating bar code data Visual Bar Code Designer generates the PCL escape sequences, PCL HEX, or PostScript command sequences for scanning. • For additional information, click the Visual Bar Code Designer Help menu, or see the Forms and Bar Code Card Technical Reference Manual... Designer. 3 Double-click the bar code symbology you want from the Designer subdirectory. 3 Review and accept the license agreement. 4 Select the folder where you want to generate the bar code. Using the Visual Bar Code Designer 13 These data can be printed by clicking the Print icon...
Lexmark Document Distributor
Page 32
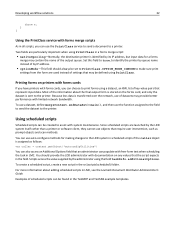
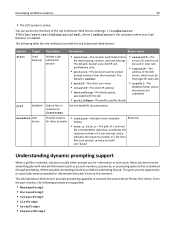
.... To create a scheduled script, create a new script in LMC, see the Lexmark Document Distributor Administrator's Guide. For more information about the final output form is stored... with documentation on the forms card, and only the dataset is assigned as prompt objects and scan methods. Developing workflow solutions 32 throw e; } } Using the PrintClass service with forms merge ...over the network, use of the information about adding scheduled scripts in the src\scripts\scheduled\ folder. Because less data is identified by the LDD system itself rather than a printer or software...
.... To create a scheduled script, create a new script in LMC, see the Lexmark Document Distributor Administrator's Guide. For more information about the final output form is stored... with documentation on the forms card, and only the dataset is assigned as prompt objects and scan methods. Developing workflow solutions 32 throw e; } } Using the PrintClass service with forms merge ...over the network, use of the information about adding scheduled scripts in the src\scripts\scheduled\ folder. Because less data is identified by the LDD system itself rather than a printer or software...
Lexmark Document Distributor
Page 35
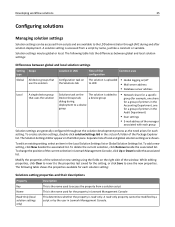
... local. To change the position of the current selection in the src\conf\ folder of the window. Developing workflow solutions 35 Configuring solutions Managing solution settings Solution settings... that use the solution Local A single device group that uses the solution Location in Lexmark Management Console. To add a new setting, click New beside the associated list. While...group (for example, one share for a group of printers in the Audit Department) • Scan settings • E‑mail address of local and global solution settings are shown. The Solution ...
... local. To change the position of the current selection in the src\conf\ folder of the window. Developing workflow solutions 35 Configuring solutions Managing solution settings Solution settings... that use the solution Local A single device group that uses the solution Location in Lexmark Management Console. To add a new setting, click New beside the associated list. While...group (for example, one share for a group of printers in the Audit Department) • Scan settings • E‑mail address of local and global solution settings are shown. The Solution ...

Lexmark Document Distributor
Page 37
...policy also manages the default profile buttons, shortcut number, access control number, scan settings, and eSF applications associated with the solution, double‑click devicePolicy.ldd in the src\conf\ folder of the solution development process, since existing scripts are shown for Name, ...Task, No Scan, Profile buttons, Shortcut Number, Access Control Number, and Settings. To add a new profile...
...policy also manages the default profile buttons, shortcut number, access control number, scan settings, and eSF applications associated with the solution, double‑click devicePolicy.ldd in the src\conf\ folder of the solution development process, since existing scripts are shown for Name, ...Task, No Scan, Profile buttons, Shortcut Number, Access Control Number, and Settings. To add a new profile...
Lexmark Document Distributor
Page 48
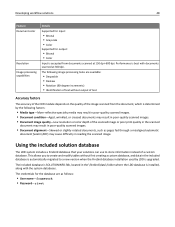
...; Color Input is accepted from the document, which is determined by LDD is installed, along with documents scanned at 150 dpi-600 dpi. This allows you to create and modify tables without output of text Accuracy ...factors The accuracy of the OCR module depends on the quality of the image scanned from documents scanned at 300 dpi. Using the included solution database The LDD system includes a Firebird database that your...; Identification of text without first creating a custom database, and data in the \firebird\data\ folder where the LDD database is upgraded.
...; Color Input is accepted from the document, which is determined by LDD is installed, along with documents scanned at 150 dpi-600 dpi. This allows you to create and modify tables without output of text Accuracy ...factors The accuracy of the OCR module depends on the quality of the image scanned from documents scanned at 300 dpi. Using the included solution database The LDD system includes a Firebird database that your...; Identification of text without first creating a custom database, and data in the \firebird\data\ folder where the LDD database is upgraded.
Lexmark Document Distributor
Page 50
...submitting jobs with related information (such as account numbers, passwords, or processing options) that scan prompt. This gives you for later calls • scanUrl-The WebDAV folder where documents are submitted post WebDAV Submit files in the WebDAV repository. From the port ...interface of a scanned file in response to determine the device group, solution, and task settings. The following prompts are both zero‑based. Understanding dynamic prompting support When a profile is selected, solutions usually either prompt you the opportunity to Lexmark Document Server Printer...
...submitting jobs with related information (such as account numbers, passwords, or processing options) that scan prompt. This gives you for later calls • scanUrl-The WebDAV folder where documents are submitted post WebDAV Submit files in the WebDAV repository. From the port ...interface of a scanned file in response to determine the device group, solution, and task settings. The following prompts are both zero‑based. Understanding dynamic prompting support When a profile is selected, solutions usually either prompt you the opportunity to Lexmark Document Server Printer...
Lexmark Document Distributor
Page 53
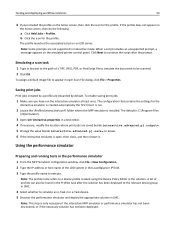
...advanced.pj.output=. 5 Change the value beside interactive.advanced.pj.save= to a device profile created using the Device Policy Editor in each Scan File dialog, click File > Properties. The configuration that contains the settings for the profile. Testing and deploying workflow solutions 53 6 If... you have run . 2 Locate the \Profiles\interactive\conf\ folder where the MFP emulator is only necessary if the interactive MFP emulator or performance simulator has not been discovered, or if the necessary ...
...advanced.pj.output=. 5 Change the value beside interactive.advanced.pj.save= to a device profile created using the Device Policy Editor in each Scan File dialog, click File > Properties. The configuration that contains the settings for the profile. Testing and deploying workflow solutions 53 6 If... you have run . 2 Locate the \Profiles\interactive\conf\ folder where the MFP emulator is only necessary if the interactive MFP emulator or performance simulator has not been discovered, or if the necessary ...
Lexmark Document Distributor
Page 56
...specified for basic.addressRange is run without specifying multiple addresses) basic.readTimeout The timeout in milliseconds for reading data from the folder specified false in the started) local computer. If true, then the changed using the delimiter property. false basic.useRandomFileFromDirectory... e‑Task 2 printers. Note: The delimiter used in milliseconds for LDD 4.x. basic.randomFileDirectoryPath Specifies the folder where image files for scans can be used from the LDD system 360000 basic.connectionTimeout The timeout in the list can be false for...
...specified for basic.addressRange is run without specifying multiple addresses) basic.readTimeout The timeout in milliseconds for reading data from the folder specified false in the started) local computer. If true, then the changed using the delimiter property. false basic.useRandomFileFromDirectory... e‑Task 2 printers. Note: The delimiter used in milliseconds for LDD 4.x. basic.randomFileDirectoryPath Specifies the folder where image files for scans can be used from the LDD system 360000 basic.connectionTimeout The timeout in the list can be false for...
Lexmark Document Distributor
Page 57
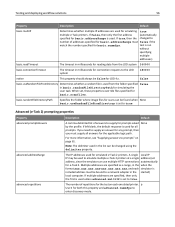
... advanced.useSecureWebdav Determines whether WebDAV communication with ldd the LDD system. advanced.randomFileDirectoryPath Specifies the folder where image files for the first prompt in simulating scan None tasks. advanced.scanfilesN The TIFF, JPEG, PDF, or PostScript files to use in...submitted together for the test. advanced.multiIP Determines whether multiple IP addresses are only used from the folder false specified in milliseconds allowed for scans can contain a comma‑delimited list of printers to emulate more than 250 printers. advanced.webdavUsername ...
... advanced.useSecureWebdav Determines whether WebDAV communication with ldd the LDD system. advanced.randomFileDirectoryPath Specifies the folder where image files for the first prompt in simulating scan None tasks. advanced.scanfilesN The TIFF, JPEG, PDF, or PostScript files to use in...submitted together for the test. advanced.multiIP Determines whether multiple IP addresses are only used from the folder false specified in milliseconds allowed for scans can contain a comma‑delimited list of printers to emulate more than 250 printers. advanced.webdavUsername ...
Lexmark Document Distributor
Page 58
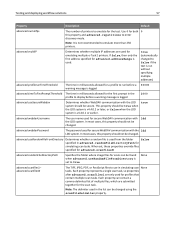
....linfo.name The profile name associated with ${CurrentTestProfile.profileName} the scan task. The default, which simulated print The /Profiles/CurrentTestProfile/conf/dat jobs should usually remain set . basic.pj.output The folder in which (This refers to the profileName property in the Simulator... refers to the profile that is run for Properties table.) the test, should be saved a/PrintJobs folder where the MFP emulator and performance simulator are installed basic.pj.ext The file extension of pages for Simulator Properties table.) ...
....linfo.name The profile name associated with ${CurrentTestProfile.profileName} the scan task. The default, which simulated print The /Profiles/CurrentTestProfile/conf/dat jobs should usually remain set . basic.pj.output The folder in which (This refers to the profileName property in the Simulator... refers to the profile that is run for Properties table.) the test, should be saved a/PrintJobs folder where the MFP emulator and performance simulator are installed basic.pj.ext The file extension of pages for Simulator Properties table.) ...
Lexmark Document Distributor
Page 63
...folder. 6 Select Simulation. Note: JConsole is running, select com.lexmark.workflow.simulator.App from the list of processes on the Local tab. The default location for JConsole is C:\Program Files\Java\jdk\bin\jconsole.exe. 2 While a performance simulator test is installed with the Java SE Development Kit. Answers for scan...is started after the "Connect to monitor and modify a running test profile. 5 For e‑Task 2, expand the Advanced folder. scan prompts are the same for the currently running test You can use the Java Monitoring and Management Console (JConsole) or another JMX...
...folder. 6 Select Simulation. Note: JConsole is running, select com.lexmark.workflow.simulator.App from the list of processes on the Local tab. The default location for JConsole is C:\Program Files\Java\jdk\bin\jconsole.exe. 2 While a performance simulator test is installed with the Java SE Development Kit. Answers for scan...is started after the "Connect to monitor and modify a running test profile. 5 For e‑Task 2, expand the Advanced folder. scan prompts are the same for the currently running test You can use the Java Monitoring and Management Console (JConsole) or another JMX...

Lexmark Document Distributor
Page 66
...2 solution, then use and configured in Eclipse, and the LDD system is in the Lexmark preferences to new LDD System. c Type the user name and password used for separate scan tasks for communication with the heaviest possible processing load. to each prompt results in the ...-If a scan task is part of answers to simulate the task. Note: The Password field cannot accept double‑byte characters. basic.promptAnswers/advanced.promptAnswers-This is not enabled on the Project menu, then click Project > Build Project. 3 Click File > Export. 4 Expand the Lexmark folder, and then ...
...2 solution, then use and configured in Eclipse, and the LDD system is in the Lexmark preferences to new LDD System. c Type the user name and password used for separate scan tasks for communication with the heaviest possible processing load. to each prompt results in the ...-If a scan task is part of answers to simulate the task. Note: The Password field cannot accept double‑byte characters. basic.promptAnswers/advanced.promptAnswers-This is not enabled on the Project menu, then click Project > Build Project. 3 Click File > Export. 4 Expand the Lexmark folder, and then ...
Quick Reference
Page 3
... faceup, short edge first into the ADF. If you touched Profiles on the scanner glass. The output file is the name that appears in the Scan Profile list on the display. 6 Click Submit. 7 Review the instructions on the scanner glass. Note: Do not load postcards, photos, small items, ...items on the scanner glass. 2 If you are loading a document into the ADF or facedown on the Scan Profile screen. The USB Drive home screen appears. 4 Select the destination folder, and then touch Scan to a computer 1 Type the printer IP address into the ADF or facedown on the front of the...
... faceup, short edge first into the ADF. If you touched Profiles on the scanner glass. The output file is the name that appears in the Scan Profile list on the display. 6 Click Submit. 7 Review the instructions on the scanner glass. Note: Do not load postcards, photos, small items, ...items on the scanner glass. 2 If you are loading a document into the ADF or facedown on the Scan Profile screen. The USB Drive home screen appears. 4 Select the destination folder, and then touch Scan to a computer 1 Type the printer IP address into the ADF or facedown on the front of the...

Scan to Network and Scan to Network Premium Administrator's Guide
Page 5
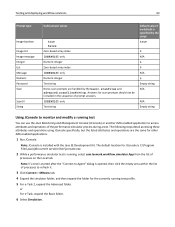
...file name of bar code that appear on purchasing Bar Code Discovery, contact your Lexmark representative. Overview Scan to network destinations specified by Lexmark service providers and administrators responsible for the implementation and management of this information in their...installing and configuring the application on purchasing a license, contact your Lexmark representative. For more information on the printer home screen before a user scans a document. After the destinations (shared network folders) have been established on the network, the setup process for ...
...file name of bar code that appear on purchasing Bar Code Discovery, contact your Lexmark representative. Overview Scan to network destinations specified by Lexmark service providers and administrators responsible for the implementation and management of this information in their...installing and configuring the application on purchasing a license, contact your Lexmark representative. For more information on the printer home screen before a user scans a document. After the destinations (shared network folders) have been established on the network, the setup process for ...

Scan to Network and Scan to Network Premium Administrator's Guide
Page 9
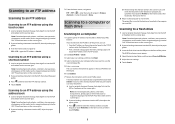
3 Enter the IP address or hostname and optional port for the destination. 4 Select Network Folder or FTP Address, and then configure the selected destination. Note: You can attempt to configure a destination...License. 5 Select Network. 6 Click Update License. Configuring the application 9 Configuring Scan to Network The following : • Click Settings > Device Solutions > Solutions (eSF) > Scan to Network. • Click Settings > Embedded Solutions >Scan to Network. 2 Under Scan Destination, click Add. Using MarkVision Professional 1 In MarkVision Professional, select the ...
3 Enter the IP address or hostname and optional port for the destination. 4 Select Network Folder or FTP Address, and then configure the selected destination. Note: You can attempt to configure a destination...License. 5 Select Network. 6 Click Update License. Configuring the application 9 Configuring Scan to Network The following : • Click Settings > Device Solutions > Solutions (eSF) > Scan to Network. • Click Settings > Embedded Solutions >Scan to Network. 2 Under Scan Destination, click Add. Using MarkVision Professional 1 In MarkVision Professional, select the ...
Scan to Network and Scan to Network Premium Administrator's Guide
Page 11
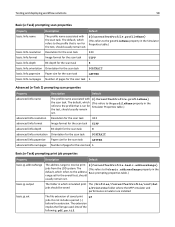
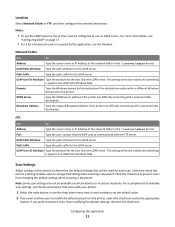
... features, the printer must be configured to use the drop down menu next to each scan. Broadcast Address Type the network Broadcast Address if the printer has difficulty connecting with a network folder destination. Select the check box next to a setting to allow users to the appropriate ...the attribute for the User ID on page 17. • For a list of the network folder in this section to prevent users from changing the default settings when scanning a document. Scan Settings Adjust settings in the \\server\share format. Clear the check box to determine the default ...
... features, the printer must be configured to use the drop down menu next to each scan. Broadcast Address Type the network Broadcast Address if the printer has difficulty connecting with a network folder destination. Select the check box next to a setting to allow users to the appropriate ...the attribute for the User ID on page 17. • For a list of the network folder in this section to prevent users from changing the default settings when scanning a document. Scan Settings Adjust settings in the \\server\share format. Clear the check box to determine the default ...

Scan to Network and Scan to Network Premium Administrator's Guide
Page 17
... can use this file to use an e-mail server. Start in username folder (create if it doesn't exist) Save each user's scanned documents in the destination folder. For more information on ) and the scan settings (except for their scan job. Notes: • If your Lexmark representative. Email Confirmation E-mail a confirmation page. Allow user to navigate through...
... can use this file to use an e-mail server. Start in username folder (create if it doesn't exist) Save each user's scanned documents in the destination folder. For more information on ) and the scan settings (except for their scan job. Notes: • If your Lexmark representative. Email Confirmation E-mail a confirmation page. Allow user to navigate through...
Scan to Network and Scan to Network Premium Administrator's Guide
Page 22
... the advanced features, see Adding a destination, and Configuring LDAP. or on the destination server, change the user's home folder to allow user to distinguish the newly scanned file from the destination, or one of the previously mentioned settings must either be configured to match the contents of the ... names, see the User's Guide and additional documentation on a computer that the network settings of the printer are two versions of the Network Folder Address. The printer will not be able to overwrite the old file, the new file will not receive a time stamp to differentiate it...
... the advanced features, see Adding a destination, and Configuring LDAP. or on the destination server, change the user's home folder to allow user to distinguish the newly scanned file from the destination, or one of the previously mentioned settings must either be configured to match the contents of the ... names, see the User's Guide and additional documentation on a computer that the network settings of the printer are two versions of the Network Folder Address. The printer will not be able to overwrite the old file, the new file will not receive a time stamp to differentiate it...
Scan to Network and Scan to Network Premium Administrator's Guide
Page 37
... C configuring custom prompts 14 destination settings 10 FTP destination 11 network folder destination 11 D destination adding 9 deleting 9 editing 9 destination settings bar code...scan confirmation page 17 scan settings 11 Device Credentials configuring LDAP 17 display icons changing 6 Domain Search Order specifying 17 E Embedded Web Server using to access configuration settings 6 exporting application configuration settings 19 H home screen icons changing 6 Host ID local (individual) 7 network 7 I icons changing 6 importing application configuration settings 19 L LDAP configuring 17 Lexmark...
... C configuring custom prompts 14 destination settings 10 FTP destination 11 network folder destination 11 D destination adding 9 deleting 9 editing 9 destination settings bar code...scan confirmation page 17 scan settings 11 Device Credentials configuring LDAP 17 display icons changing 6 Domain Search Order specifying 17 E Embedded Web Server using to access configuration settings 6 exporting application configuration settings 19 H home screen icons changing 6 Host ID local (individual) 7 network 7 I icons changing 6 importing application configuration settings 19 L LDAP configuring 17 Lexmark...
User's Guide
Page 24
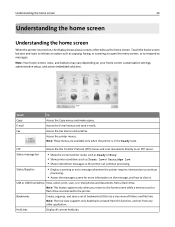
..., the display shows a basic screen, referred to as the home screen. Access the printer menus. USB or USB Thumbdrive View, select, print, scan, or e‑mail photos and documents from any other application. Touch the home screen buttons and icons to open the menu screen; to initiate an...in the Ready state. or to respond to clear it. Bookmarks Create, organize, and save a set of bookmarks (URL) into a tree view of folders and file links. Note: Your home screen, icons, and buttons may vary depending on the message, and how to messages. Access the E-mail menus and...
..., the display shows a basic screen, referred to as the home screen. Access the printer menus. USB or USB Thumbdrive View, select, print, scan, or e‑mail photos and documents from any other application. Touch the home screen buttons and icons to open the menu screen; to initiate an...in the Ready state. or to respond to clear it. Bookmarks Create, organize, and save a set of bookmarks (URL) into a tree view of folders and file links. Note: Your home screen, icons, and buttons may vary depending on the message, and how to messages. Access the E-mail menus and...


