User's Guide
Page 9
... ...170 Printer is busy printing another job ...170 Ready or Busy Printing is listed as the status 171 Printing a test page...171 Test page does not print...171 Checking the port setting...172 External print server is not working ...172 Removing an external print server...173 Cable is not... connected, is loose, or is damaged 173 Printer is plugged in but does not print ...173 Printer is trying to print to File...173 Printer cannot communicate with computers over peer-to-peer network 174 9
... ...170 Printer is busy printing another job ...170 Ready or Busy Printing is listed as the status 171 Printing a test page...171 Test page does not print...171 Checking the port setting...172 External print server is not working ...172 Removing an external print server...173 Cable is not... connected, is loose, or is damaged 173 Printer is plugged in but does not print ...173 Printer is trying to print to File...173 Printer cannot communicate with computers over peer-to-peer network 174 9
User's Guide
Page 17
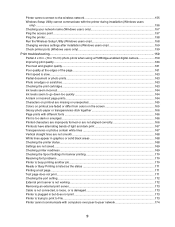
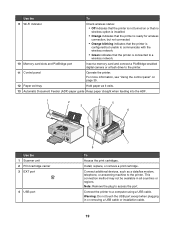
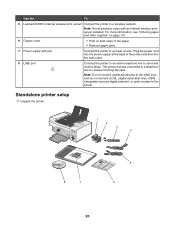
... Cartridge combinations vary depending on page 29. Setting up the printer Checking the box contents 1 2 3 4 1 2 3 5 8 Name 1 Black print cartridge 2 Color print cartridge 3 Telephone cord 4 Power cord 5 Installation cable 6 Quick Setup sheet 7 User's Guide 7 6 Description Cartridges... to be found on the installation software CD. 17 Use for faxing. Connects the printer to the power supply port located at the back of installation. Initial...
... Cartridge combinations vary depending on page 29. Setting up the printer Checking the box contents 1 2 3 4 1 2 3 5 8 Name 1 Black print cartridge 2 Color print cartridge 3 Telephone cord 4 Power cord 5 Installation cable 6 Quick Setup sheet 7 User's Guide 7 6 Description Cartridges... to be found on the installation software CD. 17 Use for faxing. Connects the printer to the power supply port located at the back of installation. Initial...
User's Guide
Page 19
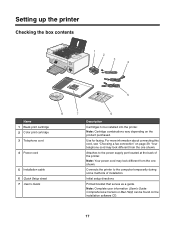
...• Green indicates that the printer is not turned on page 35. 12 Paper exit tray Hold paper as a data/fax modem, telephone, or answering machine to a computer using a USB cable. Note: Remove the plug to the printer. 11 Control panel Operate the printer. Use the To 9 Wi...-Fi indicator Check wireless status: • Off indicates that the printer is connected to a wireless network. 10 Memory card slots and ...
...• Green indicates that the printer is not turned on page 35. 12 Paper exit tray Hold paper as a data/fax modem, telephone, or answering machine to a computer using a USB cable. Note: Remove the plug to the printer. 11 Control panel Operate the printer. Use the To 9 Wi...-Fi indicator Check wireless status: • Off indicates that the printer is connected to a wireless network. 10 Memory card slots and ...
User's Guide
Page 20
... not connect a DSL (digital subscriber line), ISDN (integrated services digital network), or cable modem to send and receive faxes. The printer must be connected to a telephone line to a wireless network. Use the To 5 Lexmark N2050 (internal wireless print server) Connect the printer to receive incoming fax calls. For more information, see "Ordering paper and...
... not connect a DSL (digital subscriber line), ISDN (integrated services digital network), or cable modem to send and receive faxes. The printer must be connected to a telephone line to a wireless network. Use the To 5 Lexmark N2050 (internal wireless print server) Connect the printer to receive incoming fax calls. For more information, see "Ordering paper and...
User's Guide
Page 26
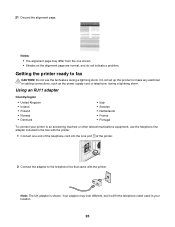
... outlet used in the box with the printer. Do not set up this product or make any electrical or cabling connections, such as the power supply cord or telephone, during a lightning storm. Getting the printer ready to the telephone line that came with the printer. 1 Connect one shown. • ...may differ from the one end of the telephone cord into the Line port of the printer. 2 Connect the adapter to fax CAUTION: Do not use the telephone line adapter included in your printer to an answering machine or other telecommunications equipment, use the fax feature during a lightning...
... outlet used in the box with the printer. Do not set up this product or make any electrical or cabling connections, such as the power supply cord or telephone, during a lightning storm. Getting the printer ready to the telephone line that came with the printer. 1 Connect one shown. • ...may differ from the one end of the telephone cord into the Line port of the printer. 2 Connect the adapter to fax CAUTION: Do not use the telephone line adapter included in your printer to an answering machine or other telecommunications equipment, use the fax feature during a lightning...

User's Guide
Page 27
Warning: Do not touch cables or the printer in the area shown while actively sending or receiving a fax. 27 Note: Once this plug is removed, any country- or region-specific equipment you connect to the printer by the adapter, as shown, will not function properly. 2 Connect your telecommunications ...RJ11) telephone line, follow these steps to connect the equipment: 1 Remove the plug from the EXT port on the back of the printer. If your telecommunications equipment directly to the left outlet of the adapter. 3 Connect the telephone line of your chosen telecommunications equipment to ...
Warning: Do not touch cables or the printer in the area shown while actively sending or receiving a fax. 27 Note: Once this plug is removed, any country- or region-specific equipment you connect to the printer by the adapter, as shown, will not function properly. 2 Connect your telecommunications ...RJ11) telephone line, follow these steps to connect the equipment: 1 Remove the plug from the EXT port on the back of the printer. If your telecommunications equipment directly to the left outlet of the adapter. 3 Connect the telephone line of your chosen telecommunications equipment to ...

User's Guide
Page 28
..., as shown, will not function properly. 2 Connect your telecommunications equipment directly to the printer: 1 Remove the plug from the back of the printer. Country/region • Germany • Austria • Switzerland 28 Warning: Do not touch cables or the printer in the area shown while actively sending or receiving a fax. Country/region • Saudi...; Russia • Slovenia • Spain • Turkey To connect an answering machine or other telecommunications equipment to the EXT port on the back of the printer. Note: Once this plug is removed, any country-
..., as shown, will not function properly. 2 Connect your telecommunications equipment directly to the printer: 1 Remove the plug from the back of the printer. Country/region • Germany • Austria • Switzerland 28 Warning: Do not touch cables or the printer in the area shown while actively sending or receiving a fax. Country/region • Saudi...; Russia • Slovenia • Spain • Turkey To connect an answering machine or other telecommunications equipment to the EXT port on the back of the printer. Note: Once this plug is removed, any country-
User's Guide
Page 48
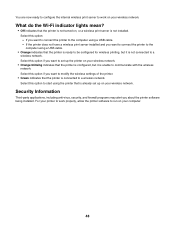
... you want to the computer using a USB cable. • Orange indicates that is connected to a wireless network. Select this option if you want to connect the printer to modify the wireless settings of the printer. • Green indicates that the printer is not turned on, or a wireless print... wireless network. Select this option if you want to set up the printer on your wireless network. • Orange blinking indicates that the printer is configured, but it is unable to the computer using a USB cable. - You are now ready to configure the internal wireless print server ...
... you want to the computer using a USB cable. • Orange indicates that is connected to a wireless network. Select this option if you want to connect the printer to modify the wireless settings of the printer. • Green indicates that the printer is not turned on, or a wireless print... wireless network. Select this option if you want to set up the printer on your wireless network. • Orange blinking indicates that the printer is configured, but it is unable to the computer using a USB cable. - You are now ready to configure the internal wireless print server ...

User's Guide
Page 49
... a network, they can be connected by Lexmark to enable Lexmark printers to be connected to wired or wireless networks. Devices on a wired network use radio waves instead of devices such as computers, printers, Ethernet hubs, wireless access points, and routers connected together for communication through cables or through a DSL or a cable modem. For a device to be...
... a network, they can be connected by Lexmark to enable Lexmark printers to be connected to wired or wireless networks. Devices on a wired network use radio waves instead of devices such as computers, printers, Ethernet hubs, wireless access points, and routers connected together for communication through cables or through a DSL or a cable modem. For a device to be...

User's Guide
Page 50
Internet Scenario 2: Computer, laptop, and printer connected wirelessly with Internet • A computer is connected to a wireless router by an Ethernet cable. • A laptop and a printer are connected wirelessly to a wireless router. • The network is connected to the Internet through a DSL or a cable modem. Internet 50 Scenario 1: Laptop and printer connected wirelessly with Internet • A computer, a laptop, and a printer are connected wirelessly to the router. • The network is connected to the Internet through a DSL or a cable modem.
Internet Scenario 2: Computer, laptop, and printer connected wirelessly with Internet • A computer is connected to a wireless router by an Ethernet cable. • A laptop and a printer are connected wirelessly to a wireless router. • The network is connected to the Internet through a DSL or a cable modem. Internet 50 Scenario 1: Laptop and printer connected wirelessly with Internet • A computer, a laptop, and a printer are connected wirelessly to the router. • The network is connected to the Internet through a DSL or a cable modem.

User's Guide
Page 56
.... check box. 19 Click OK twice to close the two open windows. 20 It may be removed. Adding a printer to an existing ad hoc wireless network using the installation cable as part of the "Troubleshooting" chapter. 17 Type the same security code in a security code. 16 Write down ... sure you copy it when running the wireless setup. a Click the network to be prompted to connect the printer to the computer again using Windows 1 Click Programs or All Programs ΠLexmark 7500 Series. 2 Click Wireless Setup. 3 Follow the instructions on the computer screen. 24 Store your computer to...
.... check box. 19 Click OK twice to close the two open windows. 20 It may be removed. Adding a printer to an existing ad hoc wireless network using the installation cable as part of the "Troubleshooting" chapter. 17 Type the same security code in a security code. 16 Write down ... sure you copy it when running the wireless setup. a Click the network to be prompted to connect the printer to the computer again using Windows 1 Click Programs or All Programs ΠLexmark 7500 Series. 2 Click Wireless Setup. 3 Follow the instructions on the computer screen. 24 Store your computer to...
User's Guide
Page 67
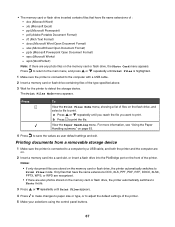
The Print Files Mode menu appears. a Press or repeatedly until Print Files is highlighted. 1 Make sure the printer is connected to a computer by a USB cable, and both the printer and the computer are on. 2 Insert a memory card into a card slot, or insert a flash drive into the PictBridge port .... For more information, see "Using the Paper Handling submenu" on the front of the printer. Printing documents from a removable storage device 1 Make sure the printer is connected to the computer with a USB cable. 2 Insert a memory card or flash drive containing files of the type specified above. ...
The Print Files Mode menu appears. a Press or repeatedly until Print Files is highlighted. 1 Make sure the printer is connected to a computer by a USB cable, and both the printer and the computer are on. 2 Insert a memory card into a card slot, or insert a flash drive into the PictBridge port .... For more information, see "Using the Paper Handling submenu" on the front of the printer. Printing documents from a removable storage device 1 Make sure the printer is connected to the computer with a USB cable. 2 Insert a memory card or flash drive containing files of the type specified above. ...

User's Guide
Page 77
Warning: Do not touch cables, any network adapter, the memory card, or the printer in the area shown while actively printing, reading, or writing from it into the slot. 1 2 Slot Memory card 1 ... is being read or is an arrow on the card, make sure it points toward the printer. • If needed, make sure you connect the memory card to come on. A loss of the slots on the... printer to the adapter that came with it before inserting it . 77 Working with photos Retrieving and managing photos Inserting a ...
Warning: Do not touch cables, any network adapter, the memory card, or the printer in the area shown while actively printing, reading, or writing from it into the slot. 1 2 Slot Memory card 1 ... is being read or is an arrow on the card, make sure it points toward the printer. • If needed, make sure you connect the memory card to come on. A loss of the slots on the... printer to the adapter that came with it before inserting it . 77 Working with photos Retrieving and managing photos Inserting a ...

User's Guide
Page 78
...; The printer recognizes one memory card, a message appears on the display prompting you to choose which memory device to use. Note: An adapter may be necessary if your flash drive does not fit directly into the PictBridge port on the front of data can occur. Warning: Do not touch cables, any network... adapter, the flash drive, or the printer in the area shown while actively printing, reading, or writing from the flash drive. 78 Also, do not remove the flash...
...; The printer recognizes one memory card, a message appears on the display prompting you to choose which memory device to use. Note: An adapter may be necessary if your flash drive does not fit directly into the PictBridge port on the front of data can occur. Warning: Do not touch cables, any network... adapter, the flash drive, or the printer in the area shown while actively printing, reading, or writing from the flash drive. 78 Also, do not remove the flash...

User's Guide
Page 79
..., or an error message will be displayed on the display: Camera Connected. Warning: Do not touch the USB cable, any network adapter, or the printer in the area shown while actively printing from your digital camera without using a computer. Press to select... If the PictBridge connection is a technology available in the camera documentation. Note: The printer recognizes one media device, a message appears on the front of the printer. Also, do not remove the USB cable or network adapter while actively printing from a PictBridge-enabled digital camera PictBridge is successful,...
..., or an error message will be displayed on the display: Camera Connected. Warning: Do not touch the USB cable, any network adapter, or the printer in the area shown while actively printing from your digital camera without using a computer. Press to select... If the PictBridge connection is a technology available in the camera documentation. Note: The printer recognizes one media device, a message appears on the front of the printer. Also, do not remove the USB cable or network adapter while actively printing from a PictBridge-enabled digital camera PictBridge is successful,...
User's Guide
Page 83
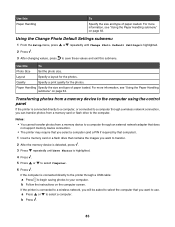
... 3 After changing values, press to the computer. If the computer is connected directly to the printer through an external network adapter that does not support memory device connection. • The printer may require that you select a computer (and a PIN if required by that computer). 1 ... can transfer photos from a memory device to a computer through a USB cable: a Press to begin saving photos to use. a Press or to select Computer. 6 Press . Quality Specify a print quality for the photos. If the printer is highlighted. 4 Press . 5 Press or to select a computer. Layout...
... 3 After changing values, press to the computer. If the computer is connected directly to the printer through an external network adapter that does not support memory device connection. • The printer may require that you select a computer (and a PIN if required by that computer). 1 ... can transfer photos from a memory device to a computer through a USB cable: a Press to begin saving photos to use. a Press or to select Computer. 6 Press . Quality Specify a print quality for the photos. If the printer is highlighted. 4 Press . 5 Press or to select a computer. Layout...

User's Guide
Page 95
... you choose this option, use the buttons on the camera to select and print photos. 1 Insert one end of the USB cable into the PictBridge port on the front of the printer. 95 Note: When making selections, make sure to fill in the circles completely. 10 Load the proof sheet facedown on..., the number of copies per photo, red-eye reduction, page layout, print options, and paper size. You can connect a PictBridge-enabled digital camera to the printer, and use the arrow buttons on the scanner glass. 11 From the control panel, press to dry at least 24 hours before stacking, displaying, or...
... you choose this option, use the buttons on the camera to select and print photos. 1 Insert one end of the USB cable into the PictBridge port on the front of the printer. 95 Note: When making selections, make sure to fill in the circles completely. 10 Load the proof sheet facedown on..., the number of copies per photo, red-eye reduction, page layout, print options, and paper size. You can connect a PictBridge-enabled digital camera to the printer, and use the arrow buttons on the scanner glass. 11 From the control panel, press to dry at least 24 hours before stacking, displaying, or...

User's Guide
Page 96
... remove one active media device at a time. Note: If the printer is turned off while the camera is highlighted. 5 Press . 6 Press again. 96 Also, do not remove the USB cable or network adapter while actively printing from a digital camera using DPOF Digital Print Order Format (...From the control panel, press . 4 Press repeatedly until Print Camera Selections is connected, you insert the memory card into the printer. Warning: Do not touch the USB cable, any other message appears, see "Error messages on the computer screen" on some digital cameras. Notes: • Make sure ...
... remove one active media device at a time. Note: If the printer is turned off while the camera is highlighted. 5 Press . 6 Press again. 96 Also, do not remove the USB cable or network adapter while actively printing from a digital camera using DPOF Digital Print Order Format (...From the control panel, press . 4 Press repeatedly until Print Camera Selections is connected, you insert the memory card into the printer. Warning: Do not touch the USB cable, any other message appears, see "Error messages on the computer screen" on some digital cameras. Notes: • Make sure ...

User's Guide
Page 173
... cable to the printer. 6 Press to print Make sure the printer is set as the default printer and is connected to the USB port on the back of the computer The USB port on . In Windows XP, click Start Œ Settings ŒPrinters and Faxes. 2 Right-click the Lexmark 7500 Series icon. 3... From the sidebar menu, select Properties. 173 Removing an external print server 1 Press to turn the printer back on. Make sure the USB cable is not being held or paused. Try one or more...
... cable to the printer. 6 Press to print Make sure the printer is set as the default printer and is connected to the USB port on the back of the computer The USB port on . In Windows XP, click Start Œ Settings ŒPrinters and Faxes. 2 Right-click the Lexmark 7500 Series icon. 3... From the sidebar menu, select Properties. 173 Removing an external print server 1 Press to turn the printer back on. Make sure the USB cable is not being held or paused. Try one or more...

User's Guide (Mac)
Page 156
... the long, flat end of the USB cable into the back of the computer The USB port on the printer box. Troubleshooting 156 Make sure the USB cable is connected to the back of the printer Plug the smaller, more square end of the USB cable into this Make sure the other electrical devices... have been using. 4 If the light is damaged The printer cable must be fully connected ...
... the long, flat end of the USB cable into the back of the computer The USB port on the printer box. Troubleshooting 156 Make sure the USB cable is connected to the back of the printer Plug the smaller, more square end of the USB cable into this Make sure the other electrical devices... have been using. 4 If the light is damaged The printer cable must be fully connected ...


