Lexmark X5320 Support Question
Lexmark X5320 Support Question
Find answers below for this question about Lexmark X5320.Need a Lexmark X5320 manual? We have 2 online manuals for this item!
Question posted by debbiecook66 on April 13th, 2017
Replace My Printer Cord
Im looking to replace the power cord, how can i replace it
Current Answers
Answer #1: Posted by TheWiz on April 14th, 2017 5:34 AM
TheWiz

Member since:
October 13th, 2011 Points: 25,383,424

Member since:
October 13th, 2011 Points: 25,383,424
Related Lexmark X5320 Manual Pages
User's Guide - Page 7

... distinctive ring...110 Setting the number of rings before receiving a fax automatically 111 Setting up Speed Dial...111
Printing fax activity reports...112
Maintaining the printer 113
Replacing print cartridges...113
Installing print cartridges...113 Removing a used print cartridge ...114
Refilling print cartridges...115 Using genuine Lexmark print cartridges...115 Aligning print...
User's Guide - Page 10

...memory card...171 Paper Jam ...171 Multiple All-In-Ones found on the printer display...163
Alignment Error...164 Cartridge Error (1102, 1203, 1204, or......170 Unsupported file types found ...171 Black Cartridge replacement required...171 Color Cartridge replacement required...171 Black and Color Cartridge replacement required ...172
Notices 173
Product information...173 Edition notice...173
Contents
...
User's Guide - Page 17

For more information about connecting this cord, see "Choosing a fax connection" on page 28.
4 Power cord
Attaches to the power supply port located at the back of the printer
5 Quick Setup sheet
Initial setup directions
6 Installation software CD • Installation software for the printer • User's Guide: Comprehensive Version in electronic format
7 User's Guide
Printed booklet that...
User's Guide - Page 20
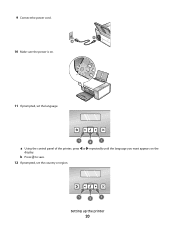
b Press to save.
12 If prompted, set the language.
1
2
1
a Using the control panel of the printer, press or repeatedly until the language you want appears on the
display. 9 Connect the power cord. 10 Make sure the power is on.
11 If prompted, set the country or region.
1
2
1
Setting up the printer
20
User's Guide - Page 24
... modem to receive incoming fax calls.
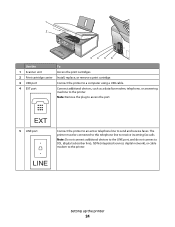
EXT
5 LINE port
Connect the printer to an active telephone line to the printer. 1 2
34 5 6
Use the
To
1 Scanner unit
Access the print cartridges.
2 Print cartridge carrier Install, replace, or remove a print cartridge.
3 USB port
Connect the printer to a computer using a USB cable.
4 EXT port
Connect additional devices...
User's Guide - Page 25

...
• Italy • Sweden • Netherlands • France • Portugal
To connect your printer to a power source using .
3 If the light is not on the printer. 2 Plug the cord into the Line port of the printer. Do not set up the printer
25
Setting up this product or make any electrical or cabling connections, such as...
User's Guide - Page 26

...Once this plug is shown. Setting up the printer
26 Your adapter may look different, but it will not function properly.
or region-specific equipment you connect to the printer by the adapter, as shown, will fit the...telephone line, follow these steps to the telephone line that came with the printer.
2 Connect the adapter to connect the equipment:
1 Remove the plug from the EXT port on the ...
User's Guide - Page 29

....
Note: Setup steps may vary depending on page 29
Send faxes using the computer or the printer. For more information on connecting the printer to set up the printer
29 Equipment
• The printer • A telephone cord
• The printer • A telephone • Two telephone cords
• The printer • A telephone • An answering machine • Three telephone...
User's Guide - Page 30

... wall jack to make copies or to the EXT port of the printer.
Setting up the printer
30 3 Remove the protective plug from the EXT port of the printer.
4 Connect a second telephone cord from the telephone to the answering machine. 5 Connect a third telephone cord from the answering machine to send and receive faxes without using...
User's Guide - Page 31

... product) and a telephone wall jack. 2 Connect one end of the telephone cord into the LINE port of the printer. 3 Connect the other end of the telephone cord into the N slot of the telephone cord into an active telephone wall jack.
Setting up the printer
31 3 Connect the other end of an active telephone wall jack.
User's Guide - Page 32
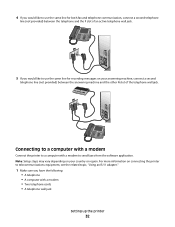
...depending on your country or region. Connecting to a computer with a modem
Connect the printer to use the same line for recording messages on your answering machine, connect a second...with a modem to send faxes from the software application. For more information on connecting the printer to telecommunications equipment, see the related topic, "Using an RJ11 adapter."
1 Make sure you would...
User's Guide - Page 33
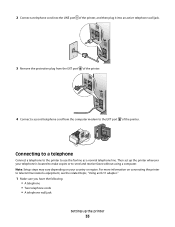
... receive faxes without using a computer. Then set up the printer
33 Connecting to a telephone
Connect a telephone to the printer to the EXT port of the printer.
4 Connect a second telephone cord from the EXT port of the printer. 2 Connect a telephone cord into the LINE port of the printer, and then plug it into an active telephone wall jack...
User's Guide - Page 34

... the Welcome Screen, click Fax History and Settings. Ordinarily, when dialing a fax number, the printer waits to a telephone, and then plug it into the EXT port of the printer. 2 Connect one telephone cord to the LINE port of the printer, and then plug it into an active telephone wall jack.
3 Remove the protective plug...
User's Guide - Page 113
Maintaining the printer
113
Maintaining the printer
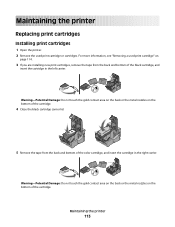
Replacing print cartridges
Installing print cartridges
1 Open the printer. 2 Remove the used print cartridge" on the bottom of the cartridge.
4 Close the black cartridge carrier lid.
5 Remove the tape from the back and bottom ...
User's Guide - Page 115

... damage caused by a refilled cartridge. Maintaining the printer
115 For best results, use of Original Lexmark Ink message appears:
1 Click Learn More on the message. 2 Click Report a non-Lexmark print cartridge. To prevent the message from appearing again for the indicated cartridge(s):
• Replace your cartridge(s) with new Lexmark print cartridge(s). •...
User's Guide - Page 141

...
connect it supports bidirectional communication. Troubleshooting
141 No
Yes
Disconnect the printer from the computer. 5 Connect the printer USB cable to the printer. 6 Press to the print server is on . Plug the...USB cable is not damaged. • The light is off . 2 Make sure the power to turn the printer off . 3 Remove the USB cable from the external print server. 4 Disconnect the ...
User's Guide (Mac) - Page 43

...8226; Italy • Sweden • Netherlands • France • Portugal
To connect your printer to an answering machine or other telecommunications equipment, use the telephone line adapter included in your ...printer.
2 Connect the adapter to the telephone line that came with the printer.
1 Connect one end of the telephone cord into the Line port of the adapter. Your adapter may look...
User's Guide (Mac) - Page 143

...SETTING
Make sure that you want
to resume all print jobs in the upper left corner. CHECK POWER
If the light is Automatic or the size of the following :
CHECK DOCUMENT PLACEMENT
Make sure... if you selected. Try one or more information, see "Power button is displayed, see "Error messages on the printer display" on page 125. Partial document or photo copies
These are possible solutions.
User's Guide (Mac) - Page 159
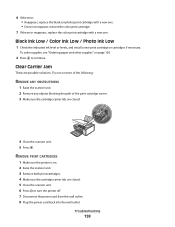
...8226; Does not reappear, reinsert the color print cartridge.
7 If the error reappears, replace the color print cartridge with a new one or more of the following:
REMOVE ANY OBSTRUCTIONS...5 Press . REMOVE PRINT CARTRIDGES
1 Make sure the printer is on page 120.
2 Press to turn the printer off. 7 Disconnect the power cord from the wall outlet. 8 Plug the power cord back into the wall outlet.
User's Guide (Mac) - Page 160

...Reappears, replace the print cartridge with a new one.
Left Cartridge Incorrect / Right Cartridge Incorrect
1 Remove the indicated print cartridge. 2 Disconnect the power cord from the electrical outlet. 3 Reconnect the power cord to ...page 113
11 Close the scanner unit. 12 Plug the power cord into the wall outlet. 13 Press to turn the printer on . 14 Reinstall the print cartridges. For more ...
Similar Questions

What Cartridges Does The Lexmark X5320 All In One Printer Take Losted Manuals
(Posted by latanyalatricedorn 9 years ago)


Lexmark Printer Impact S301 Does Want To Power On
(Posted by aldiana 10 years ago)

How Can I Retrieve The Fax From My X5320 Lexmark Printer Its In Memory
(Posted by ccooperyoung 11 years ago)
When Power Cord Is Plugged The Printer Directly On Without Pressing The Power Bu
(Posted by vorsi 11 years ago)