User's Guide
Page 3
... panel 40 Understanding the Setup menu and submenus 41 Installing the printer software...43 Understanding the printer software 43 Turning printing voice notification on or off 46 Installing an internal wireless print server 47 What do the Wi-Fi indicator lights mean 48 Security Information...48 Networking...49 General networking...49 Networking...
... panel 40 Understanding the Setup menu and submenus 41 Installing the printer software...43 Understanding the printer software 43 Turning printing voice notification on or off 46 Installing an internal wireless print server 47 What do the Wi-Fi indicator lights mean 48 Security Information...48 Networking...49 General networking...49 Networking...

User's Guide
Page 4
... Document Feeder 62 Using the Paper Handling submenu 63 Printing...64 Printing basic documents...64 Printing a document...64 Printing a Web page ...64 Printing photos or images from a Web page 65 Printing multiple copies of a document...65 Collating copies ...66 Printing the last page first (reverse page order 66 Printing multiple pages on one sheet (N-Up 66 Understanding the...
... Document Feeder 62 Using the Paper Handling submenu 63 Printing...64 Printing basic documents...64 Printing a document...64 Printing a Web page ...64 Printing photos or images from a Web page 65 Printing multiple copies of a document...65 Collating copies ...66 Printing the last page first (reverse page order 66 Printing multiple pages on one sheet (N-Up 66 Understanding the...

User's Guide
Page 5
......74 Using the Change Printer Default Settings submenu 74 Resetting printer software to factory default settings 75 Using the Change Print File Default Settings submenu 75 Resetting factory default settings ...76 Saving settings ...76 Working with photos 77 Retrieving and managing photos...77 ... from a PictBridge-enabled digital camera 79 Understanding Photo and the Photo Card Mode menu 80 Understanding the PictBridge Default Print Settings menu 82 Using the Change PictBridge Default Settings submenu 82 Using the Change Photo Default Settings submenu 83 Transferring photos from ...
......74 Using the Change Printer Default Settings submenu 74 Resetting printer software to factory default settings 75 Using the Change Print File Default Settings submenu 75 Resetting factory default settings ...76 Saving settings ...76 Working with photos 77 Retrieving and managing photos...77 ... from a PictBridge-enabled digital camera 79 Understanding Photo and the Photo Card Mode menu 80 Understanding the PictBridge Default Print Settings menu 82 Using the Change PictBridge Default Settings submenu 82 Using the Change Photo Default Settings submenu 83 Transferring photos from ...

User's Guide
Page 6
... CD or removable storage device using the computer 91 Viewing / Printing photos from the Productivity Studio 92 Printing Photo Packages ...92 Creating Photo Greeting Cards ...92 Printing a photo or selected photos ...93 Printing all photos from a memory device 94 Printing photos stored on a memory device using the proof sheet 94... Using a PictBridge-enabled digital camera to control printing photos 95 Printing photos from a digital camera using DPOF 96 Creating a slideshow...97 Creating and viewing a slideshow ...97 Viewing a slideshow of...
... CD or removable storage device using the computer 91 Viewing / Printing photos from the Productivity Studio 92 Printing Photo Packages ...92 Creating Photo Greeting Cards ...92 Printing a photo or selected photos ...93 Printing all photos from a memory device 94 Printing photos stored on a memory device using the proof sheet 94... Using a PictBridge-enabled digital camera to control printing photos 95 Printing photos from a digital camera using DPOF 96 Creating a slideshow...97 Creating and viewing a slideshow ...97 Viewing a slideshow of...

User's Guide
Page 7
......124 Customizing settings using the Fax Setup Utility 124 Understanding Fax and the Fax Mode menu 126 Using the Change Fax Default Settings submenu 127 Printing the Fax Settings List...129 Setting up a fax footer ...129 Creating a fax cover page using the control panel 130 Blocking junk faxes...130 Blocking unwanted...
......124 Customizing settings using the Fax Setup Utility 124 Understanding Fax and the Fax Mode menu 126 Using the Change Fax Default Settings submenu 127 Printing the Fax Settings List...129 Setting up a fax footer ...129 Creating a fax cover page using the control panel 130 Blocking junk faxes...130 Blocking unwanted...
User's Guide
Page 8
... Maintaining the printer 135 Understanding the Maintenance menu 135 Installing print cartridges...135 Removing a used print cartridge...137 Refilling print cartridges...138 Using genuine Lexmark print cartridges 138 Aligning print cartridges...138 Cleaning the print cartridge nozzles 139 Wiping the print cartridge nozzles and contacts 139 Preserving the print cartridges...140 Cleaning the scanner glass...141 Cleaning the exterior...
... Maintaining the printer 135 Understanding the Maintenance menu 135 Installing print cartridges...135 Removing a used print cartridge...137 Refilling print cartridges...138 Using genuine Lexmark print cartridges 138 Aligning print cartridges...138 Cleaning the print cartridge nozzles 139 Wiping the print cartridge nozzles and contacts 139 Preserving the print cartridges...140 Cleaning the scanner glass...141 Cleaning the exterior...
User's Guide
Page 9
... after installation (Windows users only 159 Check printer ports (Windows users only 159 Print troubleshooting...159 Partial 4 x 6 in. (10 x 15 cm) photo prints when using a PictBridge-enabled digital camera 159 Improving print quality ...160 Poor text and graphic quality ...161 Poor quality at the edges ...or differ from colors on the screen 165 Glossy photo paper or transparencies stick together 166 Page prints with different fonts ...166 Print is too dark or smudged...166 Printed characters are improperly formed or are not aligned correctly 166 Printouts have alternating bands of light ...
... after installation (Windows users only 159 Check printer ports (Windows users only 159 Print troubleshooting...159 Partial 4 x 6 in. (10 x 15 cm) photo prints when using a PictBridge-enabled digital camera 159 Improving print quality ...160 Poor text and graphic quality ...161 Poor quality at the edges ...or differ from colors on the screen 165 Glossy photo paper or transparencies stick together 166 Page prints with different fonts ...166 Print is too dark or smudged...166 Printed characters are improperly formed or are not aligned correctly 166 Printouts have alternating bands of light ...

User's Guide
Page 10
...is attached ...176 Updating the printer software ...176 Bidirectional communication is not established 176 Experiencing poor quality or incorrect output 176 Cannot print from digital camera using PictBridge 177 Jams and misfeeds troubleshooting 177 How to clear and avoid paper jams ...177 Duplex unit does...the duplex unit ...181 Memory card troubleshooting...182 Memory card cannot be inserted ...182 Nothing happens when memory card is inserted 182 Cannot print documents from a memory card or flash drive 183 Photos do not transfer from a memory card across a wireless network 184 Copy ...
...is attached ...176 Updating the printer software ...176 Bidirectional communication is not established 176 Experiencing poor quality or incorrect output 176 Cannot print from digital camera using PictBridge 177 Jams and misfeeds troubleshooting 177 How to clear and avoid paper jams ...177 Duplex unit does...the duplex unit ...181 Memory card troubleshooting...182 Memory card cannot be inserted ...182 Nothing happens when memory card is inserted 182 Cannot print documents from a memory card or flash drive 183 Photos do not transfer from a memory card across a wireless network 184 Copy ...

User's Guide
Page 11
... the computer screen 203 Clearing error messages ...203 Left/Right Cartridge Missing ...203 Communication not available ...203 General Printing Problem ...204 Ink Low ...204 Out of Memory...204 Out of Paper ...204 Fixing a printing failure ...204 Unsupported file types found on memory card 205 Paper Jam ...205 Multiple All-In-Ones found...
... the computer screen 203 Clearing error messages ...203 Left/Right Cartridge Missing ...203 Communication not available ...203 General Printing Problem ...204 Ink Low ...204 Out of Memory...204 Out of Paper ...204 Fixing a printing failure ...204 Unsupported file types found on memory card 205 Paper Jam ...205 Multiple All-In-Ones found...
User's Guide
Page 14
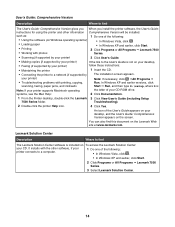
... software (on Windows operating systems) • In Windows Vista, click . • Loading paper • In Windows XP and earlier, click Start. • Printing 2 Click Programs or All Programs Œ Lexmark 7500 • Working with photos Series. • Scanning (if supported by your printer) 3 Click User's Guide. • Making copies (if supported by...
... software (on Windows operating systems) • In Windows Vista, click . • Loading paper • In Windows XP and earlier, click Start. • Printing 2 Click Programs or All Programs Œ Lexmark 7500 • Working with photos Series. • Scanning (if supported by your printer) 3 Click User's Guide. • Making copies (if supported by...

User's Guide
Page 15
... region, and then select the Customer Support link. materials and workmanship for a www.lexmark.com. Note: For additional information about contacting Lexmark, see the Statement of country or region. Mail Support. Note: For additional information about contacting Lexmark, see the printed warranty statement that shipped with your printer model. 5 From the Support Tools section...
... region, and then select the Customer Support link. materials and workmanship for a www.lexmark.com. Note: For additional information about contacting Lexmark, see the Statement of country or region. Mail Support. Note: For additional information about contacting Lexmark, see the printed warranty statement that shipped with your printer model. 5 From the Support Tools section...

User's Guide
Page 16
...: • Machine Type number • Serial number • Date purchased • Store where purchased Wireless network compatibility Your printer contains an IEEE 802.11g wireless print server. For complete descriptions: • Windows users-See the User's Guide. • Macintosh users-If your router manufacturer that the current mode setting is compatible...
...: • Machine Type number • Serial number • Date purchased • Store where purchased Wireless network compatibility Your printer contains an IEEE 802.11g wireless print server. For complete descriptions: • Windows users-See the User's Guide. • Macintosh users-If your router manufacturer that the current mode setting is compatible...
User's Guide
Page 17
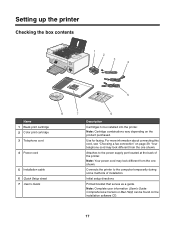
... during some methods of the printer. Connects the printer to the power supply port located at the back of installation. Initial setup directions Printed booklet that serves as a guide. Note: Your power cord may look different from the one shown. Setting up the printer Checking the... box contents 1 2 3 4 1 2 3 5 8 Name 1 Black print cartridge 2 Color print cartridge 3 Telephone cord 4 Power cord 5 Installation cable 6 Quick Setup sheet 7 User's Guide 7 6 Description Cartridges to be found on page 29....
... during some methods of the printer. Connects the printer to the power supply port located at the back of installation. Initial setup directions Printed booklet that serves as a guide. Note: Your power cord may look different from the one shown. Setting up the printer Checking the... box contents 1 2 3 4 1 2 3 5 8 Name 1 Black print cartridge 2 Color print cartridge 3 Telephone cord 4 Power cord 5 Installation cable 6 Quick Setup sheet 7 User's Guide 7 6 Description Cartridges to be found on page 29....
User's Guide
Page 19
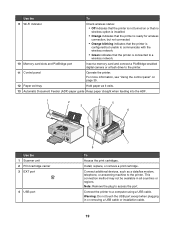
... additional devices, such as it exits. 13 Automatic Document Feeder (ADF) paper guide Keep paper straight when feeding into the ADF. 1 2 4 5 3 6 Use the 1 Scanner unit 2 Print cartridge carrier 3 EXT port 4 USB port 7 8 To Access the...
... additional devices, such as it exits. 13 Automatic Document Feeder (ADF) paper guide Keep paper straight when feeding into the ADF. 1 2 4 5 3 6 Use the 1 Scanner unit 2 Print cartridge carrier 3 EXT port 4 USB port 7 8 To Access the...
User's Guide
Page 20
... of the printer and then into the power supply at the back of the paper • Remove paper jams. 7 Power supply with an internal wireless print server installed. Note: Do not connect additional devices to the LINE port, and do not connect a DSL (digital subscriber line), ISDN (integrated services digital network... the power cord into the wall outlet. 8 LINE port Connect the printer to an active telephone line to send and receive faxes. Use the To 5 Lexmark N2050 (internal wireless print server) Connect the printer to a power source.
... of the printer and then into the power supply at the back of the paper • Remove paper jams. 7 Power supply with an internal wireless print server installed. Note: Do not connect additional devices to the LINE port, and do not connect a DSL (digital subscriber line), ISDN (integrated services digital network... the power cord into the wall outlet. 8 LINE port Connect the printer to an active telephone line to send and receive faxes. Use the To 5 Lexmark N2050 (internal wireless print server) Connect the printer to a power source.

User's Guide
Page 24
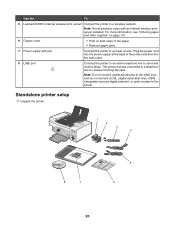
13 Open the printer. 14 Press down on the cartridge carrier levers. 15 Remove the tape from the black print cartridge, and insert the cartridge in the left carrier. 16 Close the black cartridge carrier lid. 24
13 Open the printer. 14 Press down on the cartridge carrier levers. 15 Remove the tape from the black print cartridge, and insert the cartridge in the left carrier. 16 Close the black cartridge carrier lid. 24

User's Guide
Page 25
An alignment page prints. 25 17 Remove the tape from the color print cartridge, and insert the cartridge in the right carrier. 18 Close the color cartridge carrier lid. 19 Close the printer. 20 Press .
An alignment page prints. 25 17 Remove the tape from the color print cartridge, and insert the cartridge in the right carrier. 18 Close the color cartridge carrier lid. 19 Close the printer. 20 Press .
User's Guide
Page 36
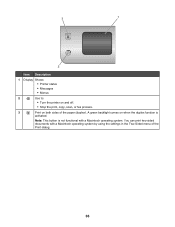
Note: This button is activated. You can print two-sided documents with a Macintosh operating system. A green backlight comes on both sides of the Print dialog. 36 3 1 A A 2 Item Description 1 Display Shows: • Printer status • Messages • Menus 2 Use to: • Turn the printer on and off. • Stop the print, copy, scan, or fax process. 3 Print on when the duplex function is not functional with a Macintosh operating system by using the settings in the Two-Sided menu of the paper (duplex).
Note: This button is activated. You can print two-sided documents with a Macintosh operating system. A green backlight comes on both sides of the Print dialog. 36 3 1 A A 2 Item Description 1 Display Shows: • Printer status • Messages • Menus 2 Use to: • Turn the printer on and off. • Stop the print, copy, scan, or fax process. 3 Print on when the duplex function is not functional with a Macintosh operating system by using the settings in the Two-Sided menu of the paper (duplex).

User's Guide
Page 37
... press to save the values you specified in the control panel menus before the printer timeouts and loses any value changes you made. 3 • Cancel a print, copy, scan, or fax job in progress. • Clear a fax number or end a fax transmission and return to the fax default screen. •... a submenu listing within a menu. • In Photo mode, decrease the number copies of a photo you are in a submenu. Note: If you want to print. • In Photo mode or Scan mode, move the Region of Interest box down. 6 • Scroll through menus, submenus, or settings on the display. ...
... press to save the values you specified in the control panel menus before the printer timeouts and loses any value changes you made. 3 • Cancel a print, copy, scan, or fax job in progress. • Clear a fax number or end a fax transmission and return to the fax default screen. •... a submenu listing within a menu. • In Photo mode, decrease the number copies of a photo you are in a submenu. Note: If you want to print. • In Photo mode or Scan mode, move the Region of Interest box down. 6 • Scroll through menus, submenus, or settings on the display. ...

User's Guide
Page 38
... answering system. • Select letters when creating a Speed dial list. • Type numbers to print. • In Photo mode or Scan mode, move the Region of these items: • Copy • Photo • Print Files • Fax 38 Enter a pause only when you have already begun entering the number. 2... A keypad number or symbol In Copy mode or Photo mode: Enter the number of copies or prints you want to redial the last number entered. • Display the last number dialed. Press or to view the last five numbers dialed. •...
... answering system. • Select letters when creating a Speed dial list. • Type numbers to print. • In Photo mode or Scan mode, move the Region of these items: • Copy • Photo • Print Files • Fax 38 Enter a pause only when you have already begun entering the number. 2... A keypad number or symbol In Copy mode or Photo mode: Enter the number of copies or prints you want to redial the last number entered. • Display the last number dialed. Press or to view the last five numbers dialed. •...


