

User's Guide
Page 4
Index 28 Thank you , step by step, from setting up your All-In-One to creating a variety of the most exciting products on your new purchase. Congratulations on the market today. The Lexmark X74-X75 All-In-One combines the functionality of an inkjet printer, a scanner, a copier, and a fax machine all into a single, multifunction device making it one of fun projects. Also included are sections describing the All-In-One software and troubleshooting information. This User's Guide takes you for purchasing a Lexmark X74-X75 All-In-One! iv Let's get started!
Index 28 Thank you , step by step, from setting up your All-In-One to creating a variety of the most exciting products on your new purchase. Congratulations on the market today. The Lexmark X74-X75 All-In-One combines the functionality of an inkjet printer, a scanner, a copier, and a fax machine all into a single, multifunction device making it one of fun projects. Also included are sections describing the All-In-One software and troubleshooting information. This User's Guide takes you for purchasing a Lexmark X74-X75 All-In-One! iv Let's get started!
User's Guide
Page 5
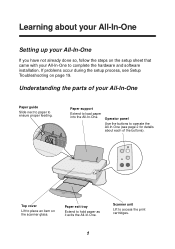
Understanding the parts of the buttons). Scanner unit Lift to ensure proper feeding. If problems occur during the setup process, see page 2 for details about each of your All-In-One Paper guide Slide next to paper to access the print cartridges. 1 Operator panel Use the buttons to complete the hardware and software installation. Learning about your All-In-One Setting up your All-In-One If you have not already done...
Understanding the parts of the buttons). Scanner unit Lift to ensure proper feeding. If problems occur during the setup process, see page 2 for details about each of your All-In-One Paper guide Slide next to paper to access the print cartridges. 1 Operator panel Use the buttons to complete the hardware and software installation. Learning about your All-In-One Setting up your All-In-One If you have not already done...
User's Guide
Page 6
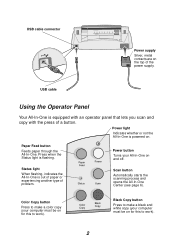
... of problem. Status light When flashing, indicates the All-In-One is flashing. USB cable connector Power supply Silver, metal contacts are on . Press when the Status light is out of paper or experiencing another type of a button. Black Copy button Press to make a color copy (your computer must be on and off. Paper Feed button Feeds paper through the All-In-One. Scan button Automatically starts the scanning process and opens the All-In-One Center (see page 6). Color Copy button...
... of problem. Status light When flashing, indicates the All-In-One is flashing. USB cable connector Power supply Silver, metal contacts are on . Press when the Status light is out of paper or experiencing another type of a button. Black Copy button Press to make a color copy (your computer must be on and off. Paper Feed button Feeds paper through the All-In-One. Scan button Automatically starts the scanning process and opens the All-In-One Center (see page 6). Color Copy button...
User's Guide
Page 7
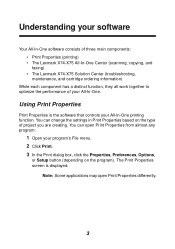
... program: 1 Open your program's File menu. 2 Click Print. 3 In the Print dialog box, click the Properties, Preferences, Options, or Setup button (depending on the type of your All-In-One. Understanding your software Your All-In-One software consists of three main components: • Print Properties (printing) • The Lexmark X74-X75 All-In-One Center (scanning, copying, and faxing) • The Lexmark X74-X75 Solution Center (troubleshooting, maintenance, and cartridge ordering...
... program: 1 Open your program's File menu. 2 Click Print. 3 In the Print dialog box, click the Properties, Preferences, Options, or Setup button (depending on the type of your All-In-One. Understanding your software Your All-In-One software consists of three main components: • Print Properties (printing) • The Lexmark X74-X75 All-In-One Center (scanning, copying, and faxing) • The Lexmark X74-X75 Solution Center (troubleshooting, maintenance, and cartridge ordering...
User's Guide
Page 9
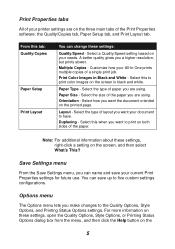
... make changes to have. Layout - Duplexing - From this to print color images on the three main tabs of the Print Properties software: the Quality/Copies tab, Paper Setup tab, and Print Layout tab. Print Color Images in black and white. Options menu The Options menu lets you want the document oriented on your needs. Customize how your current Print Properties settings for future use. Select the type of paper you a higher resolution, but prints slower. Orientation - Print...
... make changes to have. Layout - Duplexing - From this to print color images on the three main tabs of the Print Properties software: the Quality/Copies tab, Paper Setup tab, and Print Layout tab. Print Color Images in black and white. Options menu The Options menu lets you want the document oriented on your needs. Customize how your current Print Properties settings for future use. Select the type of paper you a higher resolution, but prints slower. Orientation - Print...

User's Guide
Page 11
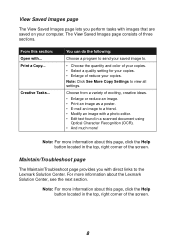
... Page consists of what type of the scanned area. • Lighten or darken your copies. • Enlarge or reduce your copies. Scan preview - Copy... Note: For more ! Note: Click See More Scan Settings to view all settings. • Choose the quantity and color of your copies. • Select a quality setting for your copies. • Adjust the size of image is being scanned. • Choose how the scan will be printed...
... Page consists of what type of the scanned area. • Lighten or darken your copies. • Enlarge or reduce your copies. Scan preview - Copy... Note: For more ! Note: Click See More Scan Settings to view all settings. • Choose the quantity and color of your copies. • Select a quality setting for your copies. • Adjust the size of image is being scanned. • Choose how the scan will be printed...
User's Guide
Page 12
... screen. 8 Print a Copy... Note: For more information about this section: Open with a photo editor. • Edit text found in the top, right corner of the screen. Note: Click See More Copy Settings to view all settings. Note: For more ! From this page, click the Help button located in a scanned document using Optical Character Recognition (OCR). • And much more information about the Lexmark Solution Center...
... screen. 8 Print a Copy... Note: For more information about this section: Open with a photo editor. • Edit text found in the top, right corner of the screen. Note: Click See More Copy Settings to view all settings. Note: For more ! From this page, click the Help button located in a scanned document using Optical Character Recognition (OCR). • And much more information about the Lexmark Solution Center...
User's Guide
Page 13
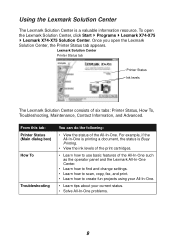
... Start Programs Lexmark X74-X75 Lexmark X74-X75 Solution Center. Lexmark Solution Center Printer Status tab Printer Status Ink levels The Lexmark Solution Center consists of the All-In-One such as the operator panel and the Lexmark All-In-One Center. • Learn how to find and change settings. • Learn how to scan, copy, fax, and print. • Learn how to use basic features of six tabs: Printer Status, How To, Troubleshooting, Maintenance, Contact...
... Start Programs Lexmark X74-X75 Lexmark X74-X75 Solution Center. Lexmark Solution Center Printer Status tab Printer Status Ink levels The Lexmark Solution Center consists of the All-In-One such as the operator panel and the Lexmark All-In-One Center. • Learn how to find and change settings. • Learn how to scan, copy, fax, and print. • Learn how to use basic features of six tabs: Printer Status, How To, Troubleshooting, Maintenance, Contact...
User's Guide
Page 18
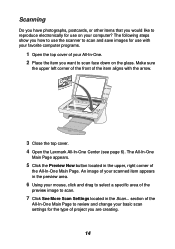
... Main Page. Make sure the upper left corner of the front of the preview image to review and change your computer? section of the All-In-One Main Page to scan. 7 Click See More Scan Settings located in the preview area. 6 Using your mouse, click and drag to scan face down on your basic scan settings for use with the arrow. 3 Close the top cover. 4 Open the Lexmark...
... Main Page. Make sure the upper left corner of the front of the preview image to review and change your computer? section of the All-In-One Main Page to scan. 7 Click See More Scan Settings located in the preview area. 6 Using your mouse, click and drag to scan face down on your basic scan settings for use with the arrow. 3 Close the top cover. 4 Open the Lexmark...

User's Guide
Page 20
... basic copy settings. Preview Now button Click to review and change your image. Note: It is possible to copy face down on . 5 Click See More Copy Settings located in the Copy... Preview area See a preview of the item aligns with the arrow. 3 Close the top cover. 4 Open the Lexmark All-In-One Center (see page 6). Make sure the upper left corner of the front of your copy. Copy settings Adjust the settings...
... basic copy settings. Preview Now button Click to review and change your image. Note: It is possible to copy face down on . 5 Click See More Copy Settings located in the Copy... Preview area See a preview of the item aligns with the arrow. 3 Close the top cover. 4 Open the Lexmark All-In-One Center (see page 6). Make sure the upper left corner of the front of your copy. Copy settings Adjust the settings...

User's Guide
Page 23
... From the Desktop, double-click the My Computer icon, and then double-click your setup documentation for information about installing print cartridges. Alignment page did not print Make sure you loaded the paper correctly and did not come on the operator panel. Make sure you completely removed the sticker and transparent tape from the back and bottom of both print cartridges. Setup troubleshooting Use this section to your CD-ROM drive icon. 19
... From the Desktop, double-click the My Computer icon, and then double-click your setup documentation for information about installing print cartridges. Alignment page did not print Make sure you loaded the paper correctly and did not come on the operator panel. Make sure you completely removed the sticker and transparent tape from the back and bottom of both print cartridges. Setup troubleshooting Use this section to your CD-ROM drive icon. 19
User's Guide
Page 25
... (refer to print a very large file. Try printing a smaller file. If problems still persist, see "Uninstalling and reinstalling the software" on page 25. Printing troubleshooting All-In-One prints slowly Close all programs not in and turn the power back on Normal or Quick Print. Consider purchasing more memory. See page 5 for details). Note: If you may be able to your computer. Restart your setup documentation for details...
... (refer to print a very large file. Try printing a smaller file. If problems still persist, see "Uninstalling and reinstalling the software" on page 25. Printing troubleshooting All-In-One prints slowly Close all programs not in and turn the power back on Normal or Quick Print. Consider purchasing more memory. See page 5 for details). Note: If you may be able to your computer. Restart your setup documentation for details...
User's Guide
Page 26
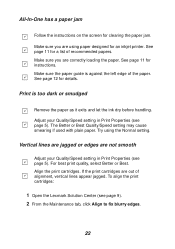
... Better or Best. Vertical lines are jagged or edges are correctly loading the paper. All-In-One has a paper jam Follow the instructions on the screen for clearing the paper jam. Print is against the left edge of alignment, vertical lines appear jagged. To align the print cartridges: 1 Open the Lexmark Solution Center (see page 9). 2 From the Maintenance tab, click Align to fix blurry edges. 22 Make sure you are out of...
... Better or Best. Vertical lines are jagged or edges are correctly loading the paper. All-In-One has a paper jam Follow the instructions on the screen for clearing the paper jam. Print is against the left edge of alignment, vertical lines appear jagged. To align the print cartridges: 1 Open the Lexmark Solution Center (see page 9). 2 From the Maintenance tab, click Align to fix blurry edges. 22 Make sure you are out of...
User's Guide
Page 27
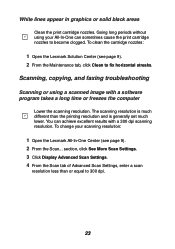
... to fix horizontal streaks. Scanning, copying, and faxing troubleshooting Scanning or using your scanning resolution: 1 Open the Lexmark All-In-One Center (see page 9). 2 From the Maintenance tab, click Clean to 300 dpi. 23 The scanning resolution is generally set much lower. You can sometimes cause the print cartridge nozzles to become clogged. To change your All-In-One can achieve excellent results with a software program takes a long time or...
... to fix horizontal streaks. Scanning, copying, and faxing troubleshooting Scanning or using your scanning resolution: 1 Open the Lexmark All-In-One Center (see page 9). 2 From the Maintenance tab, click Clean to 300 dpi. 23 The scanning resolution is generally set much lower. You can sometimes cause the print cartridge nozzles to become clogged. To change your All-In-One can achieve excellent results with a software program takes a long time or...
User's Guide
Page 28
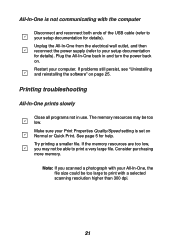
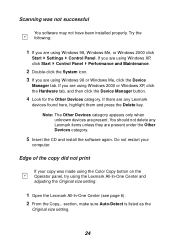
... Start Control Panel Performance and Maintenance. 2 Double-click the System icon. 3 If you are using Windows 98, Windows Me, or Windows 2000 click Start Settings Control Panel. Note: The Other Devices category appears only when unknown devices are using the Lexmark All-In-One Center and adjusting the Original size setting: 1 Open the Lexmark All-In-One Center (see page 6). 2 From the Copy... section, make sure Auto-Detect is listed as the Original size setting...
... Start Control Panel Performance and Maintenance. 2 Double-click the System icon. 3 If you are using Windows 98, Windows Me, or Windows 2000 click Start Settings Control Panel. Note: The Other Devices category appears only when unknown devices are using the Lexmark All-In-One Center and adjusting the Original size setting: 1 Open the Lexmark All-In-One Center (see page 6). 2 From the Copy... section, make sure Auto-Detect is listed as the Original size setting...
User's Guide
Page 29
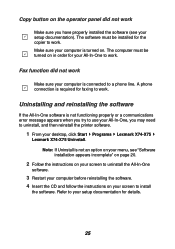
... follow the instructions on . The software must be installed for the copier to work Make sure your computer is required for faxing to work Make sure you may need to your setup documentation for details. 25 Refer to uninstall, and then reinstall the printer software. 1 From your desktop, click Start Programs Lexmark X74-X75 Lexmark X74-X75 Uninstall. Fax function did not work . A phone connection is connected to a phone line. Copy button on in...
... follow the instructions on . The software must be installed for the copier to work Make sure your computer is required for faxing to work Make sure you may need to your setup documentation for details. 25 Refer to uninstall, and then reinstall the printer software. 1 From your desktop, click Start Programs Lexmark X74-X75 Lexmark X74-X75 Uninstall. Fax function did not work . A phone connection is connected to a phone line. Copy button on in...

User's Guide
Page 30
... additional suggestions. Unauthorized changes or modifications could void the user's authority to operate this device must accept any radio or television interference caused by using other than recommended cables or by the Director of Manufacturing and Technical Support, Lexmark International, S.A., Boigny, France. Appendix Electronic emission notices Federal Communications Commission (FCC) compliance information statement The Lexmark X74-X75 All-In...
... additional suggestions. Unauthorized changes or modifications could void the user's authority to operate this device must accept any radio or television interference caused by using other than recommended cables or by the Director of Manufacturing and Technical Support, Lexmark International, S.A., Boigny, France. Appendix Electronic emission notices Federal Communications Commission (FCC) compliance information statement The Lexmark X74-X75 All-In...

User's Guide
Page 32
... tab 10 opening 9 Status tab 9 Troubleshooting tab 9 loading paper 11 M Maintain/Troubleshoot page 8 Maintenance tab 10 multiple copies 5 O OCR (Optical Character Recognition) 7, 8 operator panel using 2 Optical Character Recognition (OCR) 7, 8 orientation, selecting 5 P paper acceptable types of 11 loading 11 paper exit tray 1 Paper Feed button 2 paper feed button 2 paper guide 1 adjusting 12 Paper Setup tab 5 paper support 1 parts of 9 Color Copy button 2, 16 Contact Information tab 10 copies 5 copy settings 7 copying 15 D duplexing 5 E electronic emission notices 26 e-mailing an image...
... tab 10 opening 9 Status tab 9 Troubleshooting tab 9 loading paper 11 M Maintain/Troubleshoot page 8 Maintenance tab 10 multiple copies 5 O OCR (Optical Character Recognition) 7, 8 operator panel using 2 Optical Character Recognition (OCR) 7, 8 orientation, selecting 5 P paper acceptable types of 11 loading 11 paper exit tray 1 Paper Feed button 2 paper feed button 2 paper guide 1 adjusting 12 Paper Setup tab 5 paper support 1 parts of 9 Color Copy button 2, 16 Contact Information tab 10 copies 5 copy settings 7 copying 15 D duplexing 5 E electronic emission notices 26 e-mailing an image...
User's Guide
Page 33
... turning on the glass 14 settings, saving for future use 5 setup 1 setup troubleshooting 19 software reinstalling 25 uninstalling 25 software setup 1 sound, see voice notification status light 2 Status tab 9 T top cover 1 transparencies 11 troubleshooting copying problems 23 faxing problems 23 scanning problems 23 setup problems 19 troubleshooting checklist 18 Troubleshooting tab 9 U uninstalling software 25 USB cable connector 2 V View Saved Images page 8 Open with... section 7 Creative Tasks... section 7 Preview Area 7 Scan... menu 4 opening 3 Options menu 5 Paper Setup tab 5 Print...
... turning on the glass 14 settings, saving for future use 5 setup 1 setup troubleshooting 19 software reinstalling 25 uninstalling 25 software setup 1 sound, see voice notification status light 2 Status tab 9 T top cover 1 transparencies 11 troubleshooting copying problems 23 faxing problems 23 scanning problems 23 setup problems 19 troubleshooting checklist 18 Troubleshooting tab 9 U uninstalling software 25 USB cable connector 2 V View Saved Images page 8 Open with... section 7 Creative Tasks... section 7 Preview Area 7 Scan... menu 4 opening 3 Options menu 5 Paper Setup tab 5 Print...

Setup Sheet
Page 2
Insert the print cartridges. 1 2 3 4 Close the scanner unit. Insert the CD. Important! Connect the USB cable. 1 2 P/N 14J0070 EC 4J0006 © Copyright 2002 Lexmark International, Inc. All rights reserved. Follow the instructions on all Add New Hardware screens. Click Cancel on your computer screen. Remove the tape.
Insert the print cartridges. 1 2 3 4 Close the scanner unit. Insert the CD. Important! Connect the USB cable. 1 2 P/N 14J0070 EC 4J0006 © Copyright 2002 Lexmark International, Inc. All rights reserved. Follow the instructions on all Add New Hardware screens. Click Cancel on your computer screen. Remove the tape.


